Introduction
Nano Banana is the name given to Google’s Gemini 2.5 Flash Image, the direct successor to Gemini 2.0. By entering natural-language instructions, you can perform precise edits while the system preserves speed, fidelity, and consistency. Nano Banana is now the recommended option for most editing tasks in Scenario. A separate variant, Nano Banana T2i, exists for generating images from scratch, but this guide focuses on editing capabilities.
Capabilities
With Nano Banana, you can transform visuals using simple text commands. Key features include:
Object addition and removal – Insert new elements (e.g., a spaceship in the sky) or remove unwanted items (e.g., a signpost in the background) without selection tools.
Object modification – Adjust the colour, texture, size, or style of existing objects. For example, change a red dress into a shimmering blue gown.
Background manipulation – Modify the time of day, weather, or setting. For instance, turn a sunny beach into a moonlit night, or convert an indoor scene into a lush garden.
Style transfer – Apply artistic styles such as oil painting, pencil sketch, or cartoon rendering.
Image and element blending – Seamlessly merge multiple images or components into one composition. For example, place a character from one image into the background of another, or combine two reference photos into a unified design.
Multi-step editing – Carry out several edits in sequence while maintaining coherence and character consistency. For example, repaint a room, then add furniture and décor in successive prompts without losing detail.
Accessing Nano Banana in Scenario
Nano Banana is fully integrated into Scenario’s Edit with Prompts tool. To start editing:
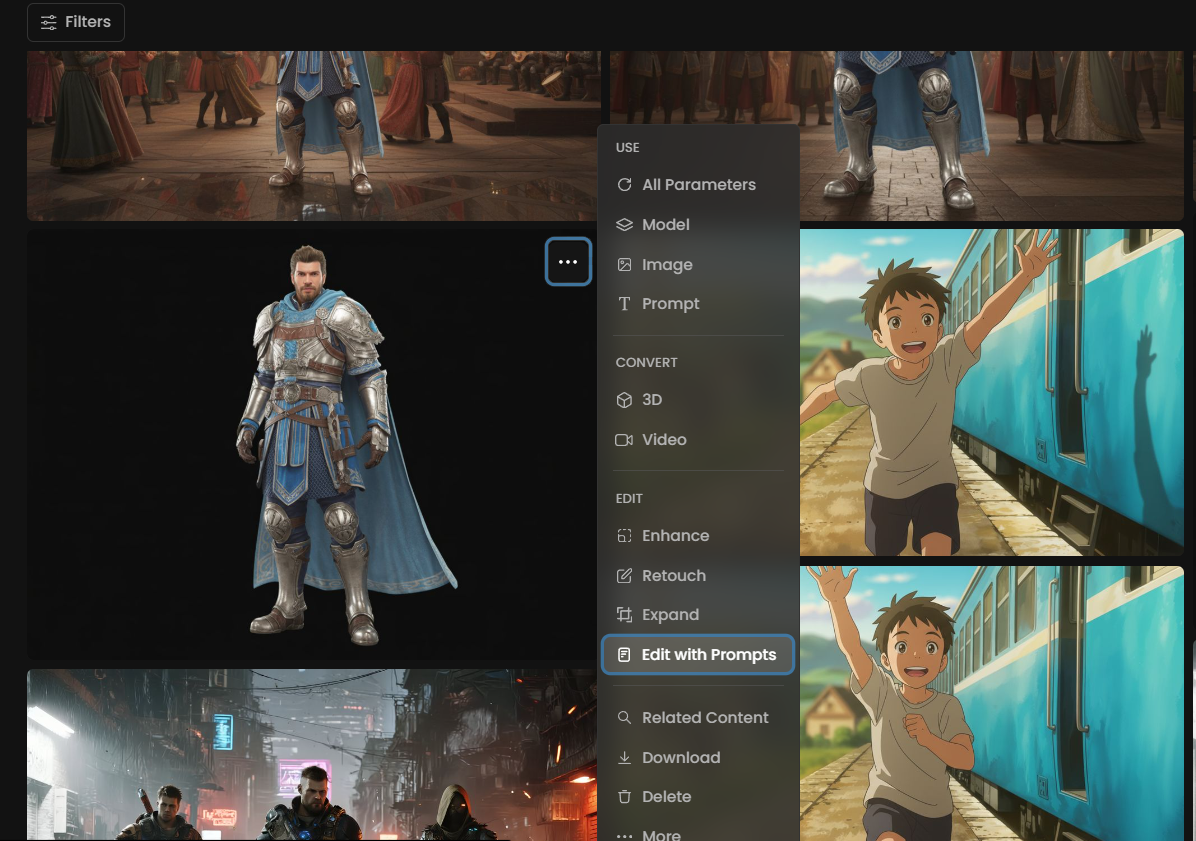
Open your image – Go to your gallery or workspace and select the image you want to edit. Click the three‑dot menu and choose Edit with Prompts.
Select the model – In the left‑hand panel, choose Nano Banana (Gemini 2.5 Flash Image). It is the default and recommended model for editing.
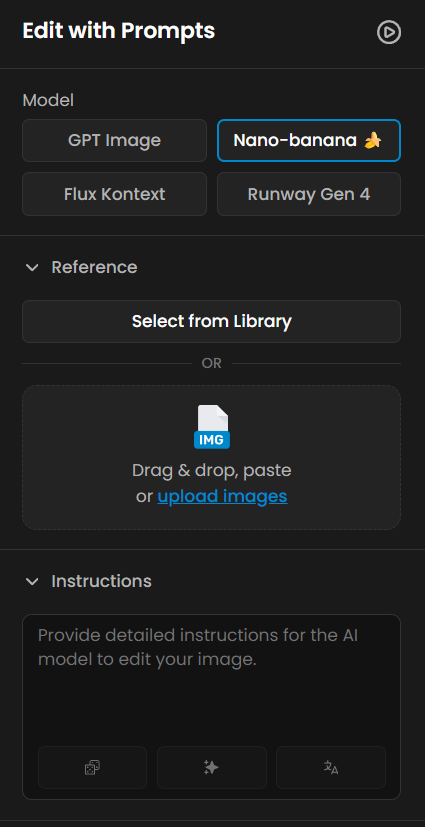
Upload additional images (optional) – Add extra reference images to guide the style or composition if needed.
Note: A separate Nano Banana – T2i model is also available in Generate Image or under Assets > Models. Use this variant when you want to create new images from scratch.
How to Use the Model
Write a clear prompt – Use natural language to describe the changes you want. Be specific about objects, colours, styles and actions. For example, instead of “make it nicer,” try “add string lights and change the walls to exposed brick.” You can also use Prompt Spark to generate suggestions and refine your wording.
Set the number of outputs – Choose how many edited images you want to generate.
Generate and iterate – Click Generate to create your edited image. Review the result and refine your prompt if needed. You can drag a generated image back into the reference slot to continue editing or combine multiple outputs.
Practical Examples
Here are the 28 practical use cases of Nano-banana's impact across creative industries, all created via Scenario's edit-with-prompts interface and fully reproducible:
1. Transforming a Scene
Let’s start with your daytime street photo and change it into a winter evening scene:
Open the image and select Edit with Prompts.
In the prompt box, type:
Change the scene to a winter evening with falling snow, add holiday lights to the trees and warm glow from the windows.Generate the edit. Nano Banana will transform the daytime street into a cozy winter night, adding snow, festive lights and warm lighting. If you want further adjustments—such as adding people wearing coats or removing the flowers—refine the prompt and generate again:
Change the scene to a winter evening with falling snow. Add holiday lights to the trees and a warm glow from the windows. The streets should be covered in snow, people are wearing winter coats, and there are no flowers visible, since it’s winter.
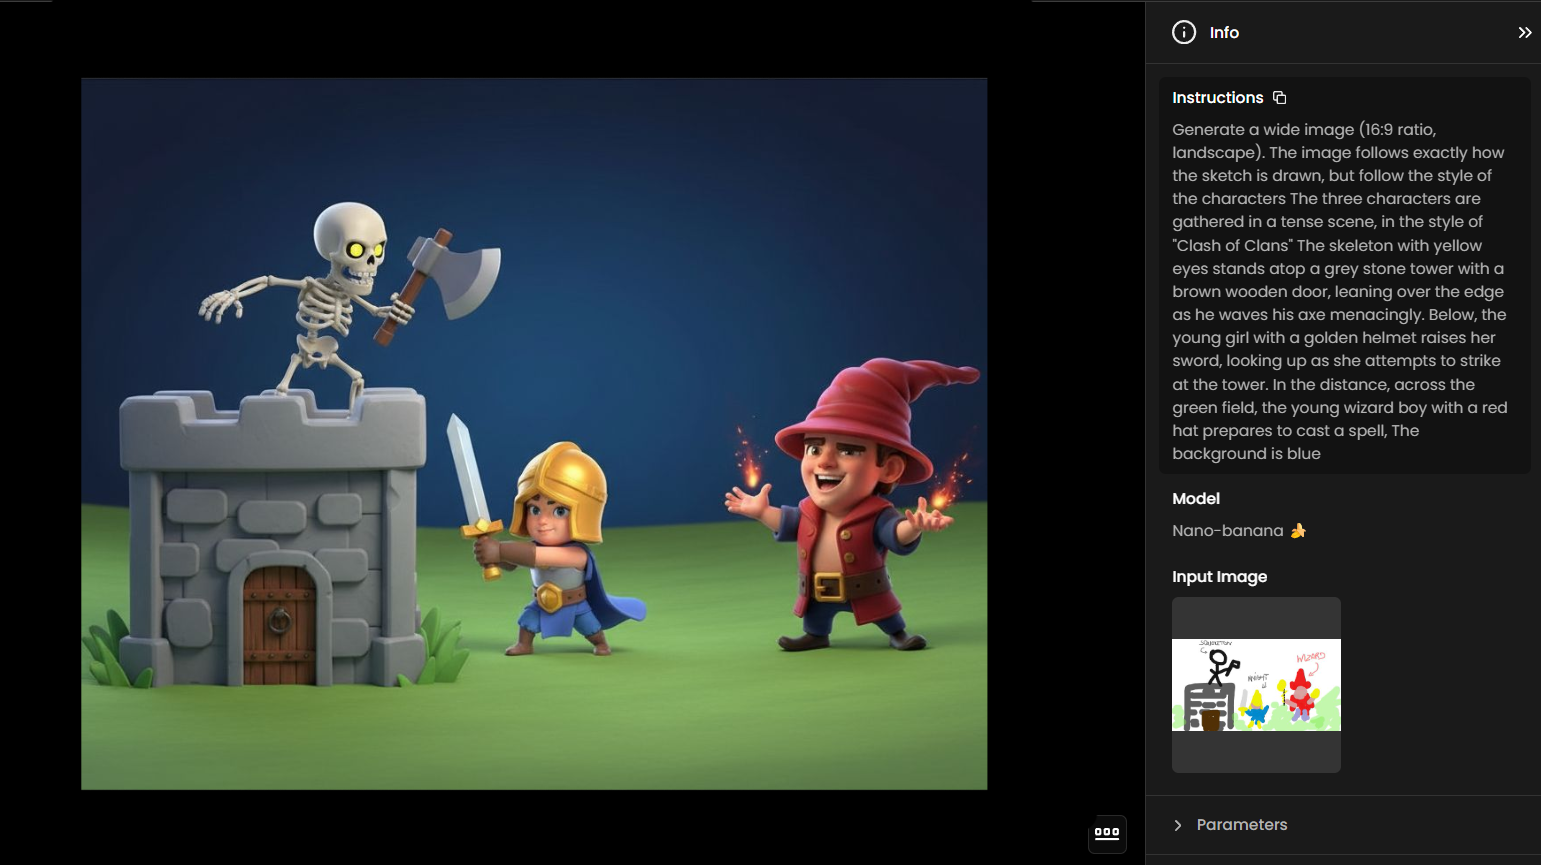
2. Creating a Scene from a Sketch
Add the sketch to the reference image.
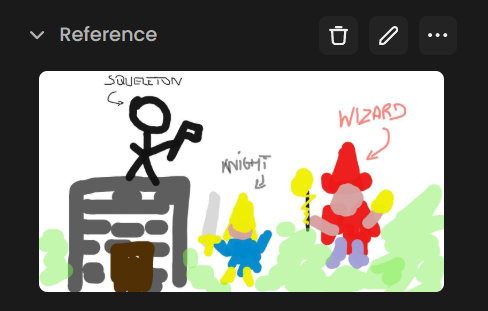
In the prompt box, write:
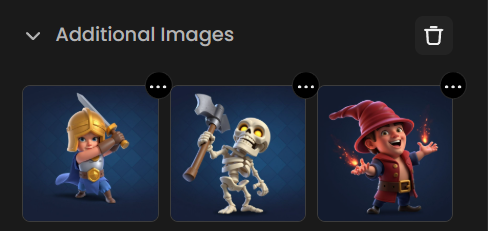
“Generate a wide image (16:9 ratio, landscape). The image follows the positions of the characters on the sketch, plus the position of the tower. The three characters are gathered in a tense scene, in the style of Clash of Clans. The skeleton with glowing yellow eyes stands atop a grey stone tower with a brown wooden door, leaning forward as he waves a large axe menacingly. Below, the young girl knight with a golden helmet raises her sword, looking up as she prepares to strike at the tower. In the distance, across the grassy field, the young wizard boy in a red hat casts a glowing spell, focusing intently on the battle.”Add Additional Images for each character.
Generate the image. Nano Banana will transform the sketch into a polished 3D-styled illustration, keeping the positions consistent but adding detail, depth, and atmosphere to match the Clash of Clans aesthetic.
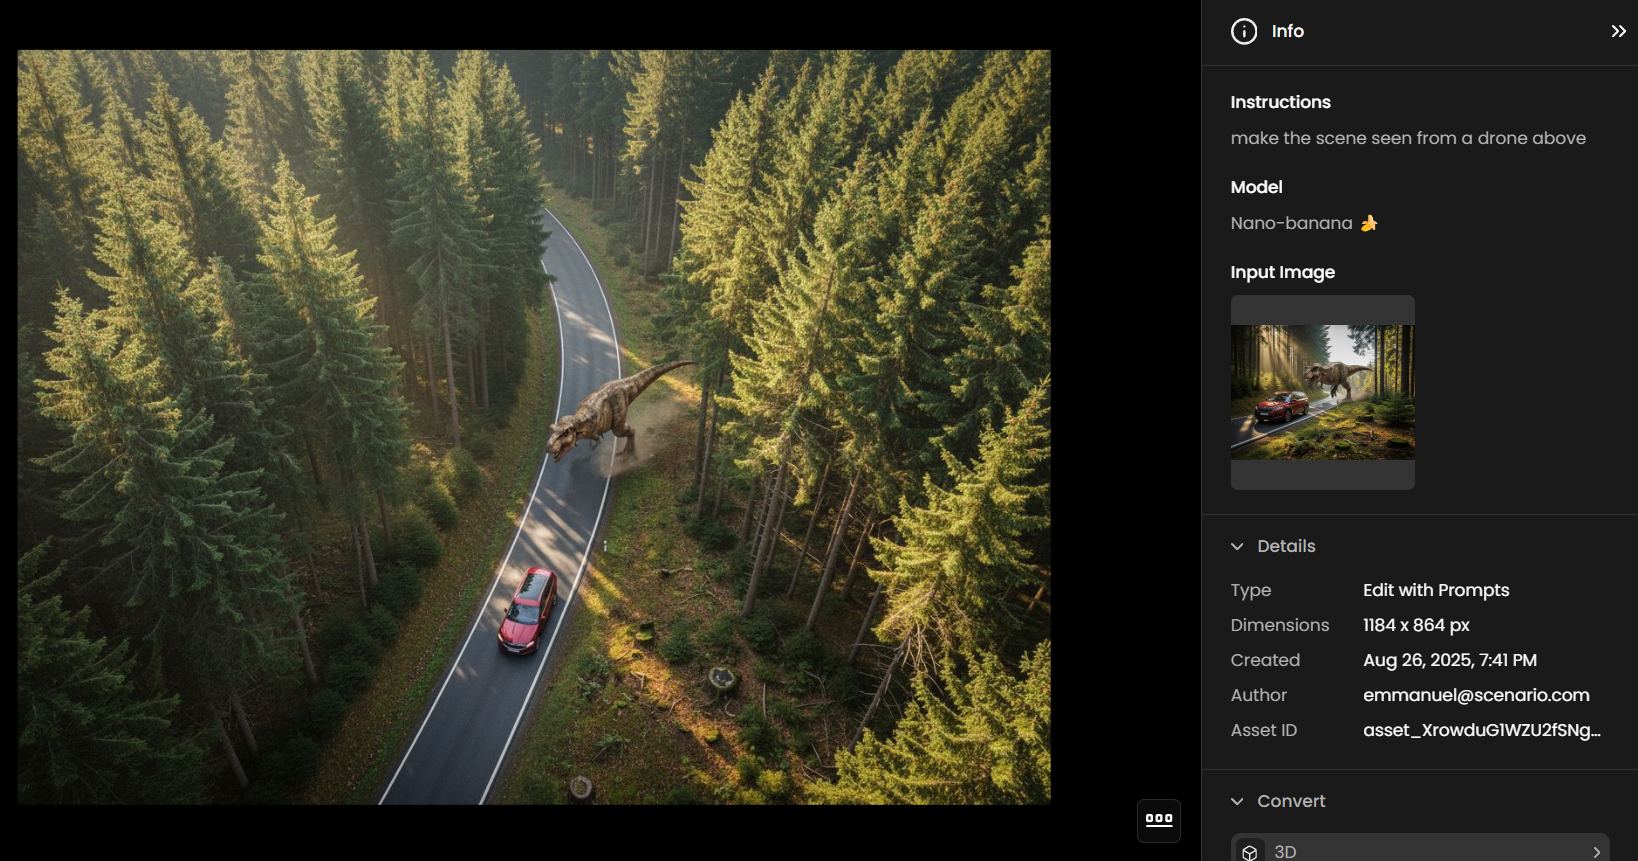
3. Changing the Camera Perspective
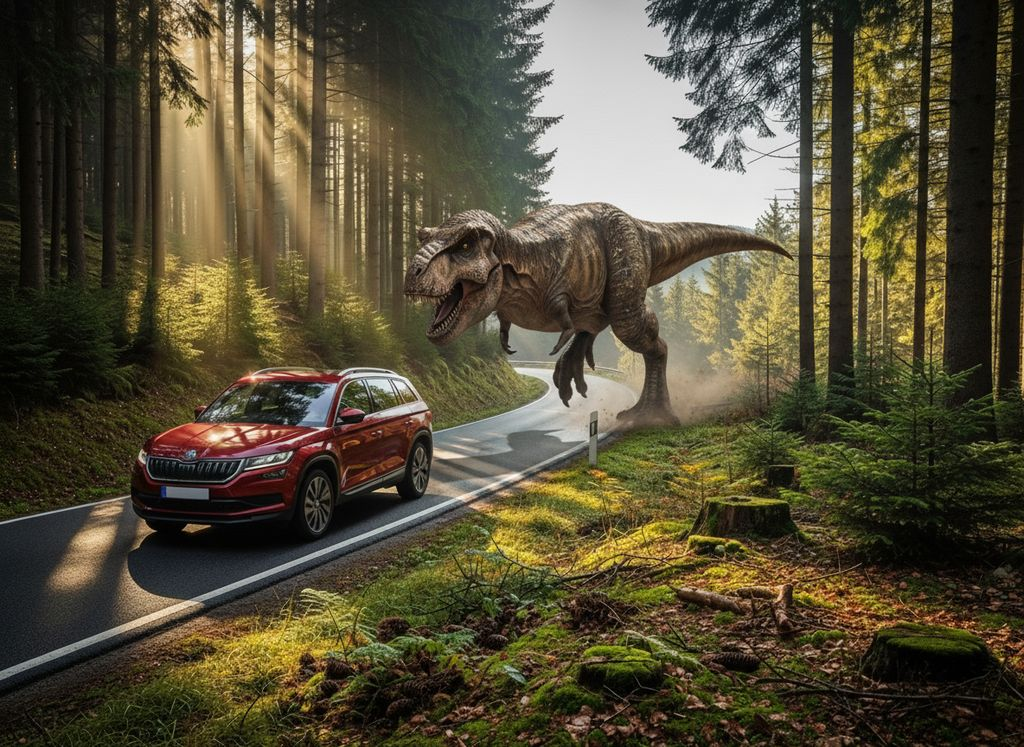
Based on this dramatic scene of a dinosaur chasing a car on a forest road, and you want to change the perspective to make it look like the moment was captured from above by a drone:
Open the image and select Edit with Prompts.
In the prompt box, type:
“Make the scene seen from a drone above”Generate the edit. Nano Banana will transform the perspective, keeping the car, the dinosaur, and the road consistent, but showing everything from a high drone angle.
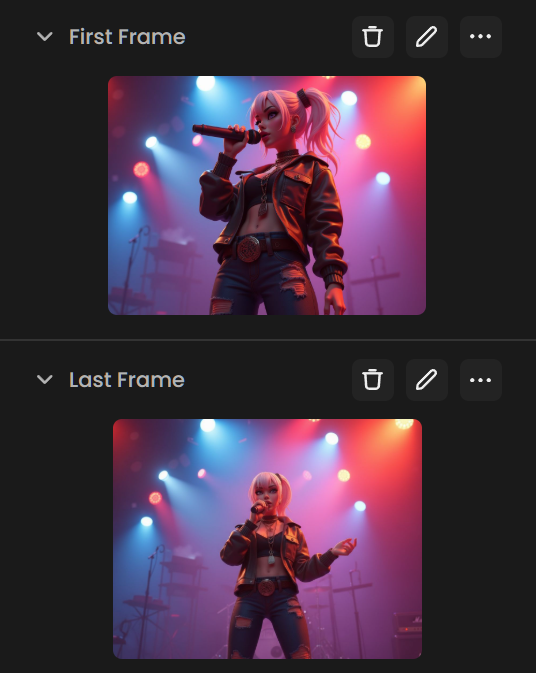
4. Generating the First and Last Frame of a Video Sequence
Add your image to the reference image.
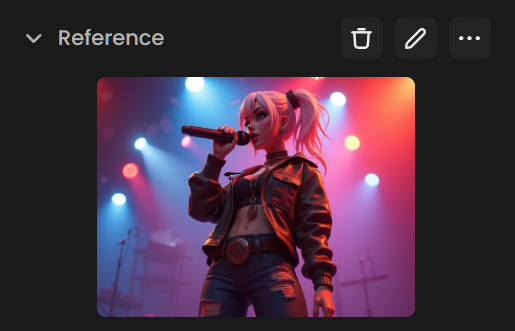
In the prompt box, describe the closing moments of the sequence. For example:
“Change the angle to the front camera showing a wider shot, change the singer's pose but keep her holding the microphone.”Generate the edit. Nano Banana will produce ending frame of the sequence, keeping consistency in character, style, and environment, while adjusting the perspective and atmosphere to reflect the progression of the scene.

Now let's go to Create > Videos and select the Kling 2.1 Pro model. Upload the original image as the First Frame and the generated image as the Last Frame.
In the prompt box, write a general description of the scene, focusing on camera movements and the character’s actions. Click on Rewrite your Prompt. The tool will reformat your description into an optimized prompt for Kling 2.1 Pro, ensuring consistency between the first and last frame while enhancing cinematic flow and performance intensity. For example:
A stylized 3D female singer with platinum blonde hair in a high ponytail, wearing a black leather jacket, layered necklaces, and ripped jeans, performs on stage under vibrant red and blue concert lights. She holds a microphone confidently, exuding charisma and attitude. The camera begins with a dramatic low-angle close-up, highlighting her fierce expression and glinting accessories. As the sequence progresses, the camera smoothly pulls back and rises into a medium full-body shot, showing her entire outfit, belt with ornate buckle, and the colorful lights illuminating the stage background. The atmosphere remains energetic and cinematic, with vivid concert lighting and a sense of live performance intensity.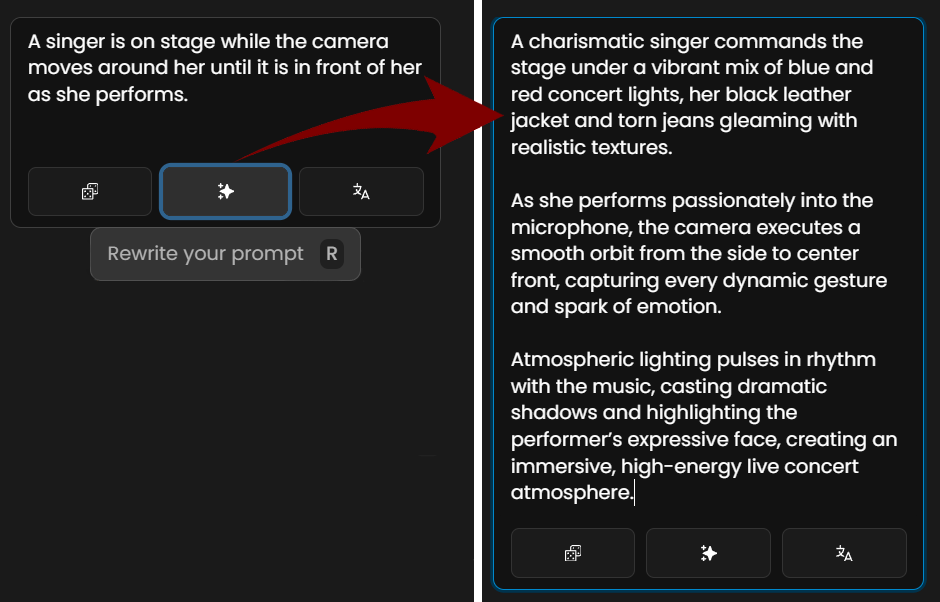
Select the duration (5 or 10 seconds) and generate the video.
Repeat to generate new frames and generate new sequences:
5. Character Pose and Action Modification
Modify character body language and positioning while intelligently removing or adding objects to create entirely different emotional contexts and narrative meanings. This technique preserves character identity, facial features, and artistic style while allowing complete repositioning of limbs, torso orientation, and hand gestures.
Use Case: A warrior character's aggressive stance is transformed into a confident, arms-crossed posture.
Prompt: "Remove the weapon and pose her with her arms crossed over her chest"

6. Character Proportion Enhancement
Alter character anatomy and body proportions to fit different archetypes, from realistic human proportions to stylized heroic builds or cartoon exaggerations. The AI maintains facial features, clothing details, and overall character design while scaling specific body parts to achieve the desired silhouette and visual impact.
Use Case: A character is given a more heroic build with broader shoulders, larger hands and feet, and increased height.
Prompt: "Make her more heroic (broader shoulders, slightly larger hands and feet, increased height relative to head size)"

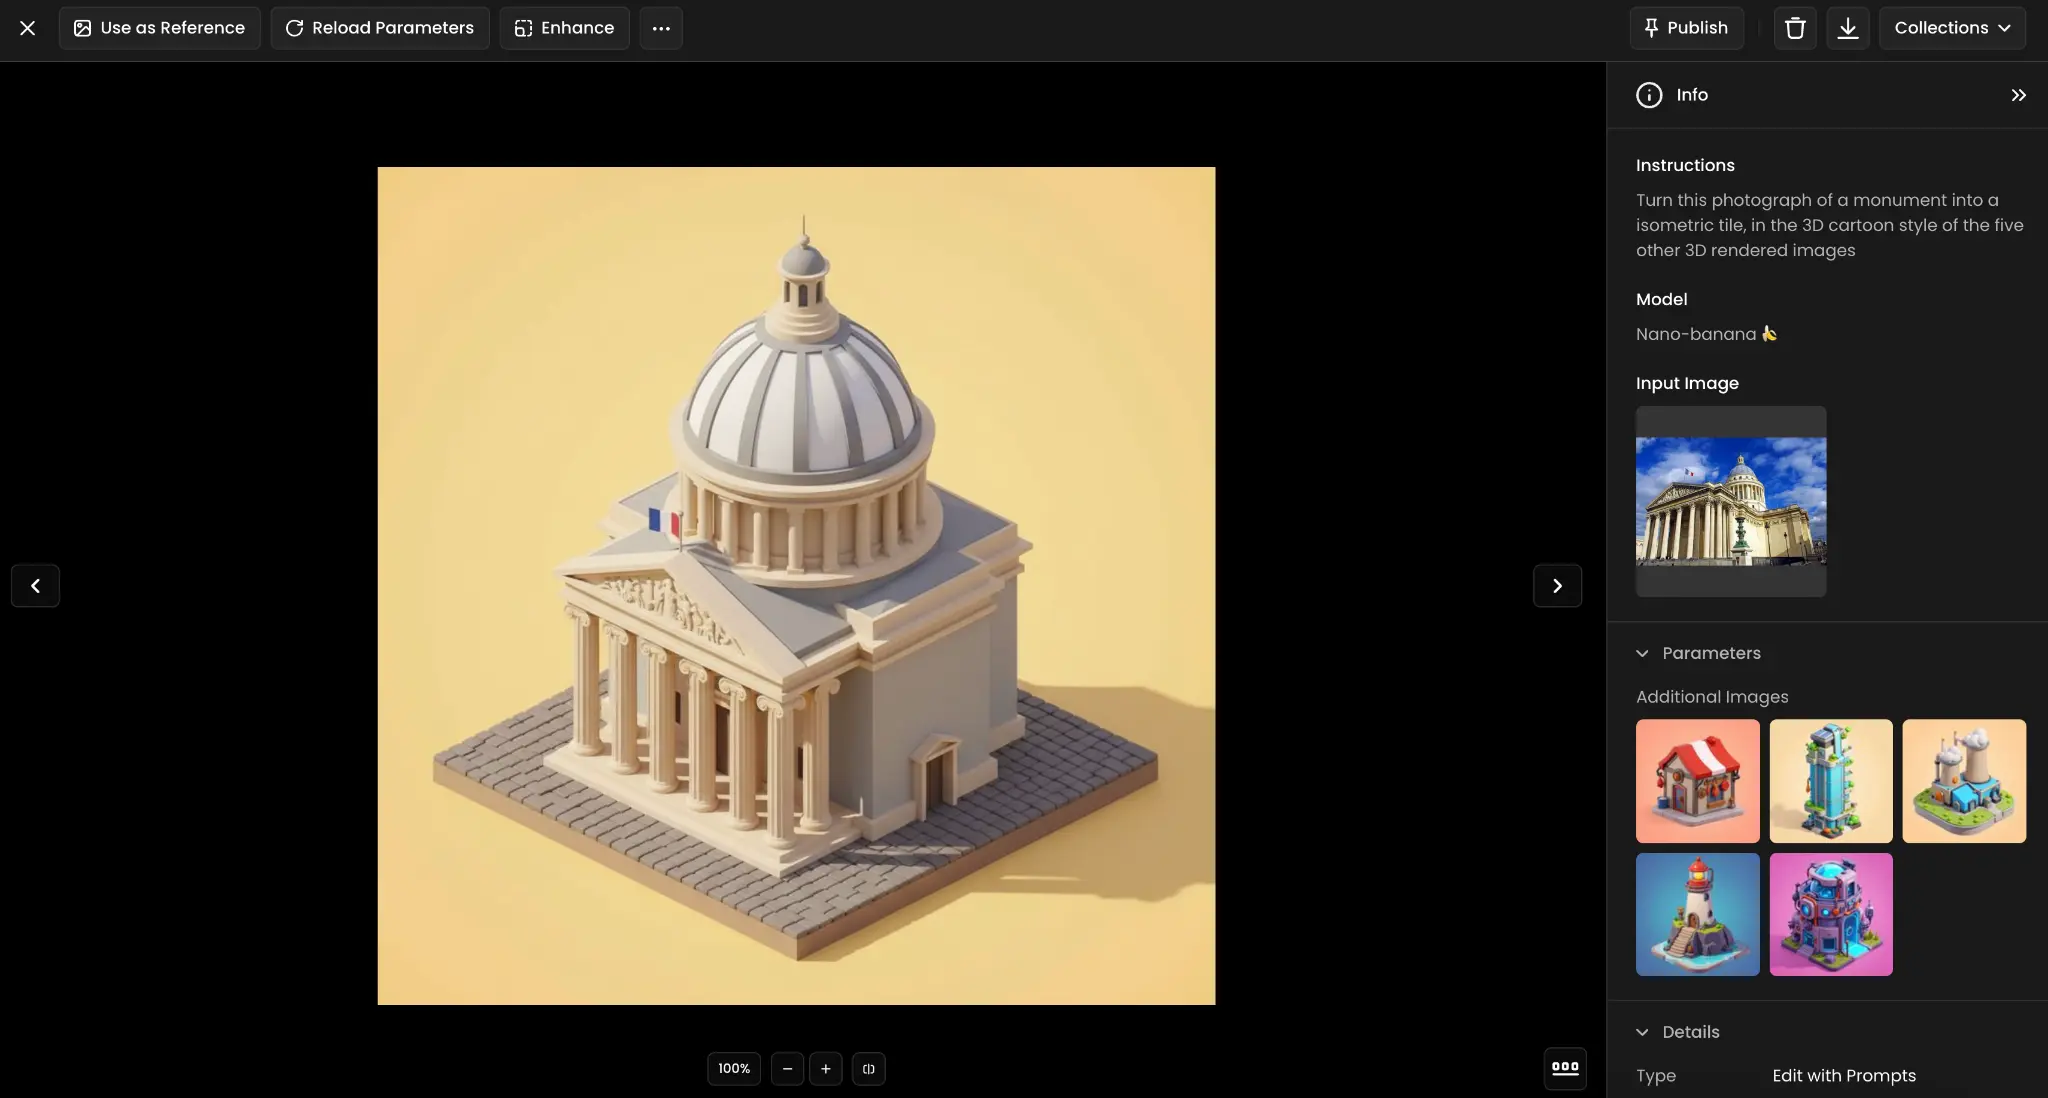
7. Photorealistic to Isometric Style Conversion
Transform real-world photography into stylized game-ready assets that match specific artistic directions and technical requirements. This process analyzes reference art styles and applies consistent color palettes, geometric simplification, and perspective adjustments to create cohesive game environments from photographic sources.
Use Case: A photograph of a monument is converted into a 3D isometric cartoon-style tile, matching the style of other reference images.
Prompt: "Turn this photograph of a monument into an isometric tile in the 3D cartoon style of the five other 3D rendered images"
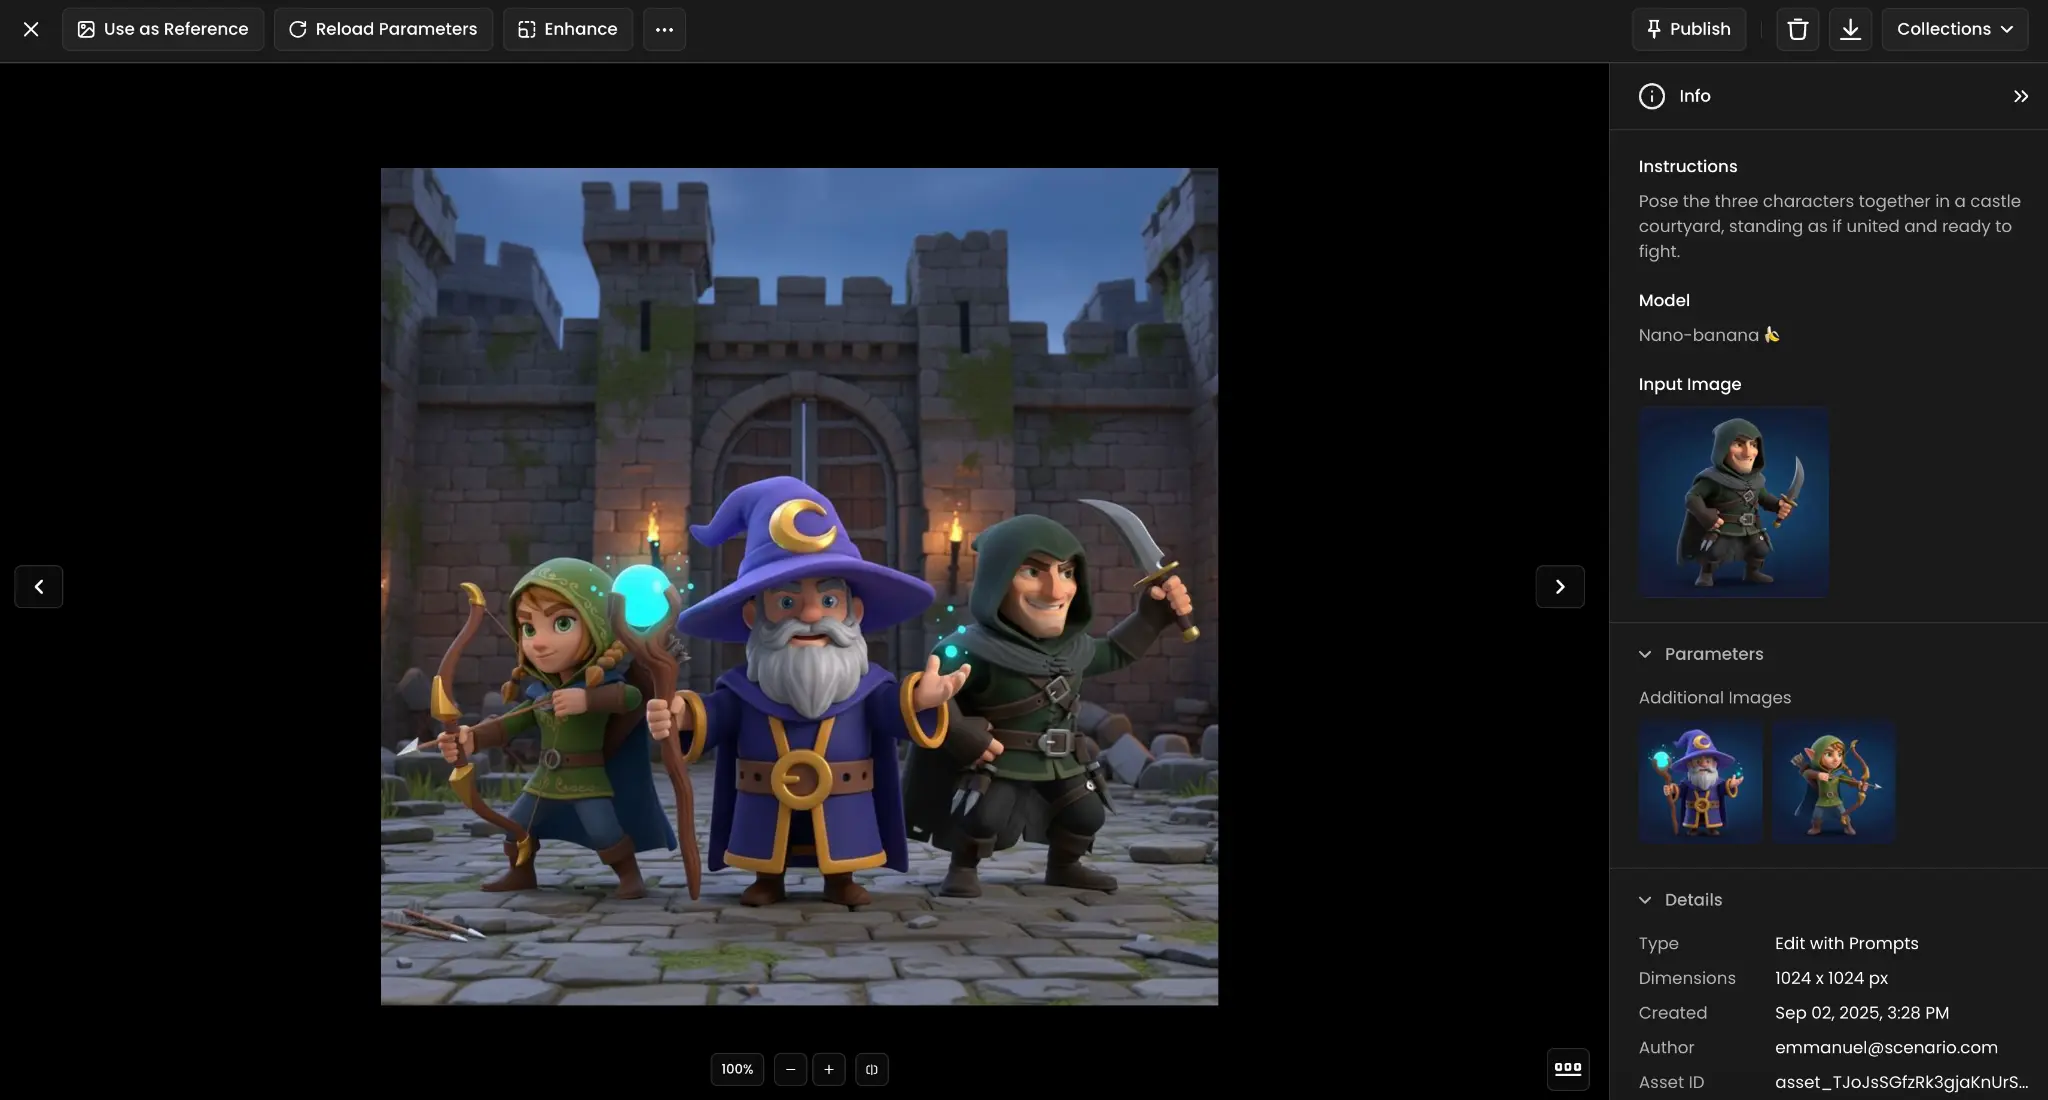
8. Multi-Character Scene Composition
Combine individual character renders into cohesive group compositions with unified lighting, consistent perspective, and environmental integration. The AI handles scale relationships, shadow casting, atmospheric effects, and character interactions to create believable scenes that look naturally composed rather than artificially assembled.
Use Case: Three individual character images are composed into a unified scene, showing them ready for battle in a castle courtyard.
Prompt: "Pose the three characters together in a castle courtyard, standing as if united and ready to fight"
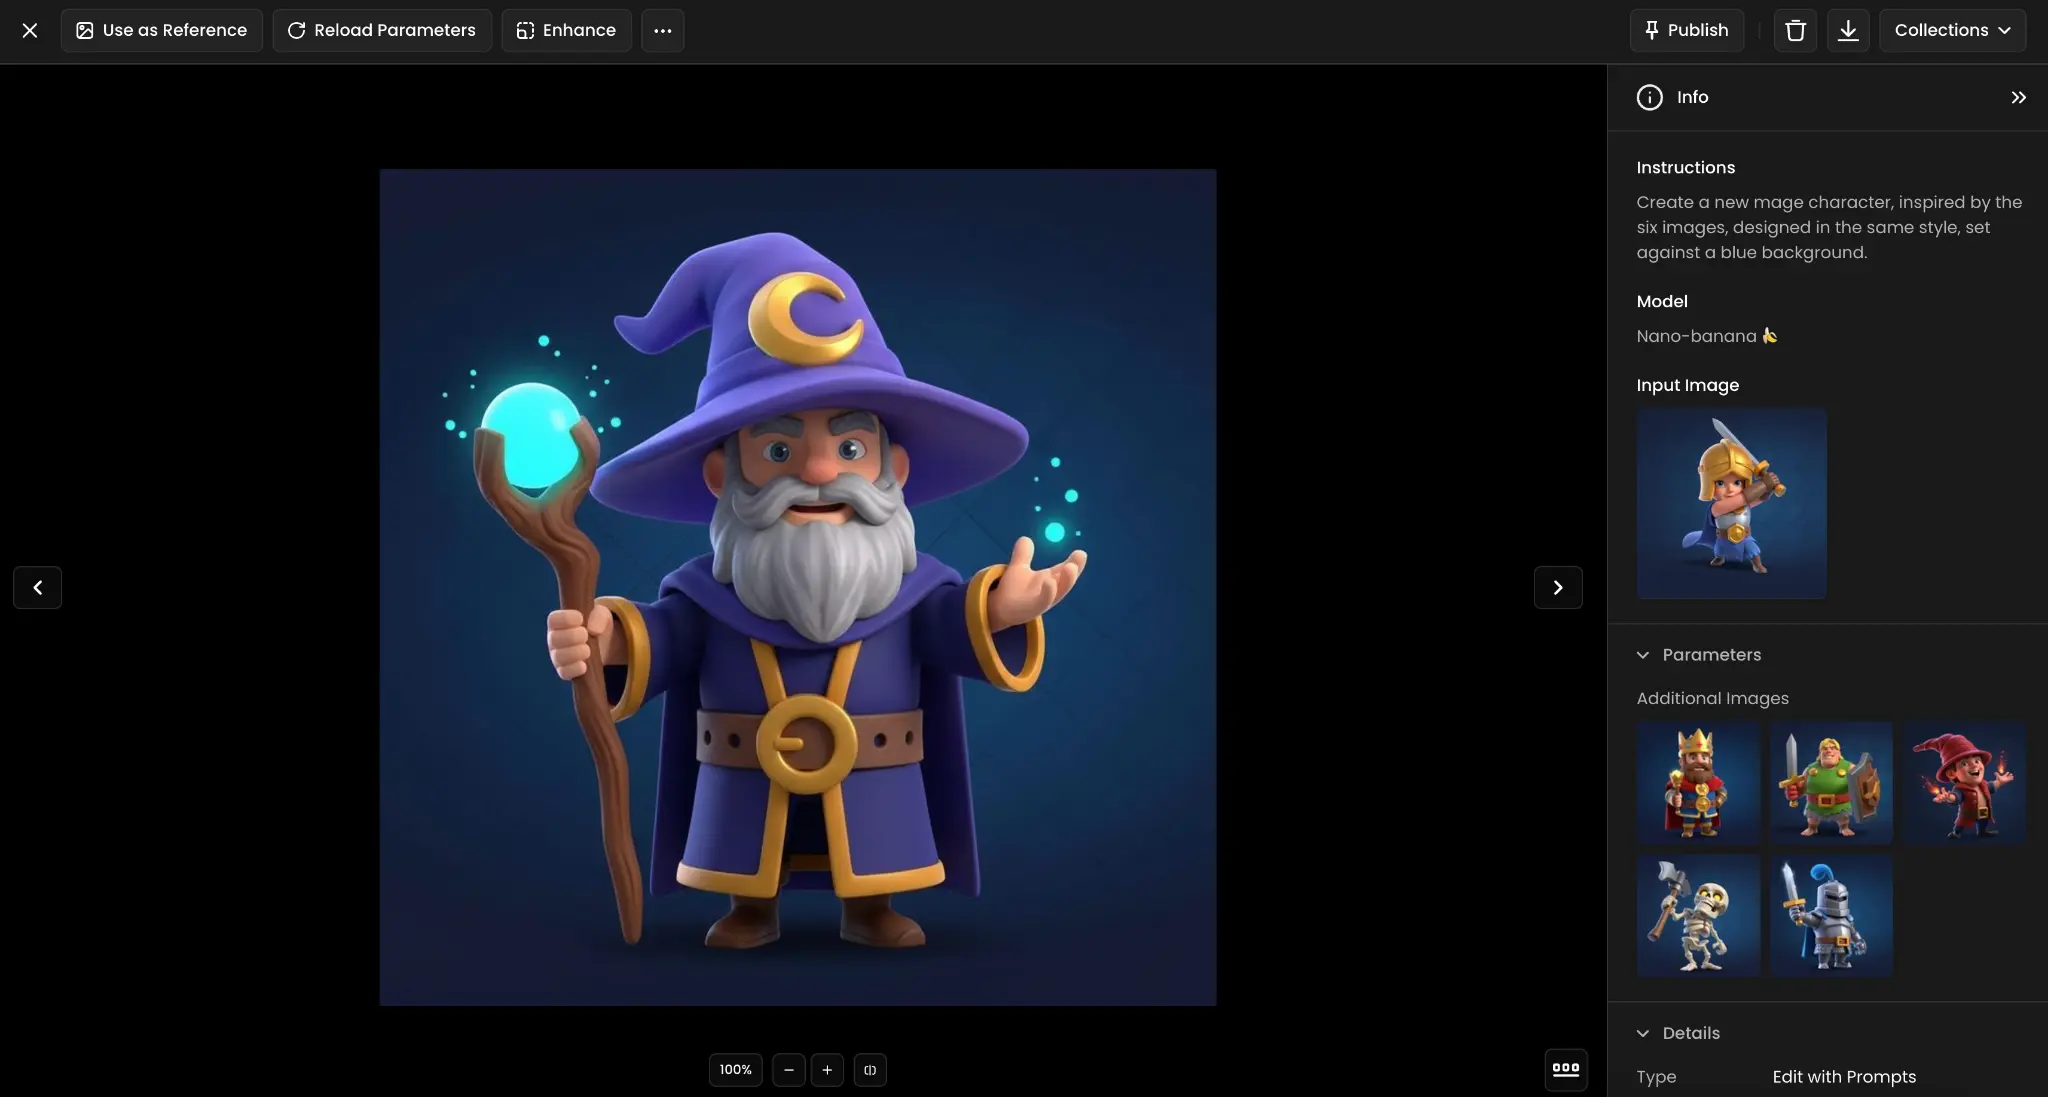
9. Character Creation from Style References
Generate completely new characters by analyzing the artistic DNA of existing character sets, extracting style elements like proportions, color schemes, shading techniques, and design motifs. This ensures new additions feel like natural extensions of established character rosters rather than foreign elements that break visual consistency.
Use Case: A new mage character is generated in the same artistic style as a set of six reference images.
Prompt: "Create a new mage character inspired by the six images, designed in the same style, set against a blue background"
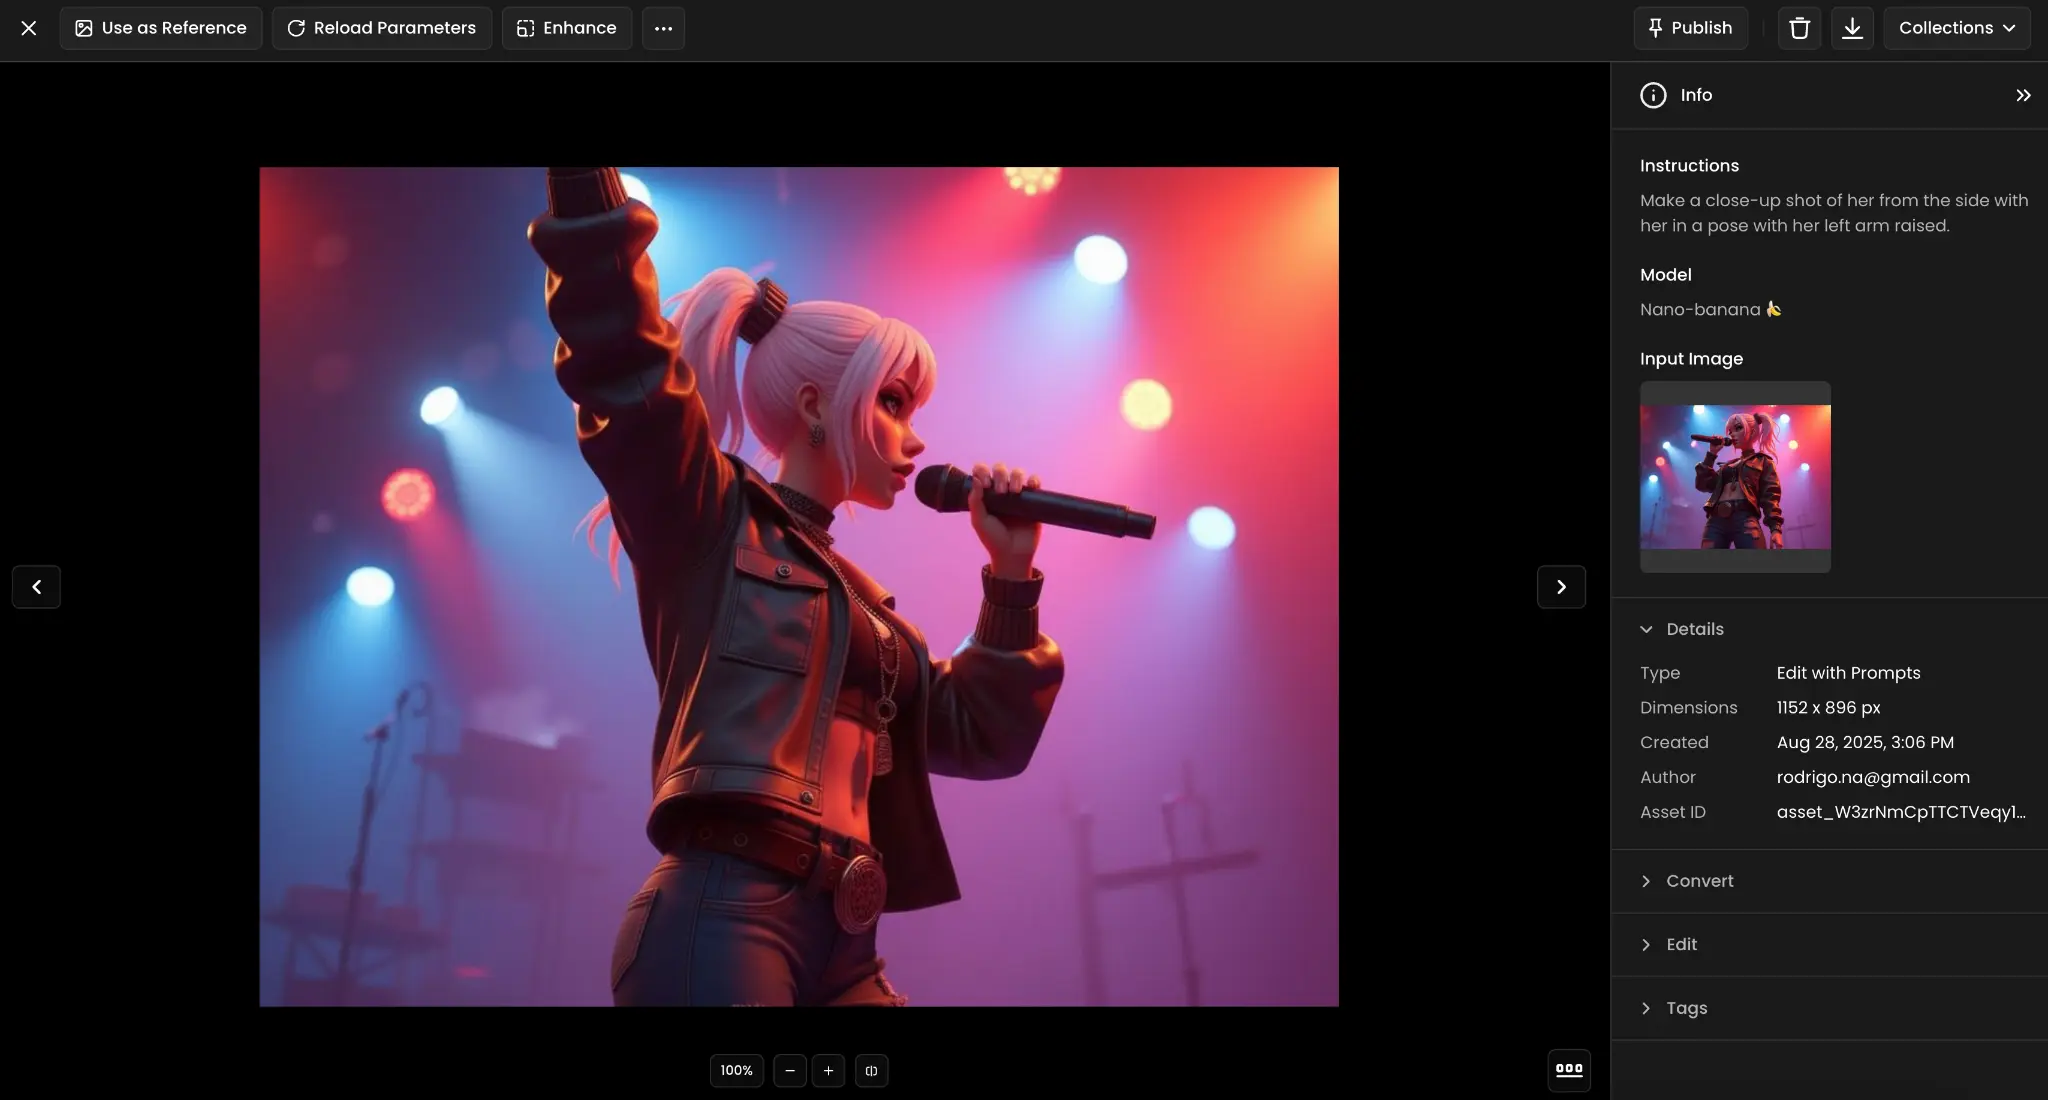
10. Camera Angle Change
Reconstruct scenes from entirely different viewpoints and camera positions, effectively creating new shots that weren't captured in the original image. This involves understanding 3D spatial relationships, adjusting perspective distortion, and maintaining proper proportions when viewing subjects from new angles.
Use Case: A performer is reframed from a side angle close-up with raised arm pose, transforming the original perspective completely.
Prompt: "Make a close-up shot of her from the side with her in a pose with her left arm raised"
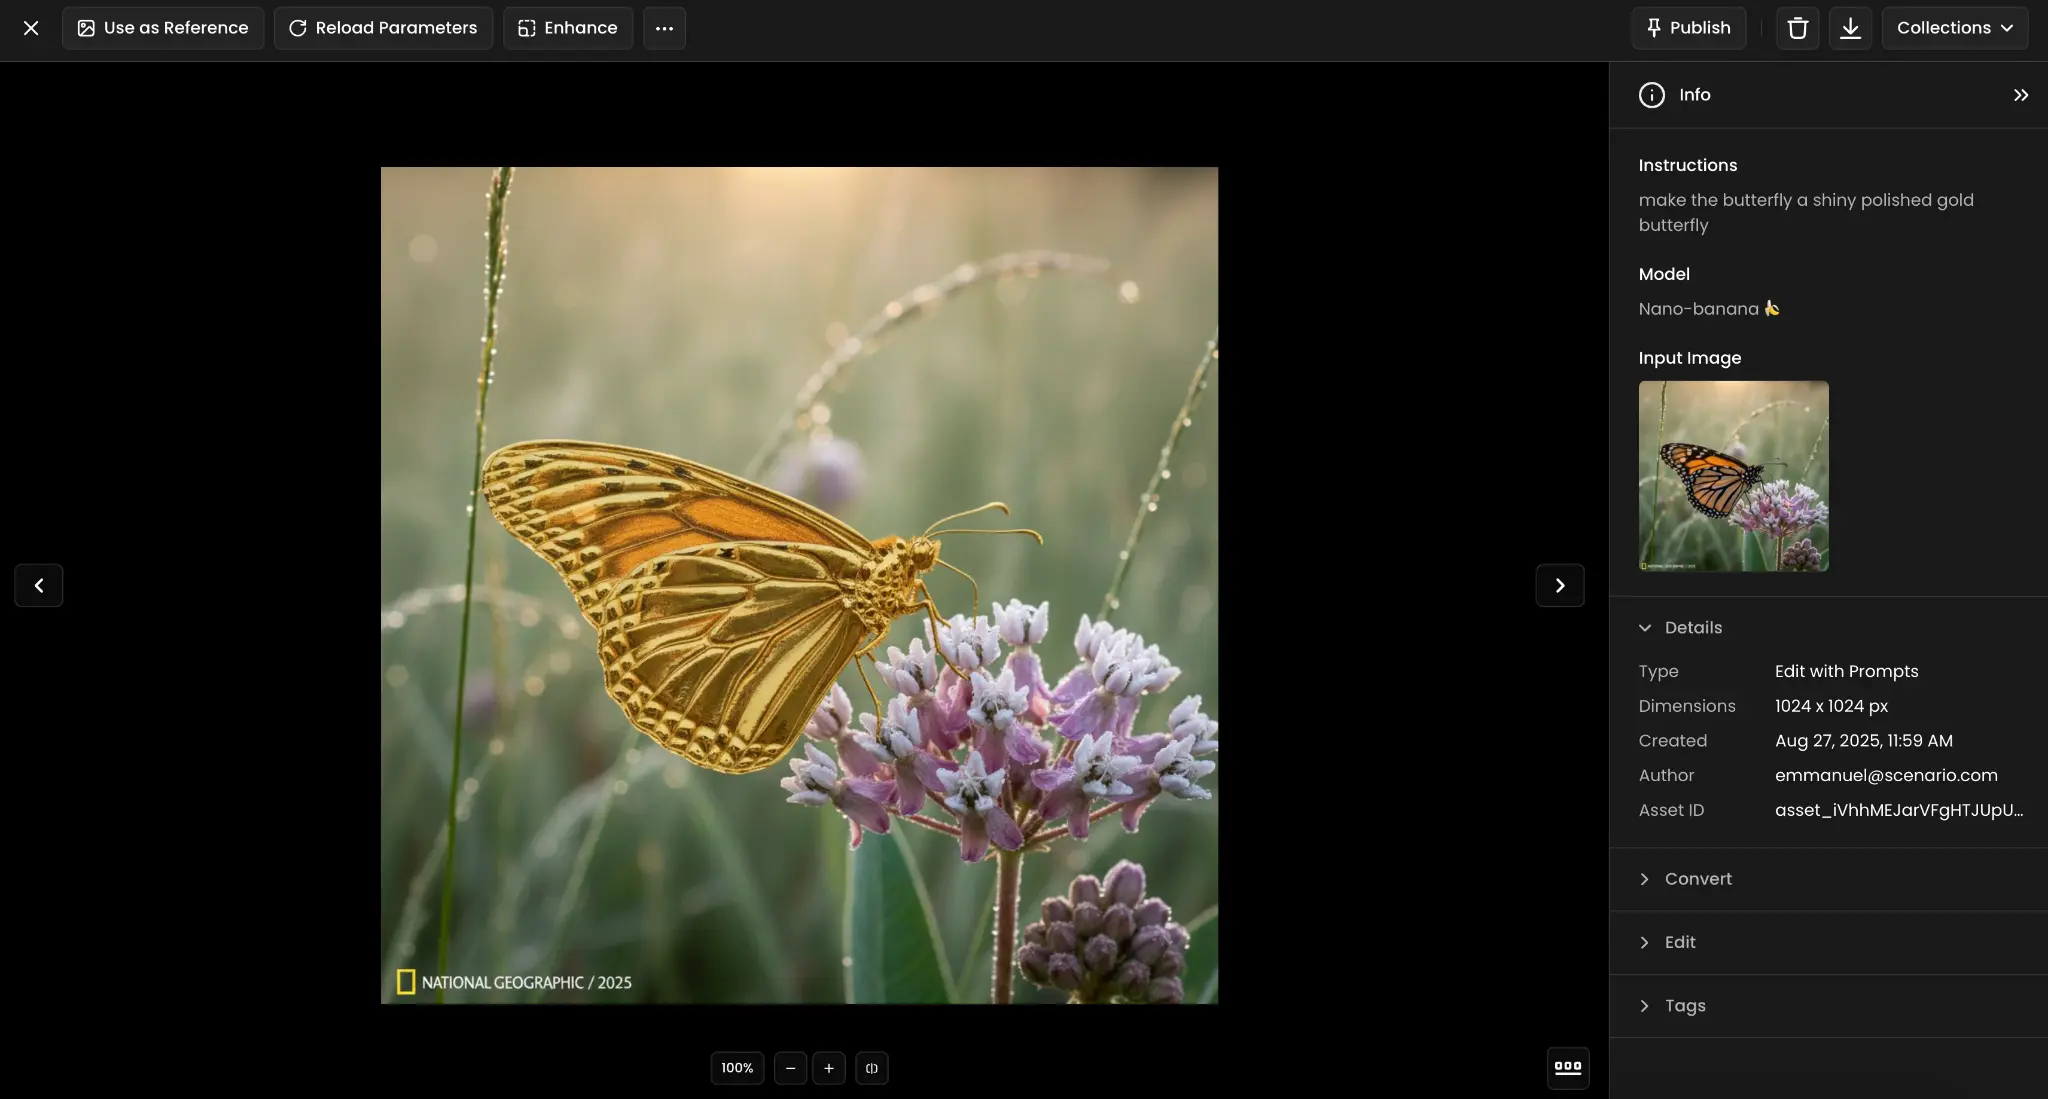
11. Material Property Change
Transform surface materials and textures while preserving underlying object geometry and form, applying realistic physical properties like reflectivity, transparency, roughness, and color temperature. The AI understands how different materials interact with light and applies appropriate highlights, shadows, and environmental reflections.
Use Case: A natural butterfly is converted into a shiny polished gold version while preserving wing patterns and anatomical details.
Prompt: "make the butterfly a shiny polished gold butterfly"
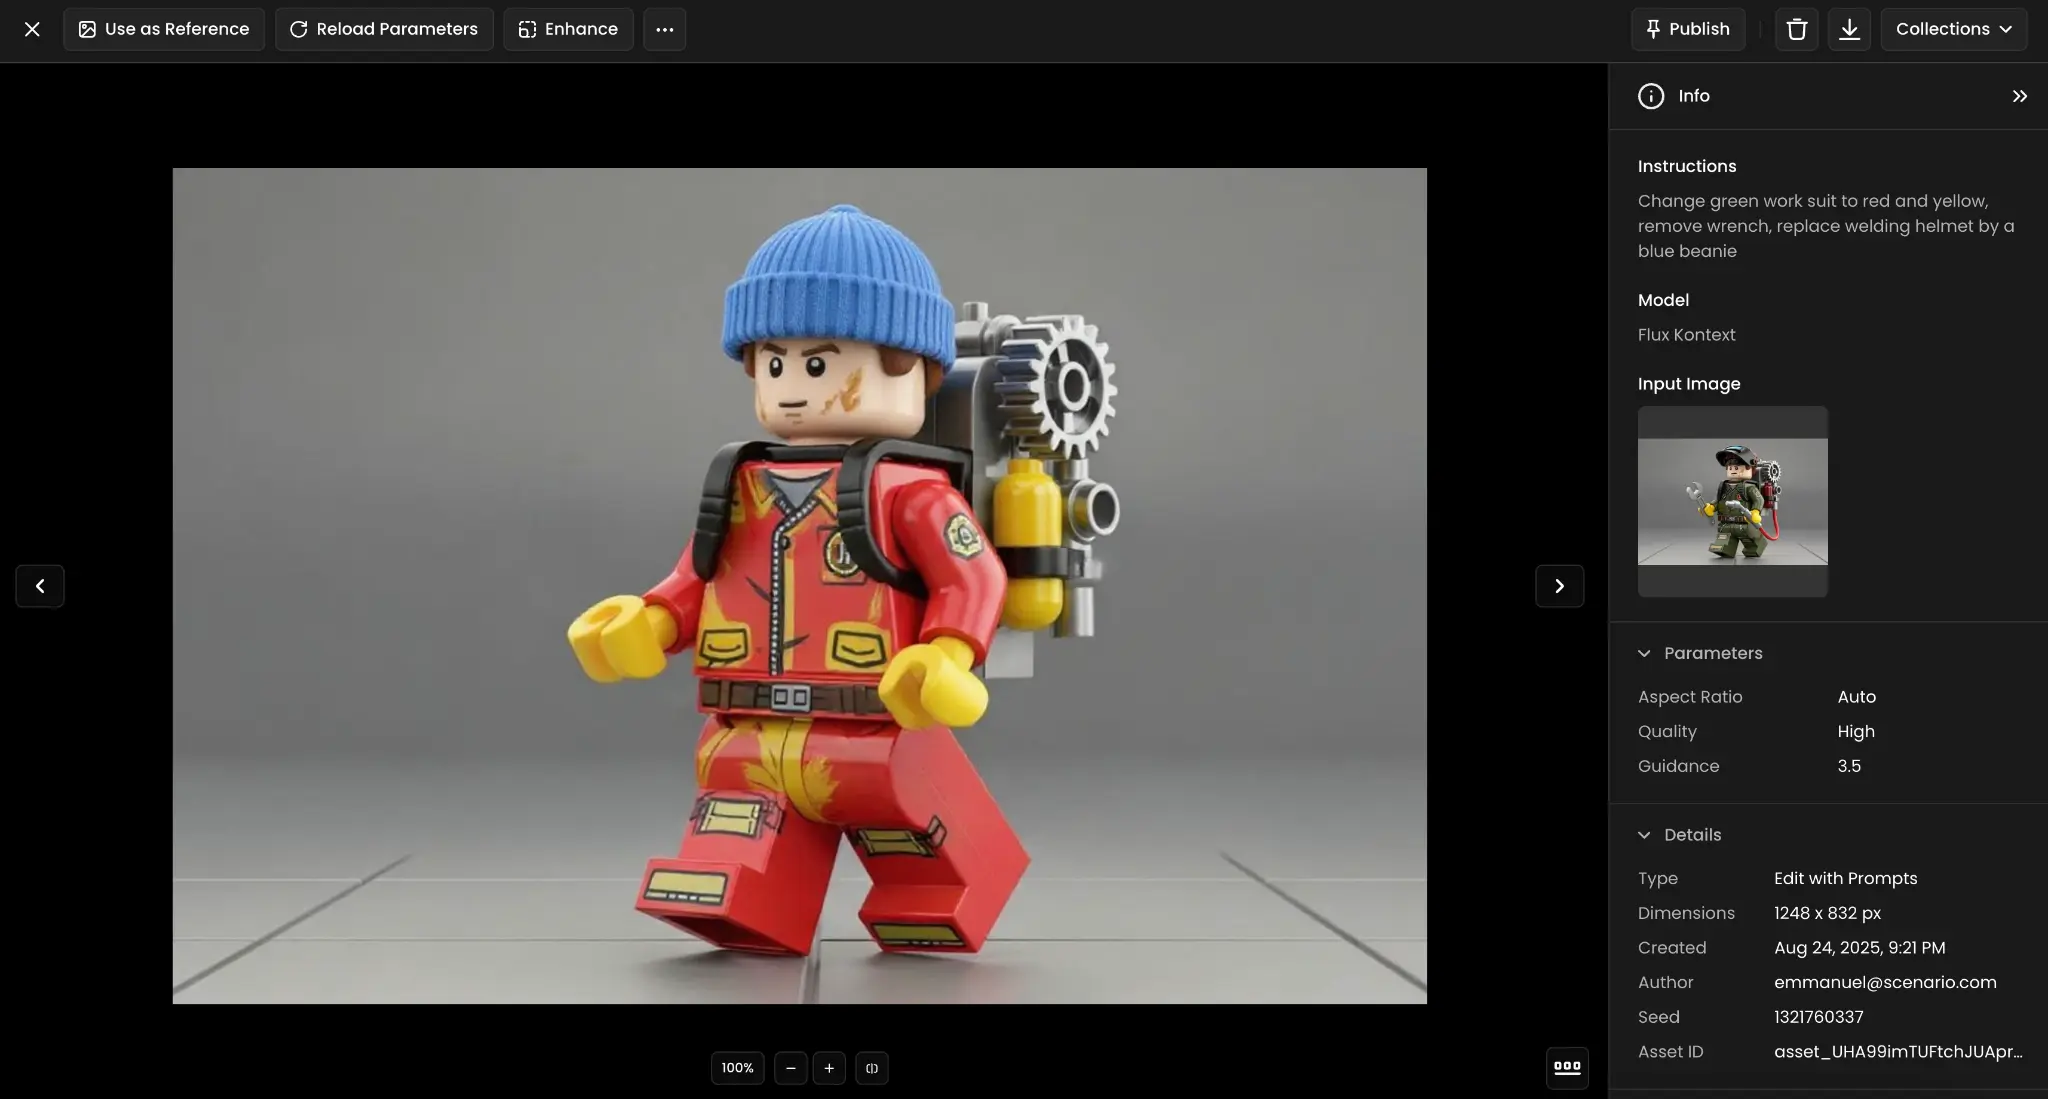
12. Costume / Equipment Swap
Execute complex wardrobe changes involving multiple simultaneous modifications to clothing, accessories, and equipment while maintaining proper fit, proportions, and realistic fabric behavior. This includes color changes, texture modifications, and complete item replacements with appropriate lighting adjustments.
Use Case: A LEGO figure's green work suit becomes red and yellow, wrench is removed, and welding helmet is replaced with a blue beanie.
Prompt: "Change green work suit to red and yellow, remove wrench, replace welding helmet by a blue beanie"
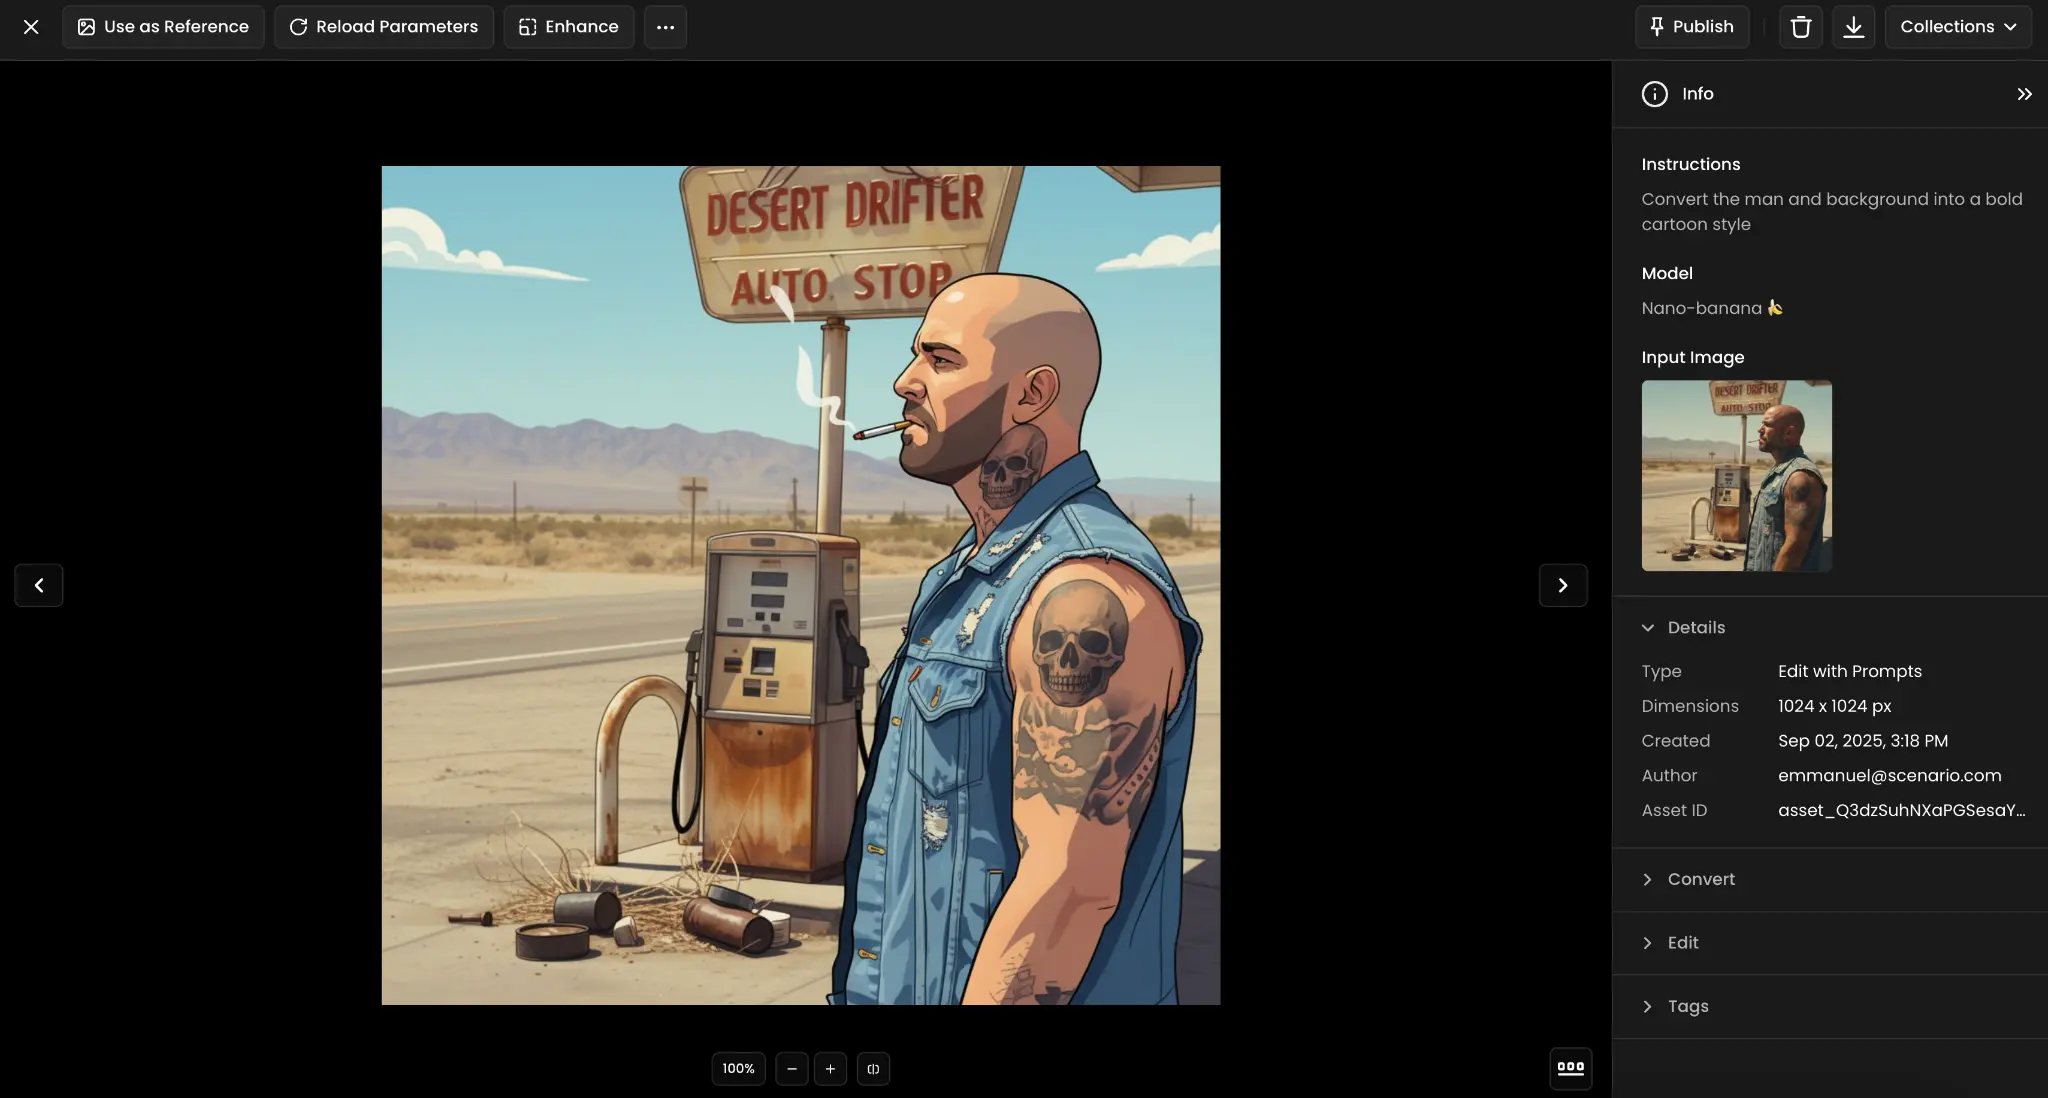
13. Photo to Cartoon Style
Convert photorealistic imagery into various illustrated styles, from bold cartoon aesthetics to subtle artistic interpretations, while maintaining compositional integrity and narrative content. The transformation involves simplifying complex details, adjusting color palettes, and applying stylistic rendering techniques that match target art styles.
Use Case: A realistic desert gas station scene with a man is transformed into a bold cartoon illustration style.
Prompt: "Convert the man and background into a bold cartoon style"
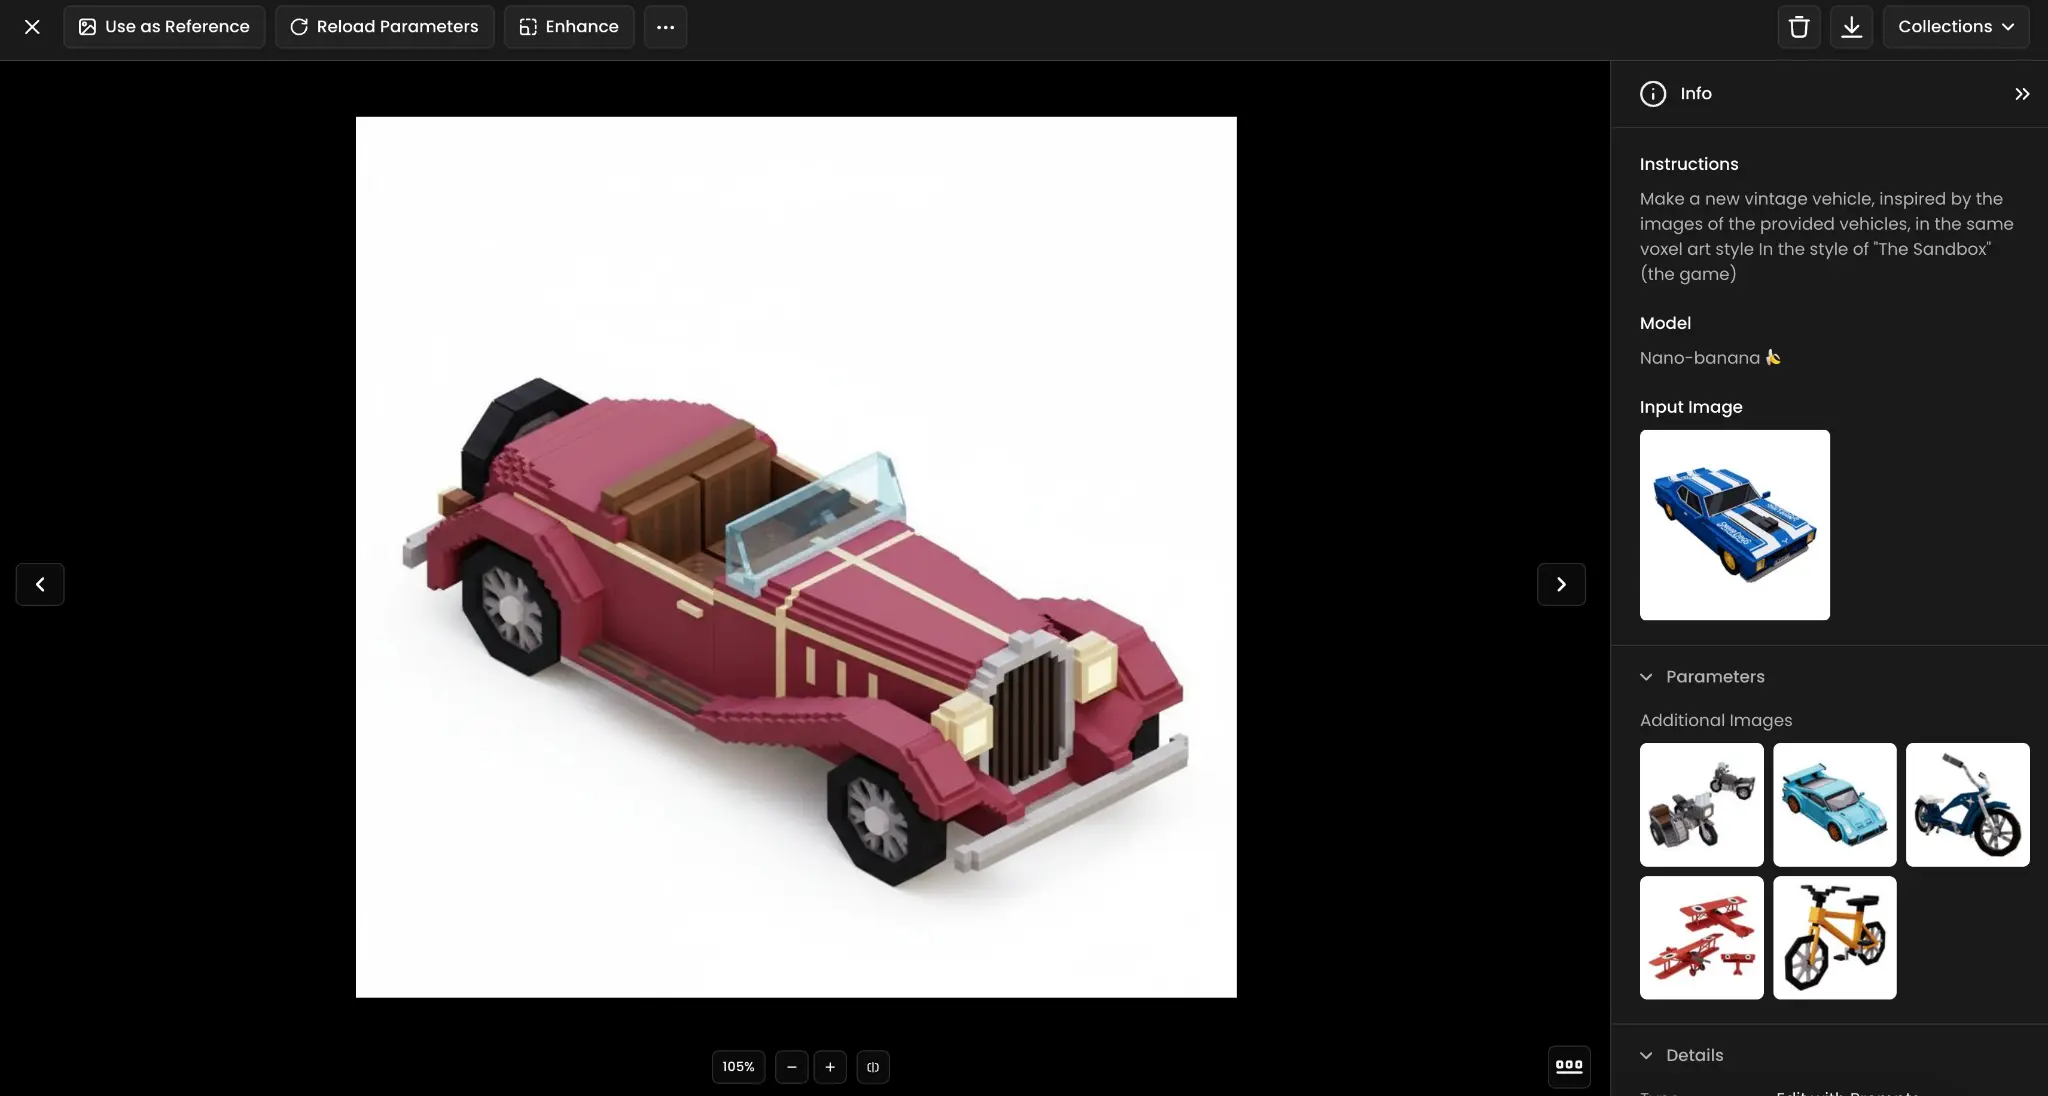
14. Asset Creation from References
Generate new assets that seamlessly integrate with existing art collections by analyzing multiple reference images to extract and apply consistent style guidelines, technical specifications, and aesthetic principles. This ensures new creations maintain visual harmony with established asset libraries.
Use Case: A vintage voxel car is created using reference vehicle images, matching "The Sandbox" game's distinctive voxel art style.
Prompt: "Make a new vintage vehicle, inspired by the images of the provided vehicles, in the same voxel art style in the style of 'The Sandbox' (the game)"
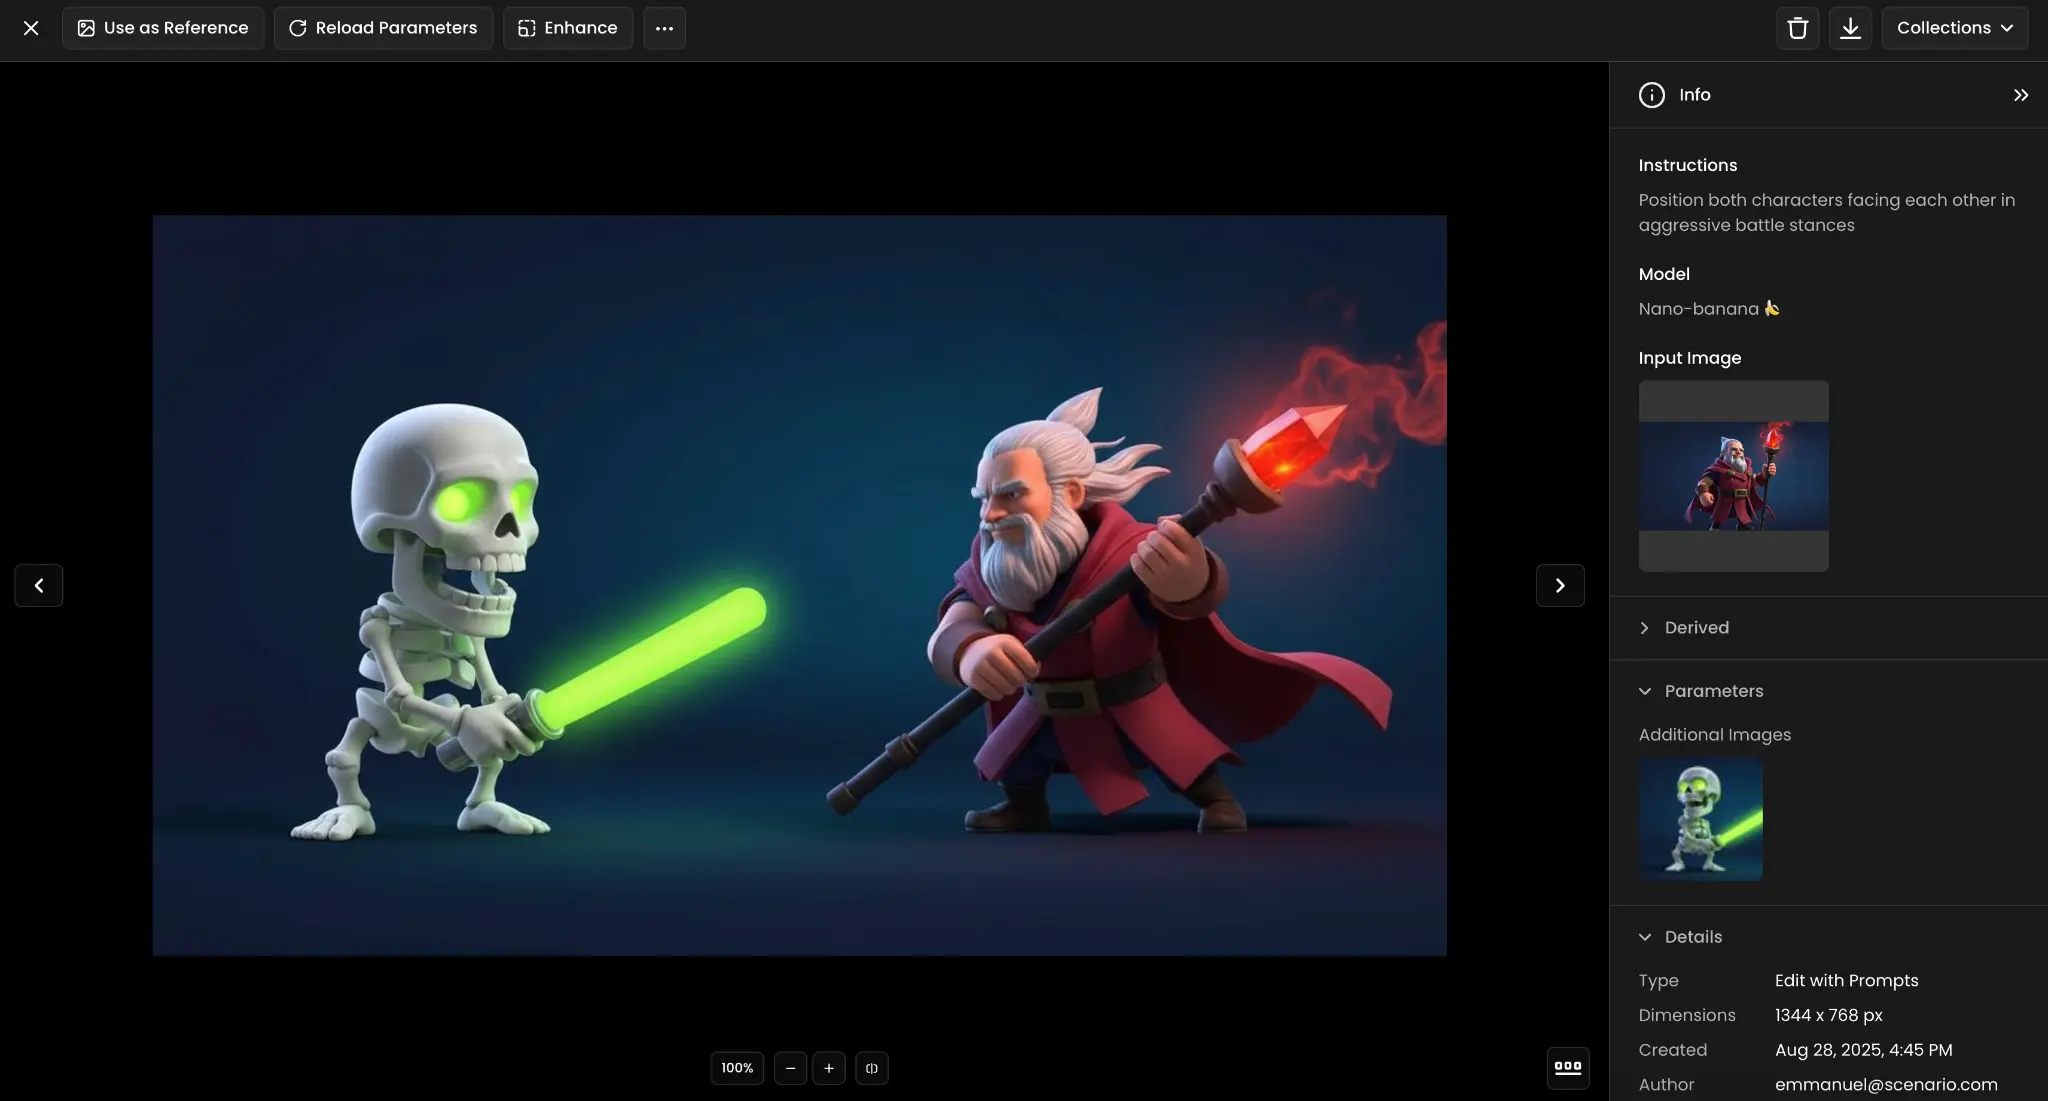
15. Character Positioning
Arrange multiple characters in dynamic combat scenarios with proper spatial relationships, weapon positioning, and action choreography that conveys movement, tension, and narrative conflict. The AI considers reach distances, defensive stances, and energy effects to create believable fight compositions.
Use Case: A skeleton warrior and wizard are positioned facing each other in aggressive battle stances, ready for combat.
Prompt: "Position both characters facing each other in aggressive battle stances"
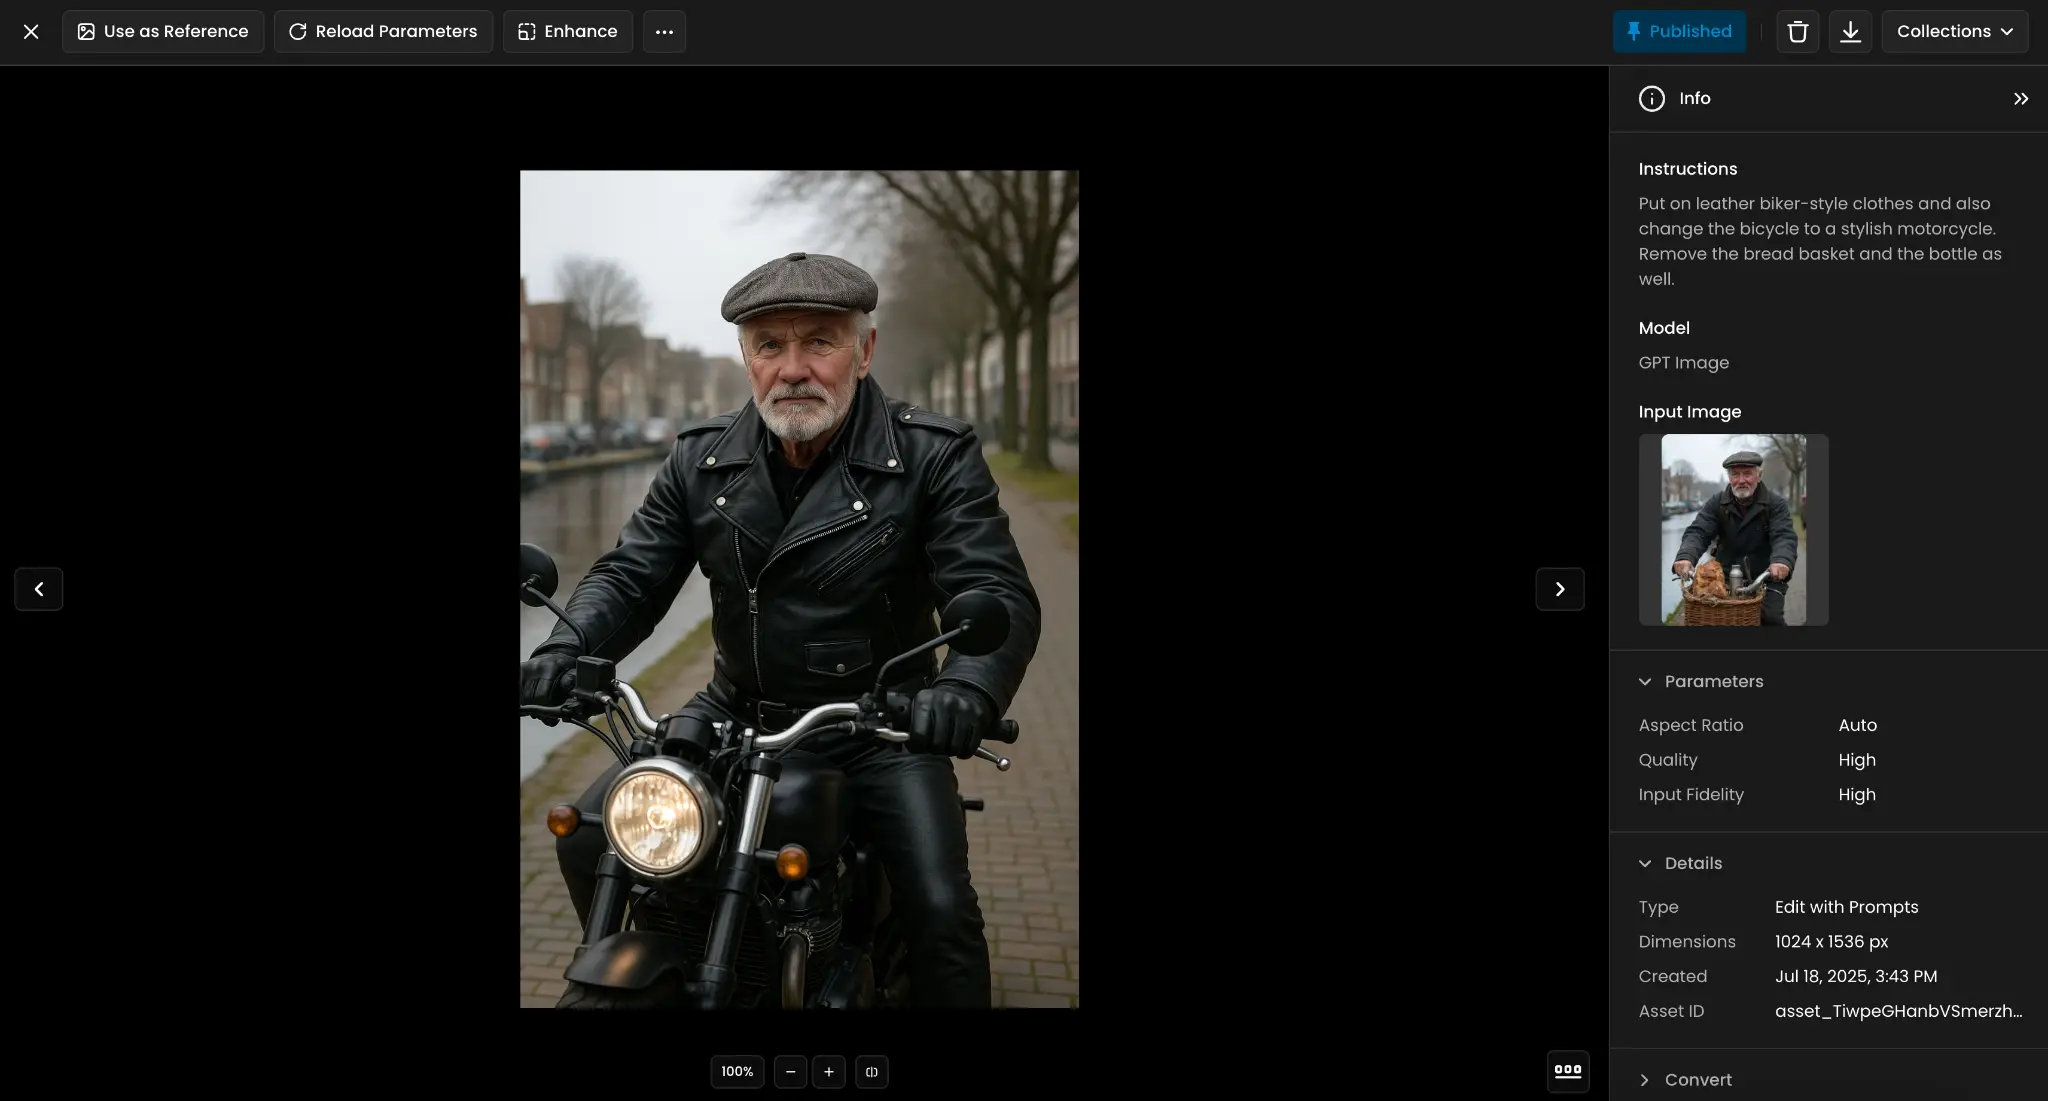
16. Lifestyle and Vehicle Change
Transform characters and their associated objects to represent completely different lifestyles, subcultures, or social contexts while maintaining character identity and proportions. This involves coordinated changes to clothing, accessories, vehicles, and environmental elements that support the new thematic direction.
Use Case: A casual cyclist with basket and bottle becomes a leather-clad biker on a stylish motorcycle, removing all casual elements.
Prompt: "Put on leather biker-style clothes and also change the bicycle to a stylish motorcycle. Remove the bread basket and the bottle as well."
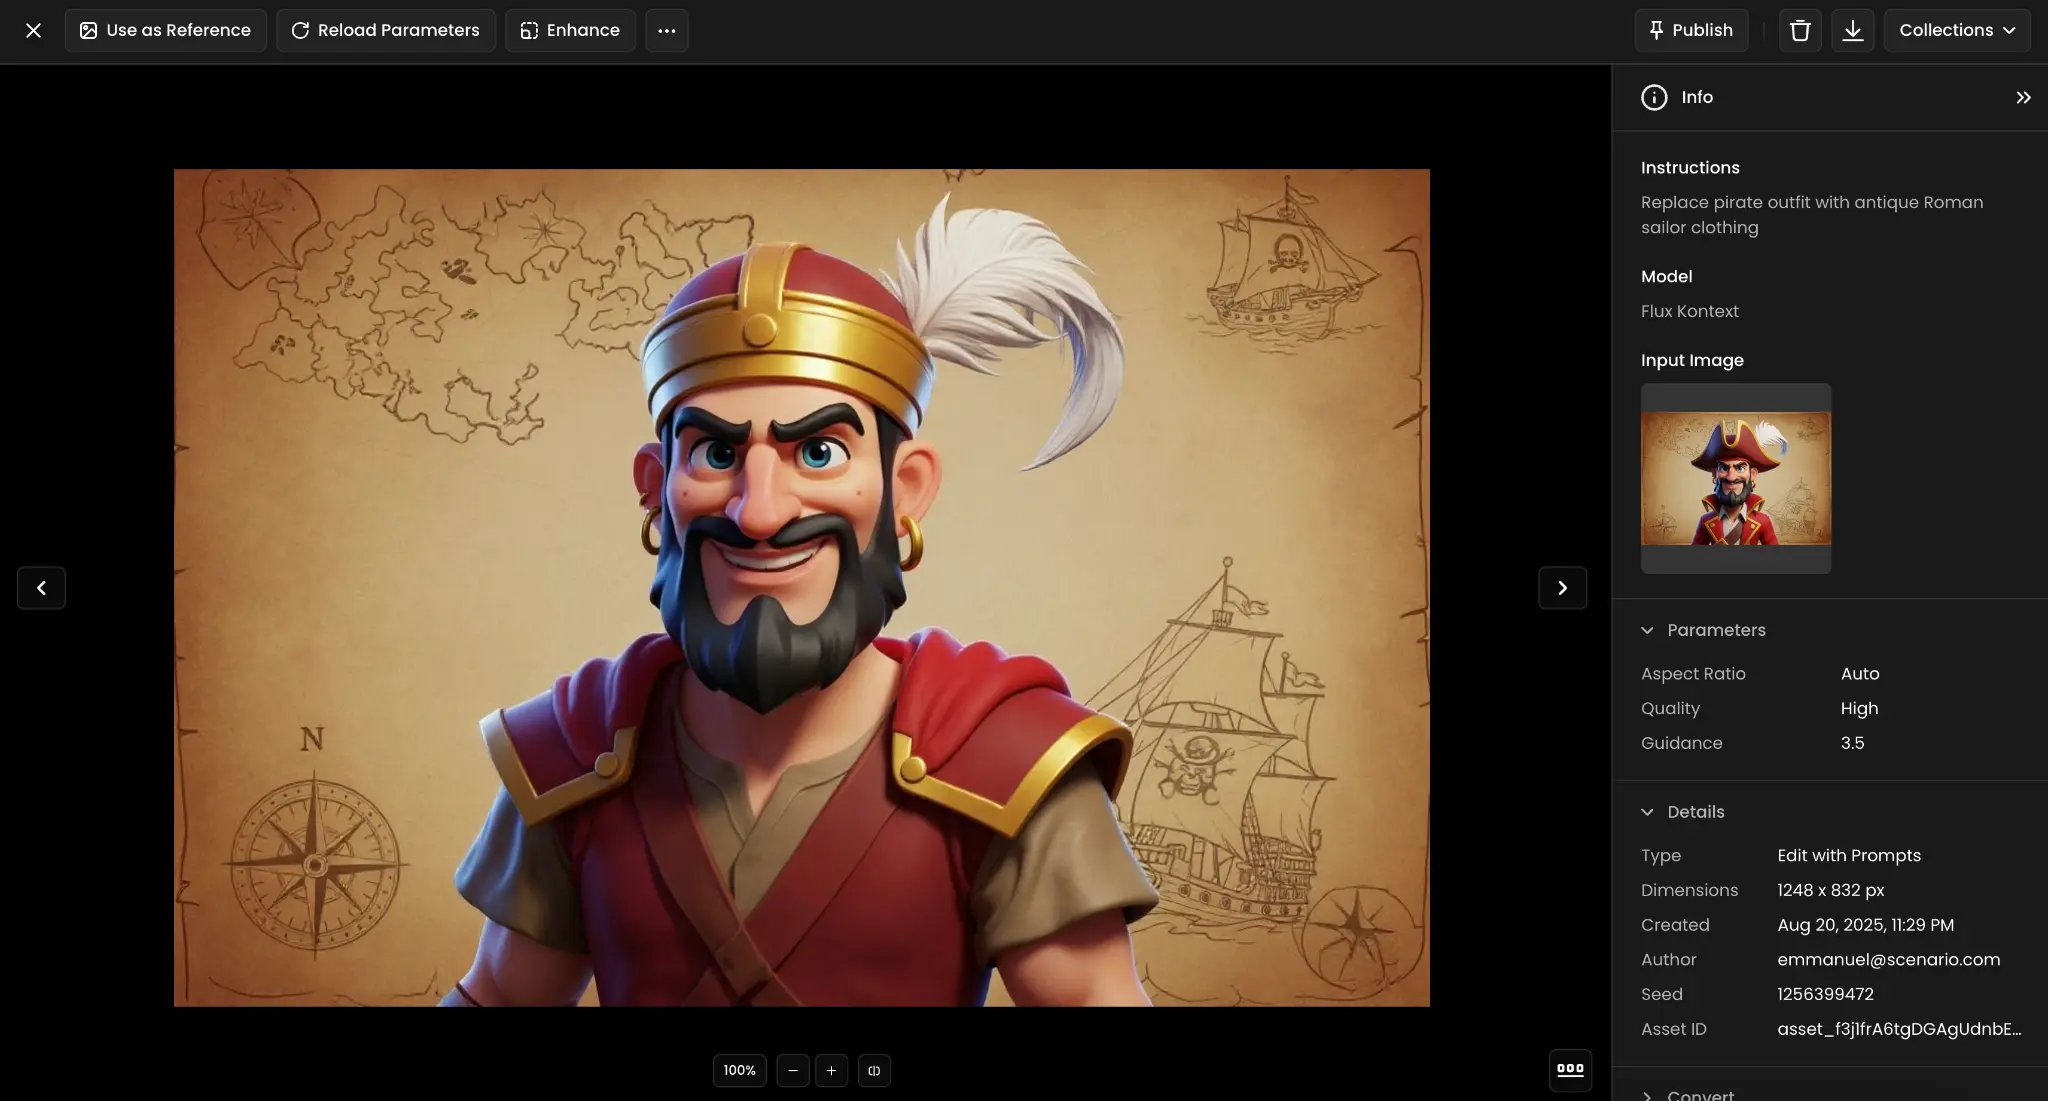
17. Historical Costume Change
Replace contemporary or fantasy clothing with historically accurate garments from specific time periods, including appropriate accessories, fabrics, and styling details that reflect authentic historical fashion and cultural context. The AI considers period-appropriate colors, materials, and construction methods.
Use Case: A pirate character is transformed into a Roman sailor with period-appropriate clothing and accessories.
Prompt: "Replace pirate outfit with antique Roman sailor clothing"
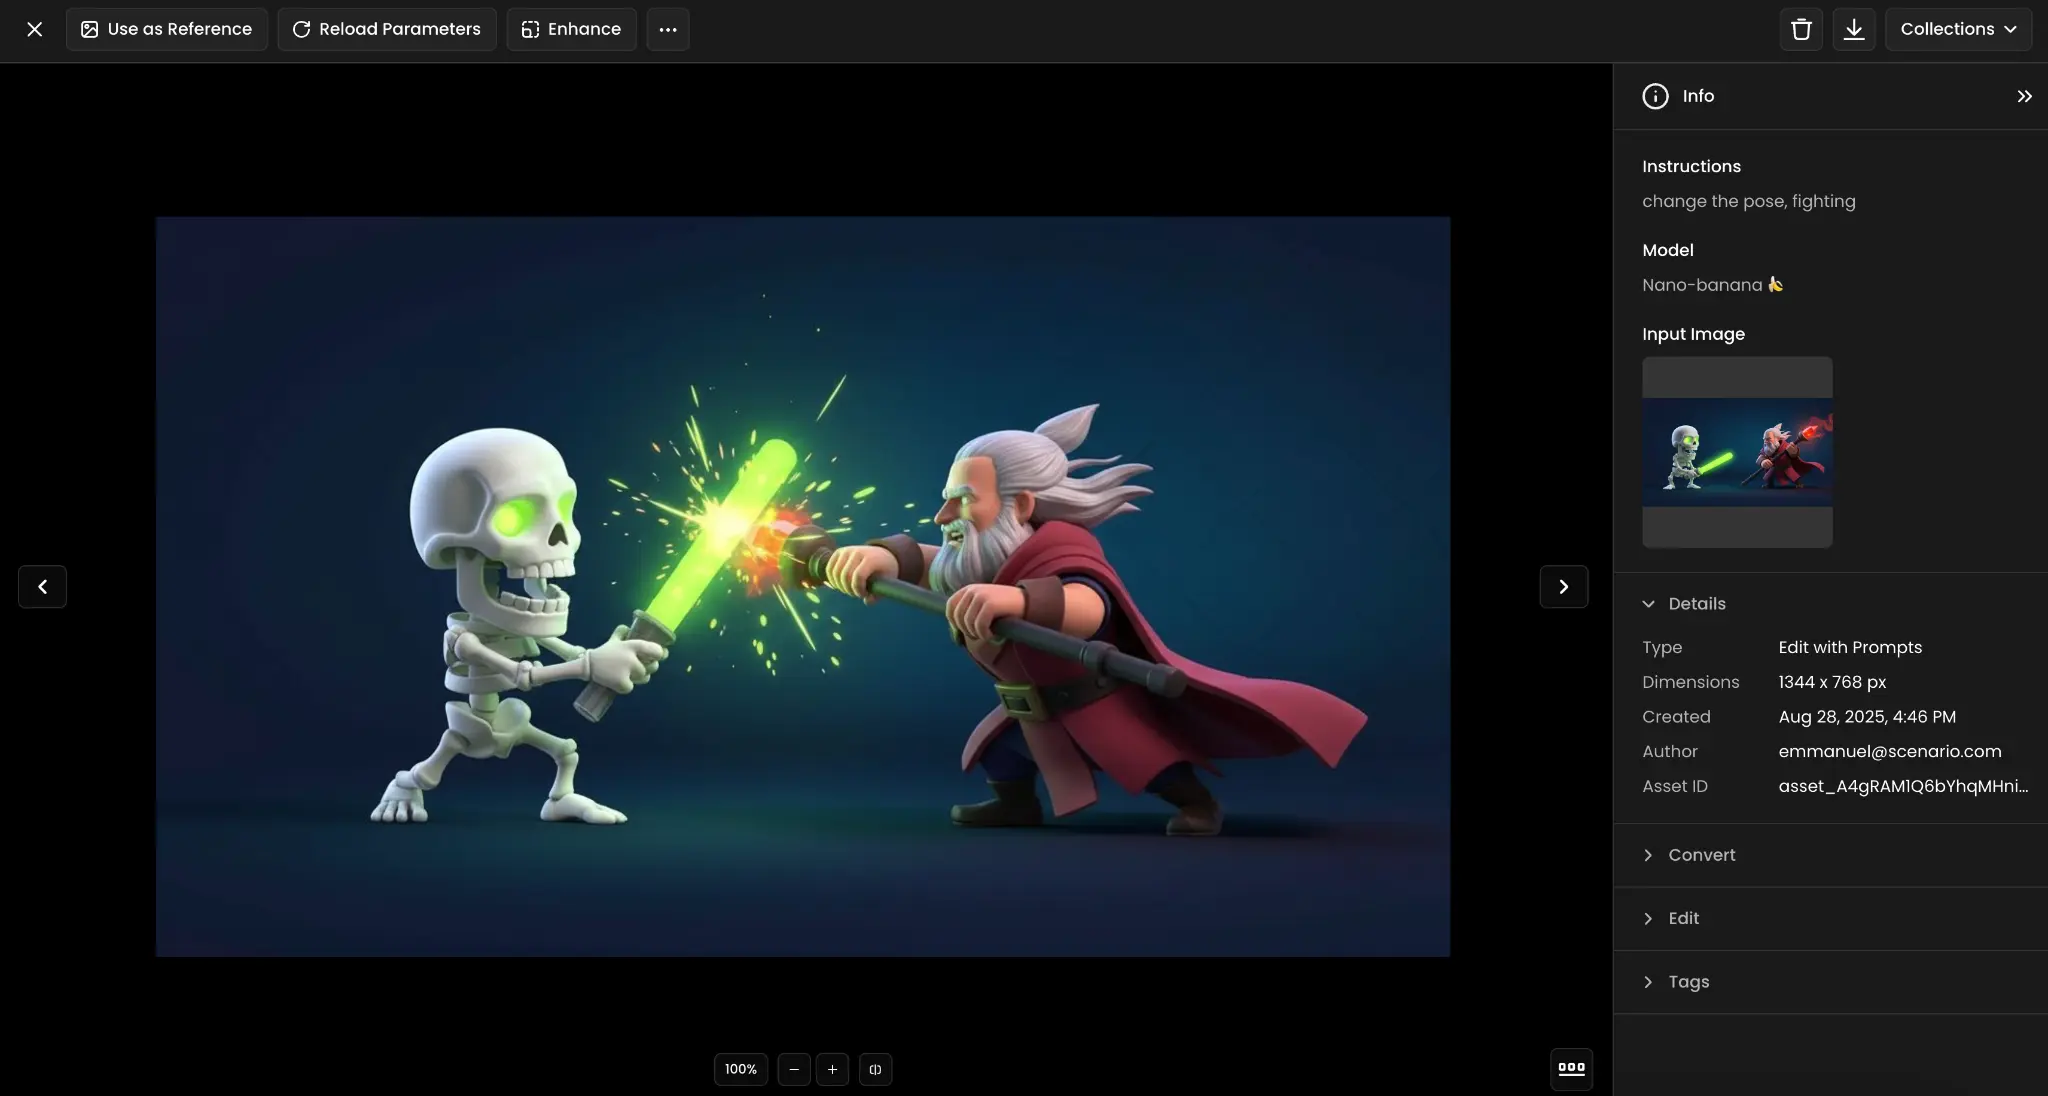
18. Combat Scene Creation
Orchestrate dynamic battle sequences with precise character positioning, weapon engagement, and energy effects that convey motion, impact, and dramatic tension. This involves coordinating multiple elements like stance dynamics, magical effects, environmental interaction, and visual storytelling through body language.
Use Case: A skeleton warrior and wizard are positioned in active combat stances with weapons engaged and dynamic energy effects.
Prompt: "change the pose, fighting"
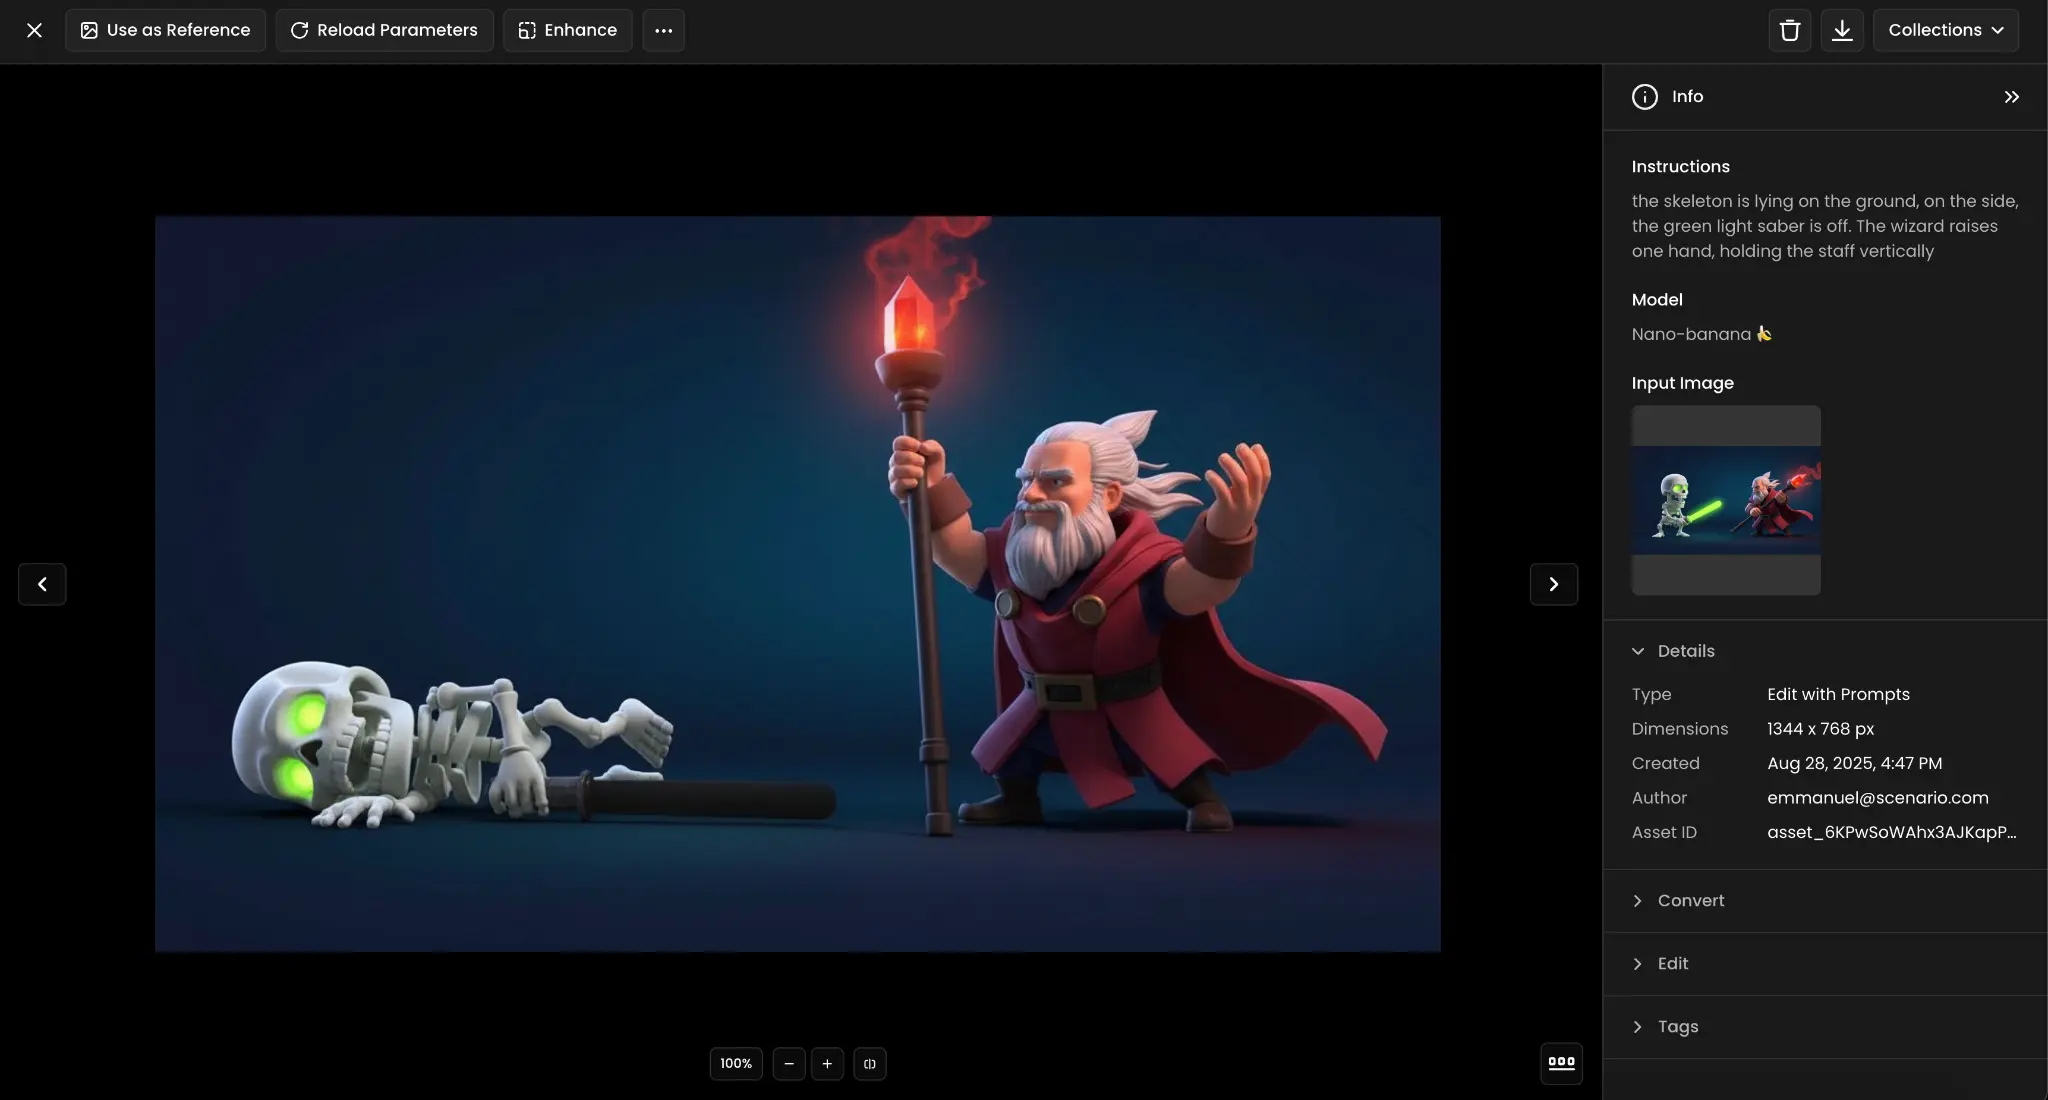
19. Battle Outcome Scene
Depict the aftermath of combat scenarios with defeated characters, victory poses, and environmental evidence of the conflict that just concluded. This creates narrative continuity by showing cause-and-effect relationships and emotional consequences through character positioning and environmental details.
Use Case: The battle concludes with the skeleton defeated on the ground, lightsaber deactivated, while the wizard stands victorious with raised staff.
Prompt: "the skeleton is lying on the ground, on the side. the green light saber is off. The wizard raises one hand, holding the staff vertically"
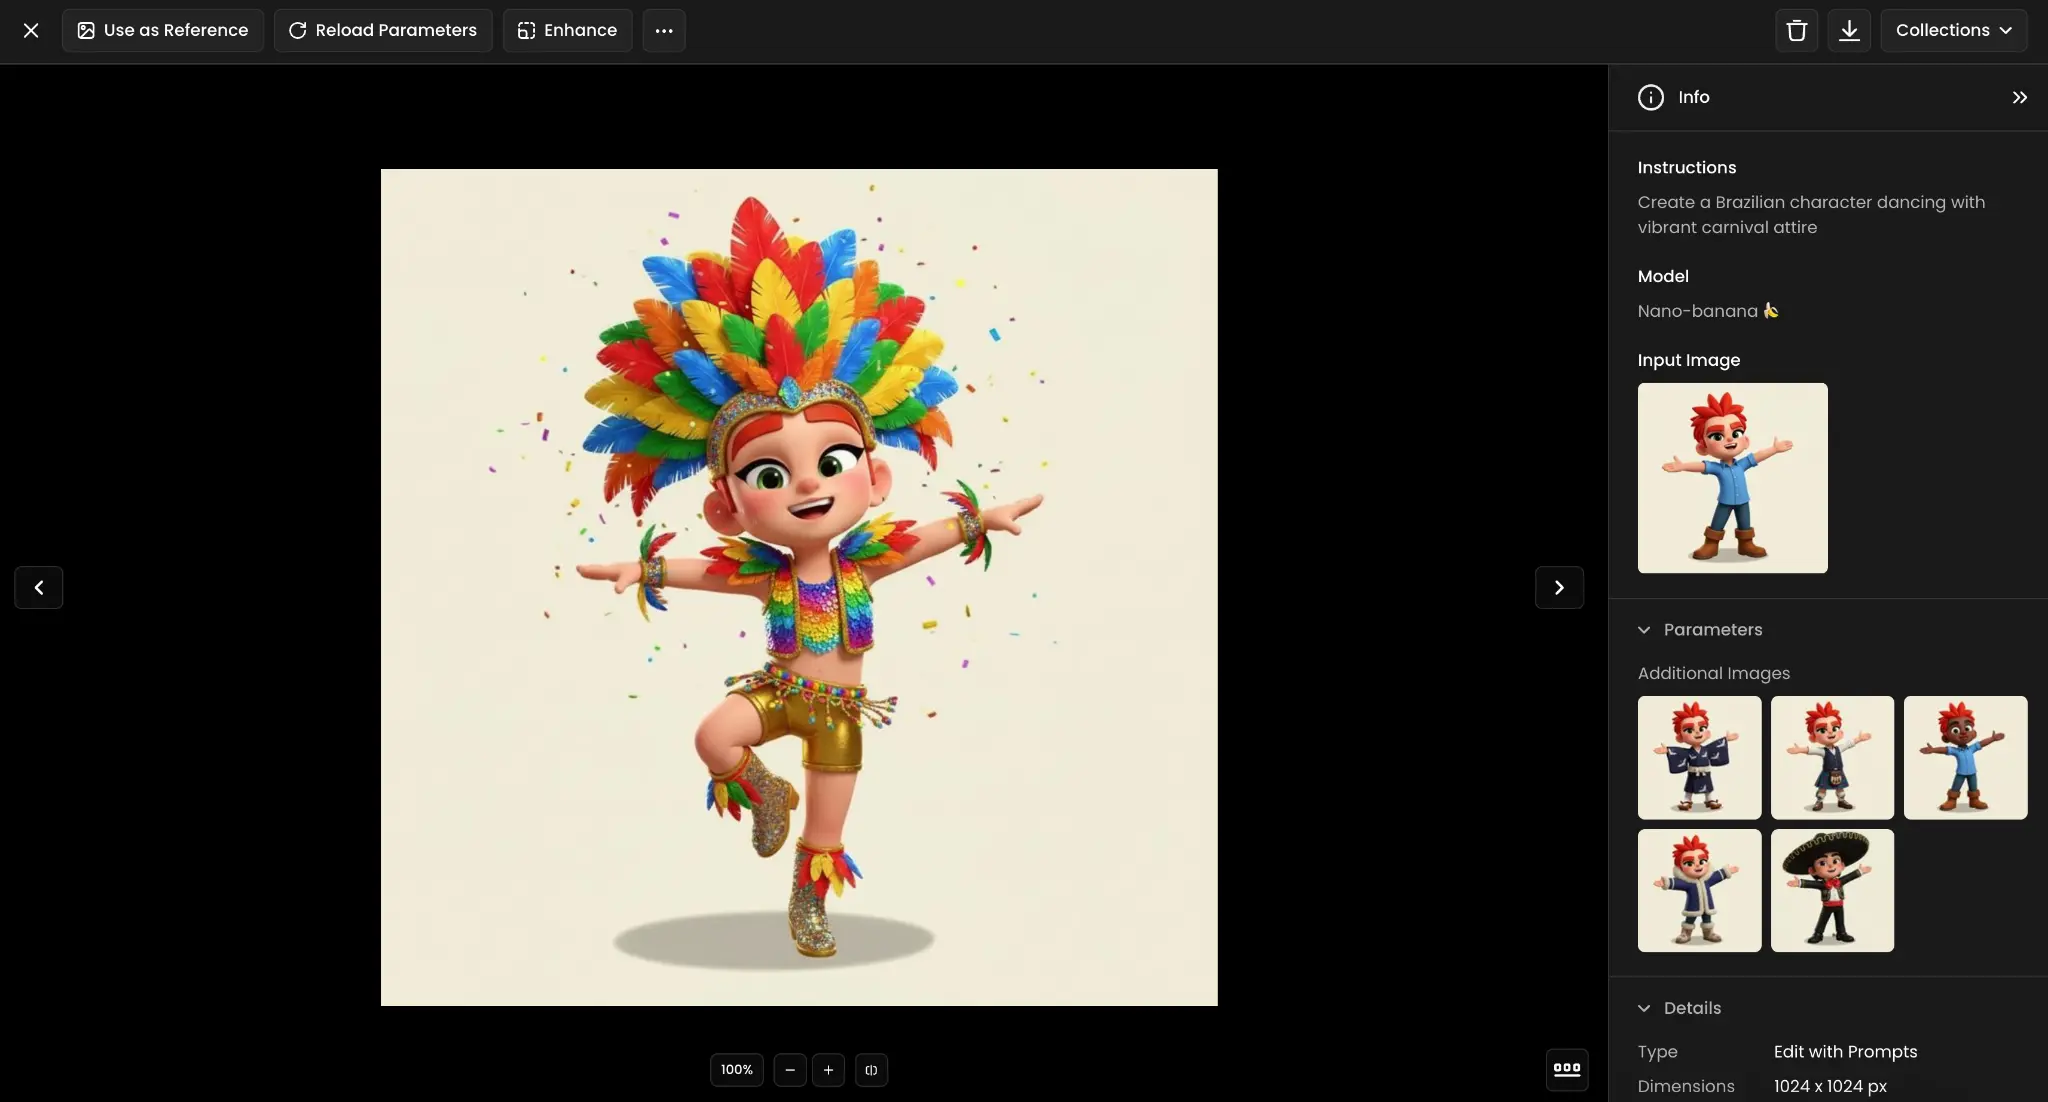
20. Cultural Costume Transformation
Transform characters into authentic cultural representations with traditional clothing, accessories, and styling that accurately reflects specific cultural heritage and ceremonial contexts. This involves understanding cultural significance, appropriate color symbolism, and traditional garment construction while maintaining respectful representation.
Use Case: A character is transformed into a Brazilian carnival dancer with vibrant feathered headdress, colorful costume, and festive pose.
Prompt: "Create a Brazilian character dancing with vibrant carnival attire"
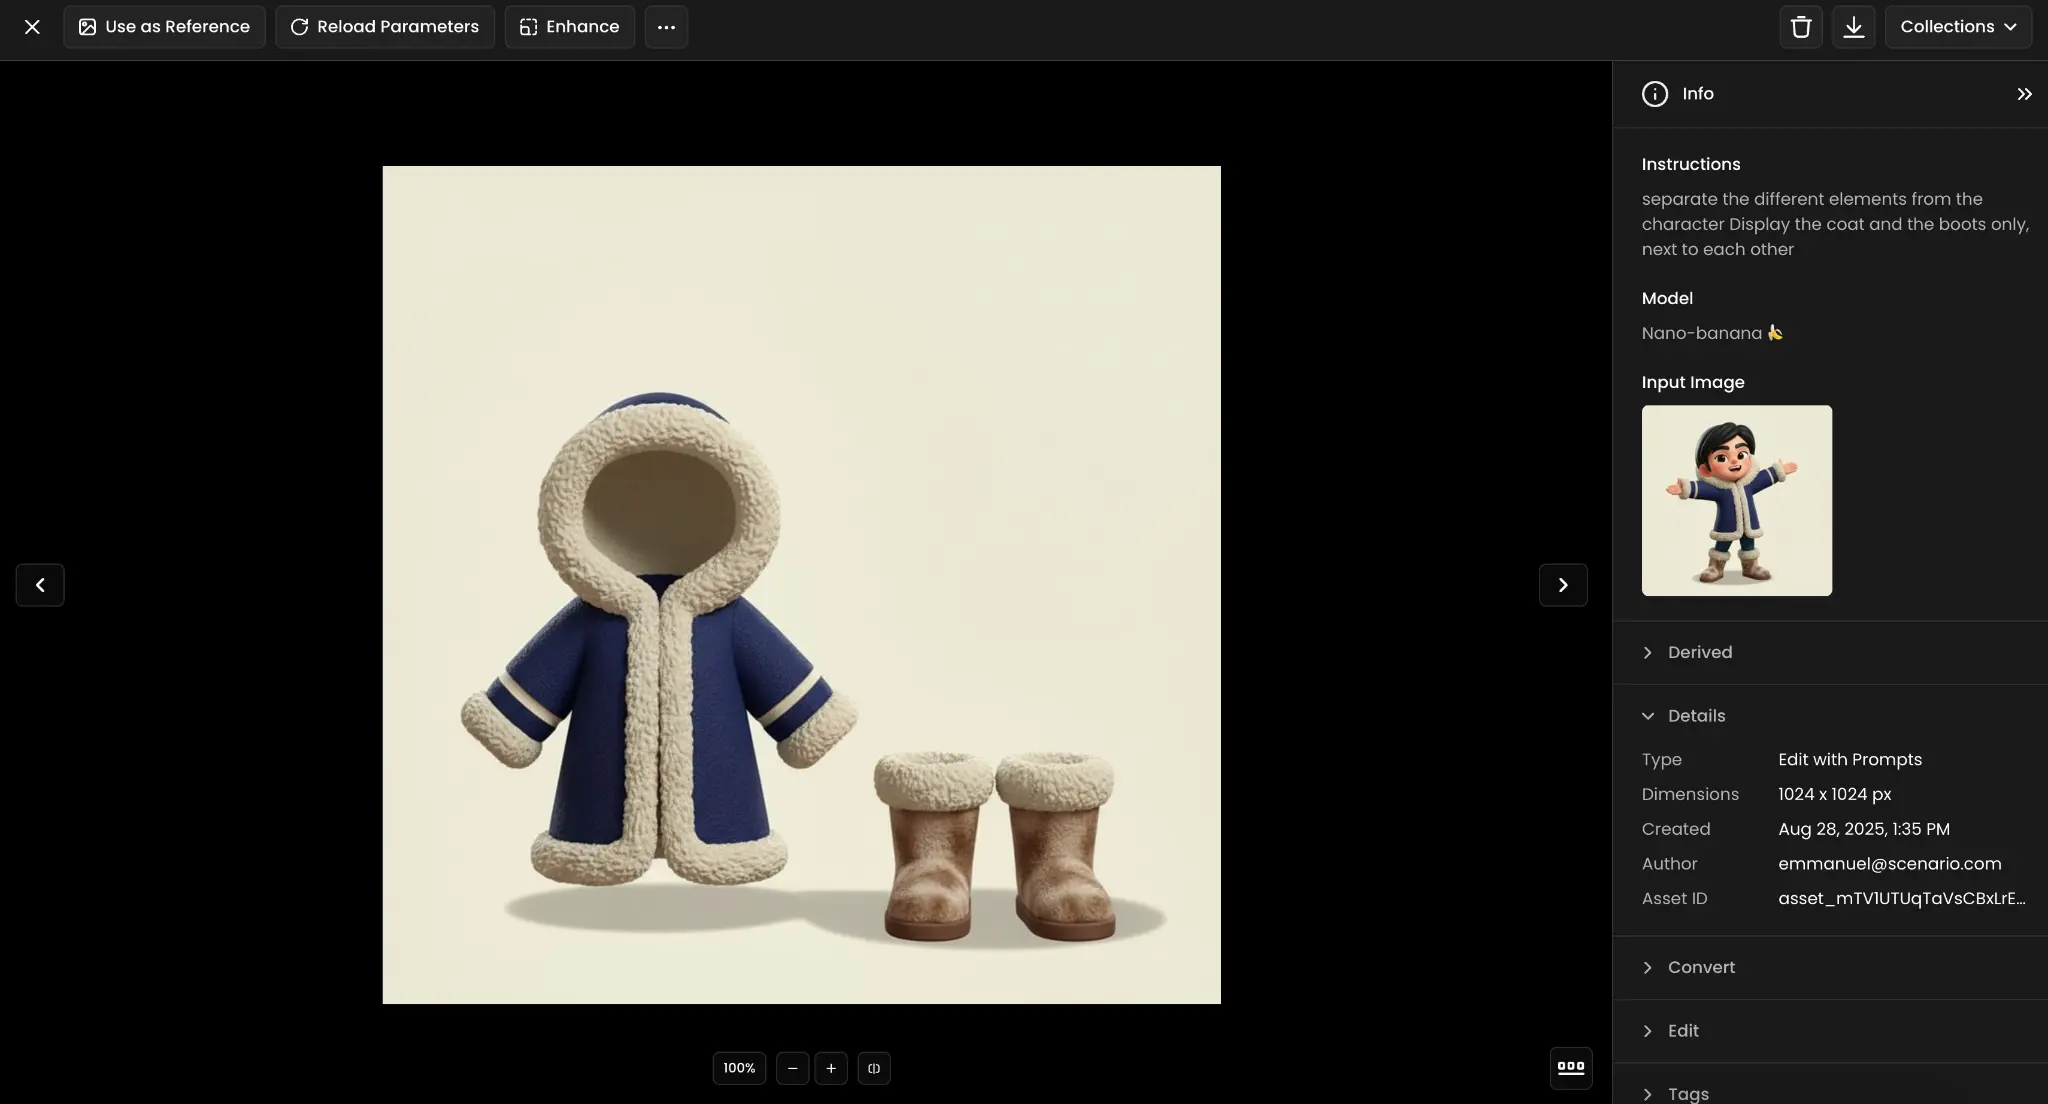
21. Clothing Item Extraction
Isolate and display individual garments or accessories as standalone objects, removing characters while preserving detailed fabric textures, construction details, and realistic draping or structural properties. This creates clean product shots or reference materials for fashion design and character customization systems.
Use Case: A character's coat and boots are extracted and displayed as separate items, removing the character while preserving clothing details.
Prompt: "separate the different elements from the character. Display the coat and the boots only, next to each other"
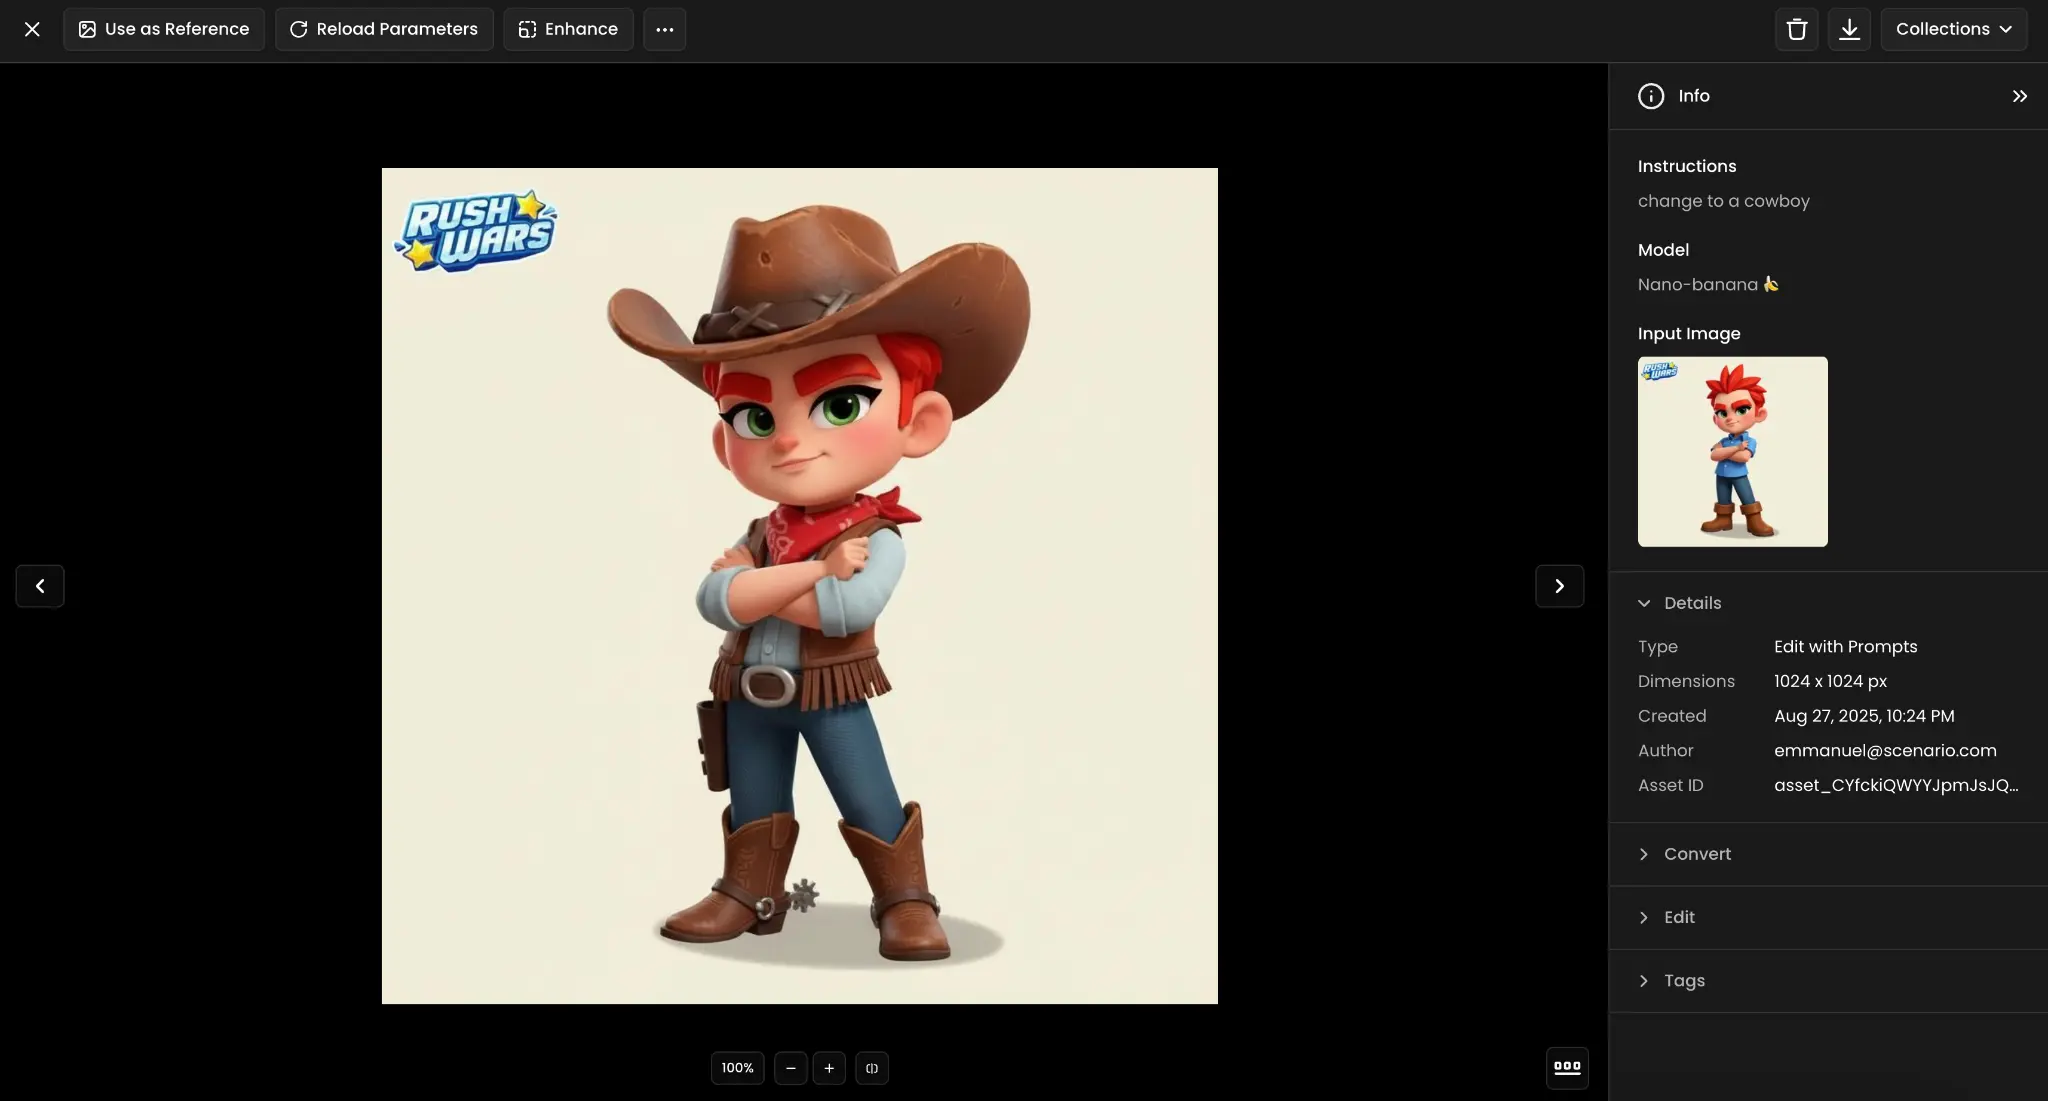
22. Character Theme Change
Transform characters into entirely different archetypes or thematic representations while maintaining core facial features and proportions, involving comprehensive changes to clothing, accessories, posture, and environmental context that support the new character role or profession.
Use Case: A character is completely transformed into a cowboy with authentic western hat, bandana, vest, and boots.
Prompt: "change to a cowboy"
23. Background with Themed Elements
Replace existing backgrounds with thematically appropriate environments that enhance character narratives and provide visual context through symbolic or literal environmental storytelling. This involves creating atmospheric effects, architectural elements, and environmental details that support character roles and story themes.
Use Case: Two royal characters are placed against contrasting elemental backgrounds - one with ice golem, another with fire titan.
Prompt: "Backgrounds replaced by giant elemental creatures (ice golem vs. fire titan)"

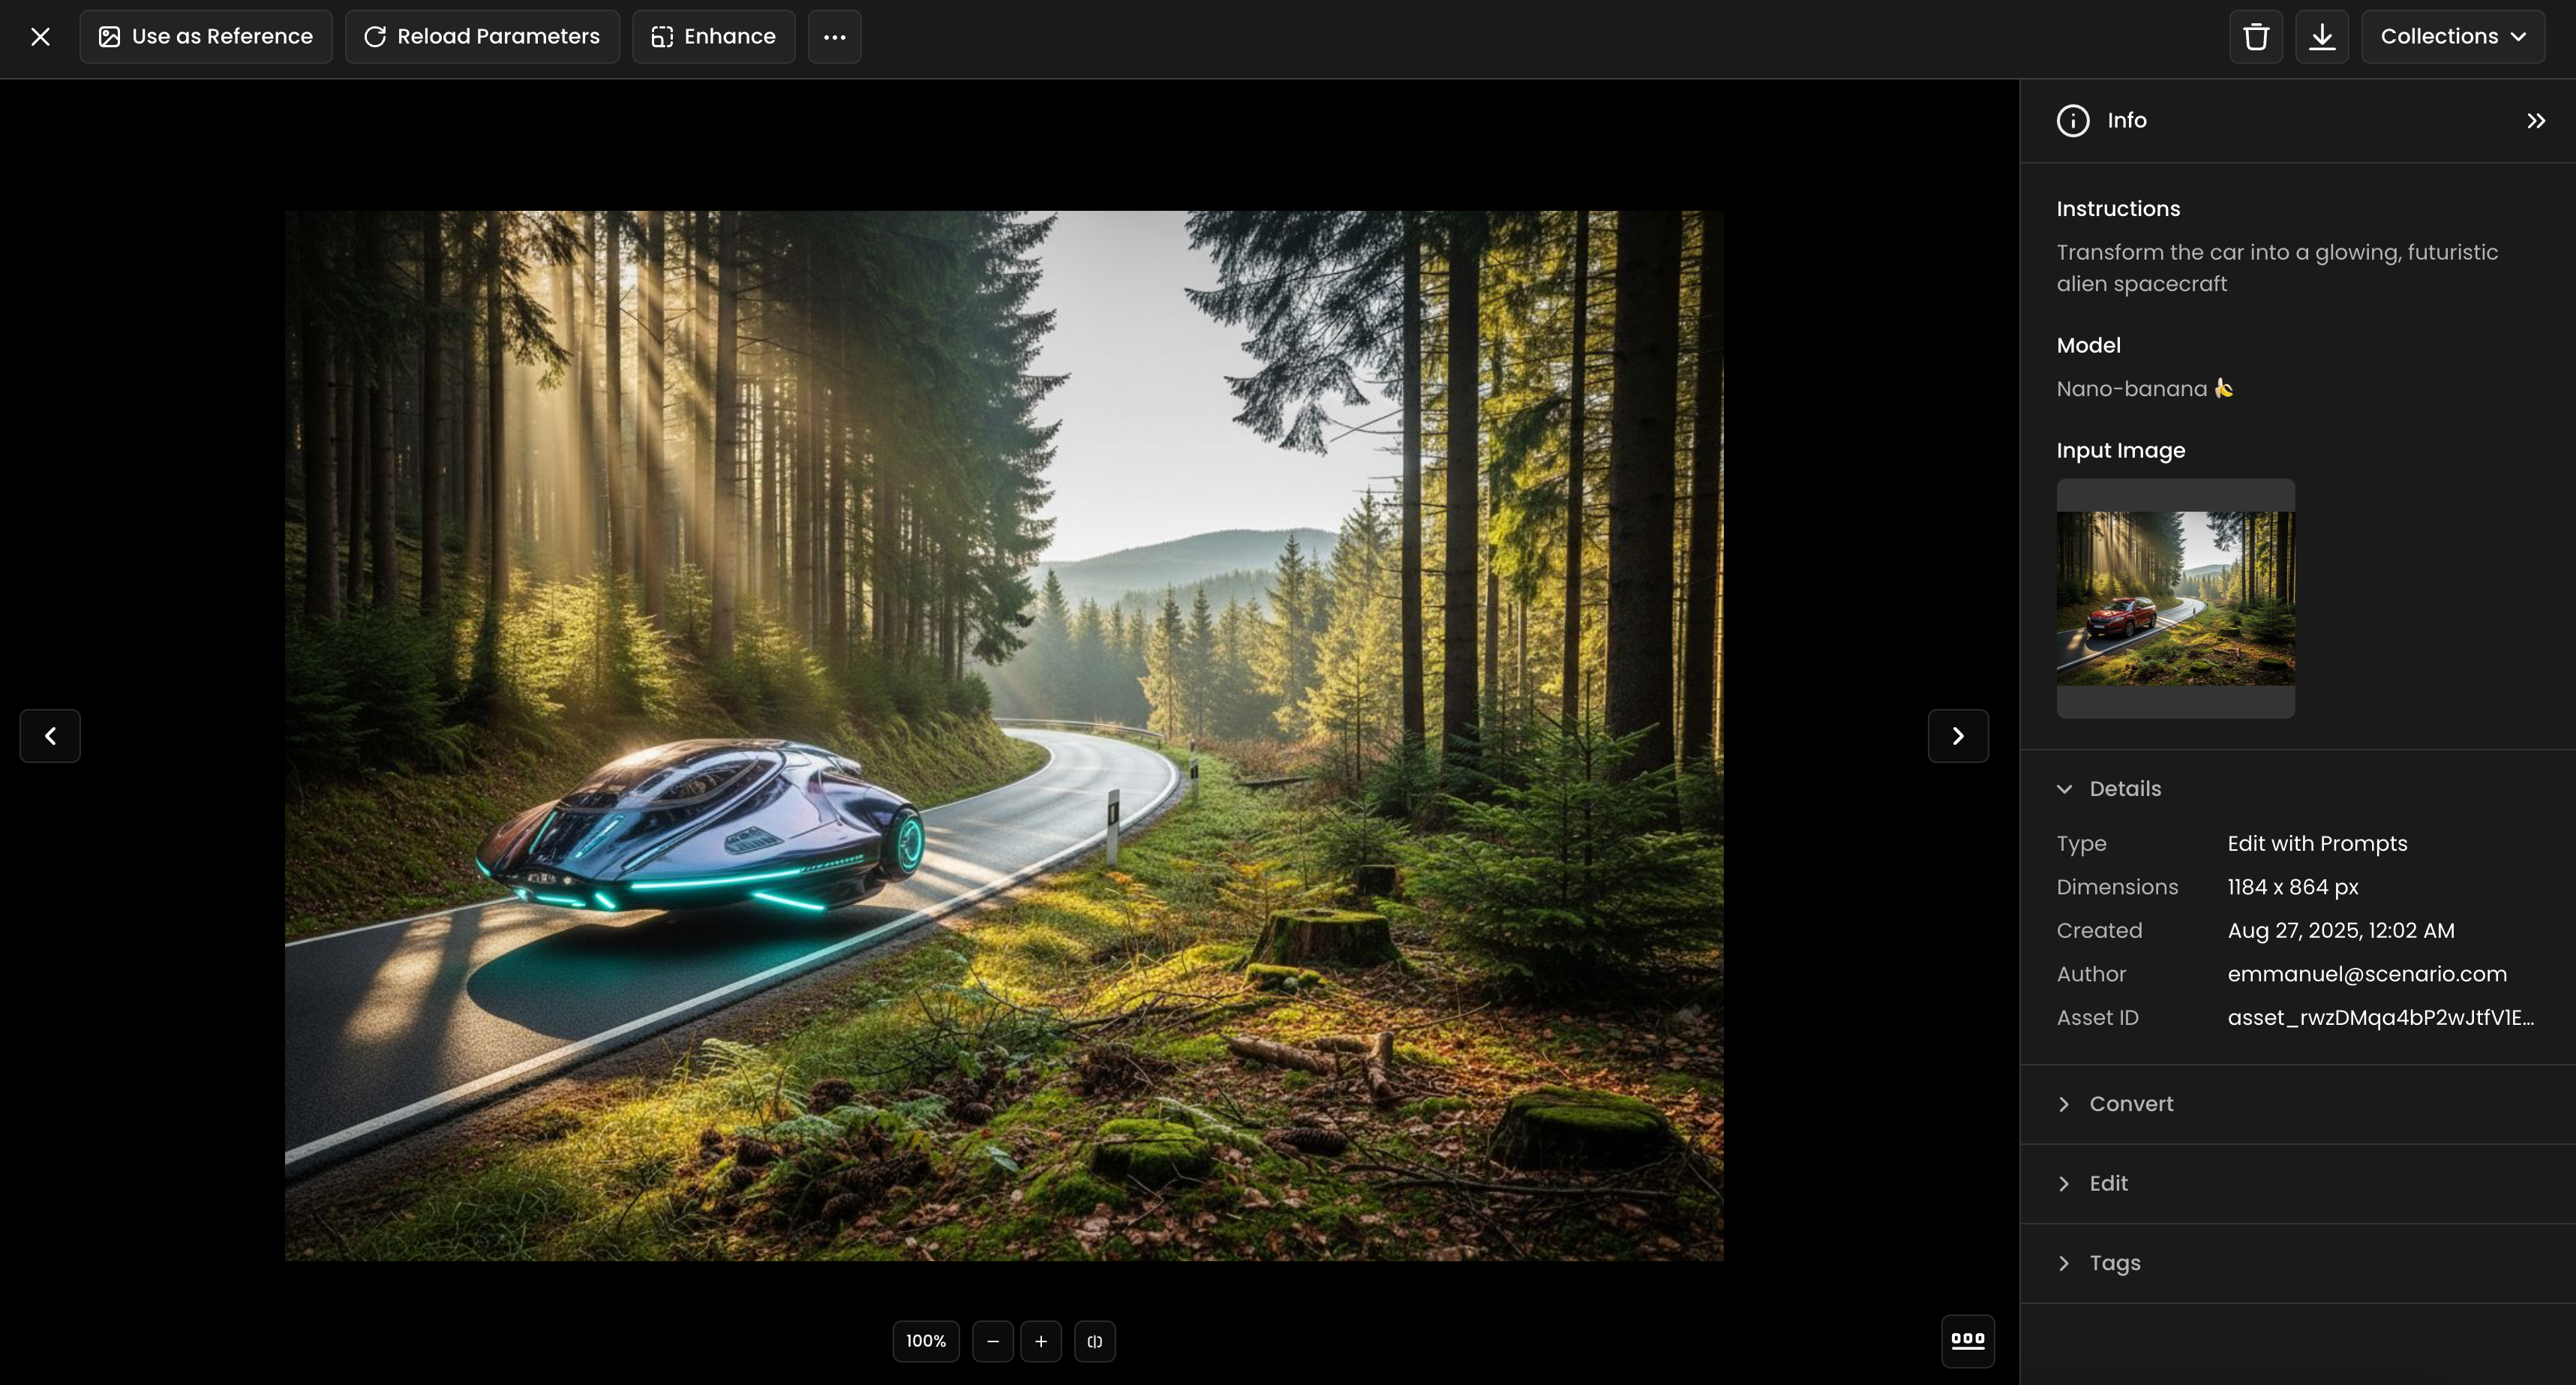
24. Vehicle to Sci-Fi Transformation
Convert everyday vehicles into futuristic or fantasy variants with advanced technology, energy effects, and design modifications that maintain recognizable vehicle functionality while adding speculative or fantastical elements. This includes propulsion systems, energy signatures, and technological details that suggest advanced capabilities.
Use Case: A regular car on a forest road is transformed into a glowing, hovering alien spacecraft with advanced propulsion effects.
Prompt: "Transform the car into a glowing, futuristic alien spacecraft"
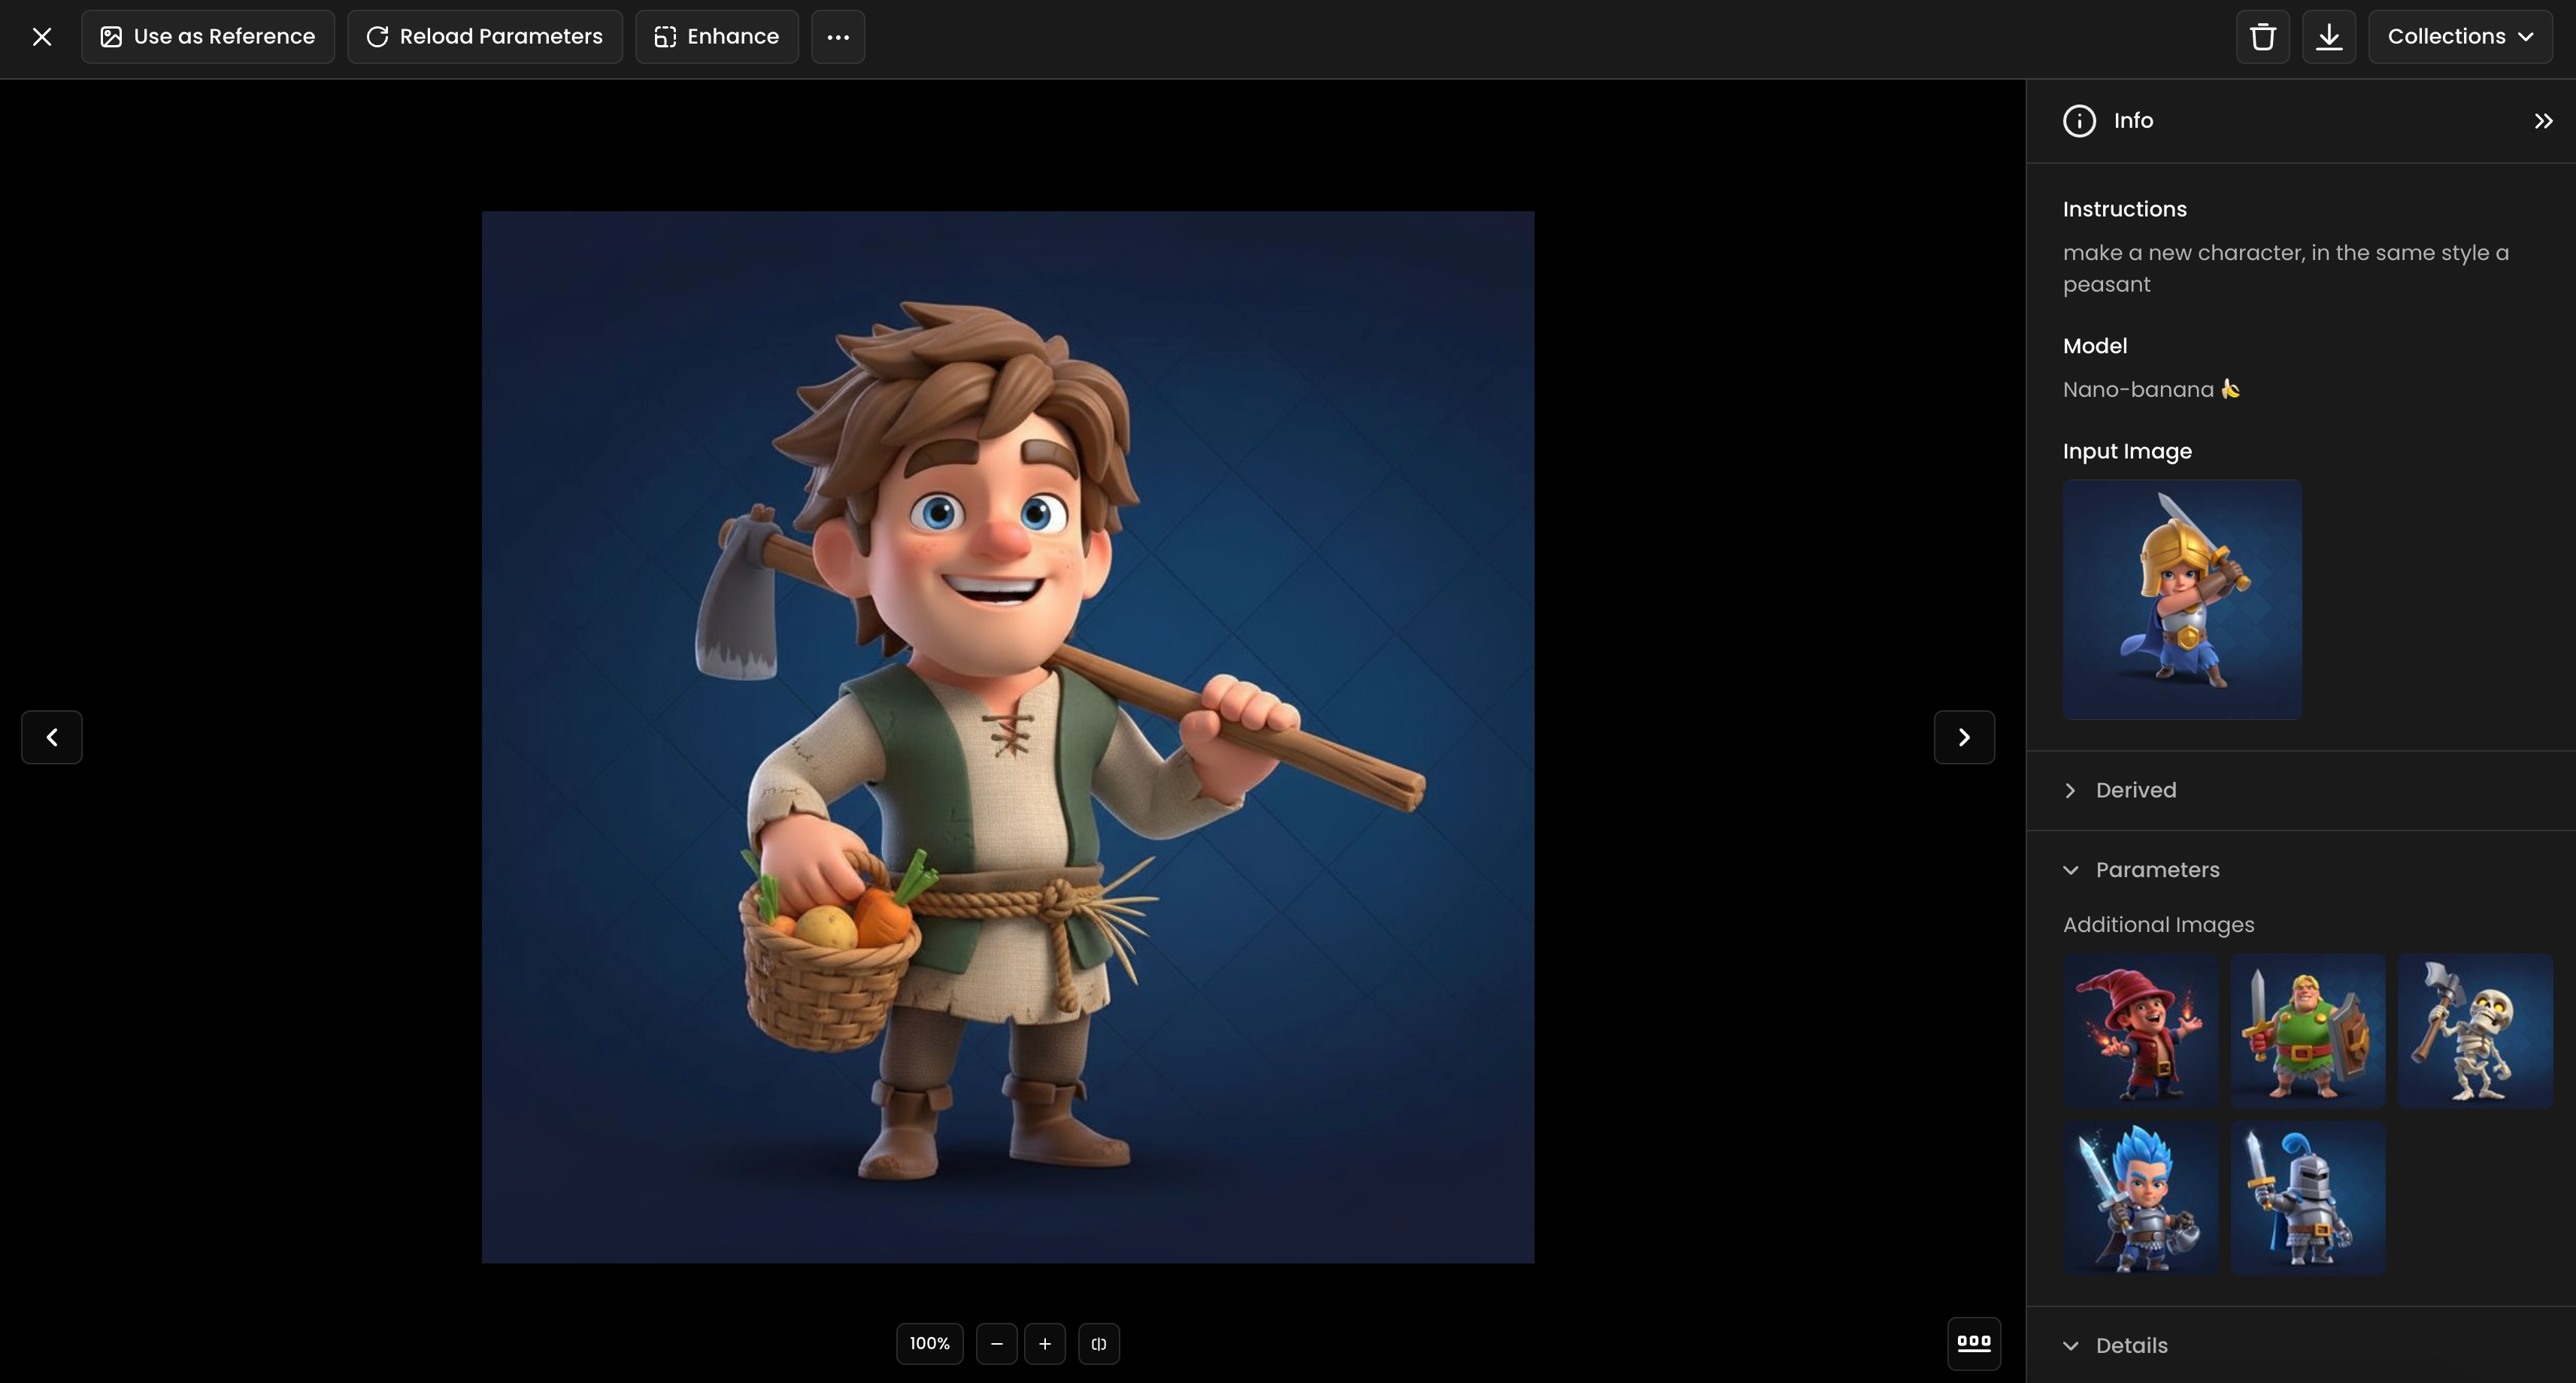
25. Character Creation Using Style References
Generate new characters by analyzing and synthesizing style elements from multiple reference images, extracting artistic DNA like proportions, color theory, shading techniques, and design philosophy to create characters that feel authentically part of established visual universes.
Use Case: A peasant character is created using the same artistic style as reference character images, complete with appropriate clothing and tools.
Prompt: "make a new peasant character, in the same style"
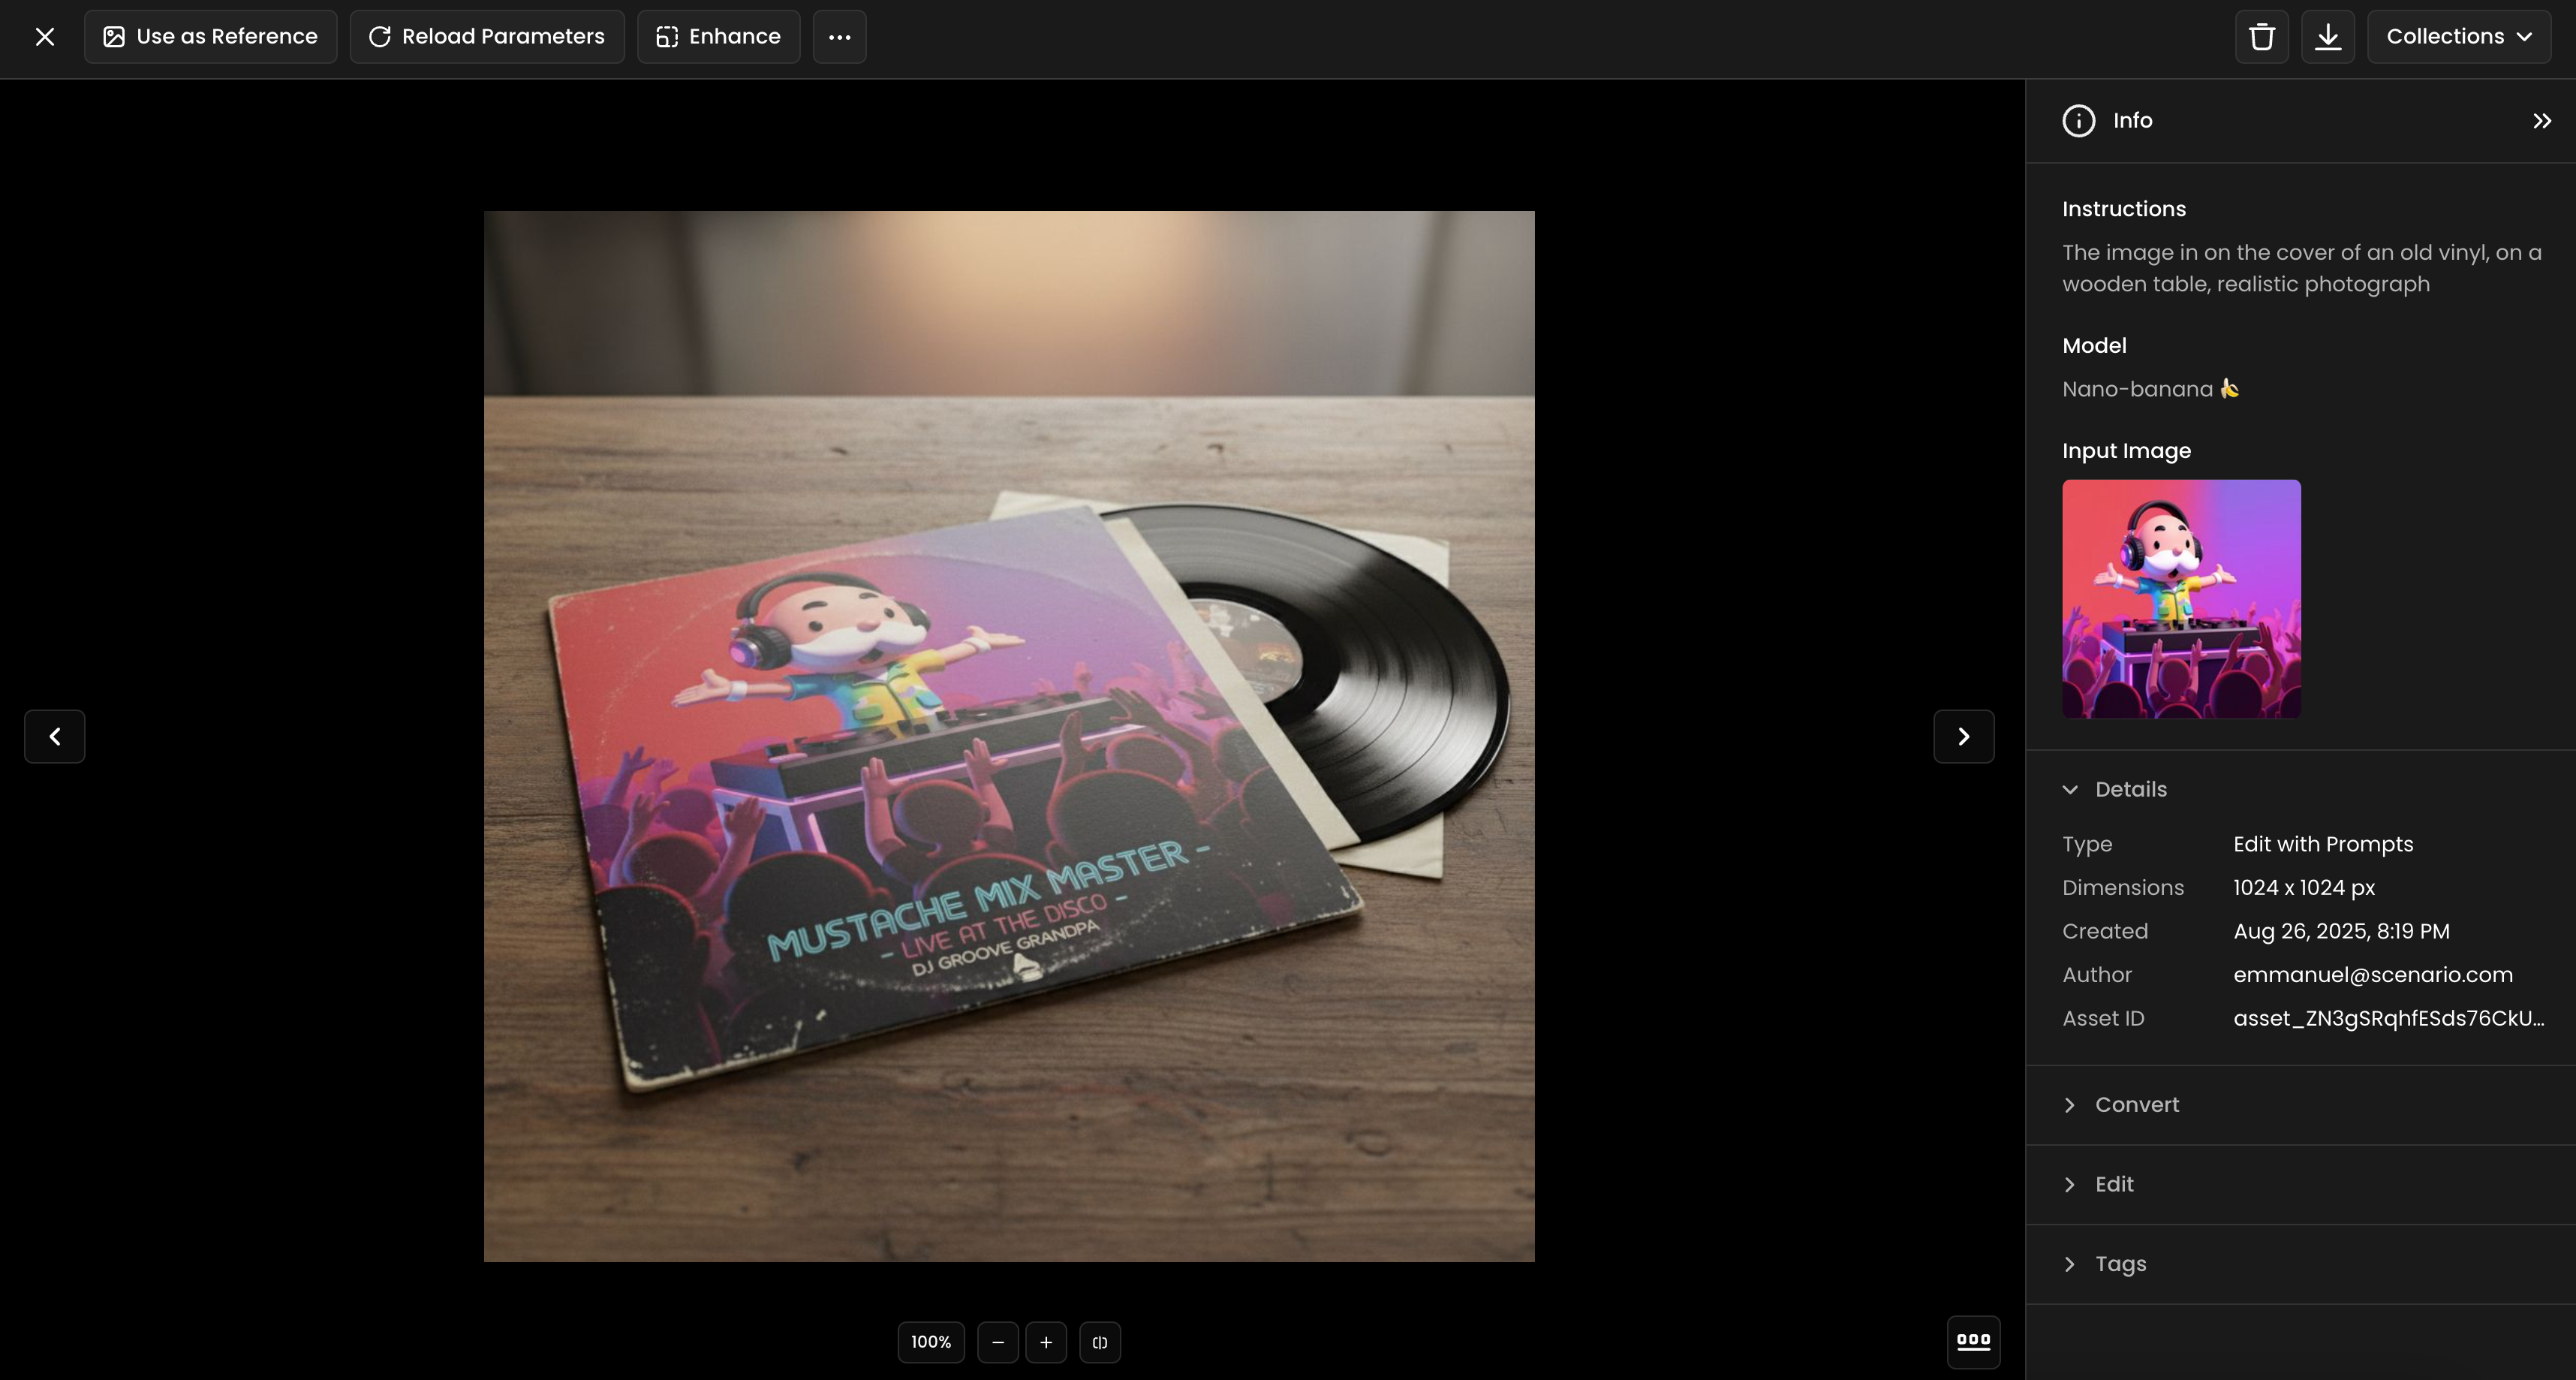
26. Digital Art to Product Mockup
Place digital artwork onto realistic physical products and environments to create authentic product visualization and marketing materials, including proper perspective, lighting, surface reflections, and environmental integration that makes digital art appear as tangible merchandise.
Use Case: A character illustration is placed on an old vinyl record cover sitting on a wooden table as a realistic photograph.
Prompt: "The image in on the cover of an old vinyl, on a wooden table, realistic photograph"
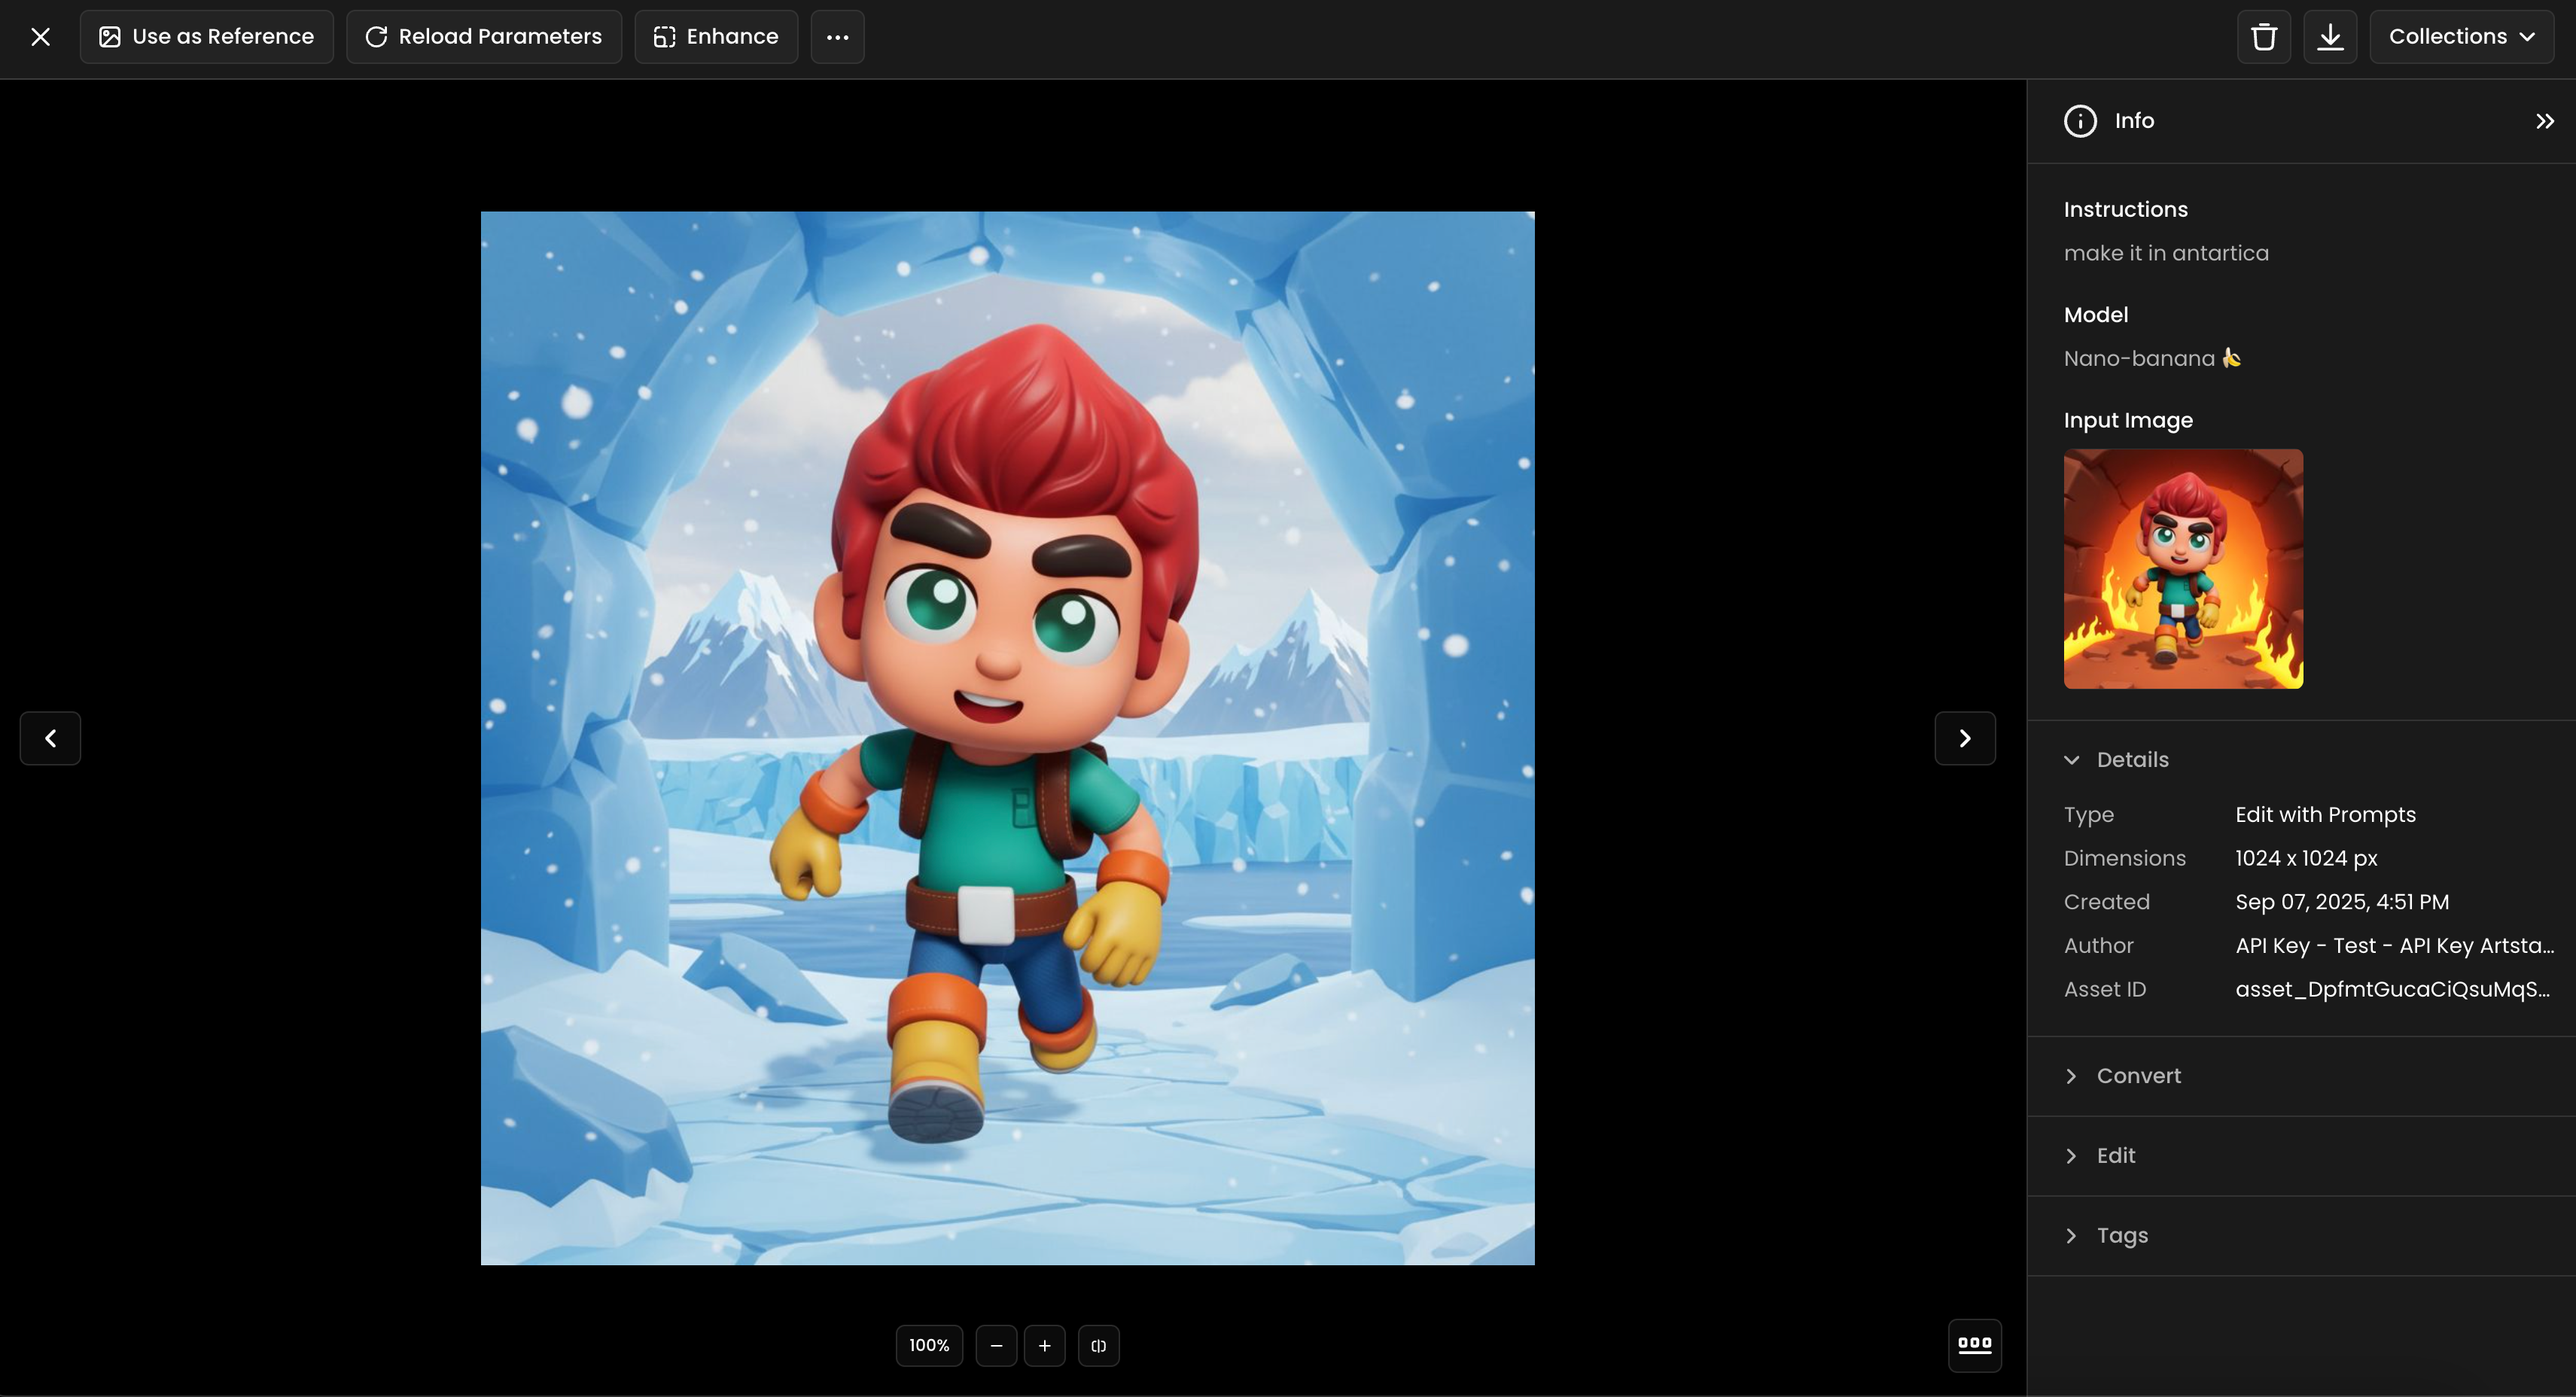
27. Background Transformation
Replace entire environmental contexts while maintaining proper character lighting, scale relationships, and atmospheric integration, ensuring characters appear naturally placed in new settings rather than artificially composited. This involves matching lighting conditions, adjusting shadows, and adding environmental effects.
Use Case: A character is moved from a fiery, volcanic environment to the frozen landscape of Antarctica with appropriate environmental effects.
Prompt: "Make it in Antartica"
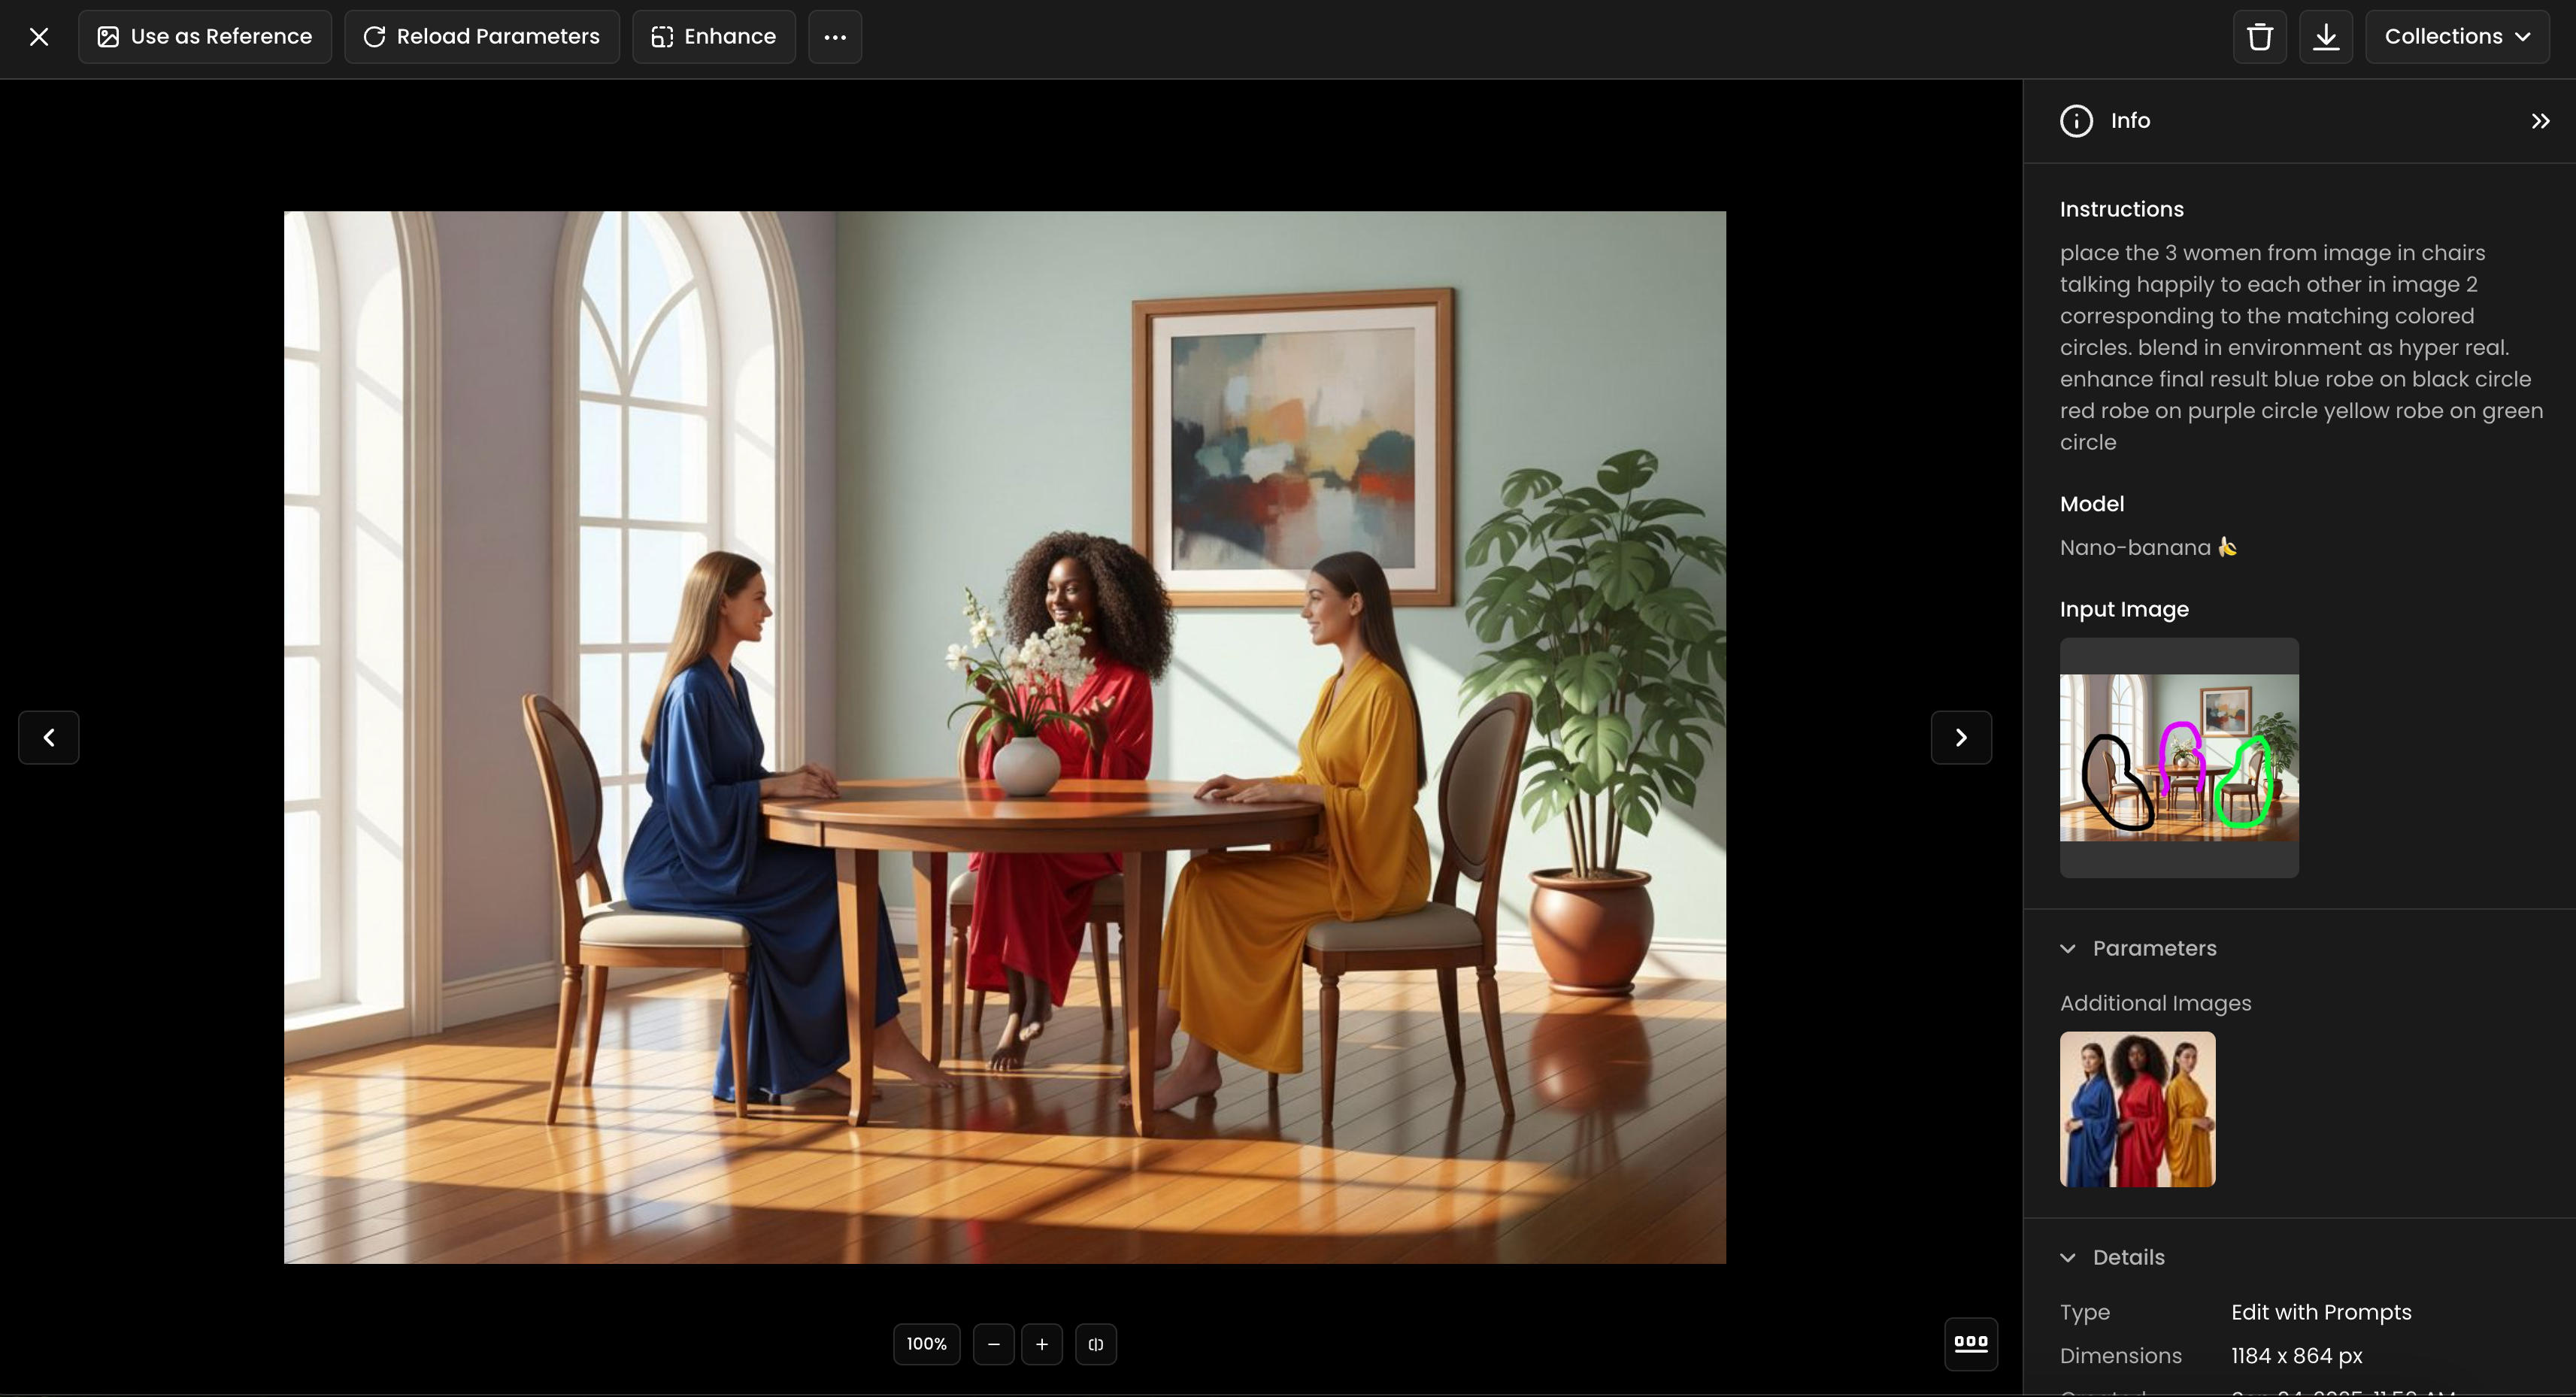
28. Multi-Person Scene Arrangement
Orchestrate complex social scenes with multiple people positioned according to specific spatial relationships, social dynamics, and visual composition rules while maintaining natural body language and realistic interpersonal spacing. This includes coordinating eye contact, gesture relationships, and environmental interaction.
Use Case: Three women are positioned in chairs having a conversation, with each person corresponding to specific colored circles for precise placement control.
Prompt: "place the 3 women from image in chairs talking happily to each other in image 2 corresponding to the matching colored circles. blend in environment as hyper real. enhance final result blue robe on black circle, red robe on purple circle yellow robe on green circle"
29. Sketch to Colored Render
Transform line drawings and sketches into fully realized colored artwork with professional lighting, detailed textures, and dimensional depth that brings flat illustrations to life while preserving the original artistic intent and compositional structure of the source sketch.
Use Case: A black and white line drawing of a fantasy creature is transformed into a full-color 3D render with dramatic lighting and detailed textures.
Prompt: "Colorize this sketch, in a 3D render style"

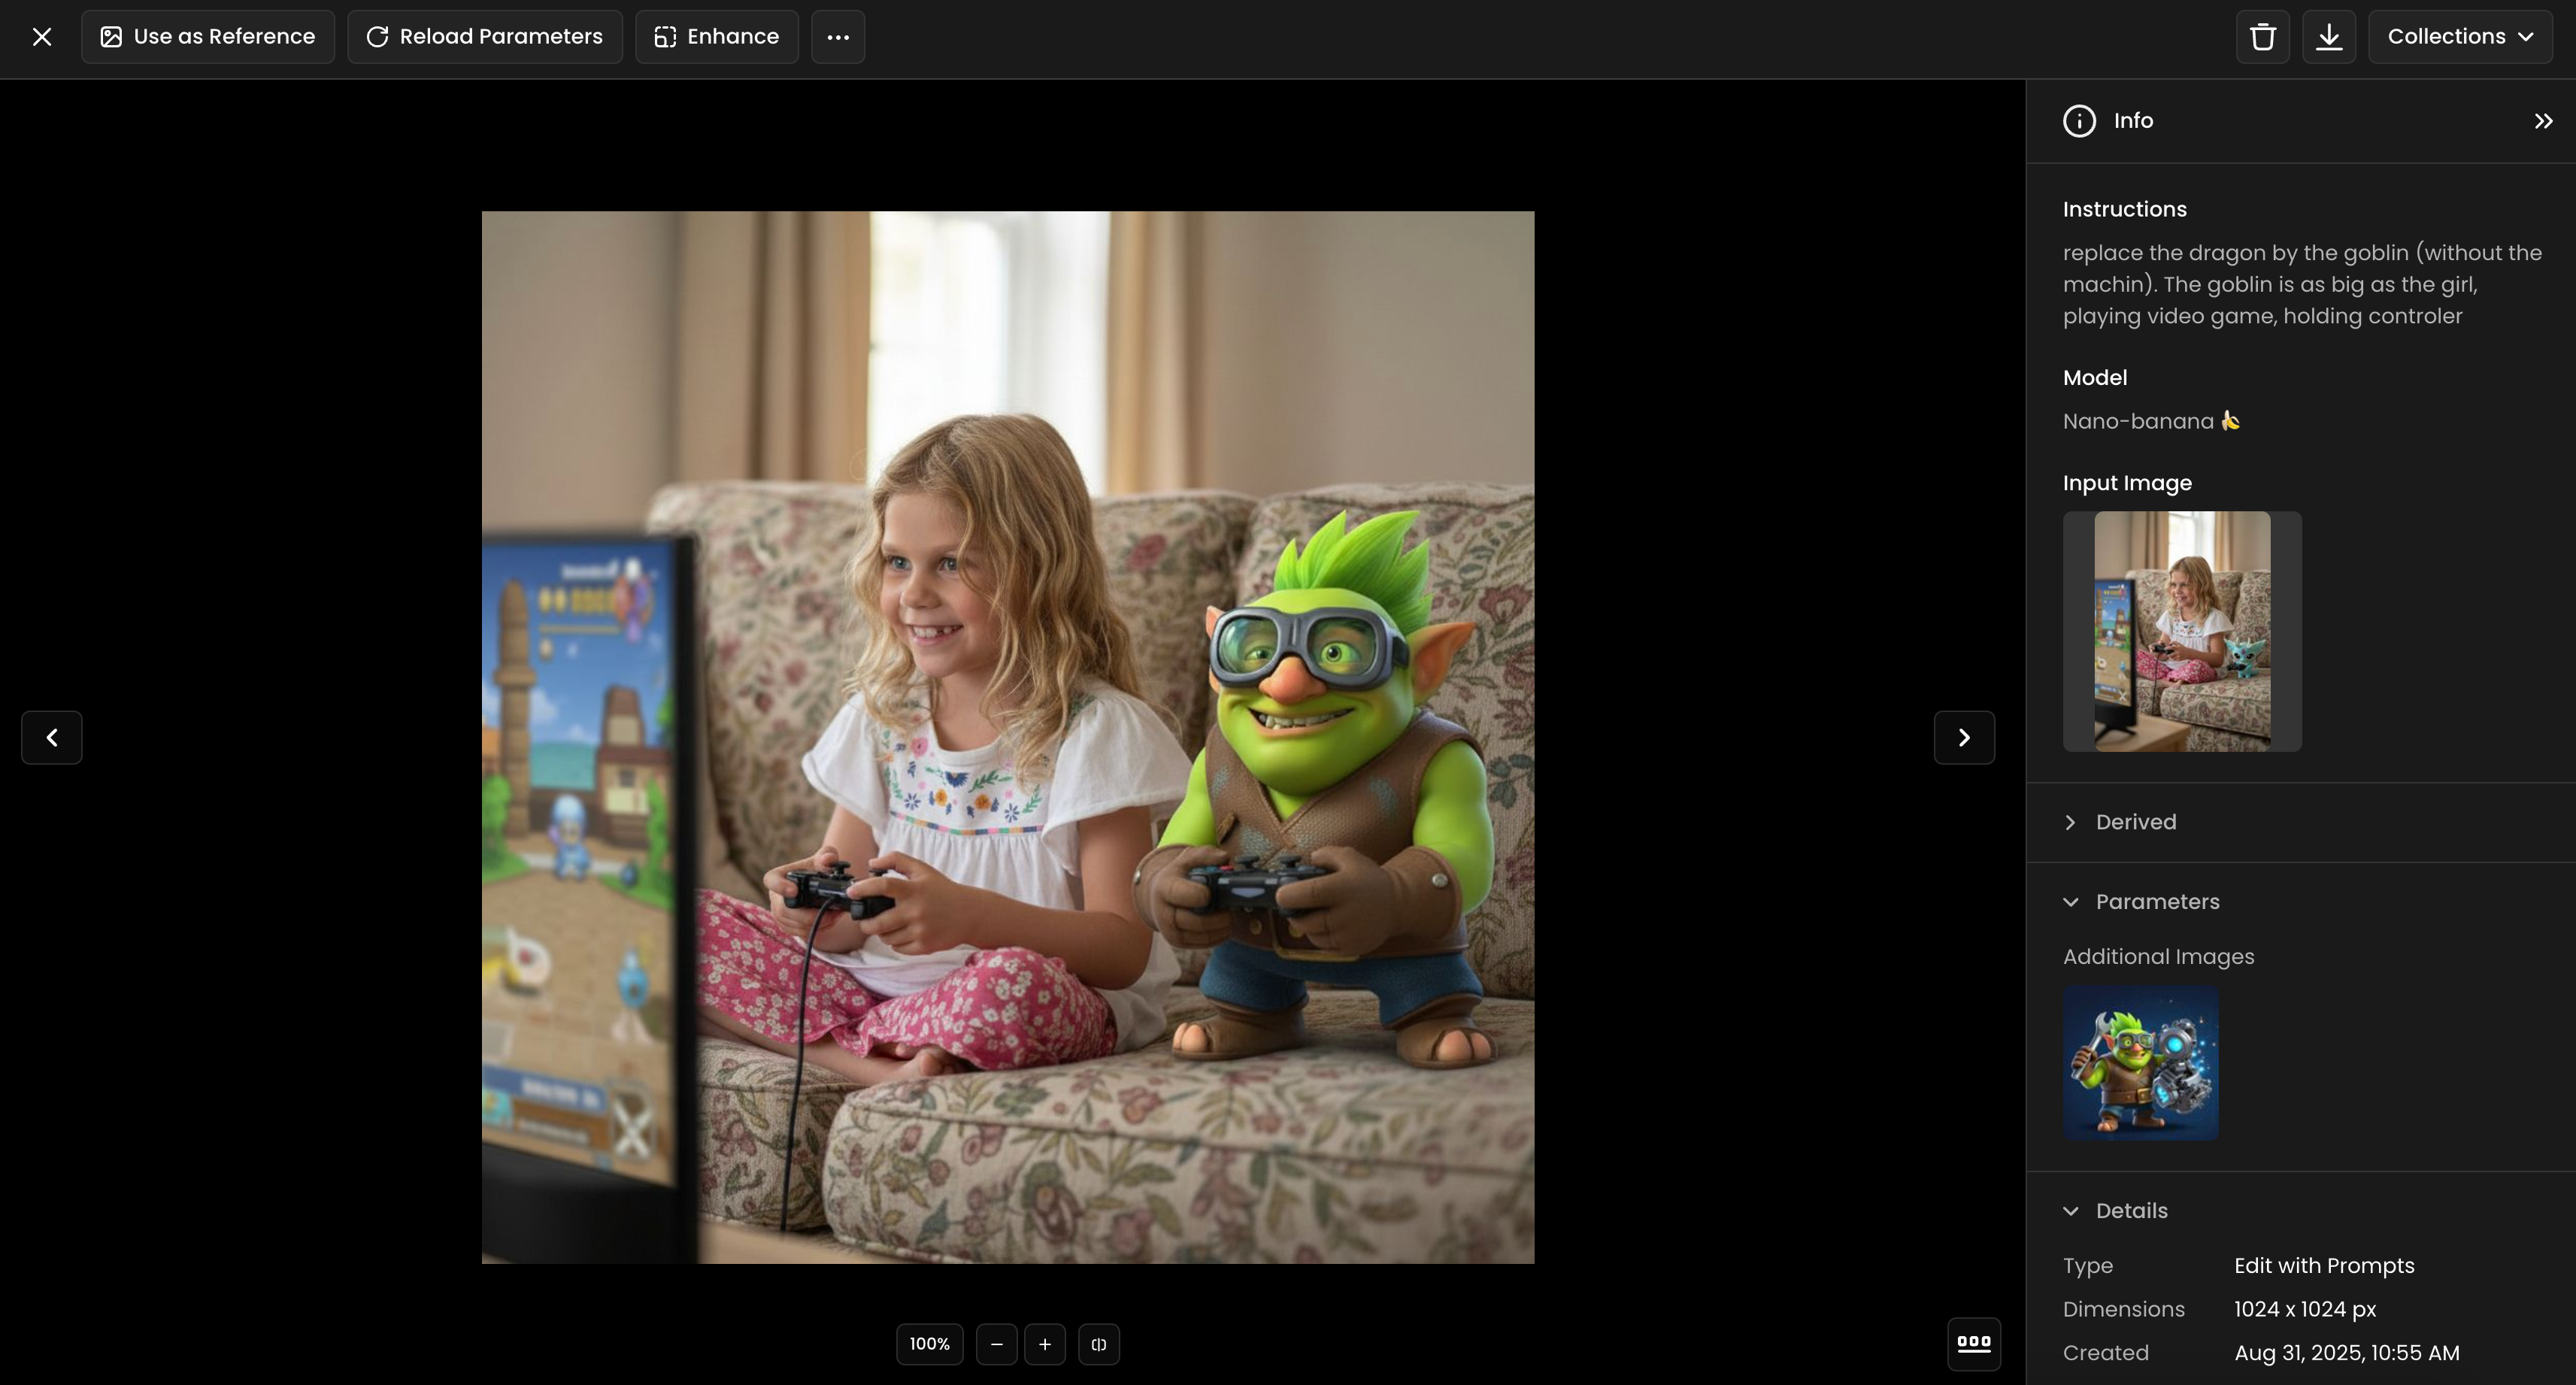
30. Character Replacement
Replace one character with a completely different character while maintaining scene composition, lighting consistency, and natural interaction dynamics between remaining elements. This technique involves understanding spatial relationships, scale proportions, and environmental integration to ensure the new character appears as if they were always part of the original scene rather than artificially inserted.
Use Case: A dragon companion is replaced with a green goblin character of similar size, both characters holding game controllers and maintaining the same gaming activity.
Prompt: "replace the dragon by the goblin. The goblin is as big as the girl, playing video game, holding controller"
Conclusion
By combining Scenario’s intuitive interface with the power of Nano Banana (Gemini 2.5 Flash Image), you can perform sophisticated image edits with simple text instructions. Nano Banana’s ability to add, remove and modify elements while maintaining overall coherence makes it the go‑to choice for artists, designers and hobbyists seeking efficient, high‑quality edits. Experiment with prompts and discover how this model can elevate your creative projects.
Was this helpful?