Expand Your Images with AI: Seamless Outpainting in Scenario
Last updated: April 9, 2026
Introduction
Expand is Scenario’s dedicated outpainting tool, designed to break the boundaries of your original canvas. It allows you to intelligently extend your images, generating new content that perfectly matches the lighting, style, and character consistency of your original work.
Use Expand to unlock greater creative freedom, giving you the extra room needed to crop, reframe, or adapt your art for any digital format.
When to Use Outpainting
In AI generation, the perfect composition doesn't always happen on the first prompt. Whether your subject is positioned too close to the edge or you need to shift the focus, outpainting provides the solution.
It is the ideal workflow for:
Aspect Ratio Adaptation: Seamlessly convert square images into cinematic wide-screens or vertical formats for mobile and social media.
Environmental Storytelling: Build out more background detail to add depth and scale to your scenes.
Fixing Tight Crops: Save an "accidental" close-up by generating the missing parts of a subject or landscape.
Video Workflow Prep: Create extra "padding" around your subjects to allow for camera pans and movement when using AI video tools.
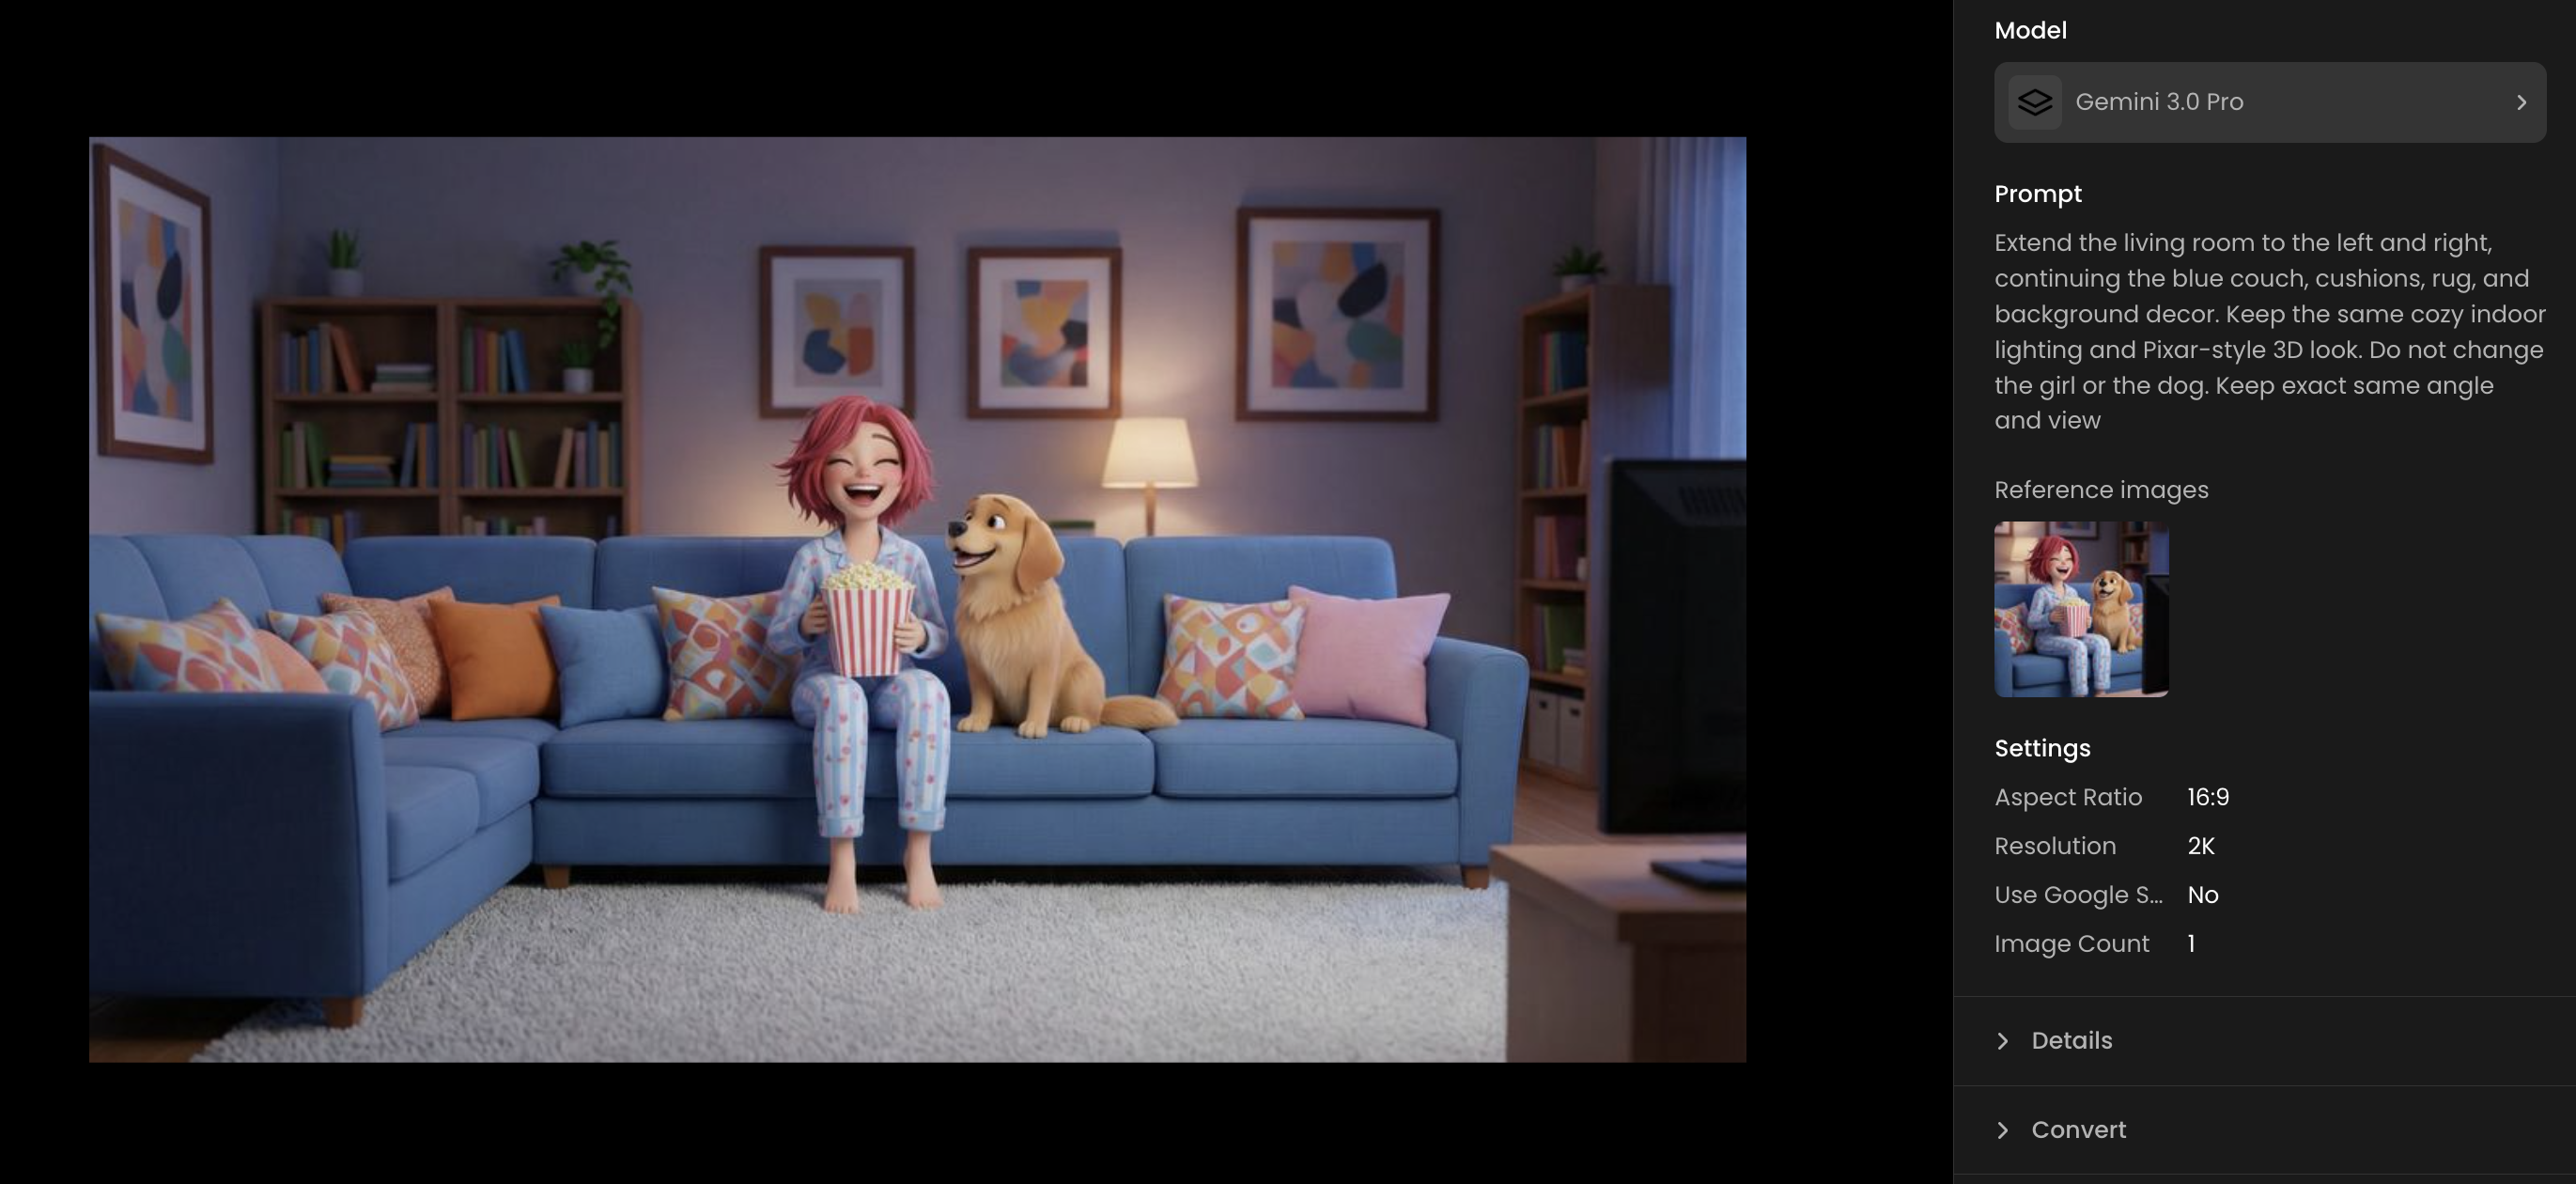
Method 1: Gemini Reframe (Recommended)
Gemini Reframe is the fastest and most advanced way to outpaint in Scenario. It uses the Gemini 3.0 Pro Image model to intelligently understand the context of your image and generate high-fidelity extensions.
How to use Gemini Reframe:
Select Your Image: Open an image from your gallery or upload a new one.
Choose Your Aspect Ratio: In the Gemini Reframe settings, select your desired output ratio such as 16:9, 9:16, or 4:3.
Refine with Prompts: You can add a text description to guide the new content. For example, if you are expanding a forest scene, you can specify "add more pine trees and misty mountains in the background."
Generate: Click the generate button. Gemini will analyze the existing pixels and build out the new areas with matching lighting and style.
For more details on what this model can do, see our guide on Gemini 3.0 Pro Image - The Essentials.
Method 2: Standard Expand Tool
The standard Expand tool provides granular control over the placement of your image within the new canvas. This is best for precise adjustments to scale and overlap.
You Can Access Expand - Two Ways:
From an Existing Image
Open an image in your Scenario library or generation screen (or even via the search menu), click the three-dot menu (ellipsis) in the top-right corner of the thumbnail, and select "Expand."
From the Main Scenario menu (to the left)
Navigate to the left sidebar (or click “m”). Under the "Image” section, click "Expand." Once the Expand screen is loaded, simply upload an image or pick one from your Scenario library to begin. You can also drag and drop an image to serve as an input, either from your computer or from the gallery to the left.

Expand: Interface
Once an image is loaded, three distinct areas appear in the image section:
Core Area: Stays unchanged, but acts as a reference for the added content (especially the style).
Chessboard Area: The empty space where new content will be created, adjustable to your preferred size.
Overlap Area: A highlighted mask between the two other areas, indicating where blending occurs on your original image. The content within this overlap area will be altered during the outpainting process.

Key Settings in Expand
Expand offers a variety of settings to shape your output, giving you control over the generation process and ensuring the added content stays consistent. Here’s how to set it up for the best results:
Step 1 Upload or Select Your Image
Start with a high-quality image (ideally 1024x1024 pixels or higher) for optimal detail retention.
Adjust Input Location
Decide where your original image sits within the expanded canvas; center, top/bottom or left/right. This frames your starting point and leaves the rest of the area for outpainting.
Set the Output Scale
Output Scale defines the size of the output image. As you adjust the output scale, the exact new dimensions of the output will appear live under the image. A larger scale (e.g., 200) creates more new content, while a smaller scale (e.g., 120) keeps extensions subtle. Preview the canvas to ensure it aligns with your goal. There are maximum output dimensions (2048x2048 for a square ratio, for instance). Scenario will automatically adjust settings to keep the output within the maximum dimensions.
Choose an Aspect Ratio
Select a predefined aspect ratio (e.g., 1:1, 16:9, 4:3) from the dropdown to match your project’s requirements.
Adjust Input Scale
Resize your original image within the expanded area using the input scale setting. Shrink it to emphasize new content or enlarge it to maintain its dominance in the final output. When modifying output scale, input scale will also automatically adjust.
Adjust the Overlap Setting (Important)
Adjust the overlap slider to control the size of the mask. A larger overlap (e.g., 30–50%) smooths transitions by blending more of the original image into the new content, reducing visible edges.
Inference Steps
20 is the recommended default. Inference steps balance speed and quality. For more detailed outputs, increase the steps, but it will take longer and consume more credits.
Seed (Optional)
Enter a specific seed value to replicate results across generations. This ensures consistency when iterating or sharing workflows. Leave it random for creative variation.
Write an Effective Prompt (Important)
You can craft a prompt to guide the outpainted content (that will be created in the chessboard area). You’ll find several options:
First, when loading a Scenario-generated image to Expand, the prompt will automatically load with the prompt used to generate the image (if any).
If you have uploaded an external image, you can turn the reference image into a prompt by clicking “Turn your reference image into a prompt” (blue link in the prompt box).
Or you can craft your own prompt, e.g., “a sprawling desert with distant mountains” or “a cyberpunk cityscape with neon lights.” Start simple, then add descriptors (colors, mood, objects) for precision. Focus on what matters and what needs to be generated in the area.
Once you’re ready, click "Generate" to create your expanded visual. Review the results in the content panel to the left, where you can zoom, compare (hit “c”), or select it for further edits.

Practical Examples
Example 1: Expanding a Neon Samurai
Process: Select or upload your character image on the Expand page. Set the input location to the top, the new content will be generated to fill the surrounding empty areas, adjust the aspect ratio to 2:3 and scale the output to 120% with a 10% overlap.
Result: The expanded image now features a full body shot of the samurai in a vibrant, neon-lit street scene with additional background elements.

Example 2: Expanding a Serene Mountain Landscape
Process: Select or upload your scenic image on the Expand page. Set the input location to the center, the new content will be generated to fill the surrounding empty areas, adjust the aspect ratio to 1:2 and scale the output to 100% with a 10% overlap.
Result: The expanded image now features a wider view of the serene mountain landscape with two Buddha statues, enhanced by a vibrant sunset, prayer flags, and additional path details.

Example 3: Making assets for mobile vs. tablet
Process: Select or upload an image of your game asset on the Expand page. To create a vertical composition, adjust the aspect ratio to 9:16 and generate the image. Then, to produce a horizontal format, simply change the aspect ratio to 16:9 and generate again, allowing new content to fill the surrounding areas in each format.
Result: The expanded image now presents the superhero team in a vertical and horizontal layouts, showcasing a the cityscape background with all the building details, preserving the vibrant colors and poses of the characters

Troubleshooting Unsatisfactory Results
The expanded (outpainted) image might display some defects like visible edges at the boundary of the mask, or the expanded content might not meet your expectations. In these cases, you might want to adjust these elements to improve the outcome:
(i) Adjust Parameters, especially the Overlap Area
If transitions look jarring or seams are visible, increase the overlap setting (e.g., from 15% to 30%) to blend more of the original image into the new content. Experiment with output scale or input location if the expansion feels unbalanced.
(ii) Adjust the Prompt
If the new content doesn’t match your goal, you might need to refine your prompt. Make it longer and more detailed (e.g., “a dense jungle with tall vines, misty air, and glowing flowers”) for clearer guidance, or shorten it (e.g., “a quiet meadow”) to leave more creative freedom to the AI. Use Prompt Spark (sparkle icon) to rewrite it if needed.
After tweaking settings or the prompt, generate again. Compare results side-by-side in the content panel to identify what works best, and you can reuse the prompt or parameters from the three-dot menu as needed.
Ensure that the output asset has dimensions equal to or greater than the original in either width or height. You cannot use "Expand" to reduce the size of an image.
Integrate Expand into Your Workflow
Expand integrates seamlessly into Scenario’s toolkit, allowing you to combine it with other features into versatile creative workflows like these (among others):
Improve Image Quality: After expanding an image, use "Enhance" to boost resolution and sharpen details. Use Style Images for even more refined results tailored to your style (link)
Refine Details: Click "Retouch" to launch the Scenario Canvas, where you can inpaint (add or remove) elements using specific custom-trained models.
Use as Reference (Image-to-Image): Apply your expanded image as a reference with a custom model to guide further generations.
Don’t forget to tag or save your expanded image to a Collection for quick access and smooth team collaboration.