Generate Character Turnarounds
Last updated: April 9, 2026
Note: Newer Workflows Available
The Character Turnaround workflow described in this article remains fully functional. However, for improved efficiency and consistency, we now recommend using newer models and dedicated tools.
Models like Nano Banana Pro and Seedream 4.5, as well as the dedicated True 4 Pose app, often achieve similar or better results with fewer steps, simplifying the process of creating consistent multi-view character sheets.
Recommended Guides:
- Gemini 3.0 Pro Image: The Essentials
- Seedream 4: The Essentials
👉 Access the True 4 Pose app here
👉 Access the Flux Kontext Turnaround model here
Introduction
This guide walks you through creating professional character turnarounds in Scenario, allowing you to create multiple views of your characters while maintaining style consistency, and without manually drawing each view.

Option 1: Edit with Prompts (Nano Banana or GPT)
You can create character turnarounds using Edit with Prompts, powered by Nano Banana (aka Gemini 2.5 Flash Image), Flux Kontext or GPT. This approach is perfect when you already have a base character image and want to quickly generate consistent alternate views without re-drawing the character.
How it works:
Open your base character image in Canvas and select Edit with Prompt.
Write a precise instruction, such as: "Generate the same character in a side profile, keeping the outfit, proportions, and art style identical."
The AI will analyze the original image and your prompt to produce the requested new angles while maintaining stylistic fidelity.
Repeat the process for front, side, and back views to build your full turnaround sheet.
When to use:
You already have at least one strong reference image for your character.
You want a faster turnaround creation process without complex pose setups.
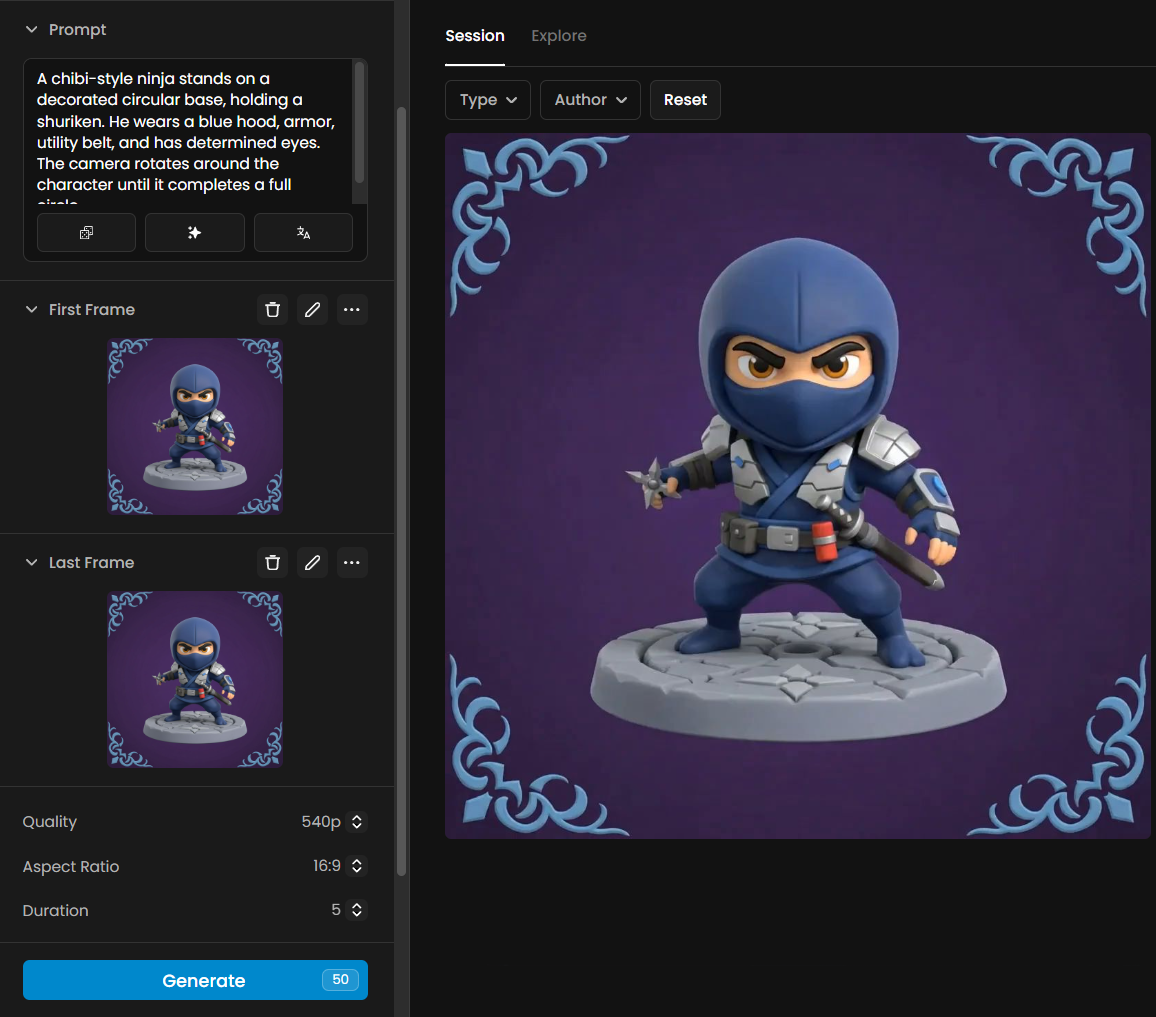
Option 2: Pixverse v5 (video model) with 360º Microwave Effect
If you want a cinematic, fully rotatable view of your character, try Pixverse v5 with the 360º Microwave effect.
This video-based generation approach creates a smooth rotation around your character, from which you can capture still frames for your turnaround.
How it works:
Start with a high-quality reference image of your character.
In the Video Generation tool, select Pixverse v5 as your model.
Go to Settings > Effects and apply the “360º Microwave effect“ setting to create a rotating camera movement around your subject.
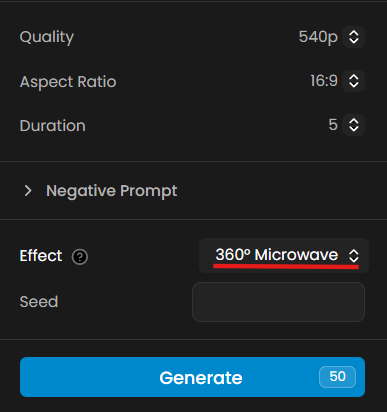
Generate the video.
Tips for best results:
If the rotation looks unstable or shows deformations, edit your prompt. Its also recommended to use 5 seconds duration.
This effect produces better results at 720p or 1080p resolution.
When to use:
You want aligned camera angles across all views.
You prefer a more automated approach to generating multiple perspectives.
You want both stills and a dynamic 360° video for presentations or marketing.
Option 3: Use Custom-Trained Models
Navigate to Images > Generate in your Scenario dashboard to access the image generation interface. Before generating a turnaround, decide if you want to work with a character model or style model.
A character model is trained to recognize and reproduce the same character across different views, ensuring consistency in facial features and outfits.
A style model applies a particular look but does not guarantee that defining features remain the same in every pose.
If your goal is to create turnarounds for the same character, using a custom character model is the best choice. If you only want a general character in a certain aesthetic, a style model will work. From there, you have various options:
3.1 - Sketch Your Own Reference (Image-to-Image Mode)
If you don’t have a turnaround reference, you can create one directly inside Scenario:
Sketch a rough outline of the character in different poses, such as front, side, and back. The drawing doesn’t need to be detailed.
Apply the sketch as a Reference Image and adjust the Image-to-Image influence slider to control how closely the AI follows the sketch. A higher value keeps the structure more rigid, while a lower value allows for some AI interpretation.
Select your custom character model to ensure consistency in identity and features.
Adjust your prompt to describe your character's appearance and actions. For example: "Character sheet of a light brown-skinned boy with dark hair and brown eyes, wearing a red hoodie over a teal shirt with a white pixel skull, dark jeans, and black sneakers, front view arms raised, back view hands on hips.”

3.2 - Upload a Reference Image
If you already have a turnaround reference, upload it directly instead of sketching one. For structured turnarounds, a grid-style reference with front, side, and back views works best. Using a reference, whether sketched or uploaded, gives the AI a structural foundation for generating accurate turnarounds.

3.3 - Activate ControlNet Pose Mode
For turnarounds that require precise pose consistency, enable ControlNet - Pose Mode before generating images. This ensures that each angle maintains the correct structure and proportions.
ControlNet helps prevent unwanted variations, ensuring that all views align properly. It works best for structured, realistic poses but can also be adjusted for more stylized or exaggerated designs. If certain features shift too much between poses, tweaking the pose influence settings will help maintain better control.

3-4: Enter Your Prompt
A well-structured prompt enhances accuracy and consistency. Organize your prompt into three key sections:
Style (Optional): Define the artistic approach, such as "Stylized 3D," "Anime," or "Realistic."
Character Description: Detail the character's key features, for example: "A man wearing a futuristic exosuit armor with glowing blue accents, short dark hair, and a stern expression."
Technical Description: Guide the AI in generating a turnaround, for instance: "Character design sheet with multiple views (Front, Side, and Back views), consistent lighting across all views."
Example prompt: "Stylized 3D, A man wearing a futuristic exosuit armor with glowing blue accents, short dark hair, and a stern expression. Character design sheet with multiple views (Front, Side, and Back views), orthographic camera, consistent lighting across all views."
3.5 - Generate and Refine the Turnaround
Once you’ve set up your reference image, prompt, and model, generate the turnaround and carefully review the results. Pay close attention to proportions, facial features, clothing details, and pose alignment across different views. If the poses appear inconsistent, such as differences in height or body proportions, adjust the ControlNet strength to enforce pose accuracy.
If certain features like facial structure or accessories vary too much between views, select the most accurate output and click "Use as Reference." Then, generate a new version while keeping the Image-to-Image influence high to reinforce consistency. If needed, repeat this process, always selecting the best result as the new reference, until the differences are minimized.
For complex designs, it's best to generate each pose separately. Start with the front view, refine it, and then use that output as a reference when generating the side and back views.
This method ensures that defining features remain stable and prevents unwanted variations between angles.

3.6 - Using Scenario Canvas for Final Adjustments
Once the turnaround is generated, the Canvas allows for precise refinements.

If small inconsistencies appear between views, such as slight facial changes, or variations in outfit details, these can be corrected using masking and inpainting tools. Focusing on specific areas like facial features or hands helps ensure everything stays aligned.
Using Canvas for targeted corrections is particularly useful for polishing final details and ensuring that all poses match visually before exporting the turnaround.

3.7 - Finalize with Scenario Enhance
Complete your turnaround by increasing quality and resolution:
Use Scenario Enhance to upscale your final character sheet (2x to 16x depending on your needs).
Choose Precise Presets or high Image Fidelity settings to maintain clean edges and detailed textures without introducing unwanted creative changes.
This step is especially important for professional-grade character sheets that might be used as reference by multiple artists or developers.

Additional Tips
The order of words in your prompt affects how the AI prioritizes details. Place the most important elements first for greater emphasis.
Experiment with different prompts and reference images to explore variations in design while maintaining the turnaround structure.
Keep pose influence high (70-100) for consistent turnaround alignment across different views.
For characters with complex details, consider generating each view separately and then compositing them together in Canvas for maximum control.
Final Notes
Character turnarounds created in Scenario provide valuable reference material for game development or concept art. By following this workflow, you can quickly generate consistent views of your character designs without the time investment of manual illustration.
Experiment with different styles and turnaround formats to discover what works best for your specific project needs. The combination of ControlNet and Scenario's editing tools offers a powerful pipeline for character design that balances efficiency with creative control.
Access This Workflow Via API
Image-To-Image Generation: Scenario API Documentation - POST /generate/img2img
ControlNet Generation: Scenario API Documentation - POST /generate/controlnet
Map Detection: Scenario API Documentation - POST /generate/detect
Inpainting Generation: Scenario API Documentation - POST /generate/inpaint