PartCrafter (Generate in Parts) - The Essentials
Last updated: July 9, 2026
PartCrafter is a structured 3D generative model that turns a single RGB image into multiple, distinct 3D meshes (parts) - all in one shot.
1 - What is PartCrafter?
PartCrafter is the first open-source, image-to-3D generative model that transforms a single RGB image into 2–16 separate 3D meshes, semantically meaningful, all in one step. It can produces explicit meshes suitable for further editing, animation, or 3D printing—no segmentation or manual intervention required.
Unlike existing “single-block” AI mesh generators, PartCrafter separates your input object into defined components it can recognize (such as arms, wheels, panels, etc). These parts are cleanly segmented, each with its own geometry.
PartCrafter is built on compositional latent diffusion transformers with hierarchical attention, enabling it to understand the microstructure of each part and the macrostructure of how parts fit together. It was trained on 130,000+ labeled 3D meshes with fine-grained part annotations, using datasets like Objaverse, ShapeNet, and ABO.
When you generate a model with PartCrafter on the Scenario web app, you'll see a preview of the 3D model with individual parts displayed in different solid colors. This visual representation helps you quickly identify and inspect the segmentation. Note that PartCrafter currently generates geometry only—no textures (as of 07/21/2025).
2 - Step-by-Step Guide
Getting started with PartCrafter is straightforward, whether you're new to 3D generation or an experienced Scenario user. Just like with other models, follow these few steps on the Scenario platform.
Access the Tool: Navigate to Create > 3D via the top bar menu, to open the generation interface. Click the model selector in the top-left corner and choose PartCrafter from the list (thumbnails).
Upload Your Image: Select or upload a single RGB image as your input. For the best results, refer to the tips in Section 4 on preparing your image.
Alternatively, if you already have an image in your Scenario library, click the three-dot menu on the image, select Convert to 3D, and choose PartCrafter.
Customize Parameters (Optional): Adjust the settings at the bottom left if needed (see Section 3 for details). It's best to start with defaults and tweak as you experiment.
Generate the 3D Model: Click Generate. Note that PartCrafter may take 3–4 minutes to process, depending on settings.
Review and Download: Once complete, preview the 3D model with parts color-coded for easy inspection. Download the .glb file, which contains the full structured mesh. Each part has its own properties, making it simple to select, modify, or animate in software like Blender.
3 - Parameters
You'll find these settings in the bottom-left panel of the interface. We recommend starting with defaults (or just adjusting the number of parts) before diving deeper. Here's a clear breakdown:
Setting What it does Recommended Use | ||
Number of parts | How many pieces to split your 3D model into | 6–12 is a sweet spot for most cases. Try fewer for simple subjects, more for complex ones. |
Steps | Generation quality. More steps = better detail | 50–100 for best fidelity. Lower for quick previews. Default = 75 |
Guidance | How strictly the result should follow your input image | Higher = more accurate (some glitches can occur), lower = looser interpretation. Default = 7 |
Number of tokens | Internal detail encoding. Leave at 4096 unless tweaking advanced use | Only change this if you’re seeing missing parts or cutoff details. |
Remove background | Automatically segments foreground object | Keep this on for characters, especially with simple backgrounds. |
Seed | Controls repeatability. Same seed = same result | Leave blank for variation, or set a number to lock in results. |
4 - Tips & Best practices
Unlocking PartCrafter's full potential comes down to some preparation and experimentation. Treat the process as a dialogue with the AI - providing various inputs and adjusting based on outputs - and you'll achieve more accurate & usable results.
a. Curate the Right Input Images
For optimal results, choose images that are clean, well-lit, and preferably feature front-facing or side-view perspectives. Isolated characters, props, and vehicles work best, though the model can handle more complex scenes with multiple objects.
3D render-like styles work better than illustrations, or hyper-detailed textured subjects. For stylized images (like toon art), you may try to lower the Guidance slightly to let the AI "interpret" the 3D side better.
A clear view and pose (T-pose for a character, for example) will increase the probability of getting a clear output. Use symmetrical or clear front-facing or side-facing images. In case your image isn't clear-facing, and if the results aren’t satisfactory enough, you can change the view angle and run it again in PartCrafter.
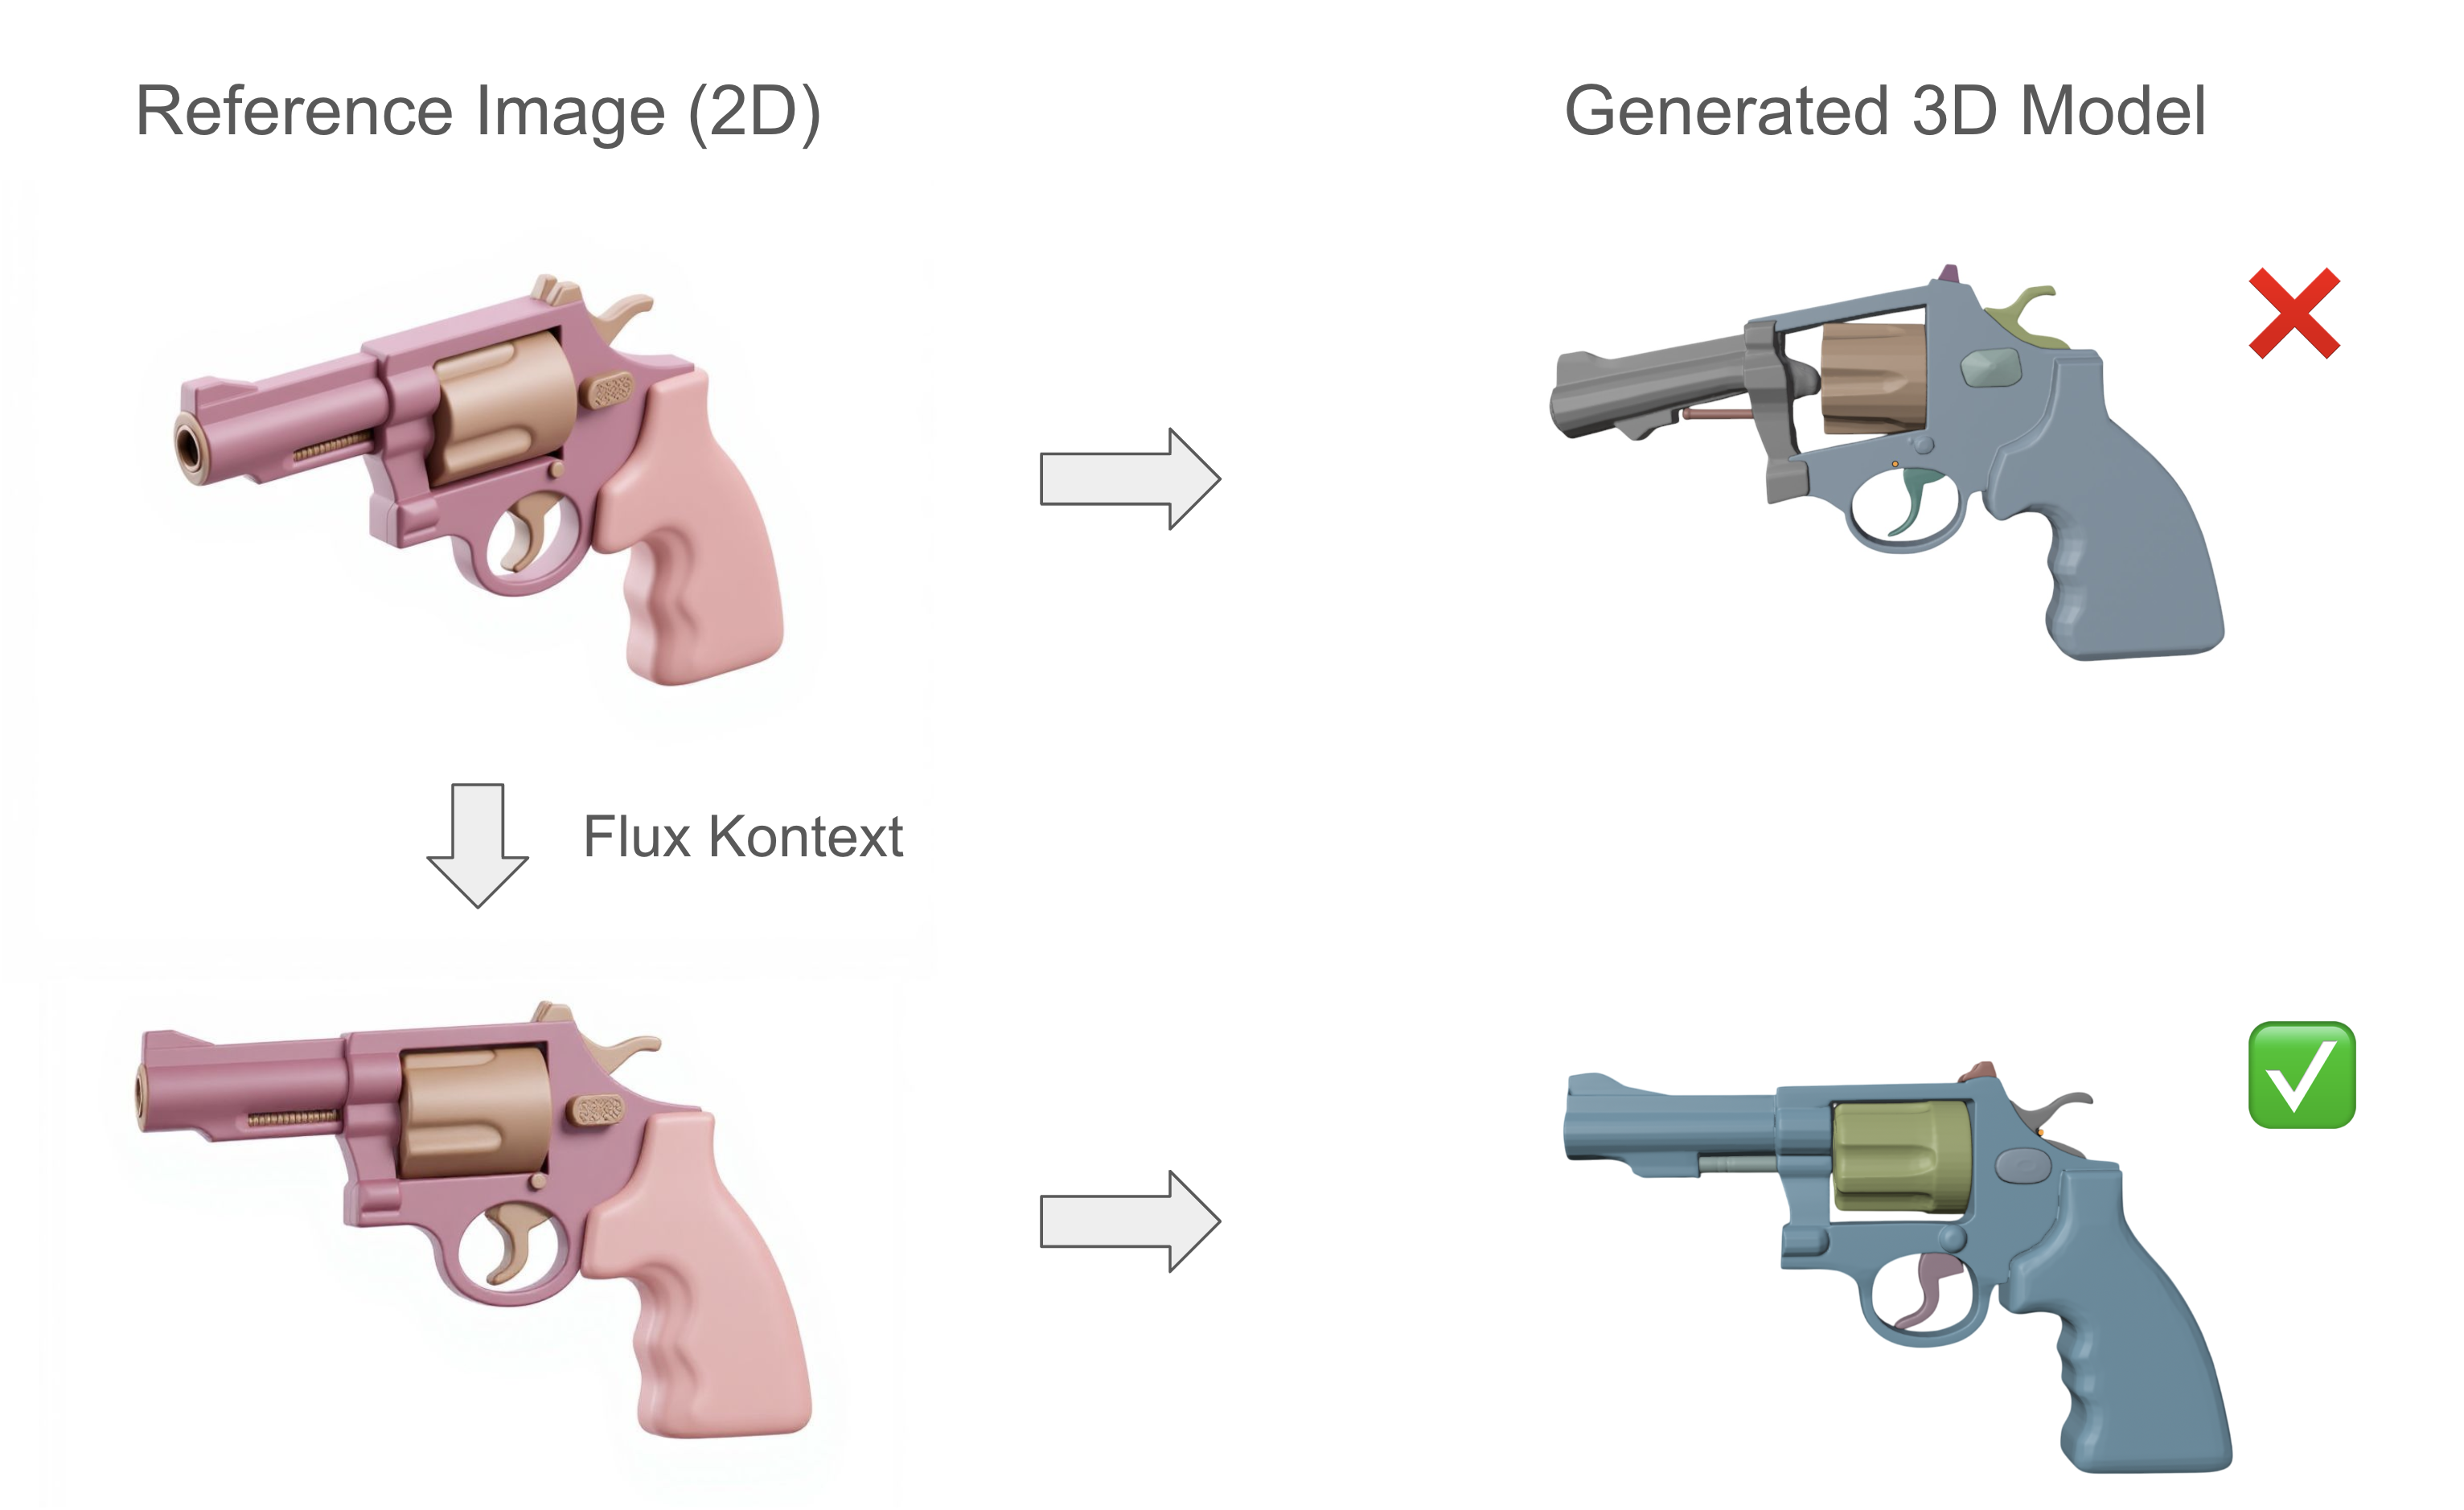
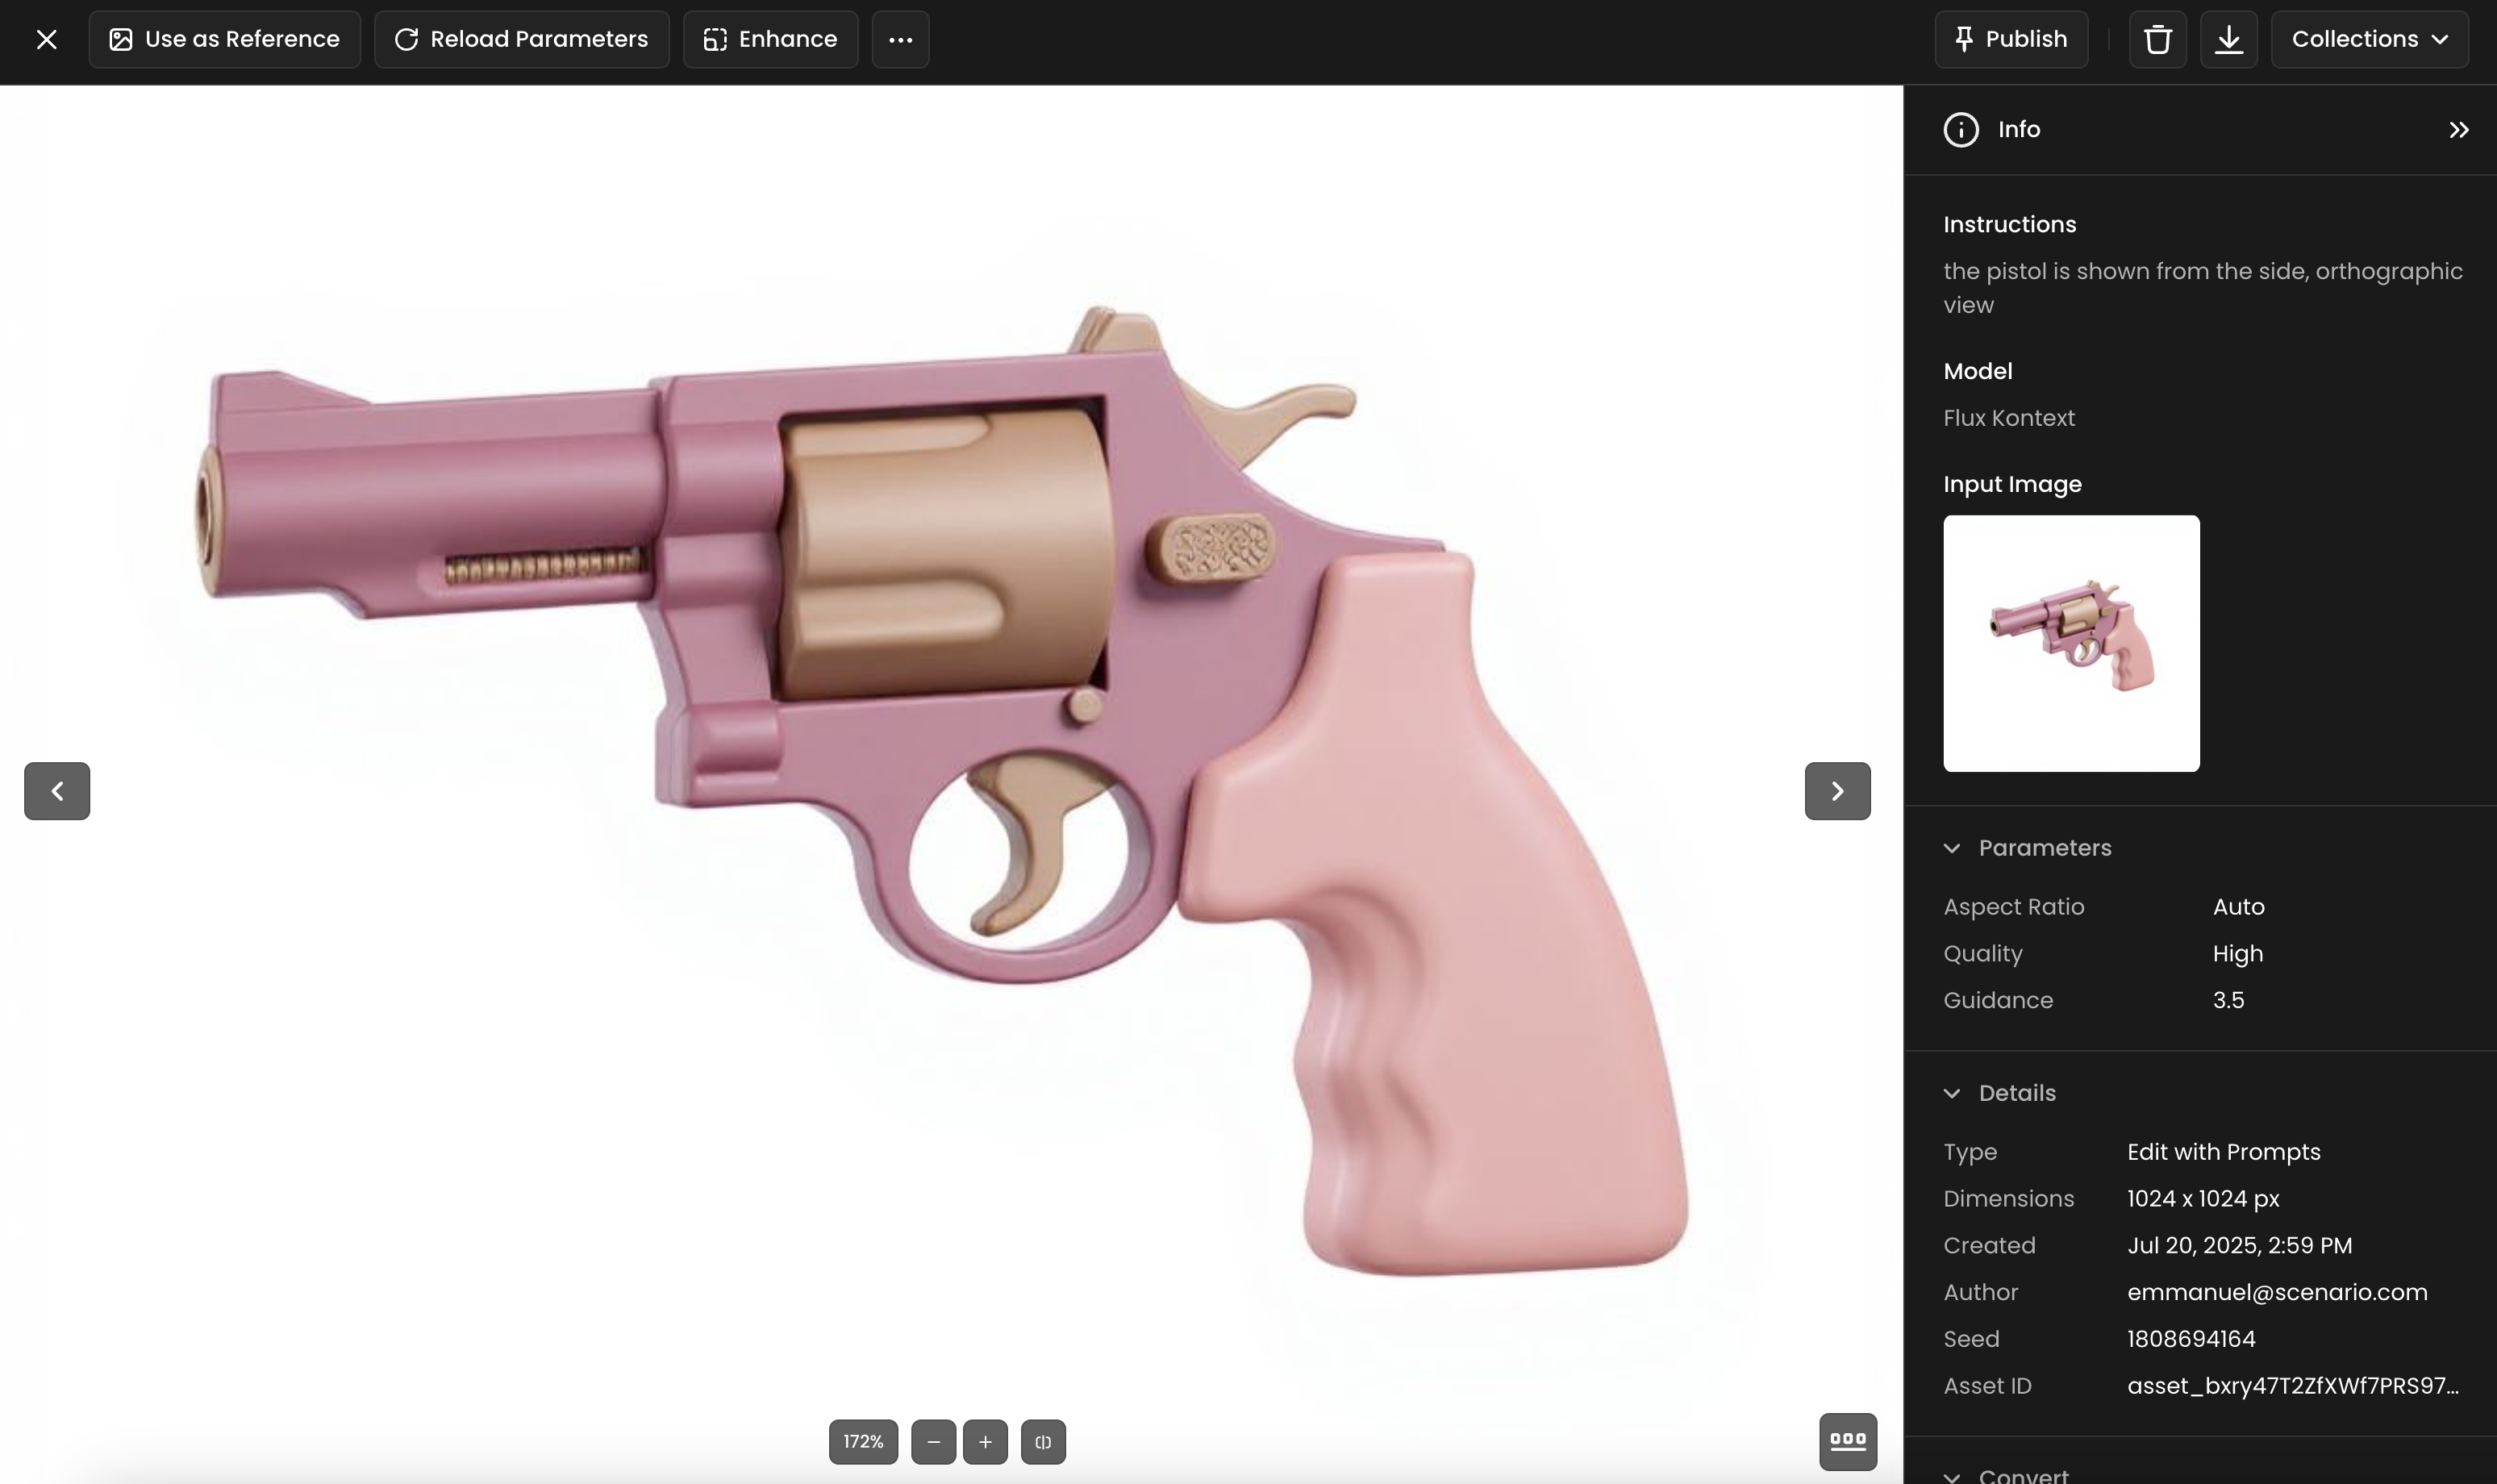
Changing the angle view can be done in one step on Scenario using "Edit with Prompts", with Kontext, Gen4, or Flux, with a simple instruction as shown below:
You may use of one Scenario’s platform models that generates images in a “3D render look”, like Sleek 3D assets or Blocky Elements among dozens of other options.
Watch out for these common challenges:
Overlapping Parts: If your image contains tightly packed elements, segmentation might struggle. Try spacing them out.
Unclear Boundaries: Parts that blend into each other (e.g. cloaks and bodies) may be grouped as one.
b. Proceed Incrementally and Explore
As you discover the capabilities of the model, begin with default parameters and make gradual changes. This saves time and compute credits while helping you understand the tool's nuances.
Start by varying only the Number of Parts—try a low count for a quick sense of the segmentation, then layer in adjustments like higher Steps (for detail, though it increases time) or Guidance (for adherence to your image). Proceed incrementally, comparing outputs to see the effect of each change. This hands-on method builds intuition and leads to better results without guesswork.
c. Adjust as needed
If the generated model's overall geometry doesn't match your expectations, verify the quality (and view angle) of the input subject. You can adjust the input image's perspective using the Edit with Prompts tool (for example, with Flux Kontext)—refer to the tips above for details.
If the segmentation in parts isn't accurate, try increasing the Number of Parts for finer divisions.
Ensure the Number of Tokens, Maximum Number of Points, and Steps are set sufficiently high (or to their maximum values) to improve detail and quality.
5 - Examples
Here are some sample generations to illustrate PartCrafter's capabilities:
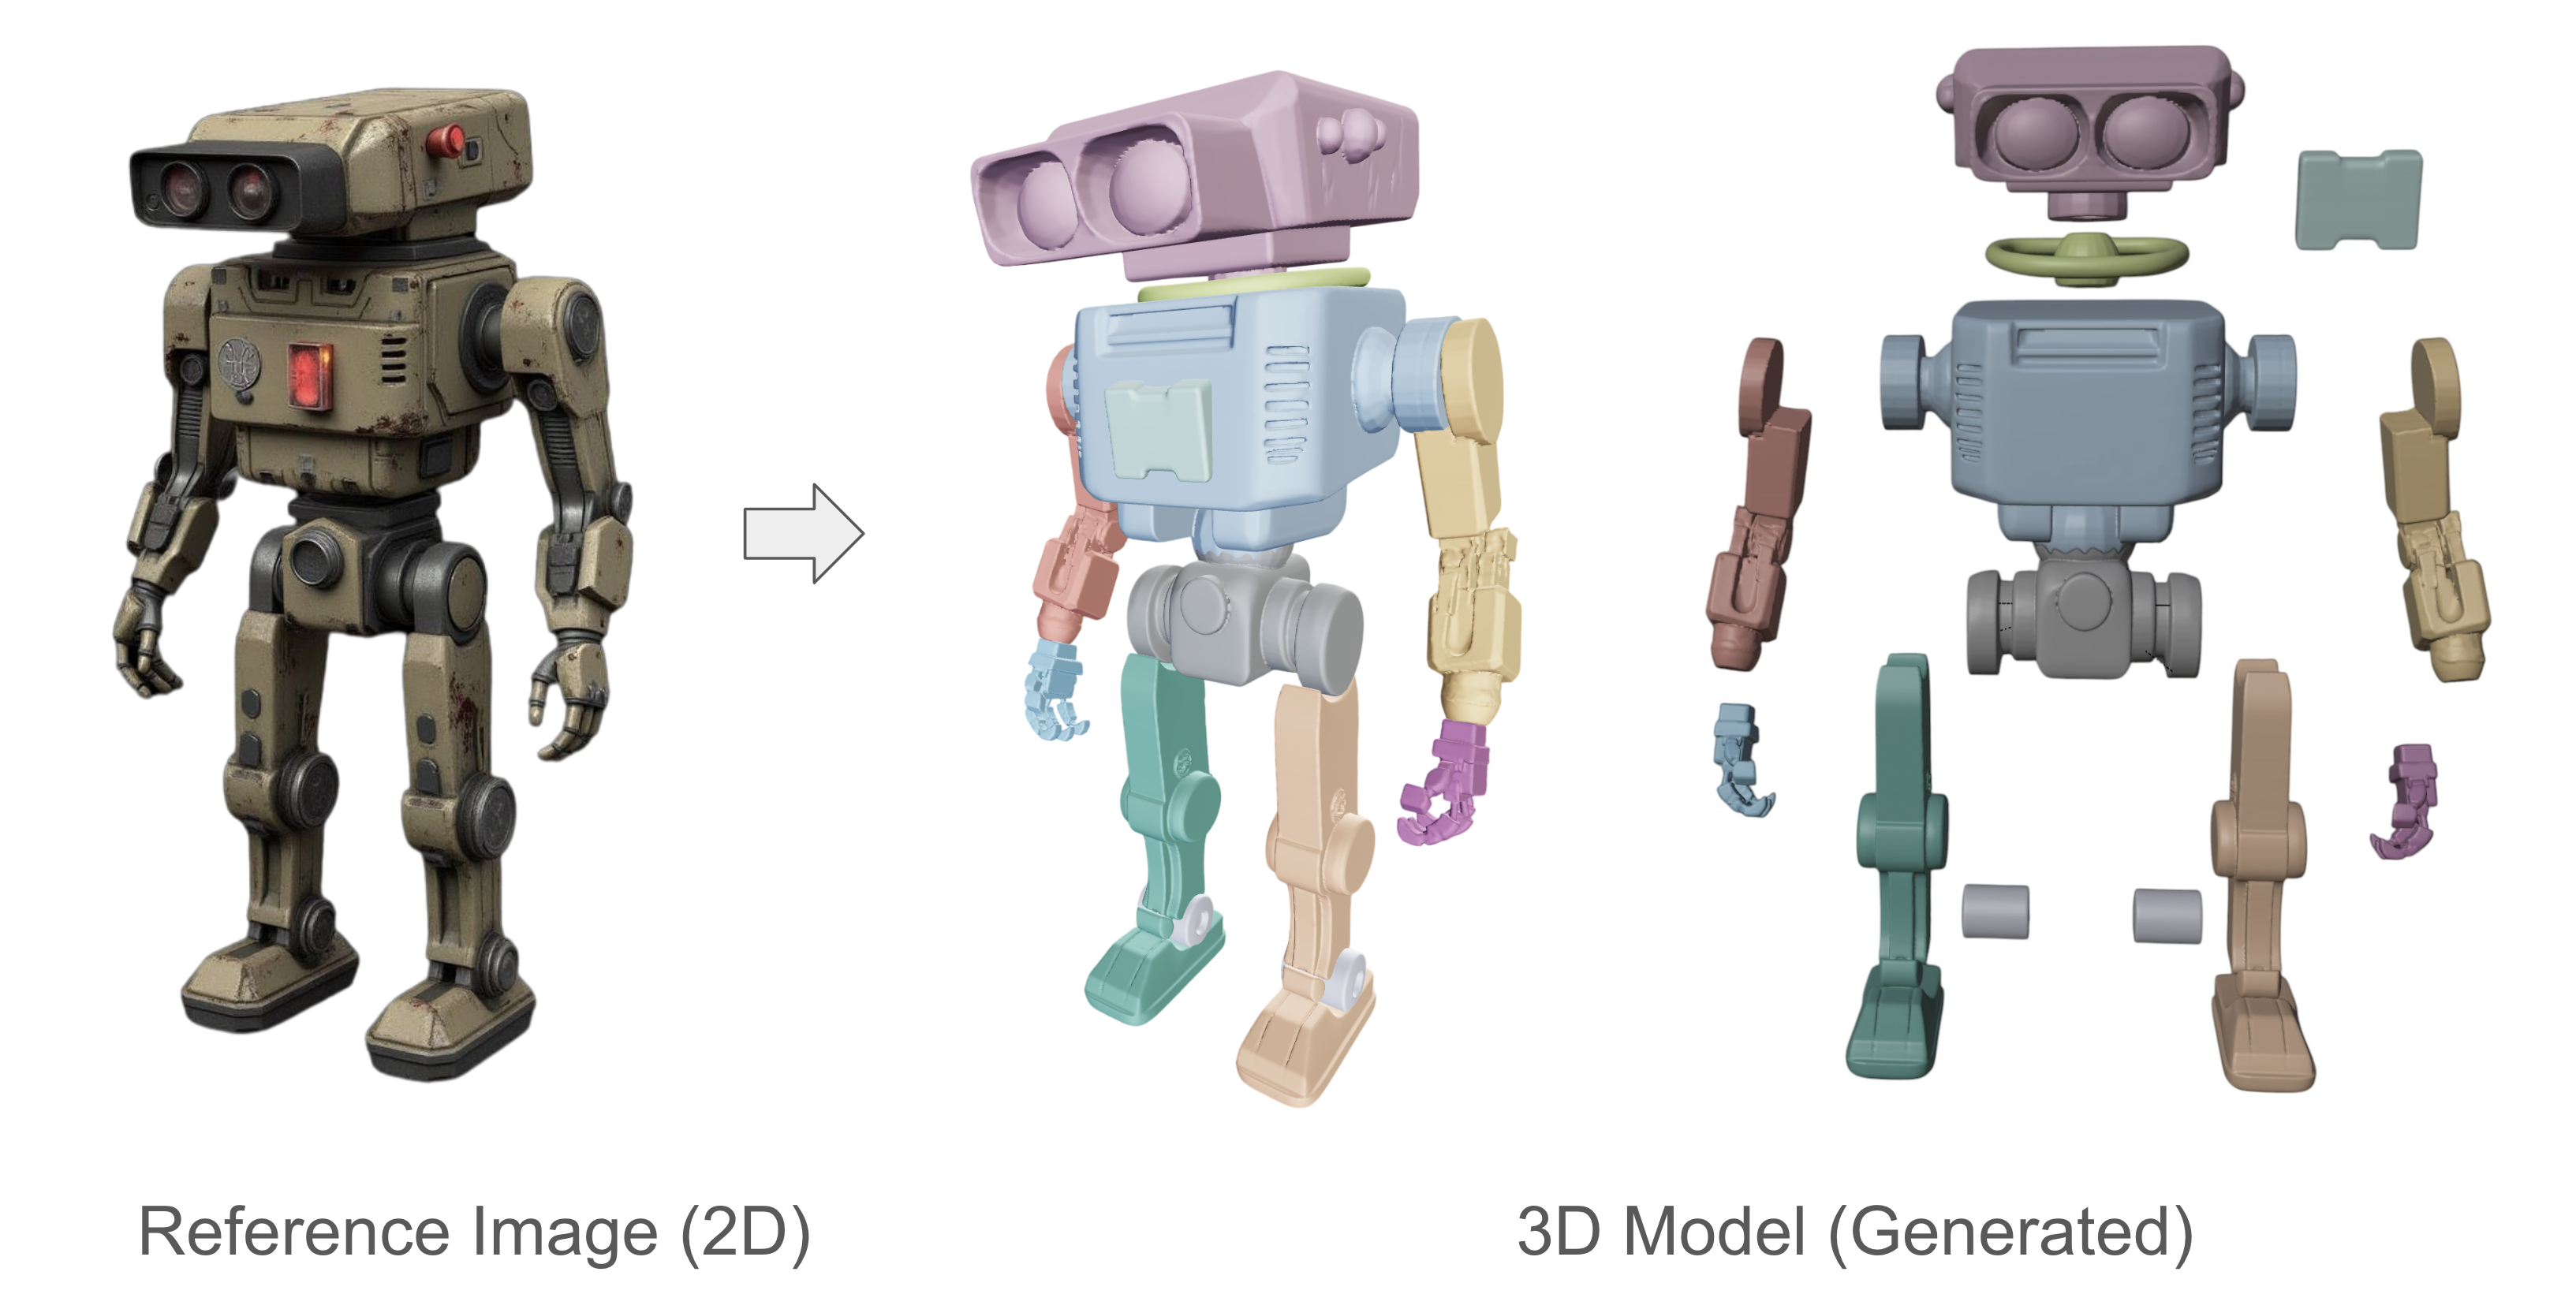
Humanoid Robot (12 parts)
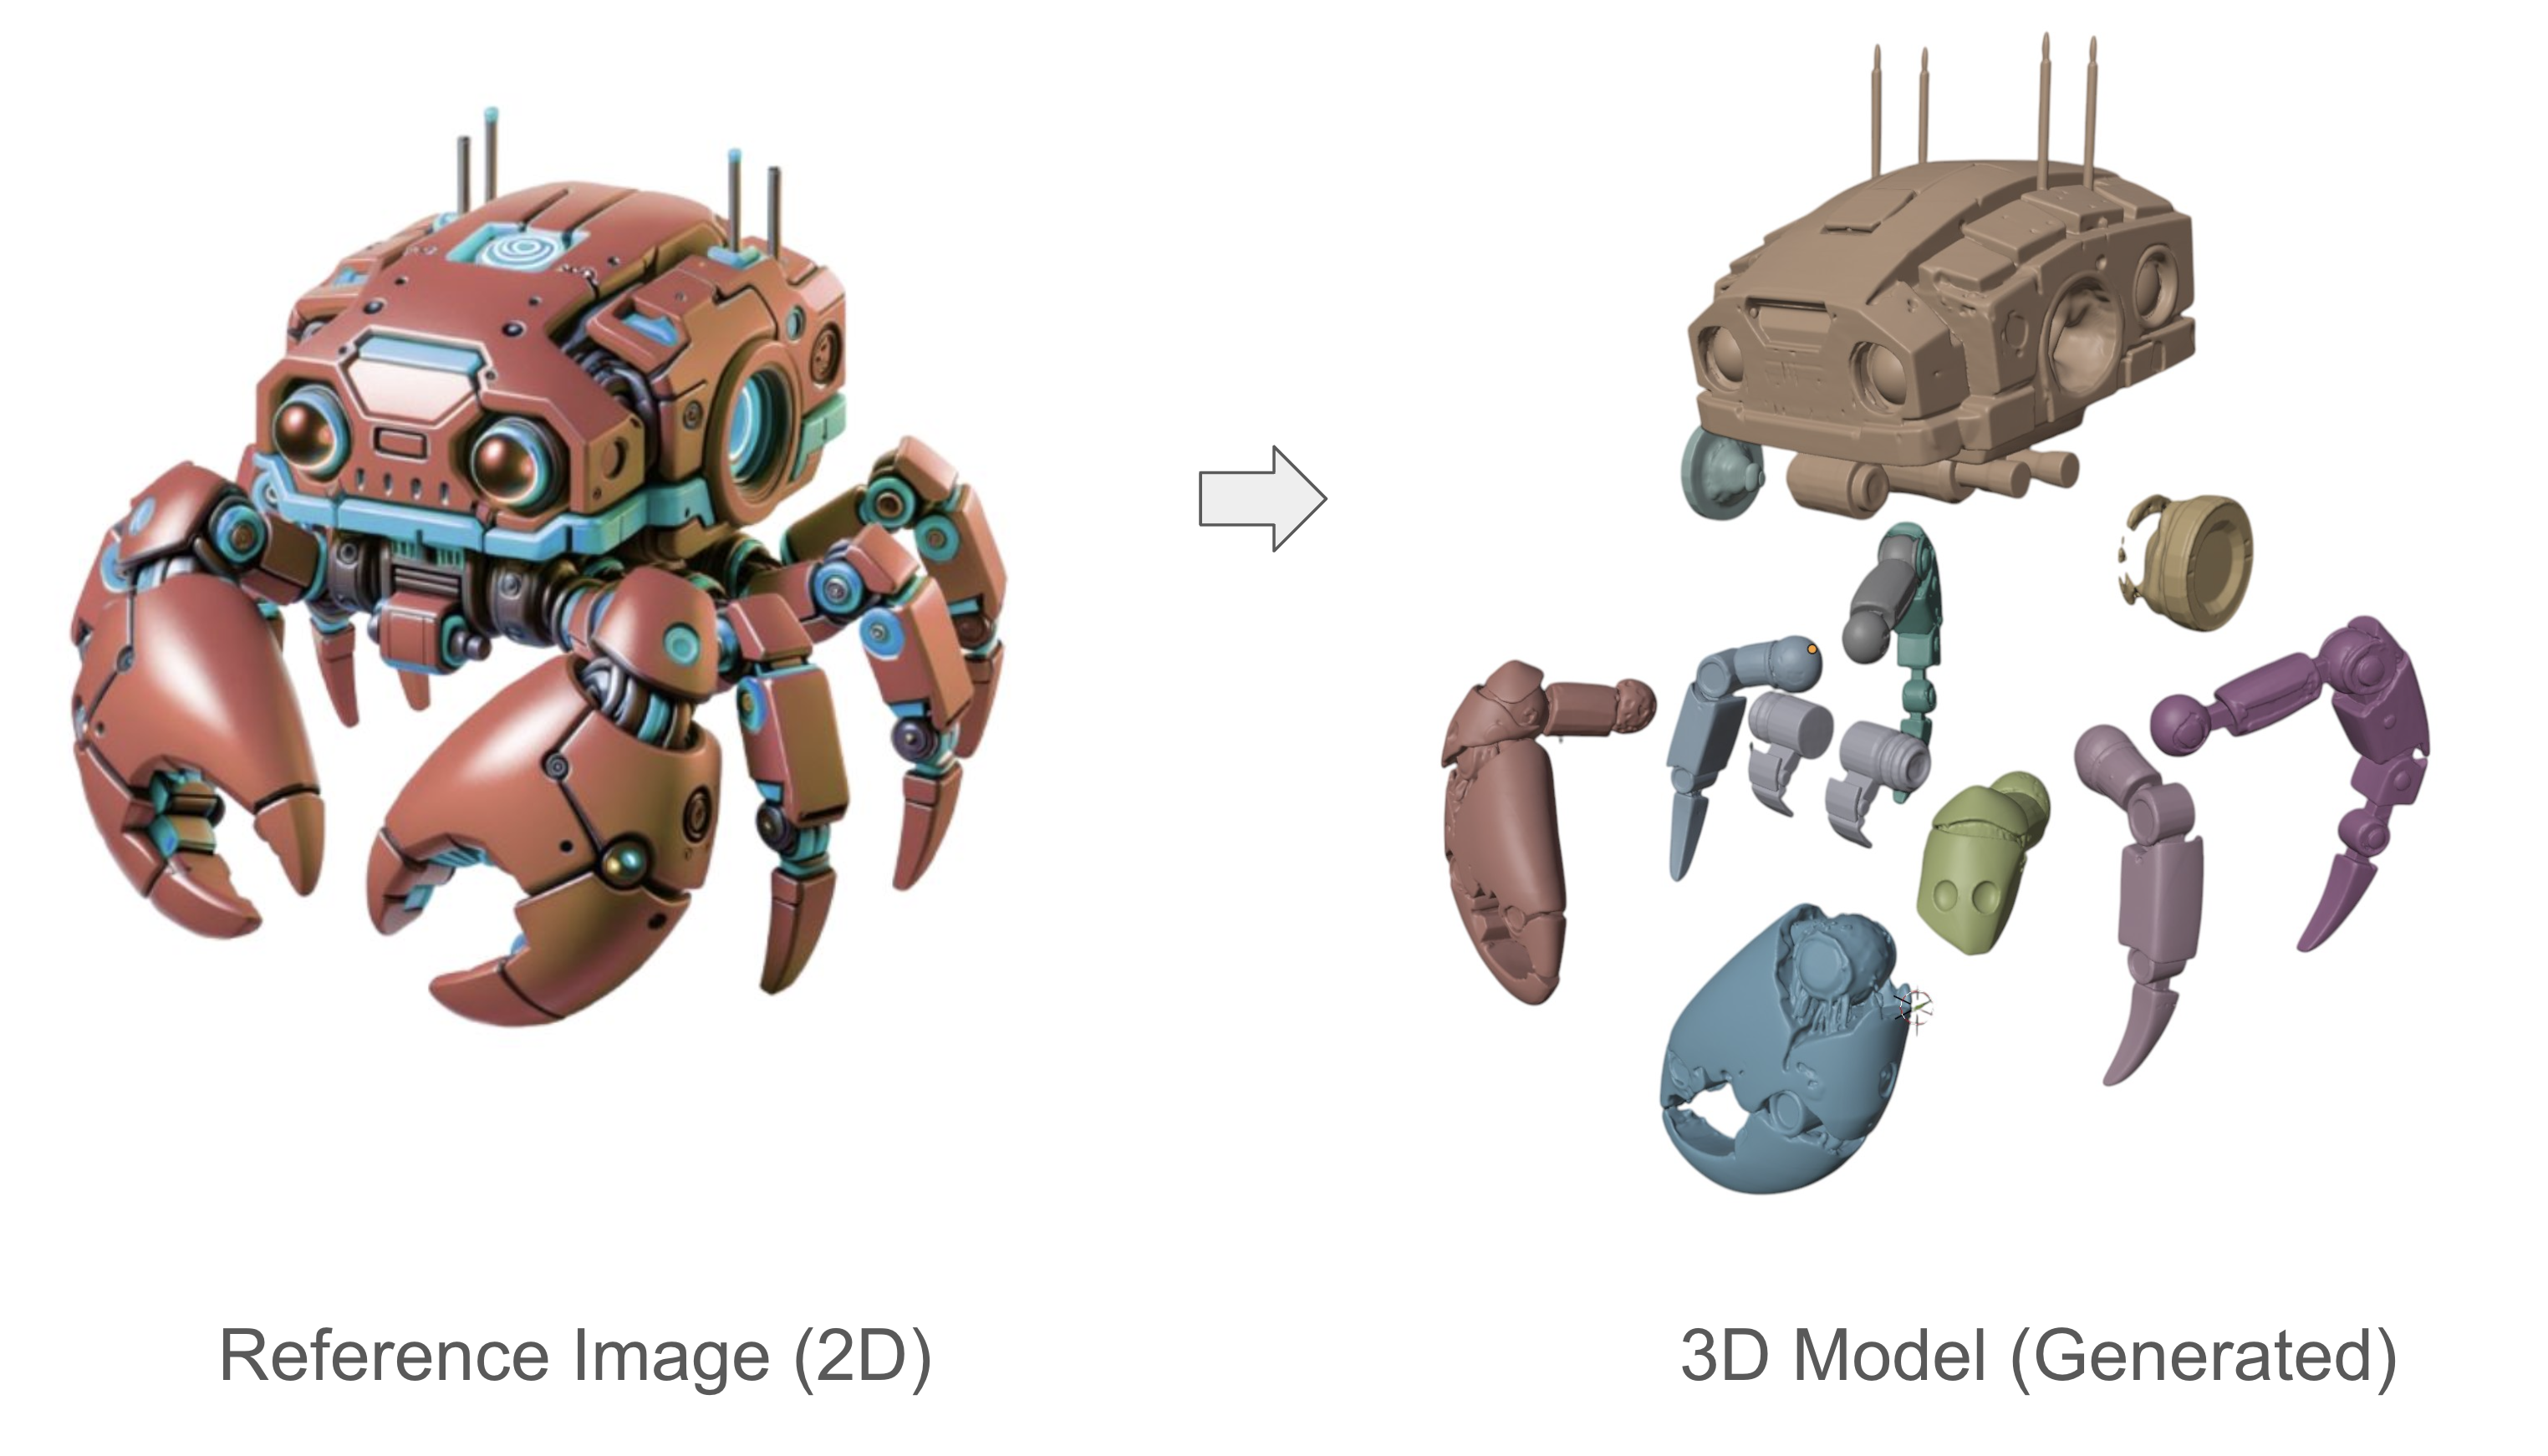
Mechanical Crab (12 parts)
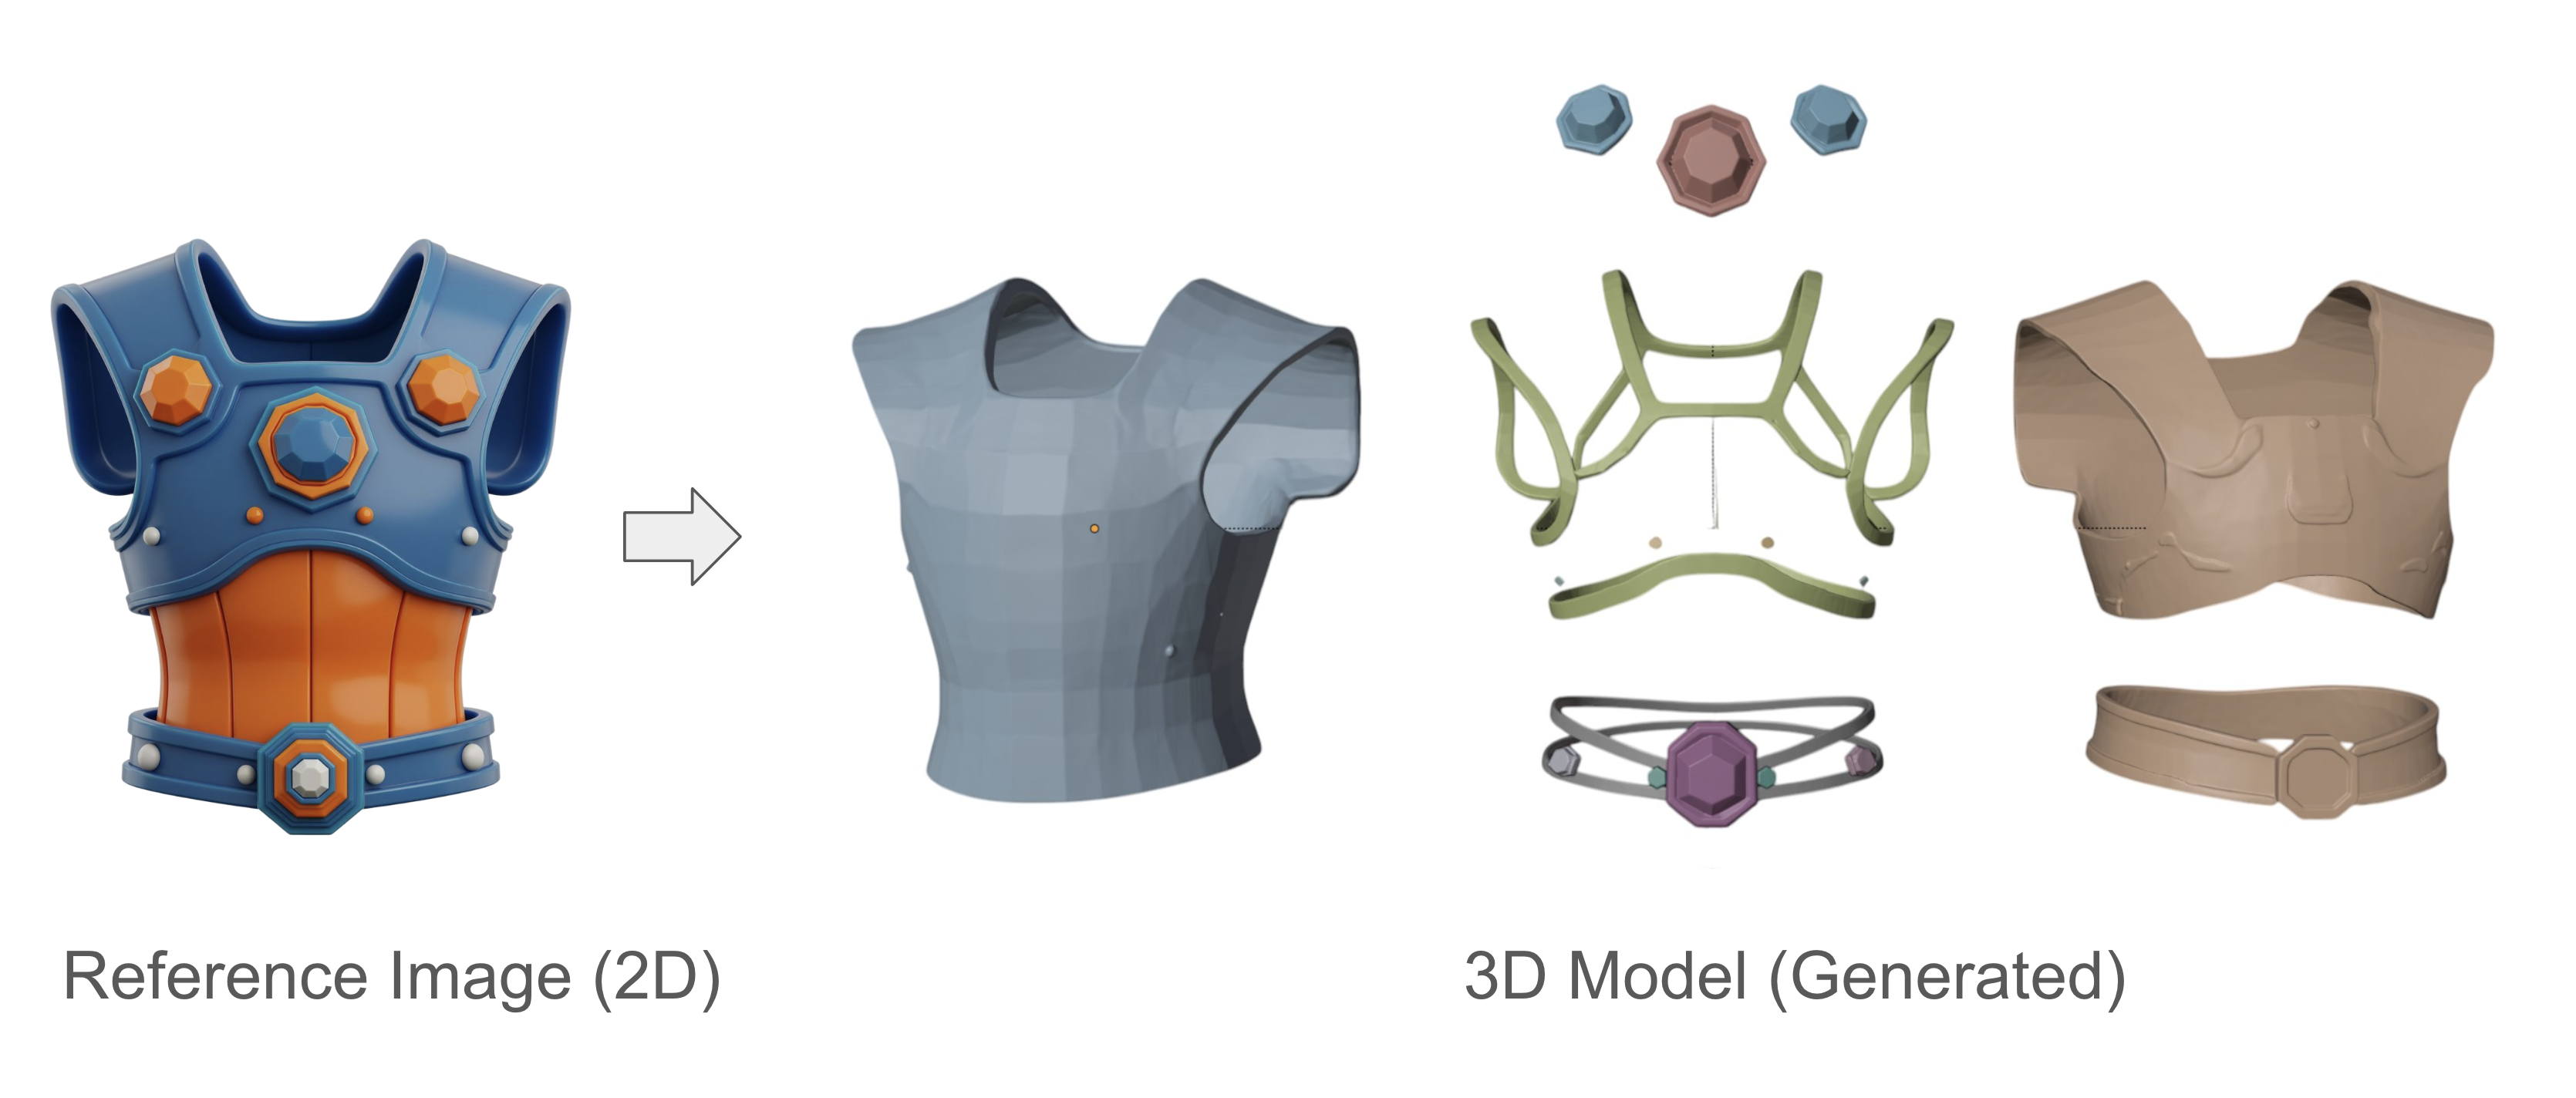
Stylized Armor (8 parts)
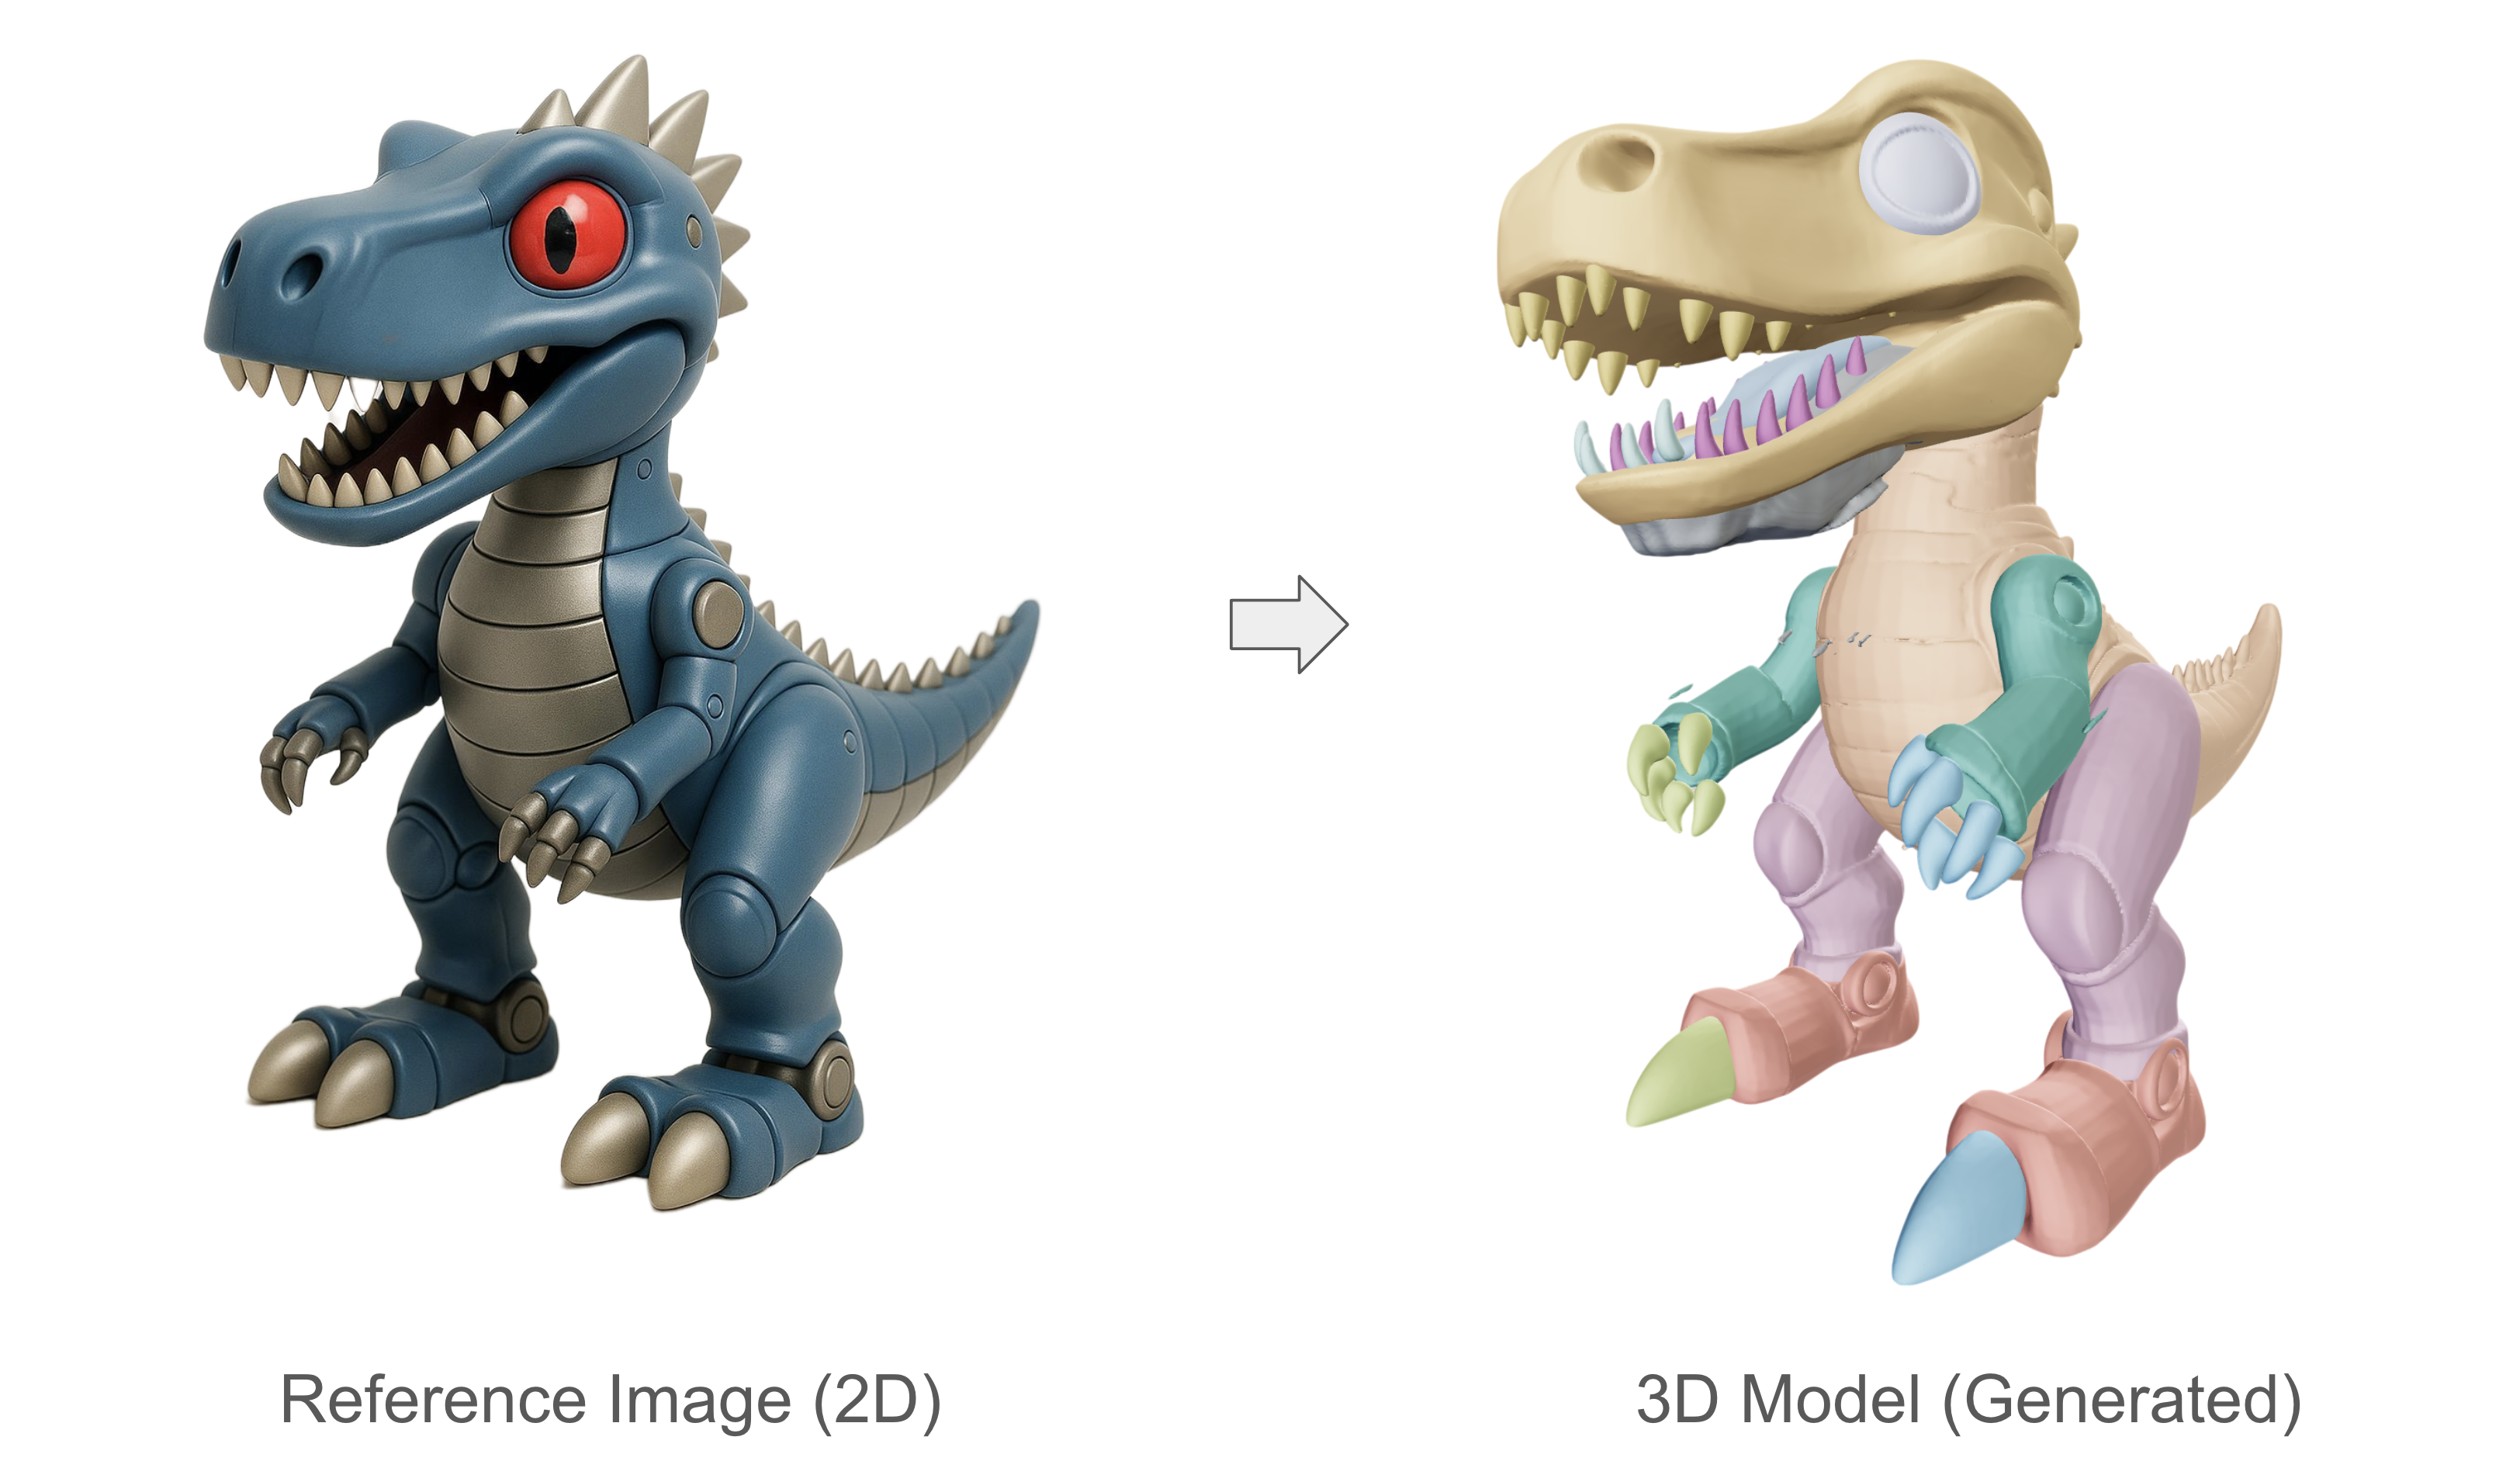
Dinosaur figurine (10 parts)
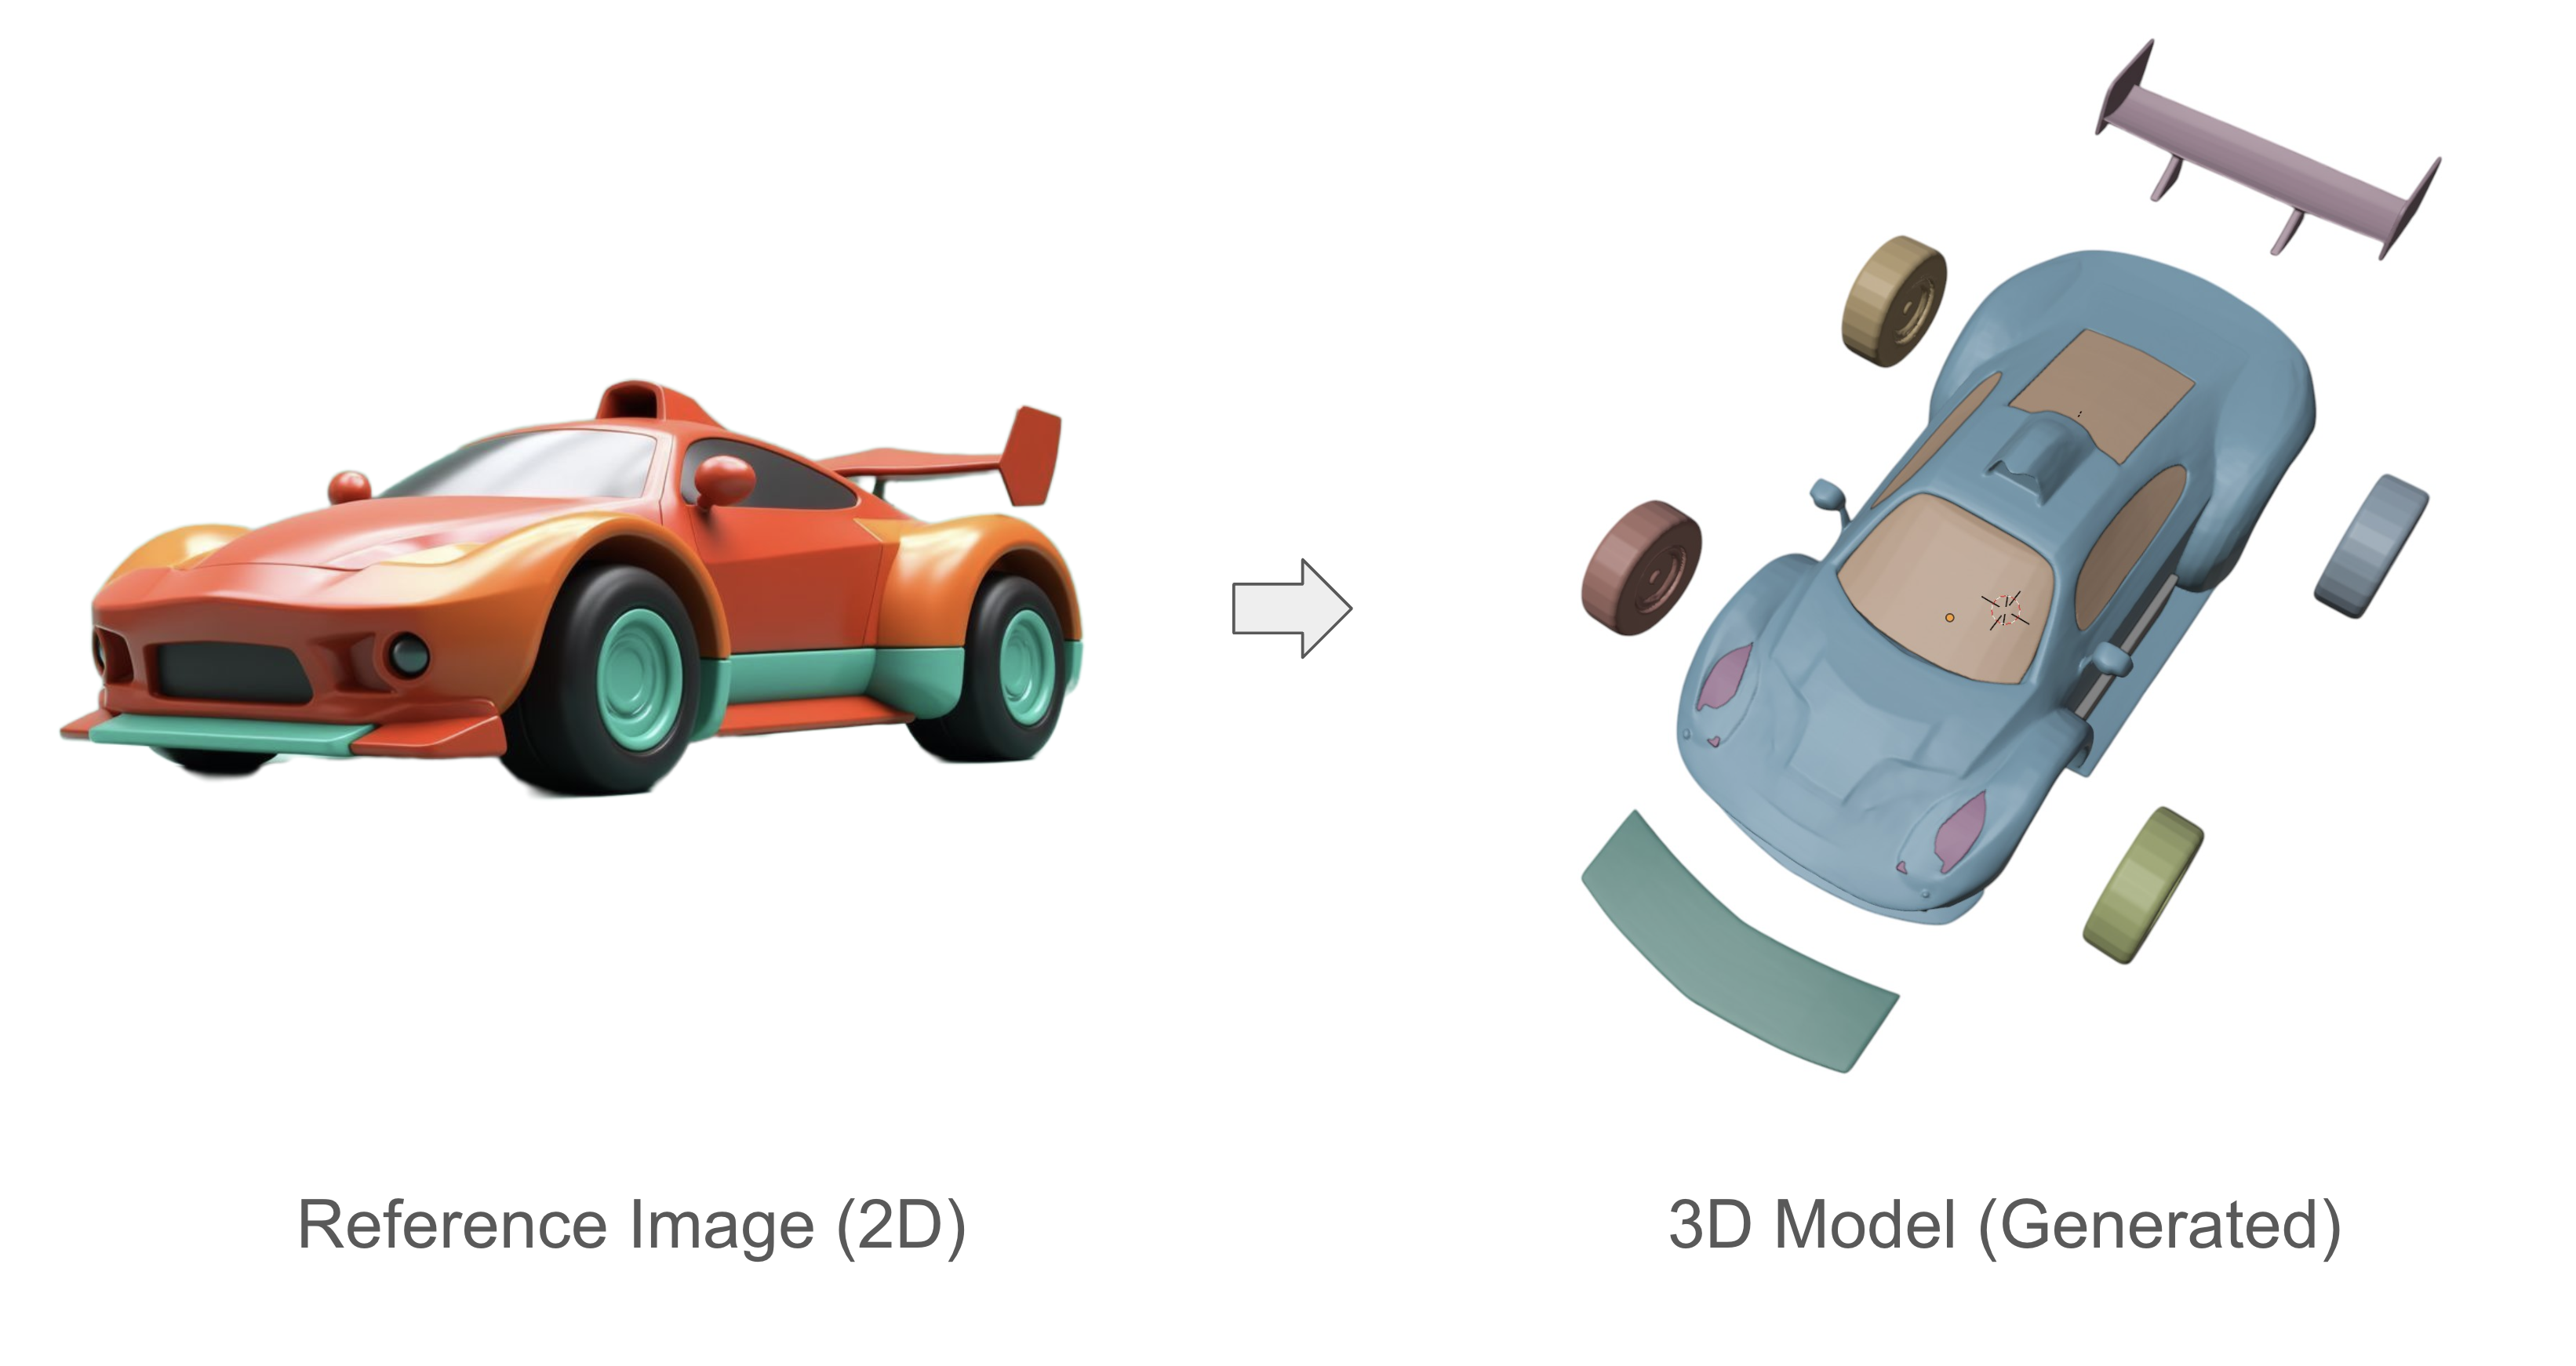
Sports car (10 parts)
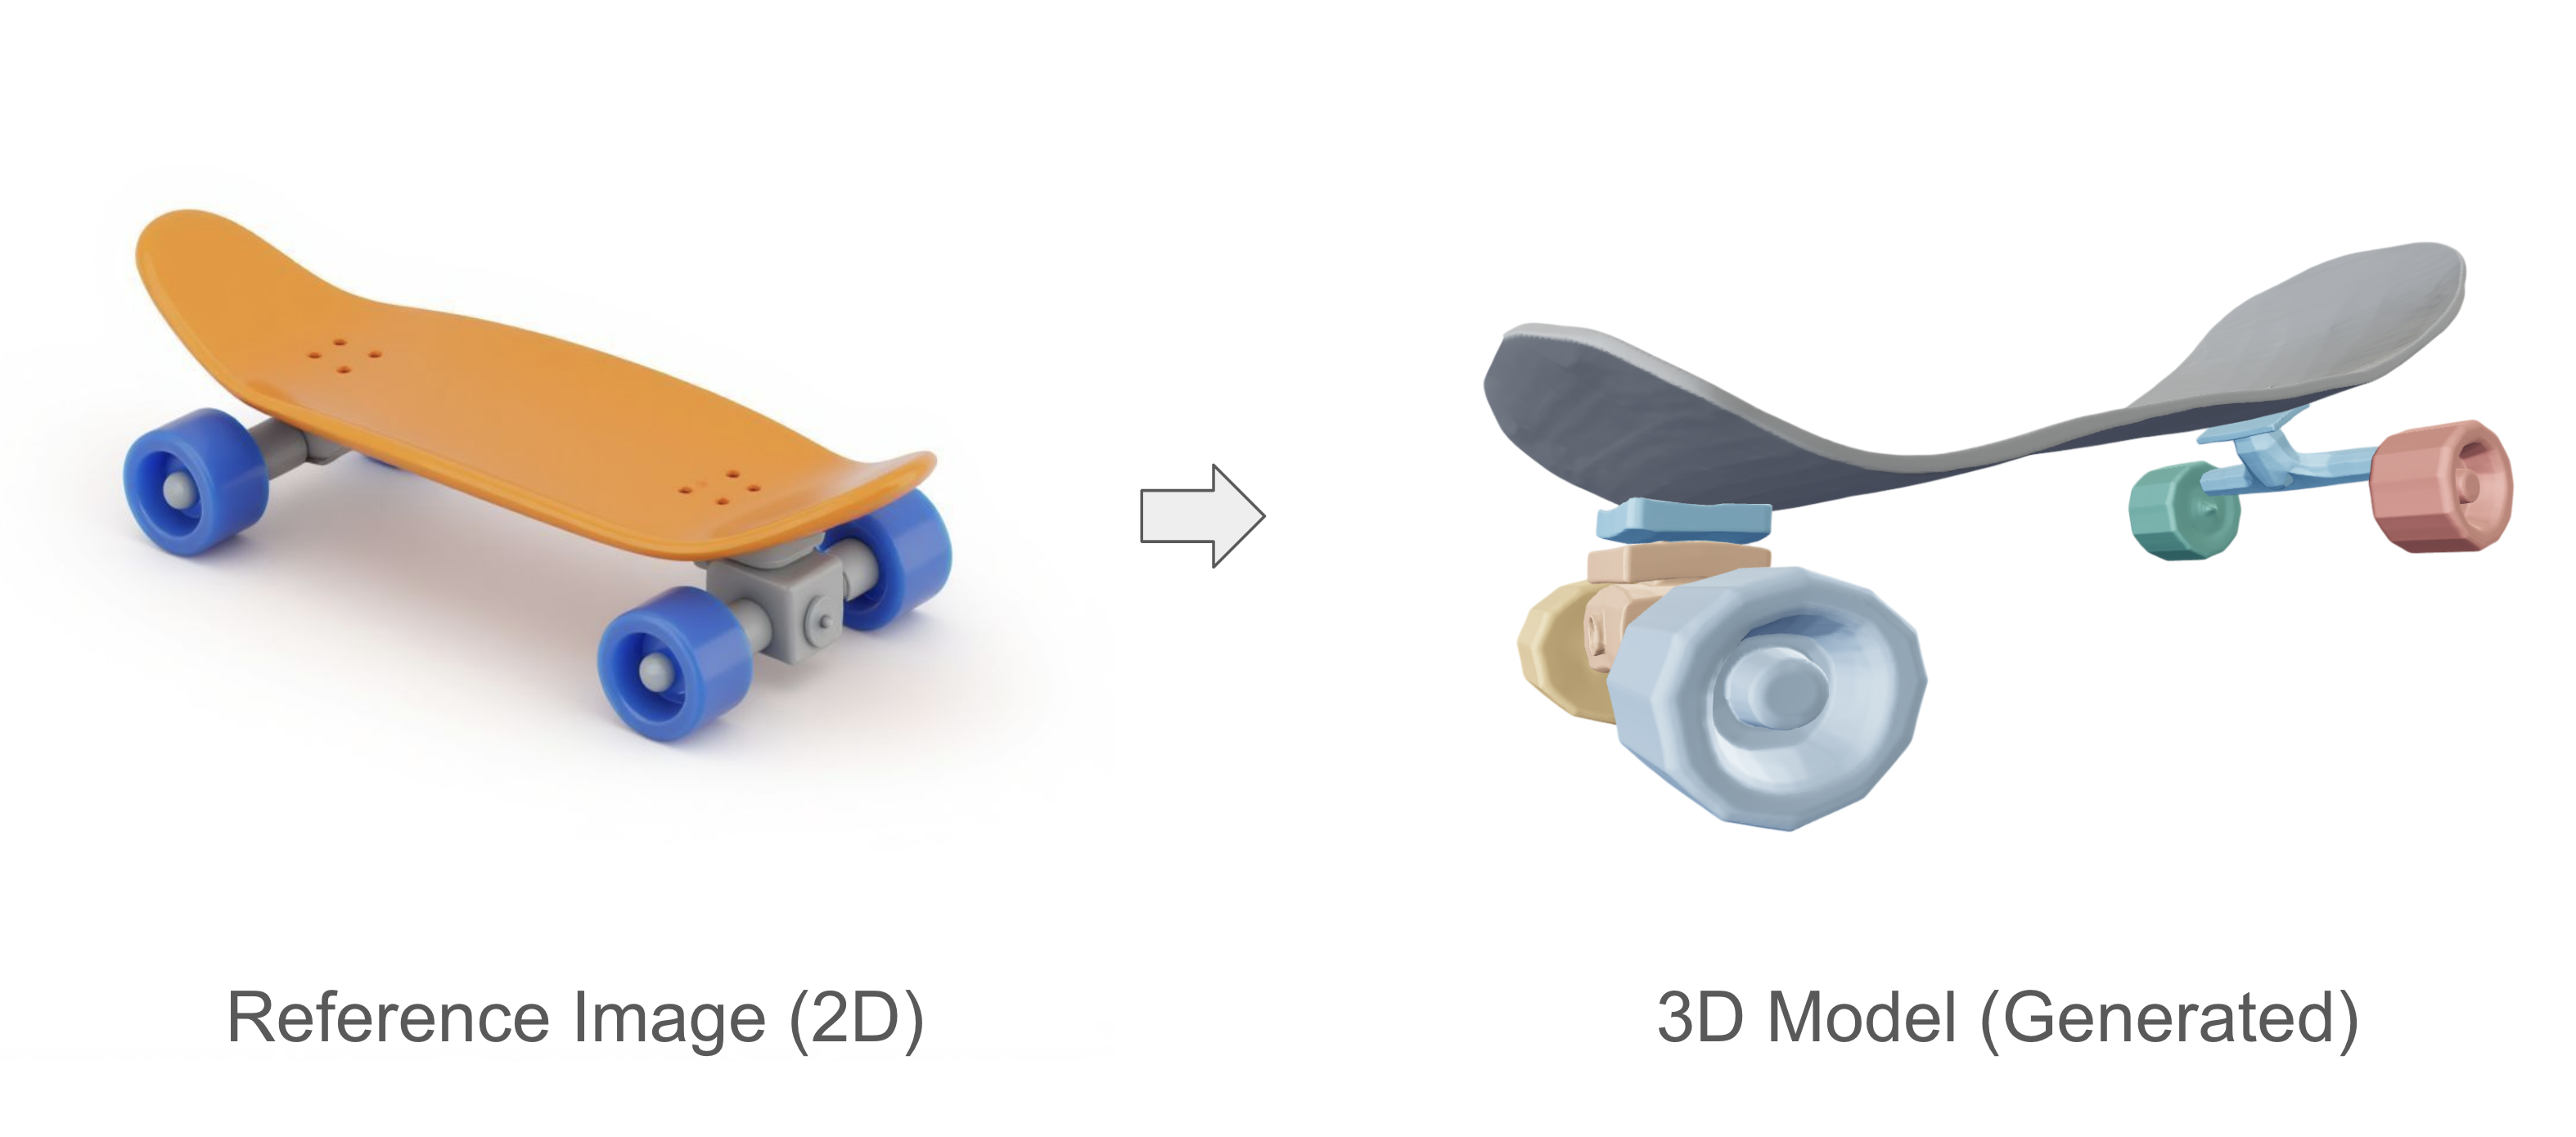
Skateboard (8 parts)
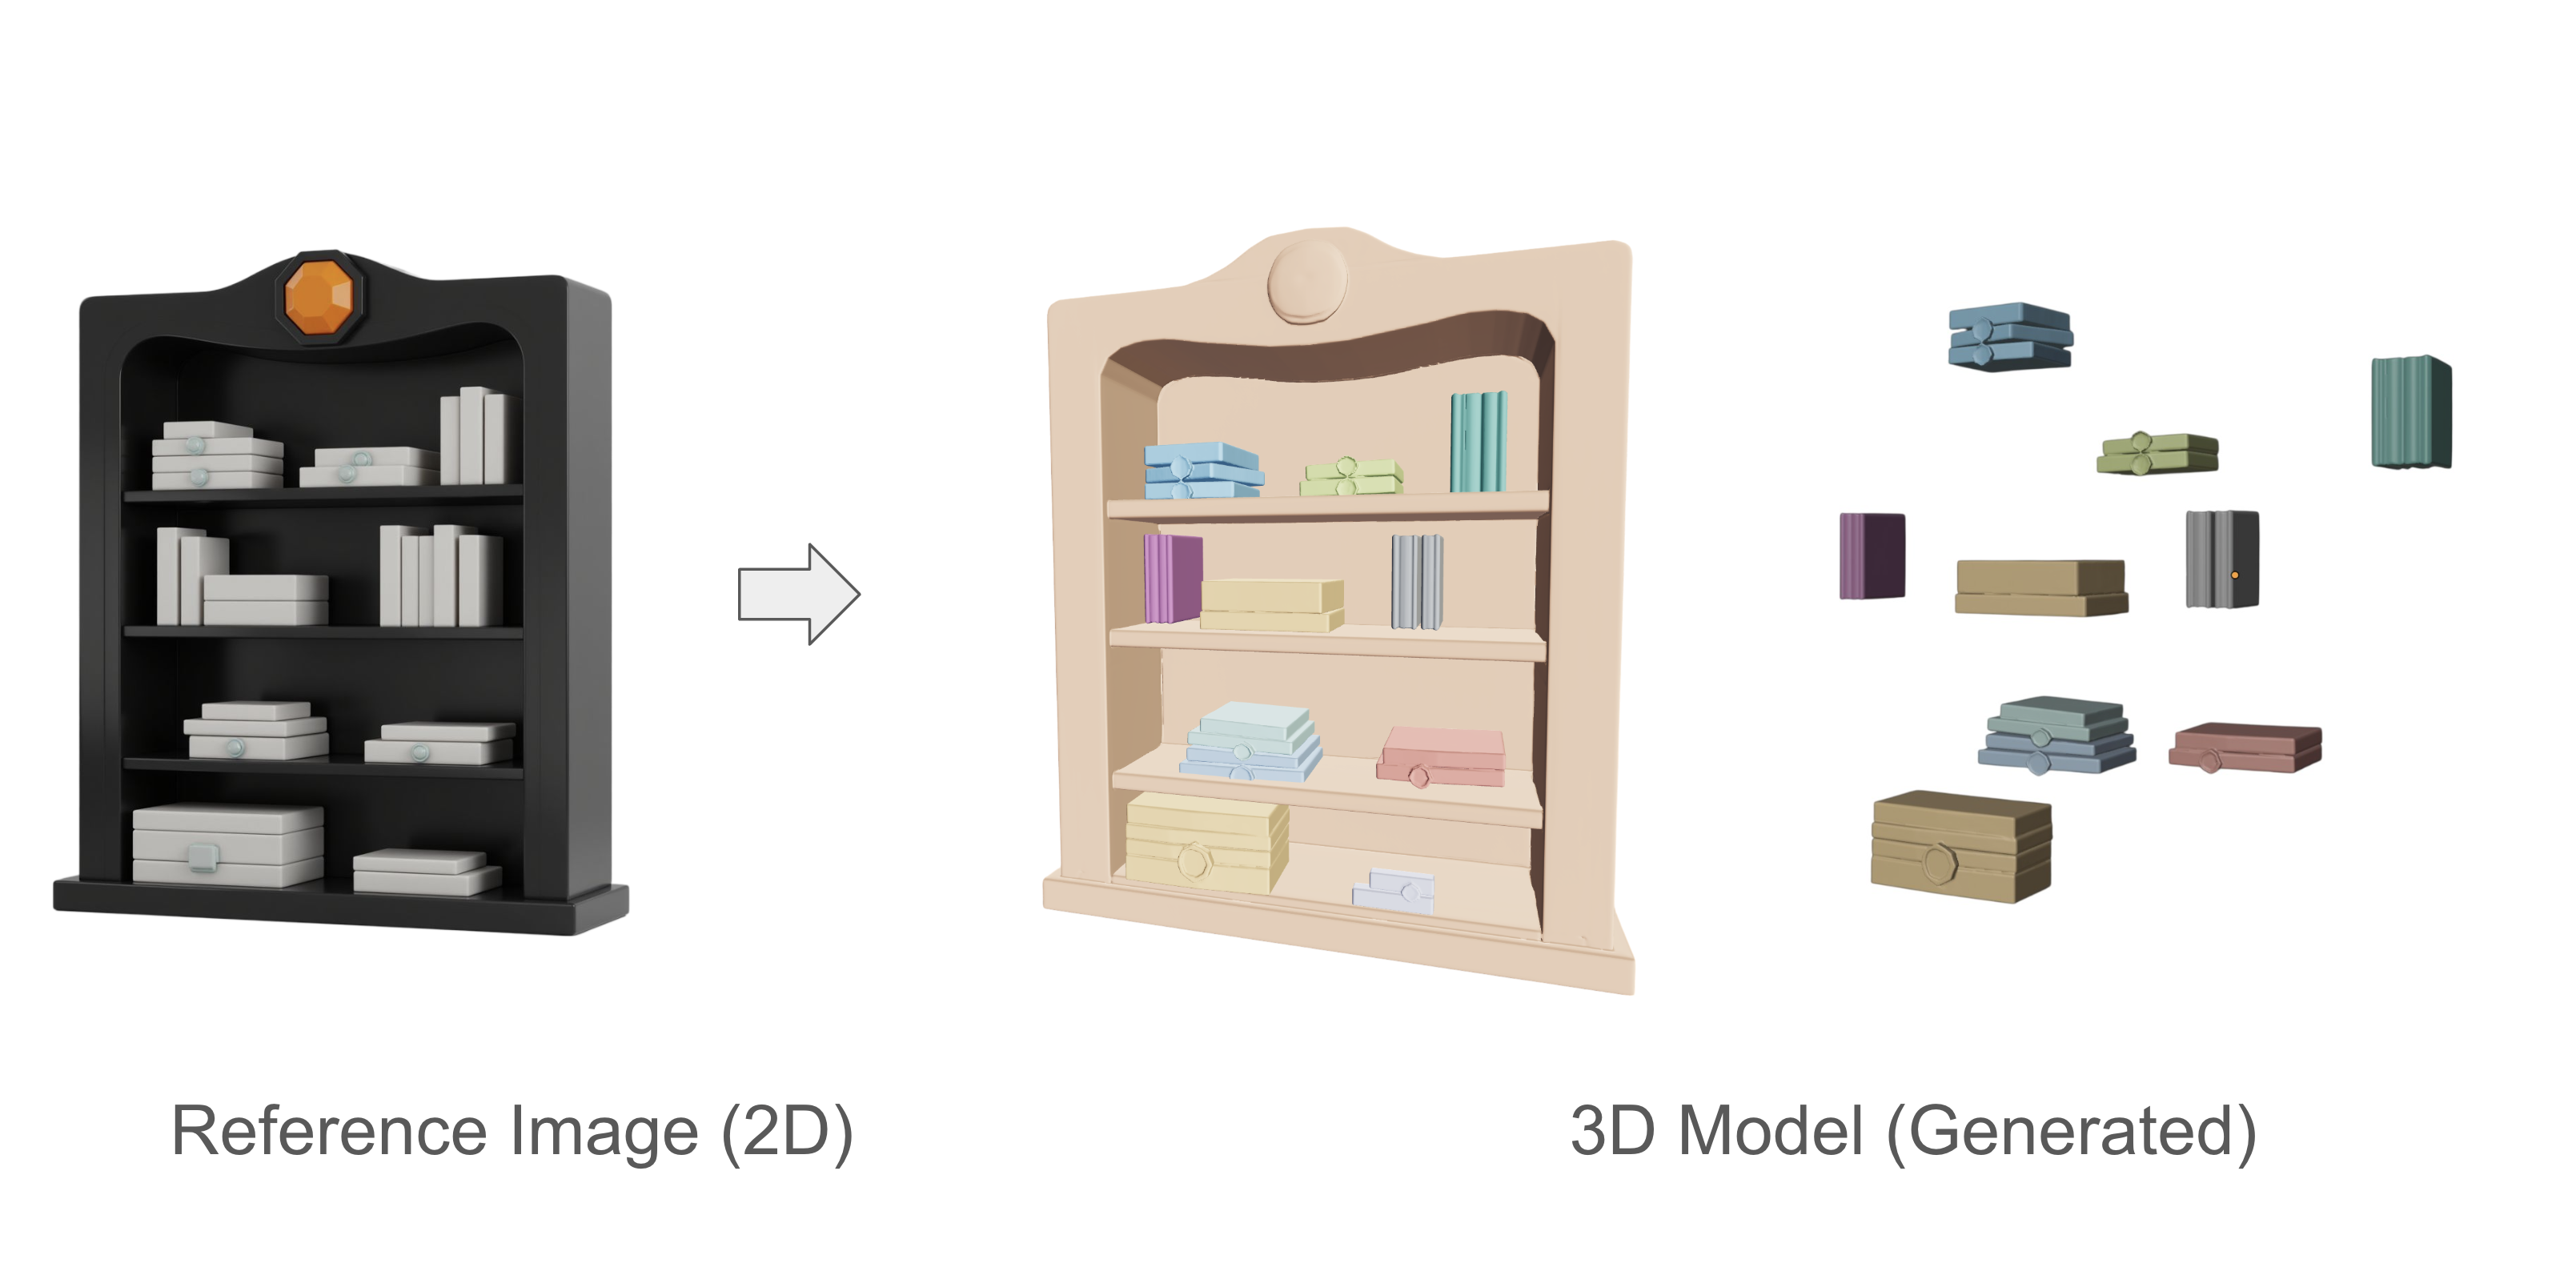
Bookshelves (10 parts)
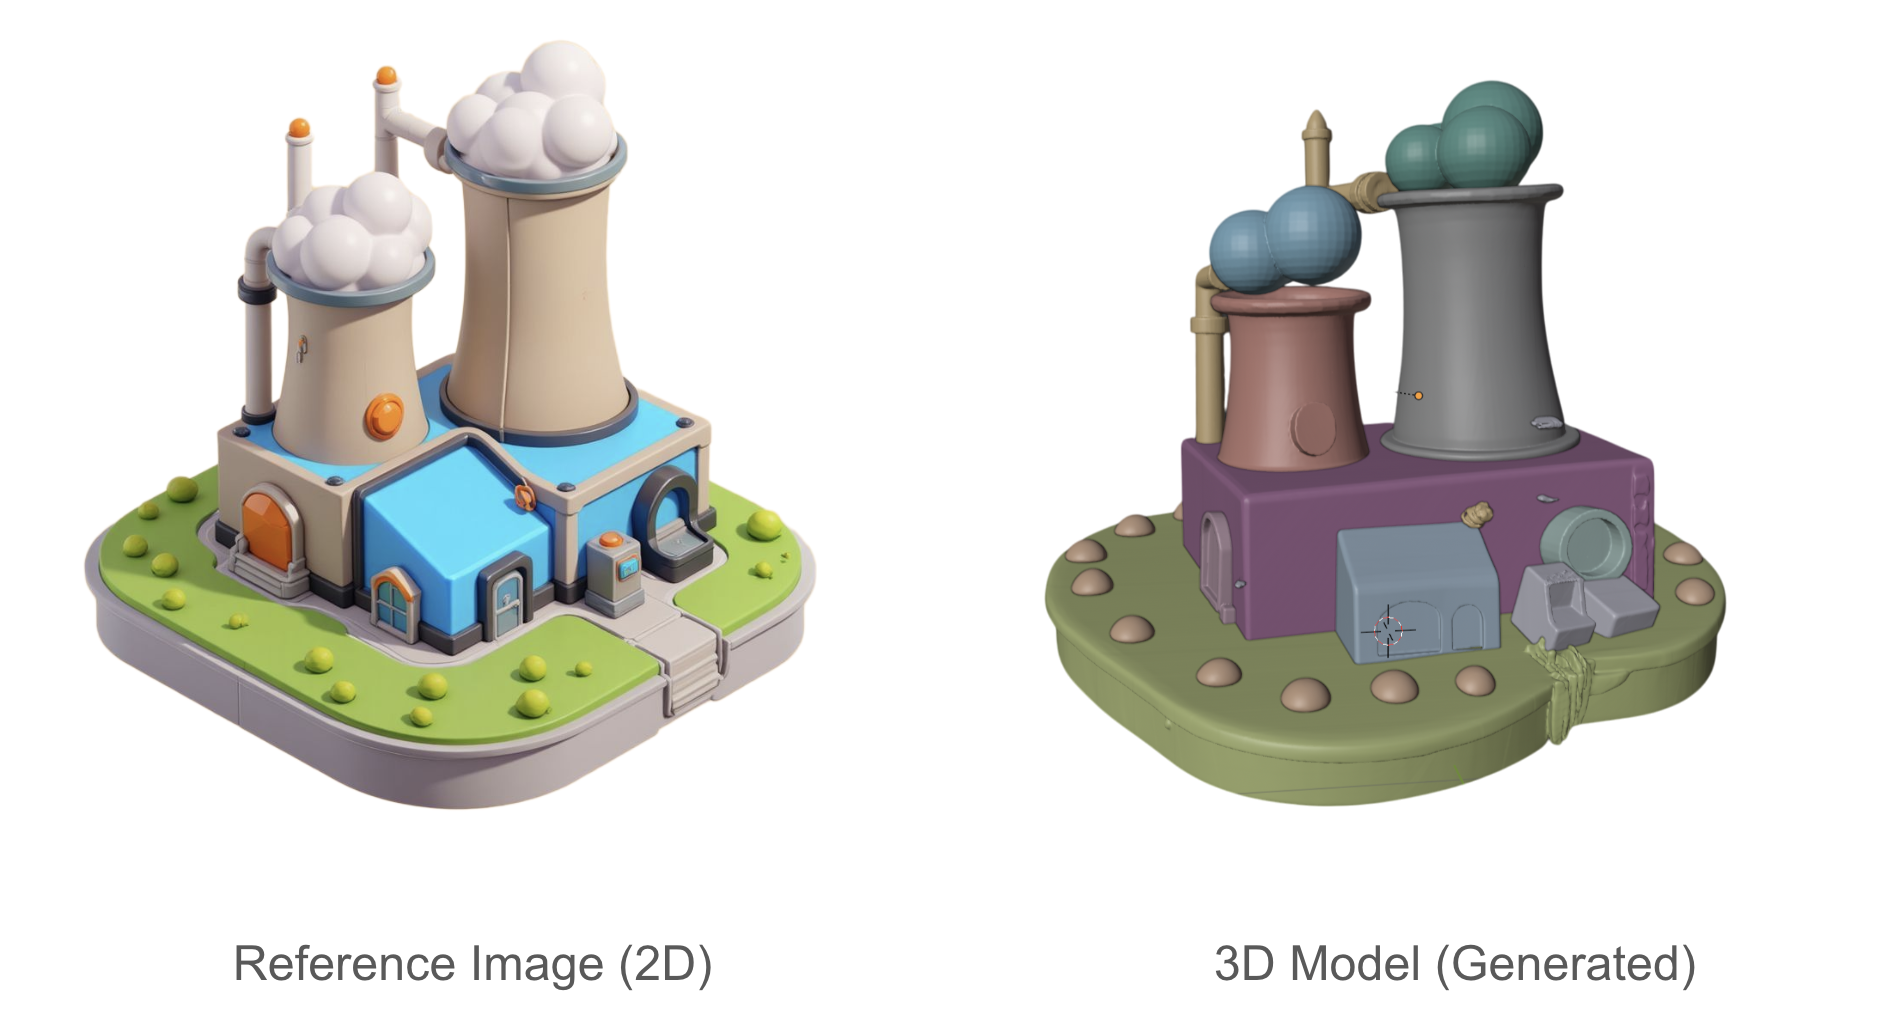
Isometric Building (10 parts)
Game Controller (12 parts)
Multi-Objects Scenes
Partcrafter also works with realistic or stylized scenes as input and will attempt to generate all the elements in the scene separately. These elements are further split into parts if the part count is high enough, as show in the minimalist example below:
6 - Conclusion
PartCrafter empowers 3D creators to generate modular, editable 3D assets directly from images, streamlining workflows for game development, animation, and design. Export your .glb files to tools like Blender for further customization.
This model is also available via the Scenario API for integration into your applications.
For questions or feedback, feel free to reach out through the Scenario support channels or [email protected].
7- FAQ
Q: Can I decide which parts are going to be separated?
A: No, unfortunately you cannot decide which are the parts PartCrafter is going to select. You can pick how many, but not which ones.
Q: What is the approximate time for each generation?
A: It depends on the complexity of each case. Please check this table for more detailed information:
Test Case | Steps | Parts | CU | Time |
Low complexity | 50 | 1 | 10 | 11s |
Medium complexity | 50 | 4 | 40 | 46s |
Advanced use | 75 | 6 | 90 | 1min58 |
Premium use | 100 | 10 | 200 | 6min31 |
Your original case | 100 | 12 | 240 | 8min18 |
Maximum complexity | 100 | 16 | 320 | 12min33 |
Minimal use | 25 | 1 | 10 | 10s |
Quality focused | 60 | 8 | 95 | 2min23 |
High parts | 50 | 12 | 110 | 2min25 |
High steps | 100 | 8 | 160 | 4min42 |
7 - References
[1] Lin, Y., Lin, C., Pan, P., Yan, H., Feng, Y., Mu, Y., & Fragkiadaki, K. (2025). PartCrafter: Structured 3D Mesh Generation via Compositional Latent Diffusion Transformers. arXiv preprint arXiv:2506.05573. https://arxiv.org/abs/2506.05573
[2] PartCrafter Project Page - Yuchen Lin. https://wgsxm.github.io/projects/partcrafter/
[3] PartCrafter: Structured 3D Mesh Generation via Compositional Latent Diffusion Transformers. GitHub Repository.
[4] Follow the authors on X: Yuchen Lin, Chenguo Lin, Panwang Pan (plus Honglei Yan, Yiqiang Feng, Yadong Mu, Katerina Fragkiadaki)