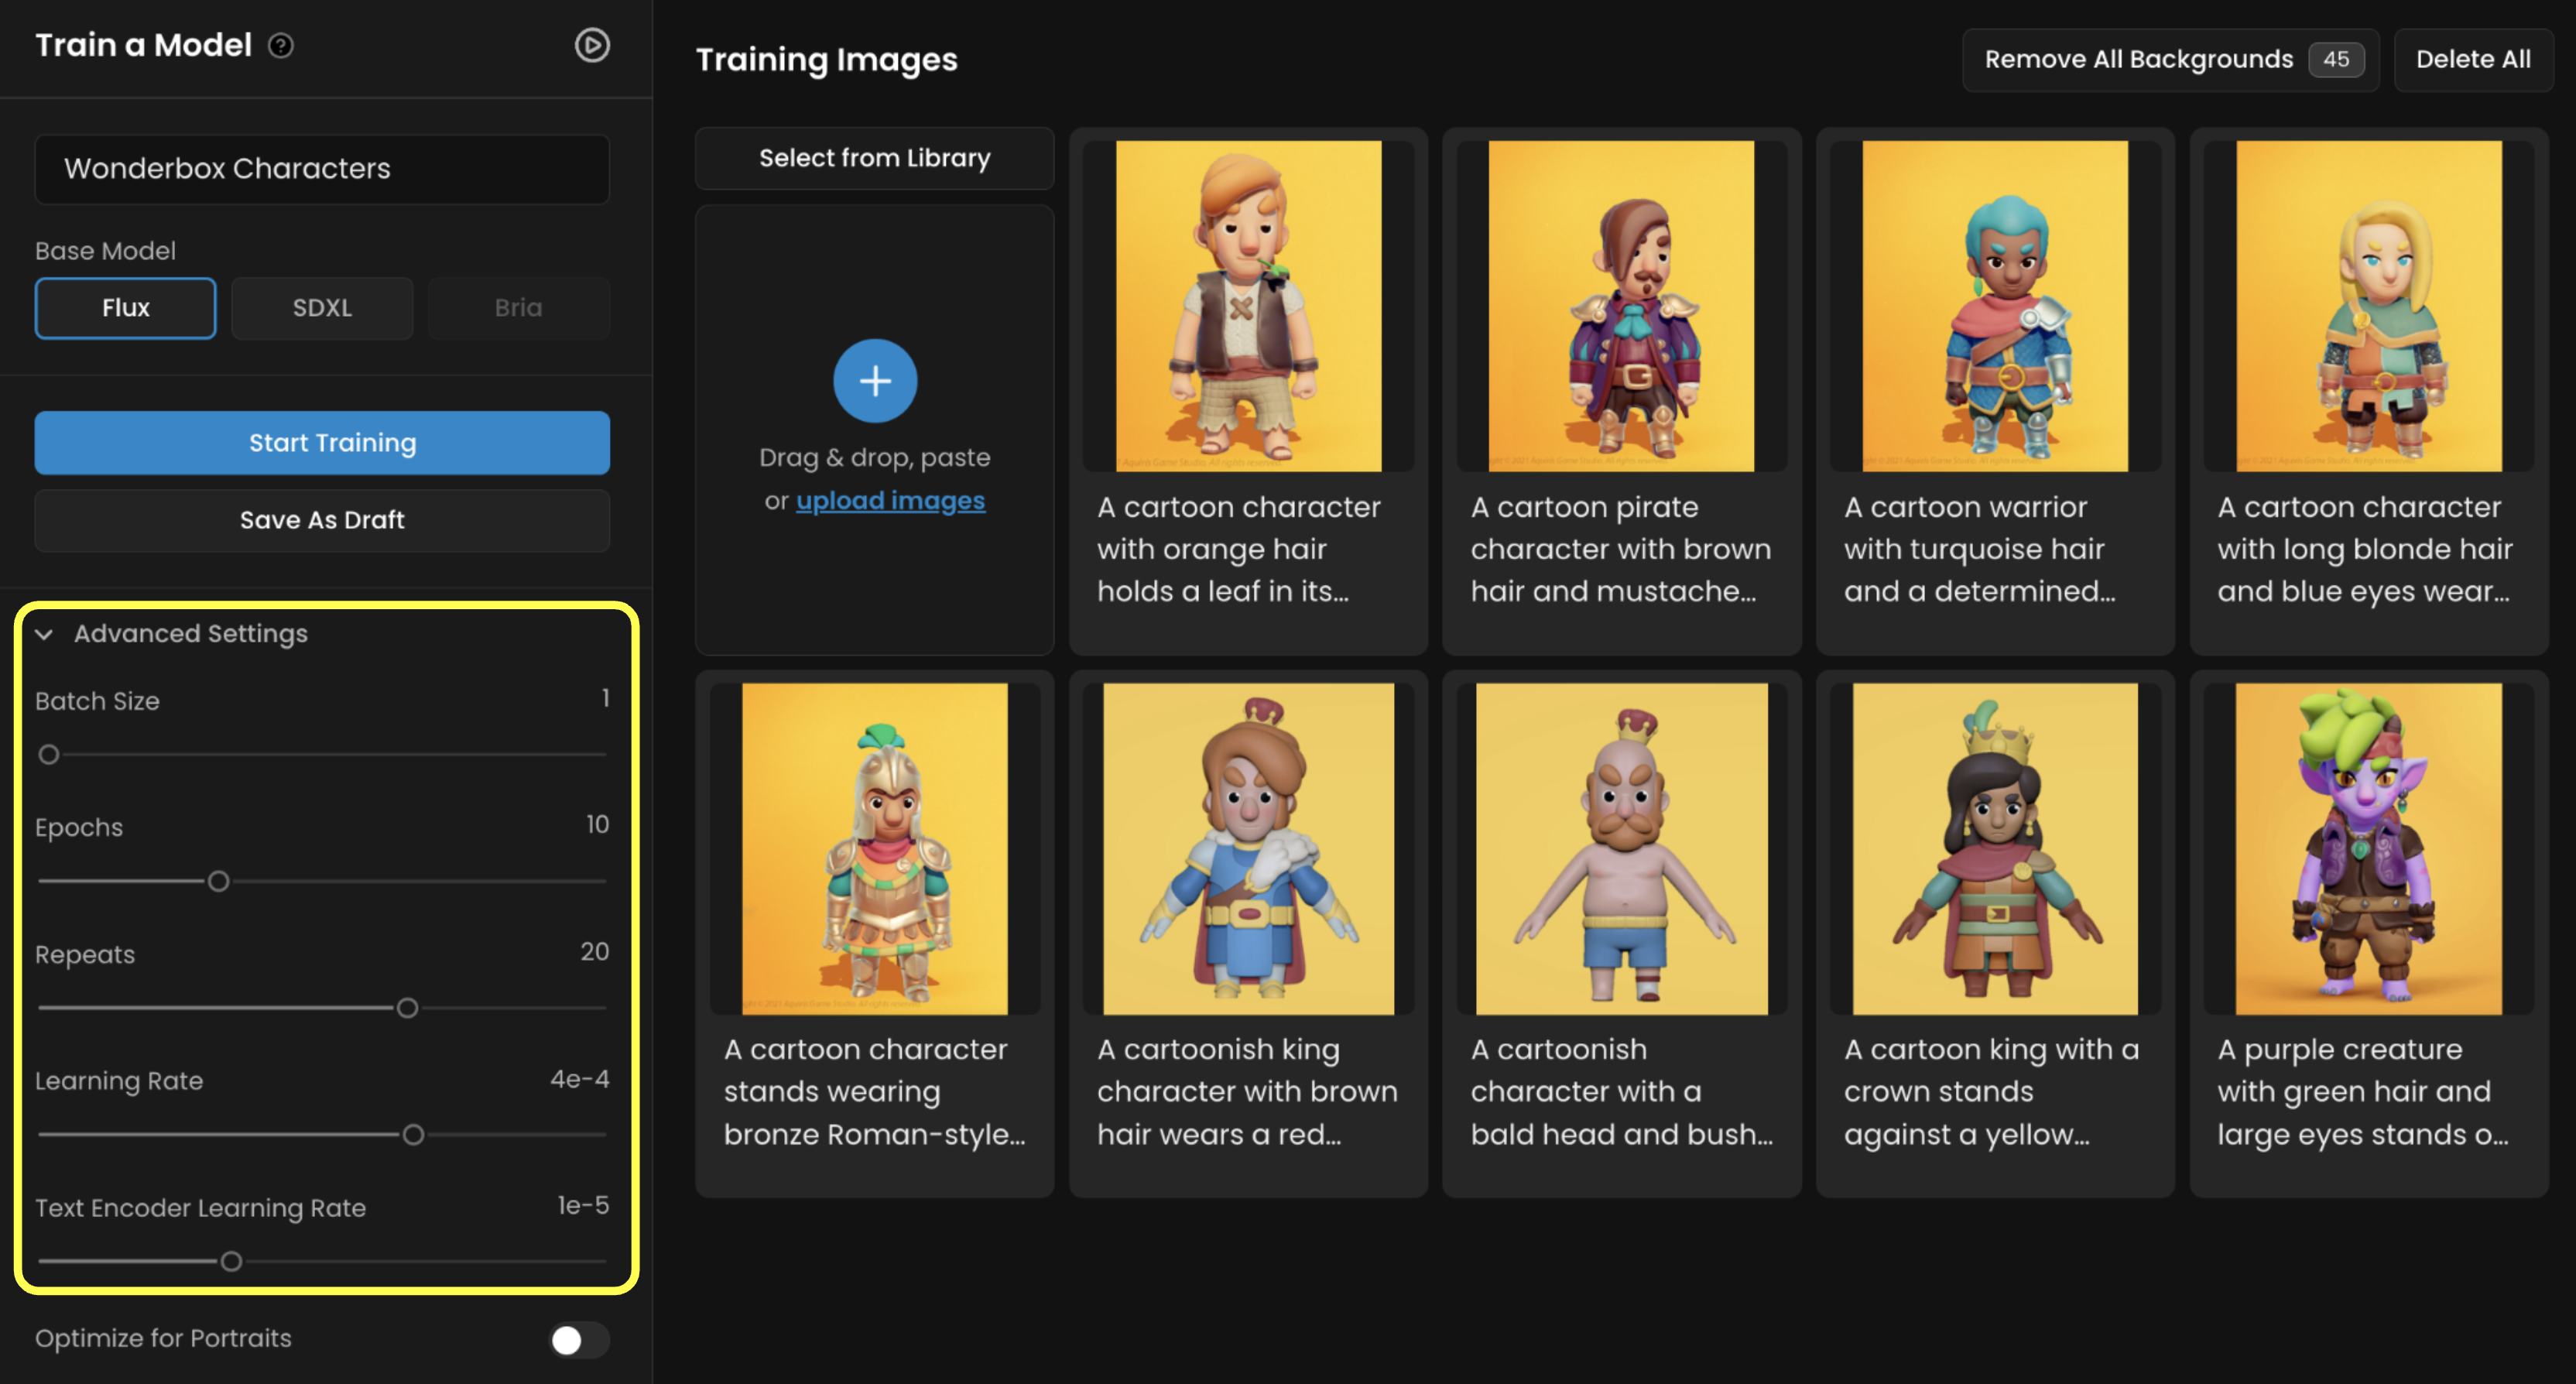
When you train a model in Scenario, you're teaching it to understand your images and captions so it can recreate your style or characters. These training settings control “how the model learns”. This section walk you through each of them, one by one in straightforward terms.
Learning Rate
This setting controls how fast the model learns.
You can think of it like the “sensitivity dial”: turn it up, and the model learns faster, but it can also become unstable or miss important details. Turn it down, and learning is slower, but more controlled.
For most trainings with 10 to 25 training images, the default learning rate of 1e-4 works perfectly. If you’re using fewer images (around 5 to 8), you might want to lower it to 5e-5 to avoid overfitting. On the other hand, if you’re using a larger dataset (25+ images), a slightly higher value like 2e-4 can help the model learn efficiently. Always start with the defaults, improve and adjust incrementally afterwards.
As a general rule:
Fewer images = lower learning rate. More images = slightly higher rate.
If you increase your batch size (explained below), you should raise the learning rate too (this is automated on the Scenario Training UI)
Text Encoder Learning Rate
This tells the model how strongly it should pay attention to the captions (i.e. the descriptions of the training images). If your images are captioned with useful details, this setting helps the model learn the connection between words and visuals.
For example, if you're training a character model, your captions might include:
elven archer with silver hair, green cloak, leather armorpixel art knight, side view, holding sword, 16-bit stylesci-fi android with glowing blue eyes, cyberpunk outfit, 3/4 pose
In these examples, you’re labeling things like pose, clothing, art style, perspective, or lighting — the kind of features you’d actually want to control later via prompting.
The default learning rate for the text encoder is 1e-5, and it’s good for most use cases.
If your captions are clean and descriptive, you might keep it at 1e-5 to let the model fully learn the link between text and image.
If the captions are weak, noisy, or mostly auto-generated and vague, you could lower this to reduce the impact - but a better option is to fix the captions themselves
Batch Size
Batch size controls how many images your model learns from at the same time during training. It doesn’t change which images are used - it just changes how they’re processed.
Think of it like “feeding the AI one meal vs. two meals at a time”:
A batch size of 1 means: “look at one image, update the model”
A batch size of 2 means: “look at two images at the same time, average what to learn, then update.”
What’s the tradeoff?
Smaller batch (1): Slower, but more precise updates. You get finer control, which is ideal for small datasets or training specific characters.
Larger batch (2+): Faster, but rougher updates. This might speed up training slightly, but you risk underfitting unless you compensate by increasing the learning rate.
1 to 2, also increase the learning rate proportionally (e.g., from 1e-4 to 2e-4). Otherwise, the model won’t update strongly enough per image.Unless you’re customizing an advanced workflow or running heavy-duty experiments, just leave batch size at 1. It’s the most stable option, especially for character or style models in Scenario. But if you’re doing more advanced or large-scale training, there are a few reasons you might increase it:
You’re using a large dataset (40+ images) and want to speed up training slightly
You’re running multiple training experiments and want to fine-tune efficiency
Epochs
What are epochs?
This setting controls how many full times the model goes through your entire image set.
An epoch means the model goes through your entire dataset one time. If you set 10 epochs, your model sees your images 10 times. And at the end of each of those passes, Scenario saves each epoch as a fully usable LoRA model.
That means if you train for 10 epochs, you don’t just get one LoRA model - you get 10. You can save test each one and see which gives you the best results. You’re not locked into the final version. In fact, the best version is often in the middle — like epoch 6, 8 or 9 — before the model starts overfitting.
⚠️ For now, you can only access and download the last epoch (e.g., if you train for 10 epochs, you'll get epoch 10). Multi-epoch comparison and download are coming soon!
How Many Epochs Should You Use?
It depends on how many images you’re training with - and how many LoRA versions you want to test.
If you have 10 to 25 images, which is the sweet spot for most users, go with 10 epochs. That’s a solid balance: the model learns enough, but doesn’t overdo it. And you get up to 10 versions to try out.
If you only have a few images, say 5 or 6, you may need more epochs to give the model enough time to learn. Something like 15-20 epochs makes sense here - and it gives you more options/versions to compare.
If you’re using 25 or more images, you can probably lower down to 6 to 8 epochs. The dataset already has enough variety to train the model well - fewer passes means faster training, less chance of overfitting, and you still get a handful of model versions to choose from.
What Happens After Training?
Once training is done, go to your model page. You’ll see the list of Epochs, from the first one all the way up to the final epoch. Don’t assume the last version is the best - especially if your images were very similar or the style was strong. Earlier versions often give more flexible, expressive outputs. Later versions can be sharper but sometimes too locked in.
Compare the few versions that seem the most relevant
In short
The more epochs, the more deeply the model learns. But there’s a balance:
too few and the model won’t learn enough (underfit)
too many and it might overfit (basically memorize your training images too much, instead of generalizing the style or subject).
Repeats
This is how many times each image gets shown to the model during each epoch. A higher repeat value tells the model, “Pay close attention to this image.”
If you set Repeats to 20, that means the model will look at each image 20 times in every training round (epoch). So if you’re training for 10 epochs, each image is actually seen 200 times total.
This setting is especially useful when you have a small dataset. The fewer images you have, the more you’ll want to increase Repeats so the model gets enough exposure to learn meaningful patterns.
Here’s a good rule of thumb:
20 repeats is the default on Scenario
If you have 10 to 25 images, 15-20 Repeats is usually enough
If you’re training with 5 to 10 images, you may try higher (20-30 Repeats)
With 25+ images, you may go lower — around 10-15 Repeats
Repeats works together with Epochs to control how much your model learns — and how much it risks overfitting. If your generations look too rigid or too close to the original training images, try lowering Repeats or Epochs a bit. If the results feel too vague or inconsistent, increase one or both slightly.
About Training Steps
You might come across the term "training steps" in other guides or tools. It’s not something you set directly in Scenario, but it helps to understand what it means. A step is one individual learning moment for the model — one small update where it adjusts based on the training images.
Steps are automatically determined by how many images you’ve uploaded, and what values you set for Repeats and Epochs.
For example, if you have 10 images, set Repeats to 20, and Epochs to 10
that’s 10 images × 20 repeats × 10 epochs = 2,000 steps
So your model will go through 2,000 steps during training.
More steps = more training time, and more chances for the model to learn. But that also means a higher risk of overfitting if the dataset is small and the training is too long.
You don’t need to calculate steps or worry about the exact number - but if you ever see them mentioned, just know they reflect the total amount of learning your model has done.
Final Thoughts
Training custom LoRA models on Scenario doesn’t require a background in machine learning — just an understanding of what each setting controls and how they work together.
Start simple. Use the defaults. Then adjust based on what you’re trying to achieve and how many images you’re working with.
Want sharper, more consistent outputs from a small dataset? Increase Repeats or Epochs.
Seeing results that are too rigid or repetitive? Dial one of them back.
Running larger-scale experiments? That’s when tweaks like Batch Size and Learning Rate scaling start to matter.
Each training parameter is a tool — not a test. You don’t have to get it perfect on the first run. Use your early trainings to explore, experiment, and learn how your model responds. And remember: you’re never locked into just one version. Scenario gives you multiple LoRA checkpoints for every training, so you can pick what works best.
The more you train, the better you’ll get at fine-tuning your models — and the closer your generations will get to exactly what you imagined.
See https://help.scenario.com/en/articles/improve-refine-your-models-in-scenario
Was this helpful?