Improve and Refine Your Models
Last updated: May 25, 2026

Introduction
A first training run is rarely the final one. This article covers the evaluation loop and the levers you can pull when results don't match what you wanted: testing strategy, dataset adjustments, parameter tuning, caption refinement, family migration, and merging as a refinement tool.
For the underlying training workflow, see Basics of Model Training. For specific training types, see:
Step 1: Evaluate systematically
Before adjusting anything, generate enough output to spot patterns. One or two test images aren't enough.
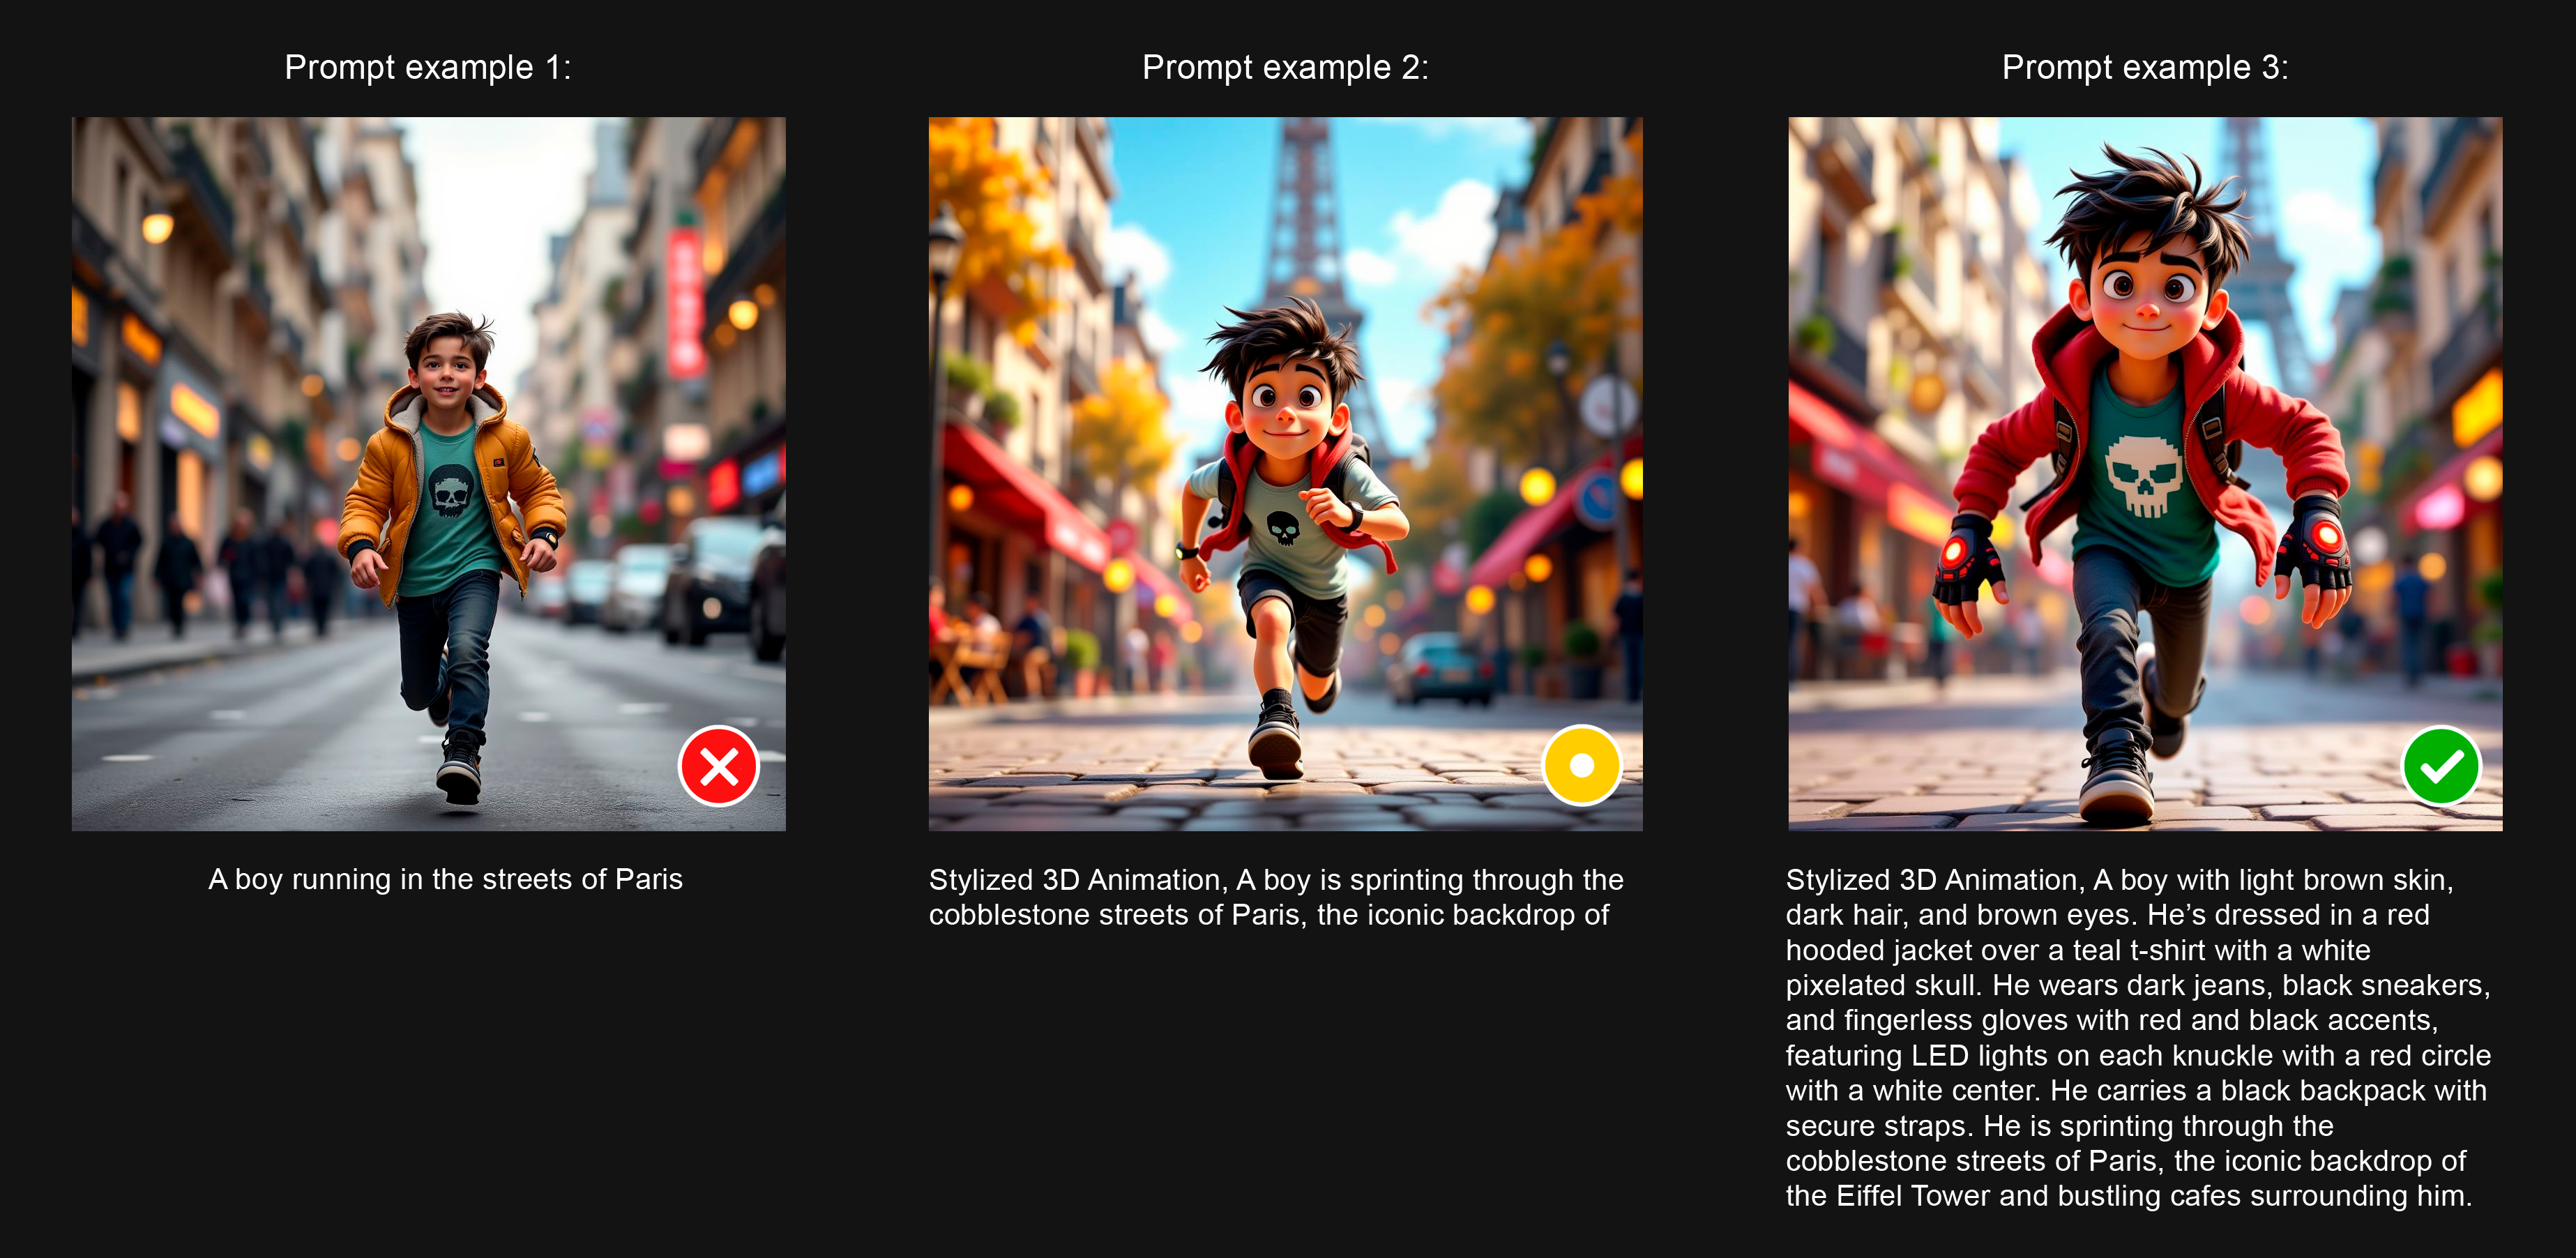
Testing approach:
Start with simple prompts (5 to 10 words) to verify the model picked up the core subject or style.
Move to complex prompts (20 to 50 words) to test whether the model holds together under specificity.
For character models, test varied poses, expressions, outfits, and environments to confirm identity stays consistent.
For style models, test the style across diverse subjects to confirm it's the style that was learned, not the content.
For edit LoRAs, test on input images that are NOT in your training set.
Generate 10 to 20 outputs against the same prompts and seeds across versions. This is the only way to compare epochs or retrains objectively.
Use Prompt Spark to write better prompts, faster
It's key to understand that custom AI models and base/foundation models require different prompting approaches. Typically, effective prompts for custom models mirror the style & structure of the captions used during training. You can leverage Scenario's Prompt Spark tool to craft better prompts, and quickly evaluate how your model responds to various prompts.
For instance, generate relevant prompts tailored to your specific model using the "dice" icon. Alternatively, start with a few key words about your subject or scene, then use "Rewrite Prompt" (sparkle icon) to expand and refine them. You can also upload an image directly into the prompt box to automatically generate a descriptive prompt that represents the visual elements in the image.

Experiment to identify which prompt structure works best with your model and determine if you need to add style-related tokens to further guide and control the output.
Step 2: Categorize the issues
Group what you see into four buckets:
Category | What it looks like |
|---|---|
Identity / style consistency | Subject drifts; style is sometimes there, sometimes not |
Detail accuracy | Logo wrong, face features off, signature element missing |
Prompt adherence | Model ignores prompt details; outputs are stuck in training compositions |
Technical quality | Artifacts, distortions, color shifts, unnatural anatomy |
Different categories point to different fixes. Diagnose before treating.
Step 3: Adjust the dataset
The dataset is the biggest lever. Most refinement runs improve the dataset before changing parameters.
Trim what's hurting:
Remove redundant or near-duplicate images that lead to overfitting.
Remove off-style images that pull the model away from your target.
Replace low-resolution images with 1024px+ alternatives.
Drop pairs (in edit LoRAs) where the transformation is inconsistent with the rest of the set.
Add what's missing:
For identity drift: add more images showing the constant traits in varied contexts.
For pose / framing limitations: add training examples covering the missing angles.
For style inconsistency: add examples that emphasize the underrepresented stylistic elements.
The current sweet spot is 5 to 15 well-curated images (max 50). Large messy datasets underperform small clean ones every time.
Step 4: Refine captions
Captions are the second-biggest lever. They tell the model what's variable and what's constant.
For single-image LoRAs:
Lead with the defining features that should stay constant (character traits, product features, environment hallmarks).
Describe what varies in this image (pose, lighting, framing) so the model treats those as variable.
Use a trigger word consistently if you need precise activation control. Audit that every caption includes it.
For style LoRAs, don't describe the style in captions: describe the contents. The style is what the model learns implicitly.
For edit LoRAs:
Captions are instructional (
Apply...,Convert...,Replace...,Transform...).Use the same verb structure across every caption in a dataset.
Use the same trigger word in every caption, or none in any.
See Advanced Captioning for deeper guidance.
Step 5: Tune training parameters
Once the dataset and captions are clean, parameter tuning is a refinement, not a rescue.
Lower the learning rate for subtler learning:
Default
1e-4works for most cases.Drop to
5e-5for fine adjustments and small datasets (5 to 10 images).Raise to
2e-4only for large datasets (25 to 50 images).
Adjust epochs and repeats to balance training depth with overfitting risk:
Dataset size | LR | Epochs | Repeats |
|---|---|---|---|
5 to 10 images |
| 15 to 20 | 20 to 30 |
10 to 25 images |
| 10 | 15 to 20 |
25 to 50 images |
| 6 to 8 | 10 to 15 |
Always train with all epochs saved so you can compare side by side and pick the optimal version. The ideal is rarely the last epoch.
For the full parameter reference, see Advanced Training Parameters.
Step 6: Consider a different family
If two or three retrains haven't fixed the issue, the problem may not be the dataset or parameters: it may be the family.
When to reconsider:
Subject identity keeps drifting in a stylized setting: try Z-Image (different training characteristics).
Cost is becoming a constraint with Flux 2 Dev: try Klein 9B or Qwen Image 2512.
Edit LoRA loses surrounding context: try Qwen Edit instead of Flux 2 Edit.
LoRAs are not interchangeable across families, so this means a fresh training run, but on the same dataset and captions you already curated.
For family selection, see Choose Your Base Model Family.
Step 7: Use merging as a refinement technique
Some weaknesses are easier to compensate for than to retrain out.
A character model with weak signature-outfit fidelity: merge with a small wardrobe LoRA at low weight.
A style model that's too aggressive: merge with the base or a softer style at low weight.
A product model that drifts in lifestyle scenes: merge with an environment LoRA at low weight.
Merging is only supported for models trained on Flux 1. See Merge Custom-Trained Models.

Versões do mesmo modelo de personagem com diferentes versões e estilos(merged)
Step 8: Finalizing and Documenting
3.1 - Compare Different Model Versions
After implementing improvements, compare your different model versions to see which performs best.
Create a series of test images using exactly the same prompts and seeds across all model versions - this gives you an accurate, side-by-side comparison of results. Look at which version best fixes the issues you spotted during your evaluation process.

Versions of the same character model with different variations and styles (merged)
What "good" looks like
After refinement, the model should:
Produce the target subject, style, or transformation consistently across diverse prompts.
Adapt to prompt variations the original training didn't include.
Stay on-identity without locking into specific training compositions.
Avoid technical artifacts (color shifts, anatomy errors, branding distortions).
When all four hold, ship it. Further tuning rarely helps from there.