Introduction
Pixverse v4, v4.5, and v5 are advanced AI video generation models integrated into Scenario, designed for creating short, visually consistent animations in a variety of artistic styles. These models provide an efficient workflow for creators who want fast, controllable video generation, with flexible options for prompt, style, effect, resolution, and aspect ratio.
Pixverse v4.5 delivers higher quality and style consistency, especially when using both a first frame and a last frame as reference.
Pixverse v5 is the latest and most recommended version, expanding beyond previous models by supporting both text-to-video (T2V) generation and frame-to-frame transitions (first frame + last frame). With greater fidelity to prompts and smoother animations, Pixverse v5 delivers the most versatile and cinematic-quality results yet.
Direct links:
Key Strengths
Pixverse v5 is the latest and most recommended version, delivering the highest visual quality and most reliable style consistency. It expands beyond previous models by supporting both text-to-video generation and first + last frame transitions, giving creators more flexibility.
Pixverse v4.5 also provides excellent results, with strong quality and consistency, especially when using a first and last frame as reference.
Good prompt adherence, with highly responsive results for character movement and camera direction.
Flexible and versatile, capable of generating videos in different artistic styles and applying a wide range of stylistic effects.
High level of control: you can use first and last frames to precisely guide your scenes, or even create seamless loops by using the same image for both.
Professional resolution support: generates videos up to 1080p, making it suitable for high-resolution and professional projects.
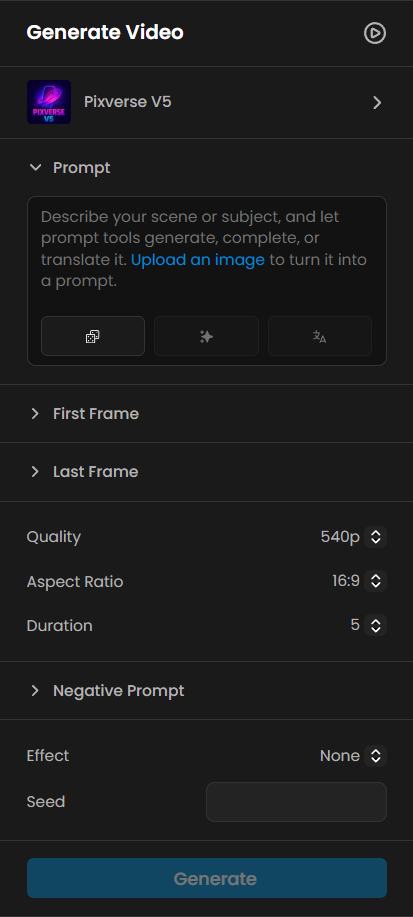
Generation Panel Options
General Options
Text-to-Video (T2V): Generate animations directly from text prompts, without needing input frames. Ideal for fast prototyping, concept exploration, or when no base images are available.
First Frame / Last Frame: Upload or select images to guide the start and end visuals of your animation. These images define the subject’s look and pose at each point.
Quality: Select the output resolution for your generated video (360p, 540p, 720p, or 1080p).
Aspect Ratio: Choose from 16:9, 9:16, or 1:1. Custom aspect ratio is only available with image-to-video.
Duration: Set the video length to either 5 or 8 seconds.
Motion Mode (available only in v4 and v4.5): Select between normal (default, more reliable) and smooth (softer transitions, but sometimes less consistent).
Style (available in v4 and v4.5): Choose from a set of predefined visual styles to guide the overall artistic direction of your video. Styles include Realistic, Cinematic, Cartoon, Anime, and 3D Render, each applying distinct visual aesthetics and color treatments.
Effects: Playful effects like Let’s YMCA! or Kungfu Club bring an energetic tone, while options such as Vogue Walk or Suit Swagger add a polished, stylish finish. These effects are ideal for quick creative experiments and eye-catching results.
Styles
Available in v4 and v4.5 only: You can choose from five predefined styles to generate your video in a specific look — anime, 3d_animation, clay, cyberpunk, or comic. These styles transform the overall appearance of your video, whether starting from a photo or any other image.
Effects
PixVerse offers a variety of effects that add unique visual themes or motion to your videos. These effects are applied directly during generation, shaping the final look and action of the output.
Effects available in v4, v4.5, and v5
All these model versions include the same set of predefined templates, such as:
Let’s YMCA! – Characters perform the iconic YMCA dance.
Subject 3 Fever – Characters dance in the energetic “Fever” style.
Ghibli Live! – Transitions into an animation inspired by Studio Ghibli.
Suit Swagger – Characters wear suits and perform stylish gestures, like adjusting their ties.
Muscle Surge – The character rips off their shirt dramatically, flexing as muscles grow.
360° Microwave – Rotates the camera 360° around the central character.
Warmth of Jesus – A Jesus-like character enters the scene and hugs the central character.
Emergency Beat – Characters dance in the energetic “Beat” style.
Anything, Robot – Transforms all characters in the scene into robots.
Kungfu Club – Characters engage in kung fu combat, or an extra fighter is added.
Mint in Box – Characters are transformed into toy figures.
Retro Anime Pop – Changes the visual style and adds retro anime background music.
Vogue Walk – Characters walk as if on a fashion runway.
Mega Dive – The character dramatically dives into water.
Evil Trigger – The character picks up a machine gun and fires with a sinister expression.
These same effects are supported in all PixVerse models, maintaining consistency in creative options while expanding generation capabilities with text-to-video support and first + last frame workflows.
Usage Recommendations
For the best results, use high-resolution images as your first and last frames.
Select a style and effect that matches your creative goal before generating. You can also combine a style and an effect for even greater visual impact.
Choose a resolution and aspect ratio that best fit your intended destination (social media, YouTube, presentations, etc).
In most cases, “normal” motion mode provides better consistency, while “smooth” is recommended for use with effects that involve more exaggerated or dynamic movements.
Workflow Examples and Use Cases
Character Transformation (Two Frames)
Upload a character image as the first frame and a second, transformed version as the last frame.
Example prompt:
“A cartoon character stands in dramatic dark lighting, clad in detailed armor and gripping a trident blazing with red-orange flames. The camera holds steady as the inferno around the character’s staff flickers intensely, casting bold shadows. Gradually, the fiery glow shifts to a shimmering blue, cooling the entire palette as the flames transform into blue fire and the demon’s crimson skin turns frosty blue. The demon’s expression softens, steam rises from the armor as heat fades, and the atmosphere cools. Electric blue highlights glint off metal details as the scene settles into a moody, icy tone.”Choose “None” for style and effect, or experiment with a style for added impact.
Generate the video and review how the transformation plays out from the first frame to the last.
This workflow is ideal for dramatic visual transformations, game character animations, or any project where you want to clearly show a visual evolution or scene change using the image-to-video workflow. For more details on this use case, please review this detailed guide.
Paper Boat Cinematic (Text-to-Video)
Use a calm pond or lake scene as your prompt focus.
Set aspect ratio to 16:9 and select normal motion mode.
Example prompt:
“A single paper boat floats on a calm pond surrounded by overhanging willow branches. As a gentle breeze rises, small ripples spread from the boat, causing its paper edges to flutter. Sunlight dapples the surface, catching on drifting pollen and faint reflections from shifting leaves above. The camera glides low alongside the boat, following its slow journey as shadows move and the breeze guides it peacefully beneath the trailing green branches.”Select Style and Effect as None for a natural, cinematic result, or experiment with styles for different looks.
Generate, review the video, and adjust prompt or settings as needed.
This approach is ideal for poetic visual stories, tranquil cutscenes, or nature-themed animations using the text-to-video workflow.
Product Showcase (Image-to-Video)
Upload a product image as the first frame. Optionally, set a last frame if you want the video to end on a specific angle or pose.
Add a prompt describing the product or item you want to showcase.
Select the 360º Microwave effect to create a dynamic rotation around the product.
Generate the video and review how the product is presented..
For professional presentations or advertising, you can Enhance the output if you need higher resolution.
This workflow is ideal for presenting 3D models, retail products, or collectibles, highlighting their design and craftsmanship through smooth, controlled camera movement.
Social Media Story
Upload a photo as the first frame.
Example prompt: “A couple hugging at sunset; close-up, slow pan right; soft, warm color palette.”
It is highly recommended to use the "Rewrite your Prompt" feature to generate a more detailed prompt with richer technical information. For example, see how the same idea is transformed after using Rewrite:
“A couple stands in a warm embrace on a sunlit balcony overlooking the sea at sunset, golden light bathing their faces and casting long reflections across the water. Soft leaves frame the scene above while their glasses shimmer on the table nearby. The camera moves slowly to the right in a gentle close-up pan, capturing the subtle smiles, their intertwined hands, and the warmth of the fading light, all rendered in a delicate, sun-drenched color palette that glows with intimacy and tranquility.”
Generate the video and adjust the prompt or settings if needed.
Ideal for TikTok, Instagram Stories, or Reels.
Sequential Video Story
It is recommended to use the Nano Banana model to create new frames from the images you’ve already generated. Learn more here: Nano Banana.
Select the Pixverse v5 model and upload the last frame of each scene to serve as the first frame of the next sequence.
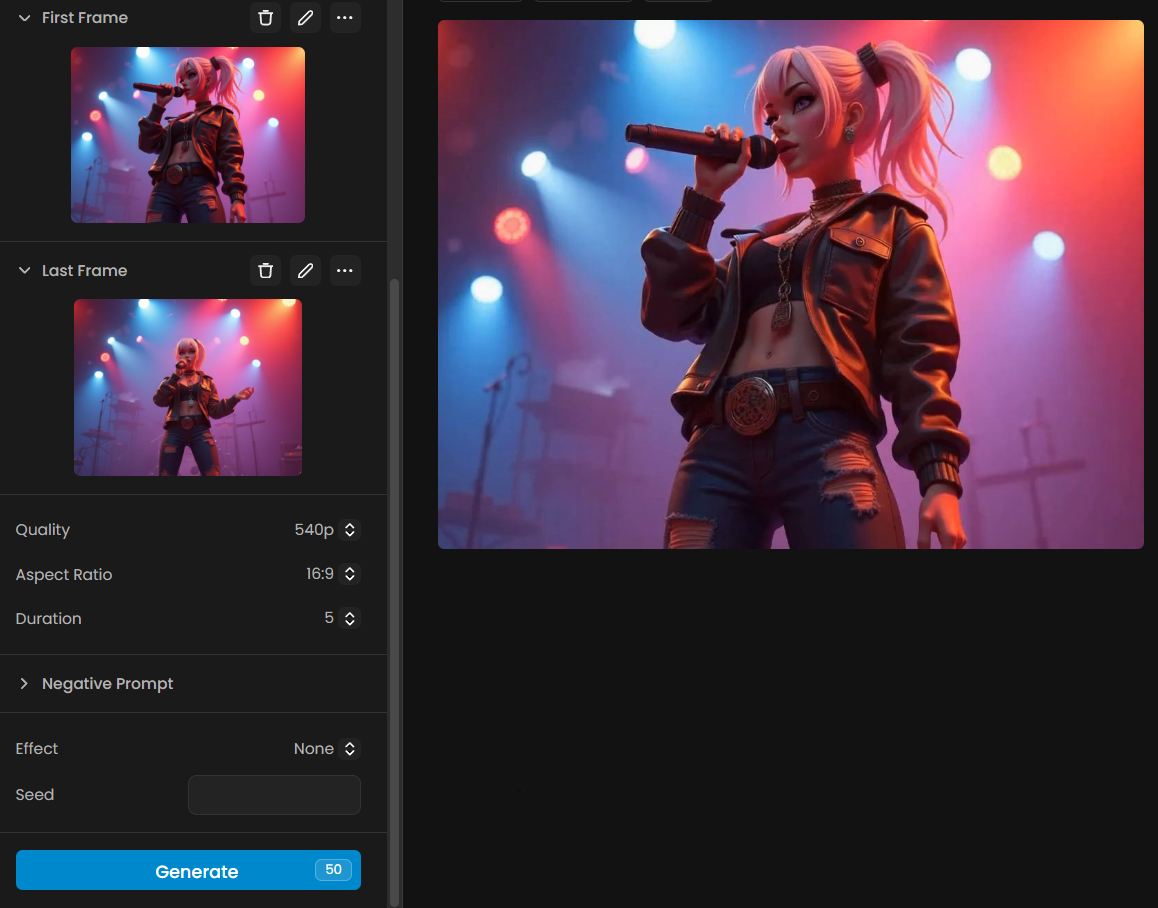
Example prompt:
“A stylized 3D female singer with platinum blonde hair tied in a ponytail, wearing a black leather jacket and ripped jeans, performs under dramatic red and blue stage lights. The camera begins with a close-up of her confident expression, microphone in hand, then transitions into a wide-angle shot revealing the cheering audience. The atmosphere is electric, filled with smoke, spotlights, and the vibrant energy of a live rock concert.”Each new final frame creates continuity for the next video, resulting in a smooth sequential narrative.
At the end, the five videos are combined into a single edit, showing the singer’s performance from multiple perspectives — from close-up to a cinematic full-stage view.
Conclusion
Pixverse 4, Pixverse 4.5, and Pixverse 5 on Scenario make it easy to generate short, high-quality videos with a high level of creative control. With these models, you can guide the video using first and last frames, apply a wide variety of effects, and adjust key settings like aspect ratio, duration, and resolution.
Pixverse v4 and v4.5 allow you to select from five distinct visual styles, combine them with effects, and use Motion Mode for different types of transitions. These versions remain powerful options for creators who want stylistic flexibility.
Pixverse v5 is the latest and most recommended version. It expands the workflow by supporting both text-to-video generation and frame-to-frame transitions, while introducing negative prompting for excluding unwanted elements. V5 delivers higher fidelity to prompts, smoother animations, and supports professional-quality outputs up to 1080p.
A recommended workflow is to start with Pixverse v5 for the most versatile and consistent results, using both first and last frames when guiding animations, and applying effects strategically to match your creative goal. For v4 and v4.5, experiment with styles and effects at lower resolutions before finalizing your output. For the best results across all versions, leverage the “Rewrite your Prompt” feature to enrich your video generation.
Pixverse empowers you to create everything from social media clips to product showcases and cinematic character transformations quickly, consistently, and with professional quality.
Was this helpful?