Edit images with prompts
Last updated: July 9, 2026
Learn how to use Gemini 3.1 (Nano Banana Pro), Gemini 3.0 Pro (Nano Banana), Seedream 5 Lite, Seedream 4.5, GPT-Image 2, Qwen Edit and P-Image Edit.
Introduction
Edit with Prompts is Scenario's natural-language image editing tool. Instead of masks or layers, you describe the change you want in plain English and the model interprets and applies it: swap a background, restyle a subject, change the lighting, replace or remove an object, adjust wardrobe, or apply broad artistic transformations without leaving the Scenario workspace.
The feature is available across the platform's most capable prompt-based editing models: Gemini 3.1 (Nano Banana 2), Gemini 3.1 Lite (Nano Banana 2 Lite), Gemini 3.0 Pro (Nano Banana Pro), Gemini 2.5 (Nano Banana), GPT Image 2, MAI Image 2.5 Edit by Microsoft, FLUX Kontext, FLUX 2 (Max), Seedream 5.0 Lite, Seedream 4.5, Qwen Edit Plus, Grok Imagine, LongCat Image, Reve Remix, and P-Image Edit. Each model brings its own strengths in reasoning, prompt adherence, resolution, and speed. Choose the one that matches your workflow, and switch freely as new versions ship.
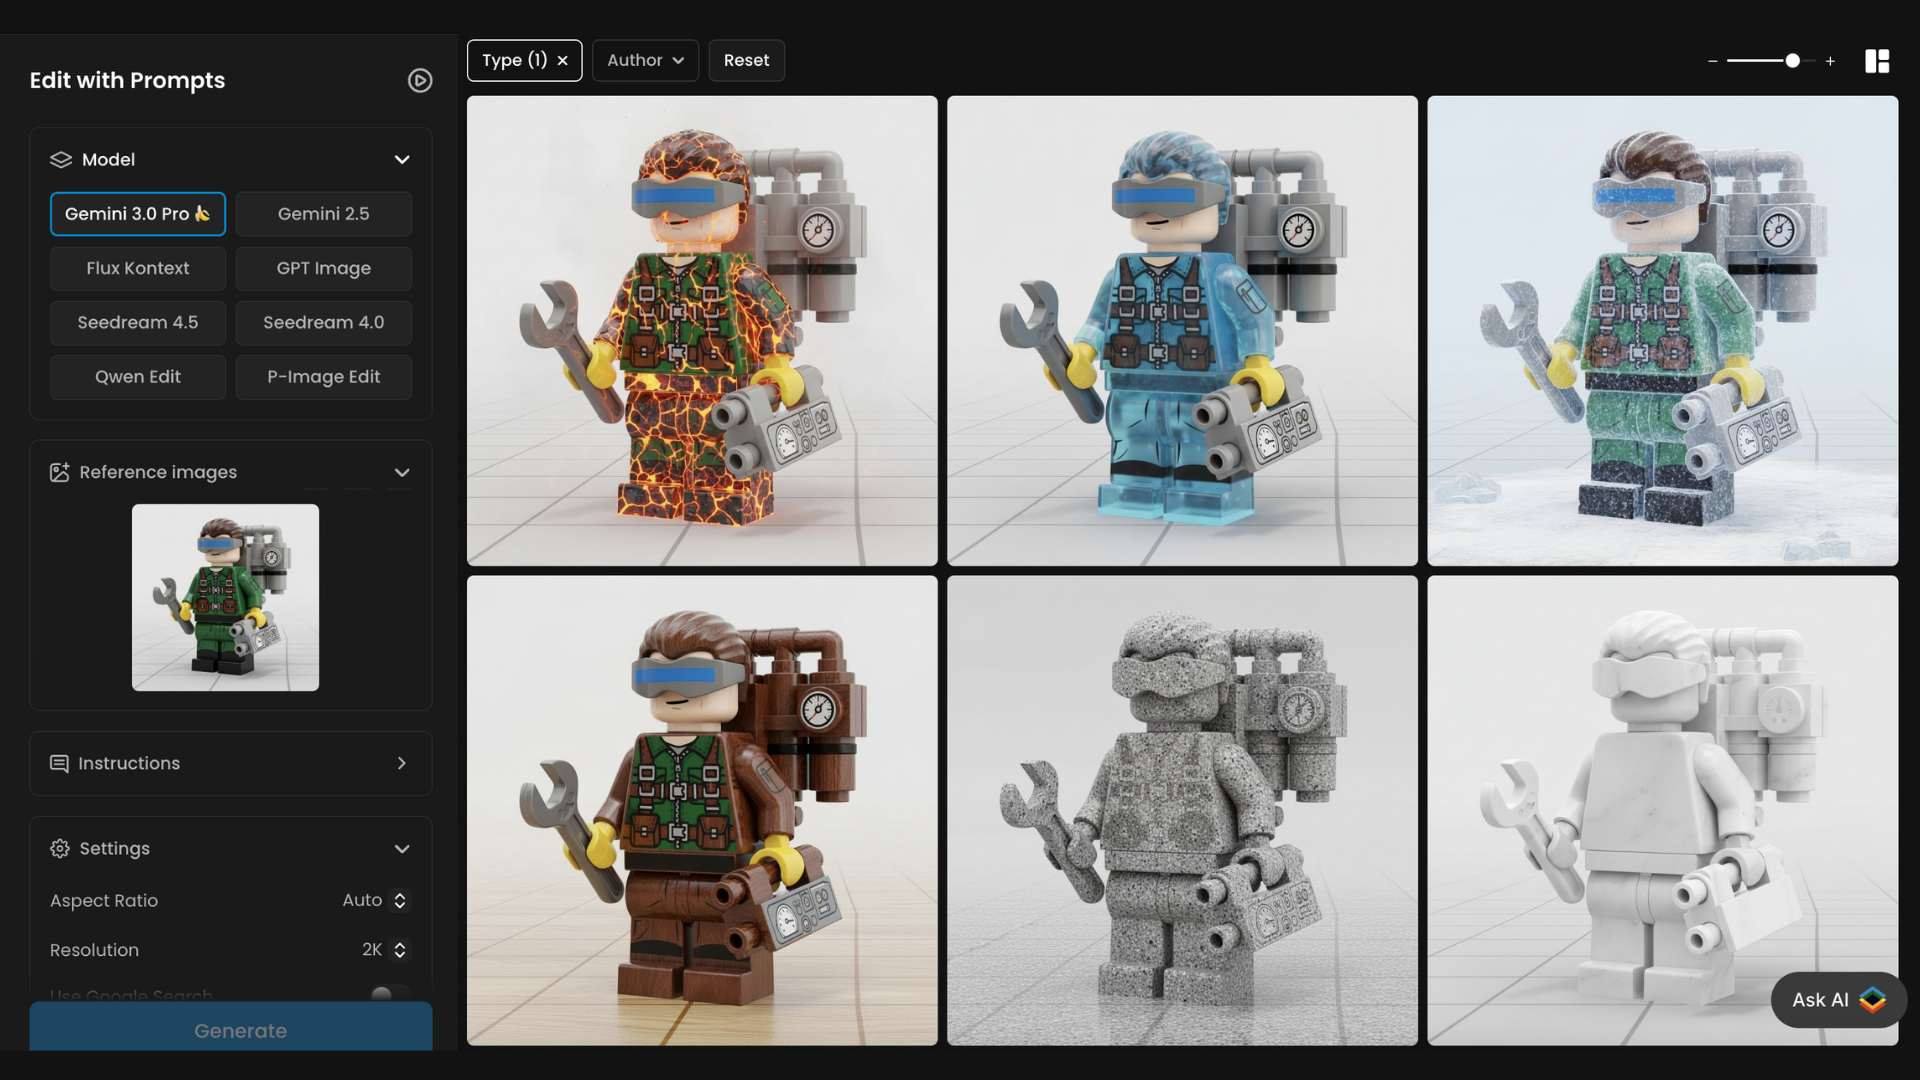
A series of character all edited with the different prompts in order to change the LEGO figure texture.
Enhanced, “Smart” Editing Capabilities
With Edit with Prompts, you can describe the desired changes using text instructions, and the selected AI model will apply these edits directly by either modifying your image or generating a new one. The tool supports a wide range of transformations, such as the following key capabilities:
Object & Element Control – Add, remove, modify, or blend elements with precision. This includes merging components from multiple images into a single composition.
Background & Scene Editing – Change environments, lighting, and perspectives, or build complex compositions such as placing characters into a scene or assembling objects.
Style & Consistency – Apply artistic transformations (anime, LEGO, cartoon, painting styles) while maintaining character identity and overall coherence.
Multi-Reference & Batch Generation – Use multiple reference images (up to ten with Seedream 4) to guide style and composition, and generate coherent sequences of images for storyboards, catalogs, or variant exploration.
Precision Masking & Localized Edits – Target specific regions of an image for focused modifications. This enables fine-tuned control, such as altering only facial features, clothing details, or individual objects while leaving the rest untouched.
Resolution & Quality Enhancement – Improve sharpness, upscale resolution, or refine details seamlessly while preserving the artistic intent.
Dynamic Variation & Iteration – Generate multiple creative variations from a single prompt or reference, enabling fast exploration of alternatives. Ideal for concept design, A/B testing, and discovering unexpected visual directions.
The quality and relevance of your results depend on several key factors: the reference image(s) you provide, the clarity and specificity of your instructions, your chosen AI model (Seedream 4.0 or 4.5, Gemini 2.5 and 3, Kontext, GPT Image, Qwen edit or P-Image Edit), and any additional settings you apply.
Overall, Edit with Prompts accelerates creative workflows, helping you produce high-quality visuals faster while maintaining greater flexibility and control.
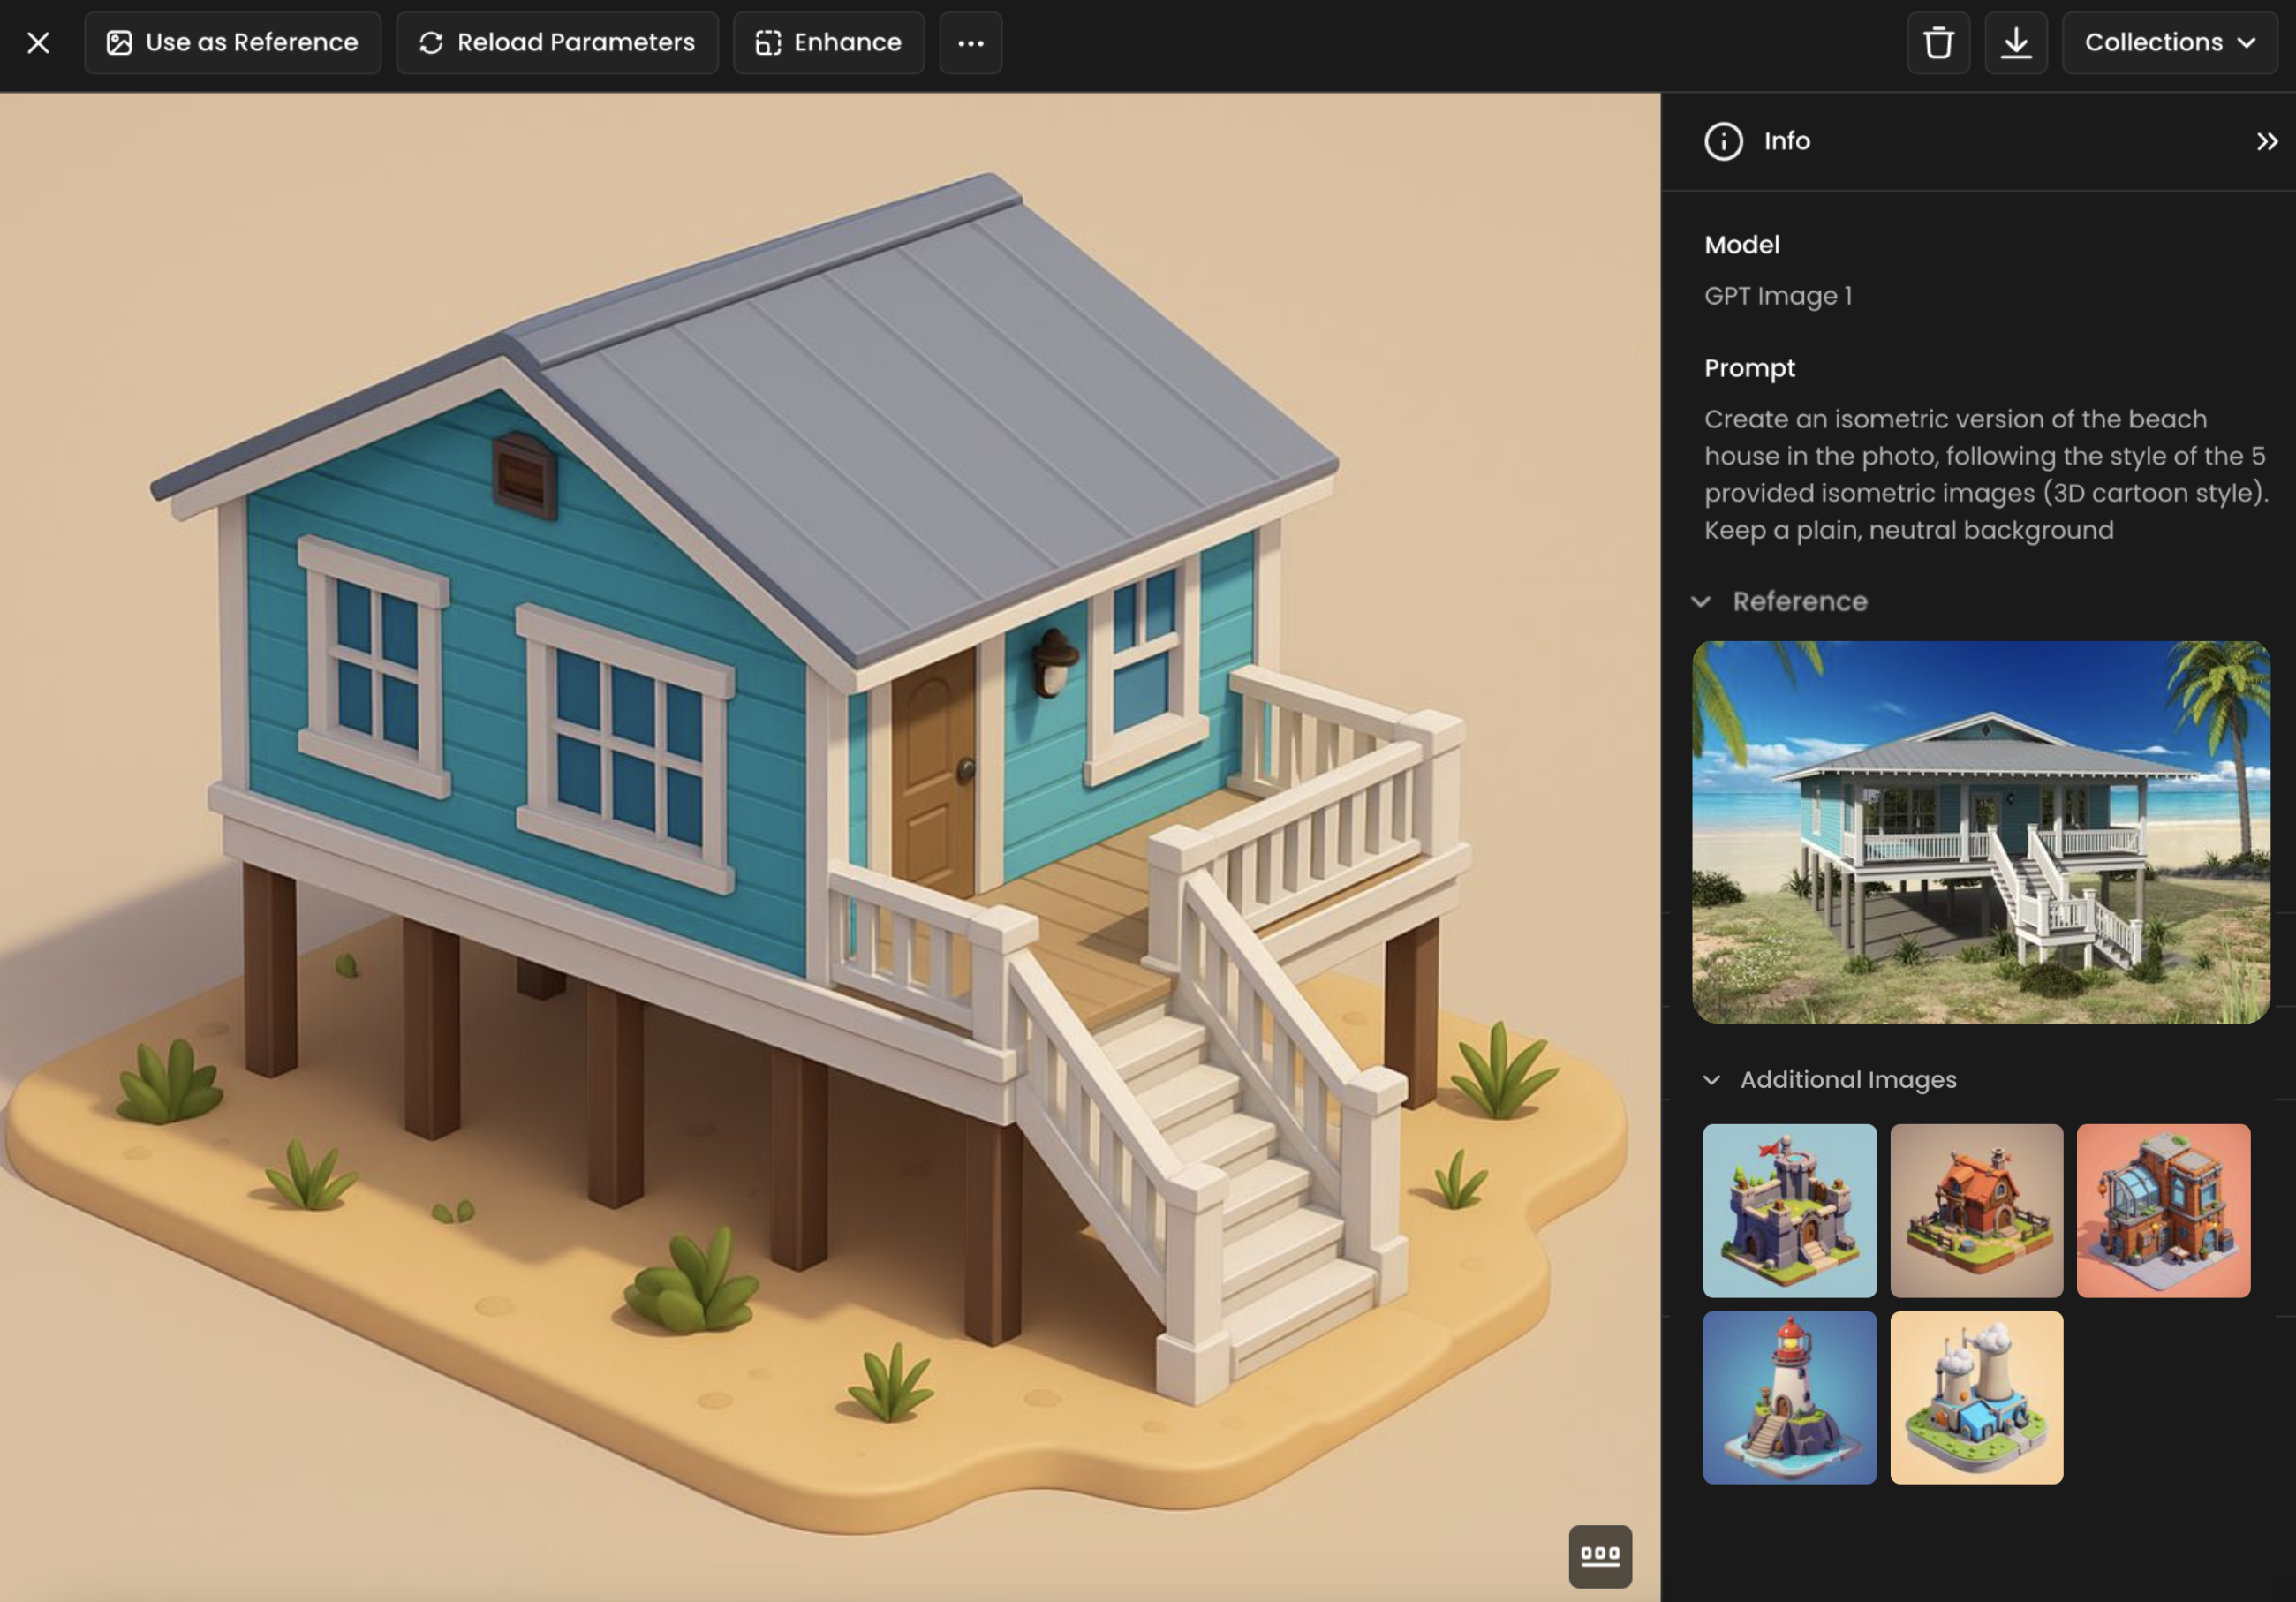
Instructions: Create an isometric version of the beach house in the photo, following the style of the 5 provided isometric images (3D cartoon style). Keep a plain, neutral background
Accessing "Edit with Prompts"
You can initiate the "Edit with Prompts" tool in several ways within Scenario:
From an individual image: Open the image you want to start with, click the three-dot icon in the top-right corner, and select "Edit with Prompts." This action will load the tool with your chosen image.
From the gallery: While browsing generated images or exploring your library, hover over any image thumbnail and click the three-dot icon in the top-right corner to reveal the "Edit with Prompts" option.
Via the main navigation panel: Navigate to “Create” → “Edit with Prompts“ to open the tool from a fresh start. No image will be pre-loaded initially.
Direct link: The tool can be accessed directly via this URL:
https://app.scenario.com/edit-with-prompts
Interface Overview
The "Edit with Prompts" interface is structured into two primary sections:
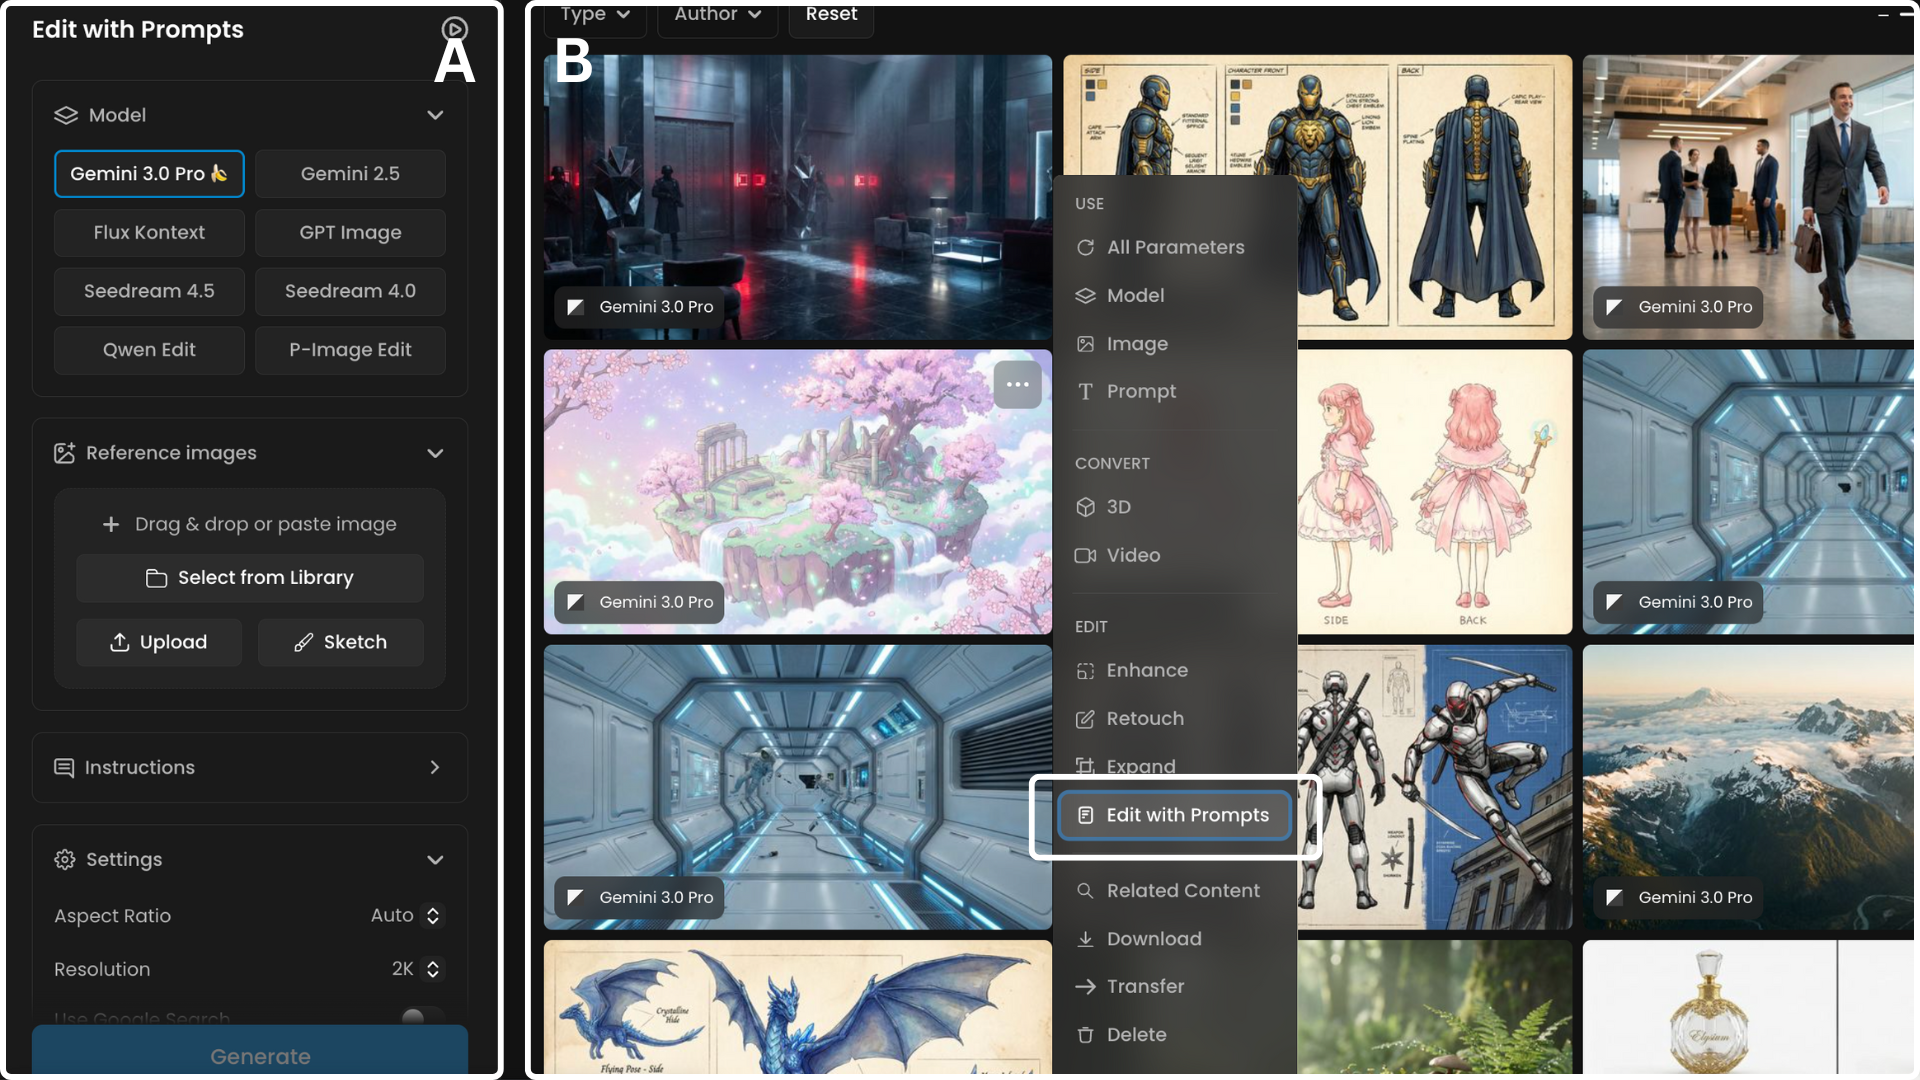
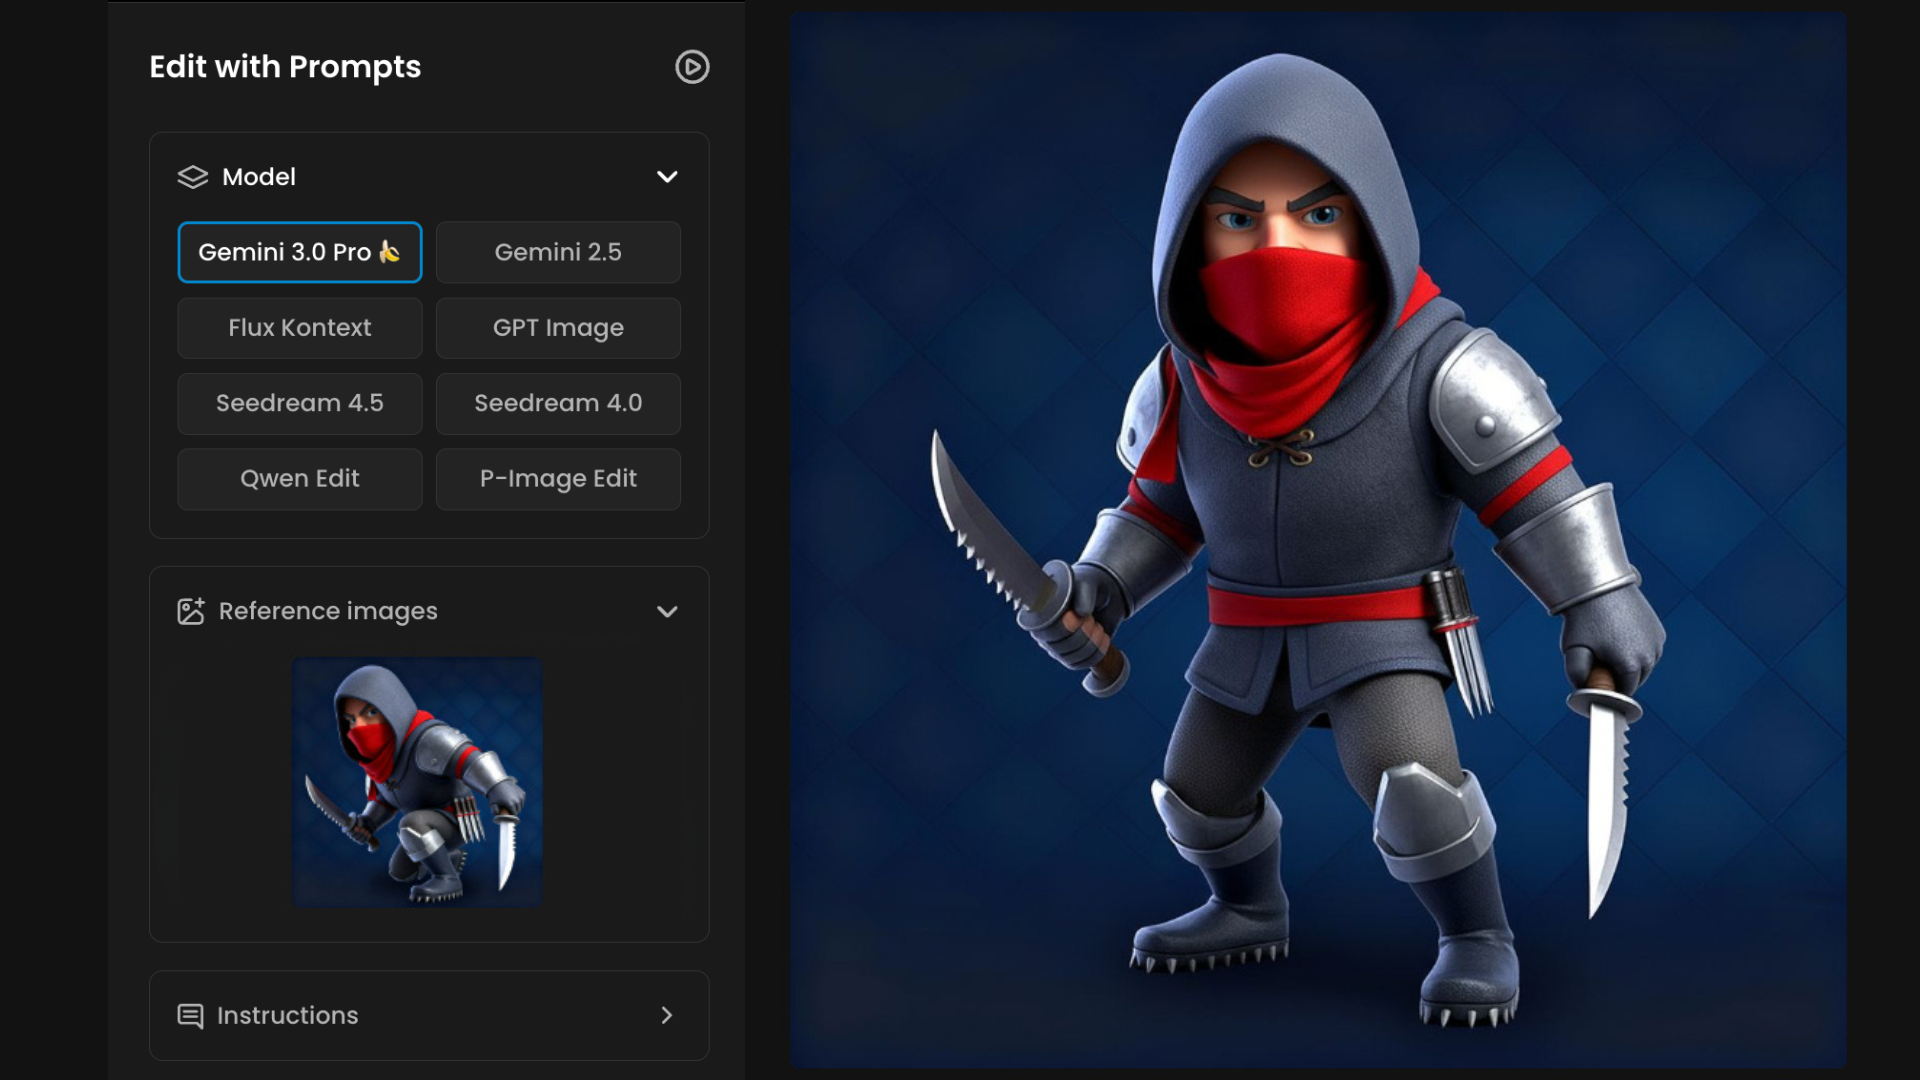
A (left-hand panel): Dedicated to input and configuration, where you select models such as Gemini 3.0, Seedream 4, Seedream 4.5, Nano Banana, GPT-Image, Flux Kontext, Qwen Edit or P-Image Edit and provide your instructions.
B (right-hand panel): Designed for reviewing, managing, and reusing the outputs generated by these editing models. You will also find previously created images from past sessions displayed to the right.
A. Left-Hand Panel: Inference and Control Configuration
This panel contains all the tools you need to configure your image editing request.
Model Selection
Choose from our curated AI models, ranging from flagship generators to specialized editing tools:
Gemini 3.0 Pro (Nano Banana Pro): Google DeepMind’s latest flagship. It is exceptionally strong for text-heavy visuals (posters, infographics) and high prompt adherence, offering reliable multi-turn consistency when refining designs.
GPT Image 1.5: OpenAI’s latest "instruction-first" powerhouse. Featuring a logic-first architecture, it is 4x faster than previous versions and handles complex layouts and legible text with high accuracy. Its biggest strength is performing localized edits while keeping lighting and subject identity consistent.
Seedream 4.5: Bytedance’s enhanced model for realistic subjects and structured edits. It offers improved facial fidelity and stable results across multi-reference prompting (up to 10 images) and sequence modes (up to 15 outputs).
Seedream 4.0: A reliable general-purpose model by Bytedance, accurate with faces and proportions, maintaining a neutral style across iterations.
Flux Kontext: An open-source favorite that minimizes style drift, making it ideal for maintaining an original aesthetic. It supports 4 total images and is optimized for LoRA training.
Gemini 2.5 (Nano Banana): A versatile model from Google DeepMind, ideal for both precise modifications and creative editing. It excels at maintaining proportions and style, supporting up to 6 reference images.
Qwen Edit: A 20B parameter model specialized in semantic editing, object swapping, and precise text changes in English and Chinese. Supports workflows with multiple images and localized edits while maintaining visual consistency.
P-Image-Edit: Pruna’s premium model for fast, flexible edits. It allows you to compose up to 5 reference images in a single pass, ideal for quick iterations on product shots and ads.
To choose the best model, it's recommended to test and compare multiple options to see which one best fits your project. Some models excel at targeted and very precise edits while maintaining character style consistency, while others might be chosen for their ability to handle multiple reference images and offer more creative flexibility.
Reference Image Upload
Upload the image you intend to edit using several supported methods:
Local Upload: Select an image file directly from your computer.
Paste from Clipboard: Paste an image that has been copied to your clipboard.
Drag and Drop: Drag a file from the right hand side gallery, into the designated upload area.
Scenario Workspace/Library: Browse and select images stored within your Scenario workspace or team library. Filtering by tags or collections can facilitate quicker access.
Once an image is uploaded, options become available to remove its background, crop it, or utilize the sketch tool to draw directly on the image, thereby guiding the AI for more controlled edits.
Instructions (Prompt Box)
This area is where you input your prompt: the natural language instructions detailing the changes you wish to apply to the image. A clear and specific prompt generally contributes to more effective results across all models.
Prompt Assistance Tools - Scenario incorporates built-in aids to assist in crafting effective prompts:
Generate Suggestions: Based on your uploaded reference image, Scenario can propose several prompt ideas. You can click any suggestion to insert it directly into the prompt box and modify it as needed.
Rewrite Your Prompt: This feature can automatically rephrase your current prompt for improved clarity or structure.
Translate Prompt: Write your prompt in any language, and Scenario will translate it to English automatically to help achieve optimal results.
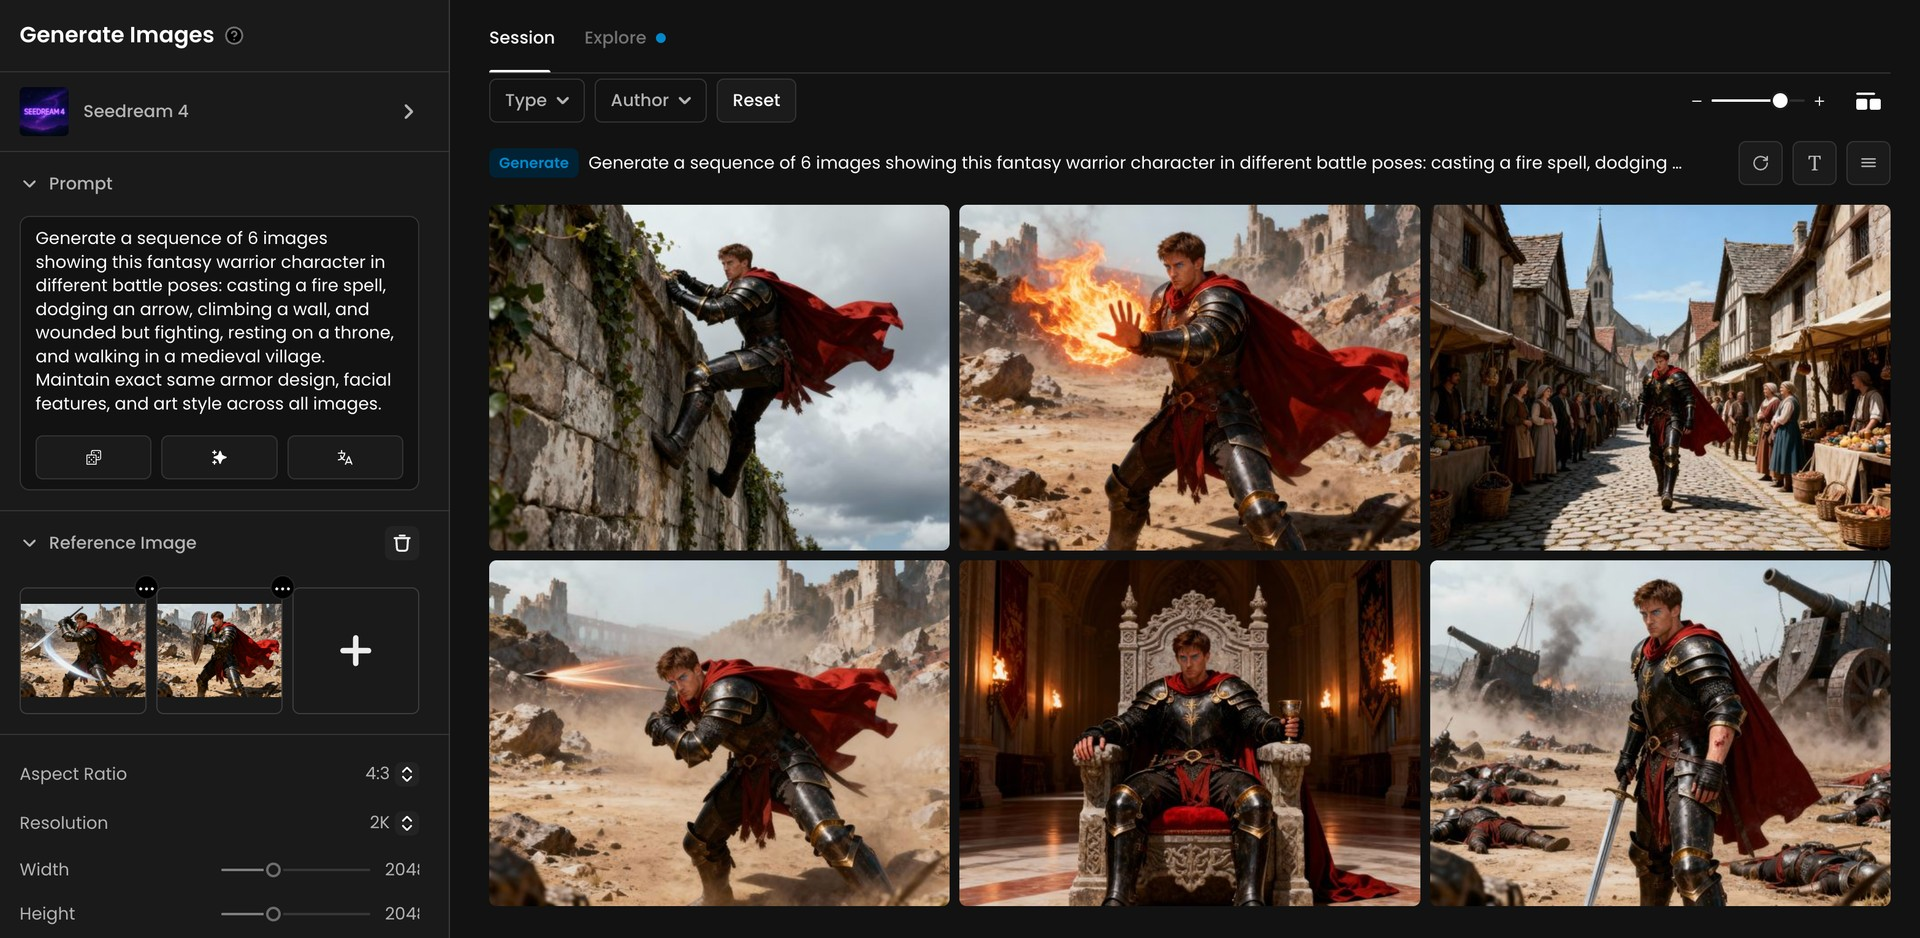
With good instructions, it is possible to create a variety of scenes with the same character.
Additional Images
You can upload additional reference images to guide the model’s style, composition, or content. The maximum number depends on the model: some allow up to 10 references (e.g., Seedream 4), while others support fewer (e.g., 4 for Flux Kontext).
You can write text and draw visual instructions like arrows directly on the reference image, which the model can interpret during editing.
You can draw directly on the image and instruct editing models like Gemini 2.5 to make modifications based specifically on those sketched areas.
Always describe how each reference should influence the result (e.g., “match the style of the forest scene”), rather than vague mentions like “use image 2.”
Settings & Parameters
Depending on the chosen model, you will have access to adjustable settings that influence the output:
Image Count: Determine the number of variations to generate.
Aspect Ratio: Select the desired dimensions or proportions for the output.
Quality (GPT-Image 1.5, Gemini, Flux Kontext, Seedream): Control the level of detail and visual fidelity in the generated image.
B. Right-Hand Panel: Output Review & Iteration
The right-hand side of the "Edit with Prompts" interface presents all your generated outputs. It is designed for straightforward review, comparison, and reuse in subsequent stages of your workflow.
Layout Options
Choose your preferred way to browse results: grid view, row view, or other layout styles. This can facilitate scanning multiple outputs and comparing them side by side.
“Compare” Slider
When viewing a generated image, activate the side-by-side comparison slider (keyboard shortcut: C) to directly compare the edited version with the original reference image.
Reuse Generated Images (Drag & Drop)
You can drag any generated image from the output panel back into the reference or additional image slots. This feature supports continued editing or building upon previous results without the need for re-uploading.
Reuse Prompts & Settings
Click the three-dot menu on any output image to quickly reload its original prompt, reference image, and generation parameters. This can be helpful for iterating based on a previous result.
This interface is structured to support a fluid, iterative workflow. It allows users to adjust inputs, generate new results, review outputs, and refine their prompts or settings in a continuous editing loop, thereby leveraging the capabilities of the selected AI models effectively.
Step-by-Step Guide
Step 1: Select the AI Model
Choose the model that best aligns with your project requirements. If you’re unsure, try running the same input across multiple models to compare results and identify the best fit for your use case.
Model Name | Main Strength | Best Use Case |
P-Image-Edit | Fast Updates & Changes | Best for quick, repetitive changes and combining different images into one. It is ideal for "rough drafts" and fast iterations. |
GPT Image 1.5 | Smart Reasoning & Text Integration | Best for following conversational instructions and adding accurate text (like signs or labels) to your image. |
Gemini 3.0 Pro | High-End & Advanced Details | Best for professional 4K quality and very complex projects that need up to 14 reference images. |
Seedream 4 / 4.5 | True Realism | Best for professional photography looks, cinematic lighting, and realistic product shots. |
Qwen Image Edit | Precise Object Swapping | Best for replacing objects (like changing a car or clothing) while keeping the rest of the scene the same. |
Flux Kontext | Style Matcher & Great Blending | Best for making specific edits that blend perfectly into the original artistic style of the image. |
Gemini 2.5 | Consistency & Multi-Image Fusion | Best for fast adjustments and keeping a character's face and identity the same across different images. |

Tip: If you are uncertain about which model to use, consider testing your prompt with one, then switching to another with a single click to compare outcomes and determine the most effective option for your needs.
Step 2: Upload the Image(s)
You can start with a single Reference Image or include multiple Additional Images to provide extra visual guidance. The maximum number of references depends on the model you choose:
Gemini 3.0 supports up to 14 reference images, making it well suited for complex scenes and highly controlled multi-reference workflows.
Seedream 4/4.5 support up to 10 reference images, ideal for complex compositions and generating consistent variations.
Qwen Image Edit supports up to 10 reference images, performing well with structured semantic edits and multi-reference guidance.
P-Image-Edit supports up to 10 reference images, making it effective for fast compositing and iterative refinement.
Gemini 2.5 supports up to 5 reference images, suitable for precise, focused edits.
Flux Kontext allows up to 3 reference images, best used with targeted visual inputs.
GPT Image: Up to 5 reference images, best for following conversational instructions and adding accurate text to images.
Using additional references can help define style, composition, or specific details more precisely.
Step 3: Writing Effective Prompts for Editing
When editing with prompts, the clarity and structure of your instructions directly influence the quality of the results. Use the following guidelines to optimize outcomes across all models:
a. Focus on One or Two Changes
Keep each prompt to one or two edits (e.g., “change the sky to stormy gray” or “transform the character into LEGO style”). Multi-step runs produce more predictable results and set you up for iteration (see g).
b. Be Clear and Specific
Avoid vague asks like “make it better.” Describe the outcome precisely: “add a glowing blue aura around the character” or “apply an aged wooden texture to the table.”
c. Use Descriptive and Contextual Language
Include style, texture, mood, and feature details.
Explore the editing models to make an informed choice: you may have to use Seedream 4 when aesthetics are the priority; use Gemini 2.5 when consistency matters most. Or combine them—for example, use Seedream 4 to refine individual elements, then Gemini 2.5 to merge them consistently.
d. Use High-Quality Inputs
Provide clear, high-resolution references; low detail can cause hallucinations. Fewer, richer references beat many weak ones (e.g., one image showing 8 garments instead of 8 separate uploads).
e. Target Elements Precisely (Labels or Numbers)
When giving instructions, point out the exact parts of the image you want to edit. You can do this by describing their position (e.g., “the character on the left” or “the red apple in the bowl”).
If possible, label your images by adding text/numbers on the images. Example: If you have multiple characters, add names or labels onto the images or labels like “Character 1”, “Character 2” etc. That way you can mention them directly in prompts which is super useful when working with complex prompts involving multiple characters and objects. It makes it easier for the editing model to interpret and apply edits correctly.
f. Manage Multiple Reference Images
When you use additional images, state each image’s role and influence: “Apply the Van Gogh painting’s style to the background.” or “Use this fabric swatch for the jacket texture.” Add brief annotations on references when helpful, and keep label names consistent across runs.
g. Iterate and Refine
If the first pass isn’t perfect, tweak: add missing details, rephrase, or simplify, then run again. Multiple focused runs reliably improve quality.
Integrating into Scenario Workflows
"Edit with Prompts" is thoughtfully integrated throughout the Scenario platform, designed to work effectively with other AI tools. It can be initiated from various points within the application, and its utility becomes particularly evident when incorporated into a broader, multi-step creative workflow.
This tool can be utilized before or after other actions, whether you are refining an initial image, enhancing a result, or further developing outputs from other tools. The adaptability of Seedream 4, Seedream 4.5, Nano Banana, GPT-Image, Flux Kontext, Qwen Edit and P-Image Edit allows for sustained creative control across different stages.
Flexible Handoff Between Tools
Any image, whether generated from a base model, a custom-trained model, or modified with other tools, can be readily transferred to "Edit with Prompts" for further adjustments using natural language. Following editing, you can continue to refine the result with complementary tools such as:
Expand for outpainting and extending the image.
Enhance for upscaling and improving quality/sharpness.
Retouch for targeted inpainting on the Scenario canvas.
Alternatively, you can restore style consistency by employing your custom-trained model with image-to-image techniques. This flexibility helps in maintaining creative direction, even if modifications by the editing models introduce unexpected changes to the image.
Composition and Assembly Workflows
"Edit with Prompts" also proves valuable for combining elements that have been created separately within Scenario. With the capacity of Seedream 4, Nano Banana, and other models to interpret and manipulate complex elements, you can:
Combine a character and an outfit, developed on separate canvases, into a single cohesive image.
Merge a vehicle with its “driver.”
Place objects, creatures, or accessories within a shared scene.
This makes it a useful component for constructing scenes and assembling intricate compositions.
Variant Generation and Model Training
"Edit with Prompts" can be employed to generate multiple variations and support model training workflows. Seedream 4, with its capability to generate several images in sequence, is particularly advantageous in this context:
Create different versions of a character featuring varied poses, outfits, backgrounds, or styles.
Use these outputs directly to train a custom model with a single click via the "Train a model" button.
If a dataset requires additional images for its training set, "Edit with Prompts" can assist in generating supplementary material for improved training outcomes.
Organize
Consistent with all Scenario tools, you can always utilize collections and tags to further organize the outputs, all within collaborative setups.
Illustrative Examples
Here are a few simple examples of how you can use "Edit with Prompts" with Seedream 4.0, Nano Banana, GPT-Image, Kontext or Qwen Edit and P-Image Edit. The outcome depends on the base image, the clarity of your prompt, the selected model, and any generation settings.
These examples are just a starting point… there are hundreds of ways to use this tool. Try your own images, write your own prompts, and experiment freely. The tool is built for creative exploration, not rigid steps.
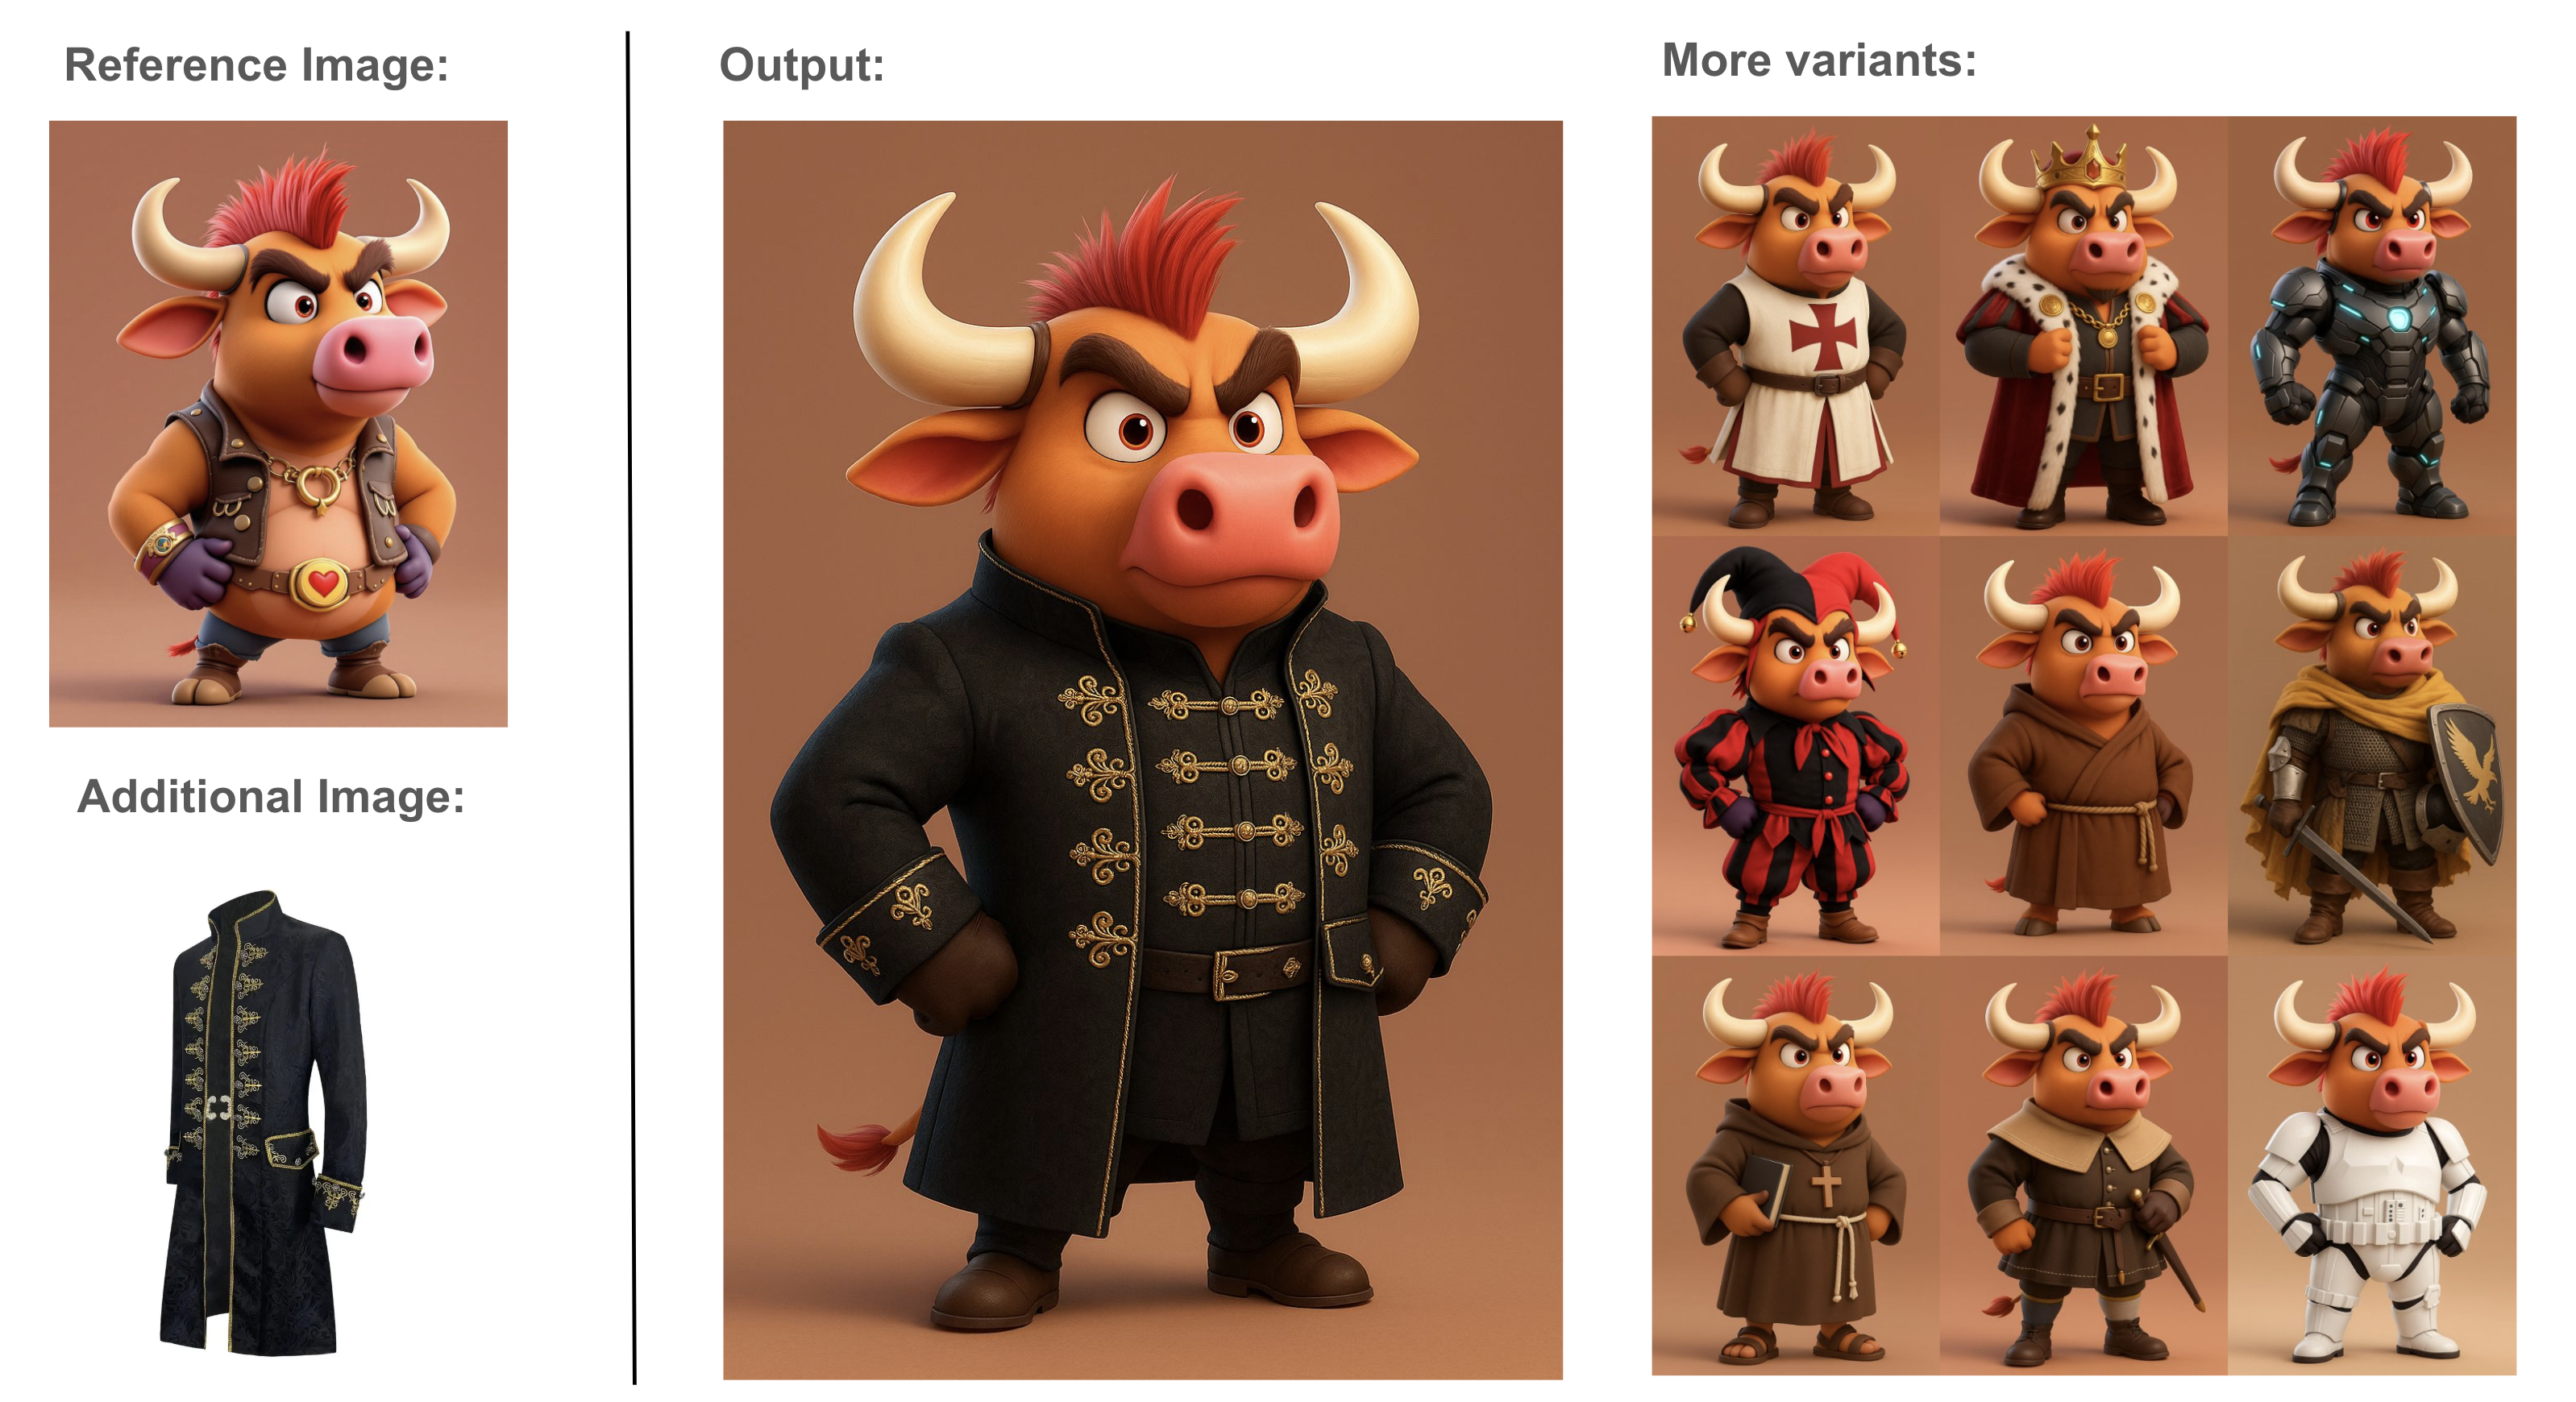
1. Change the outfit of a character
Instructions: “Change the outfit to the medieval outfit shown in the reference.”
2. Change a pose
Instructions: “Make this character stand up.”
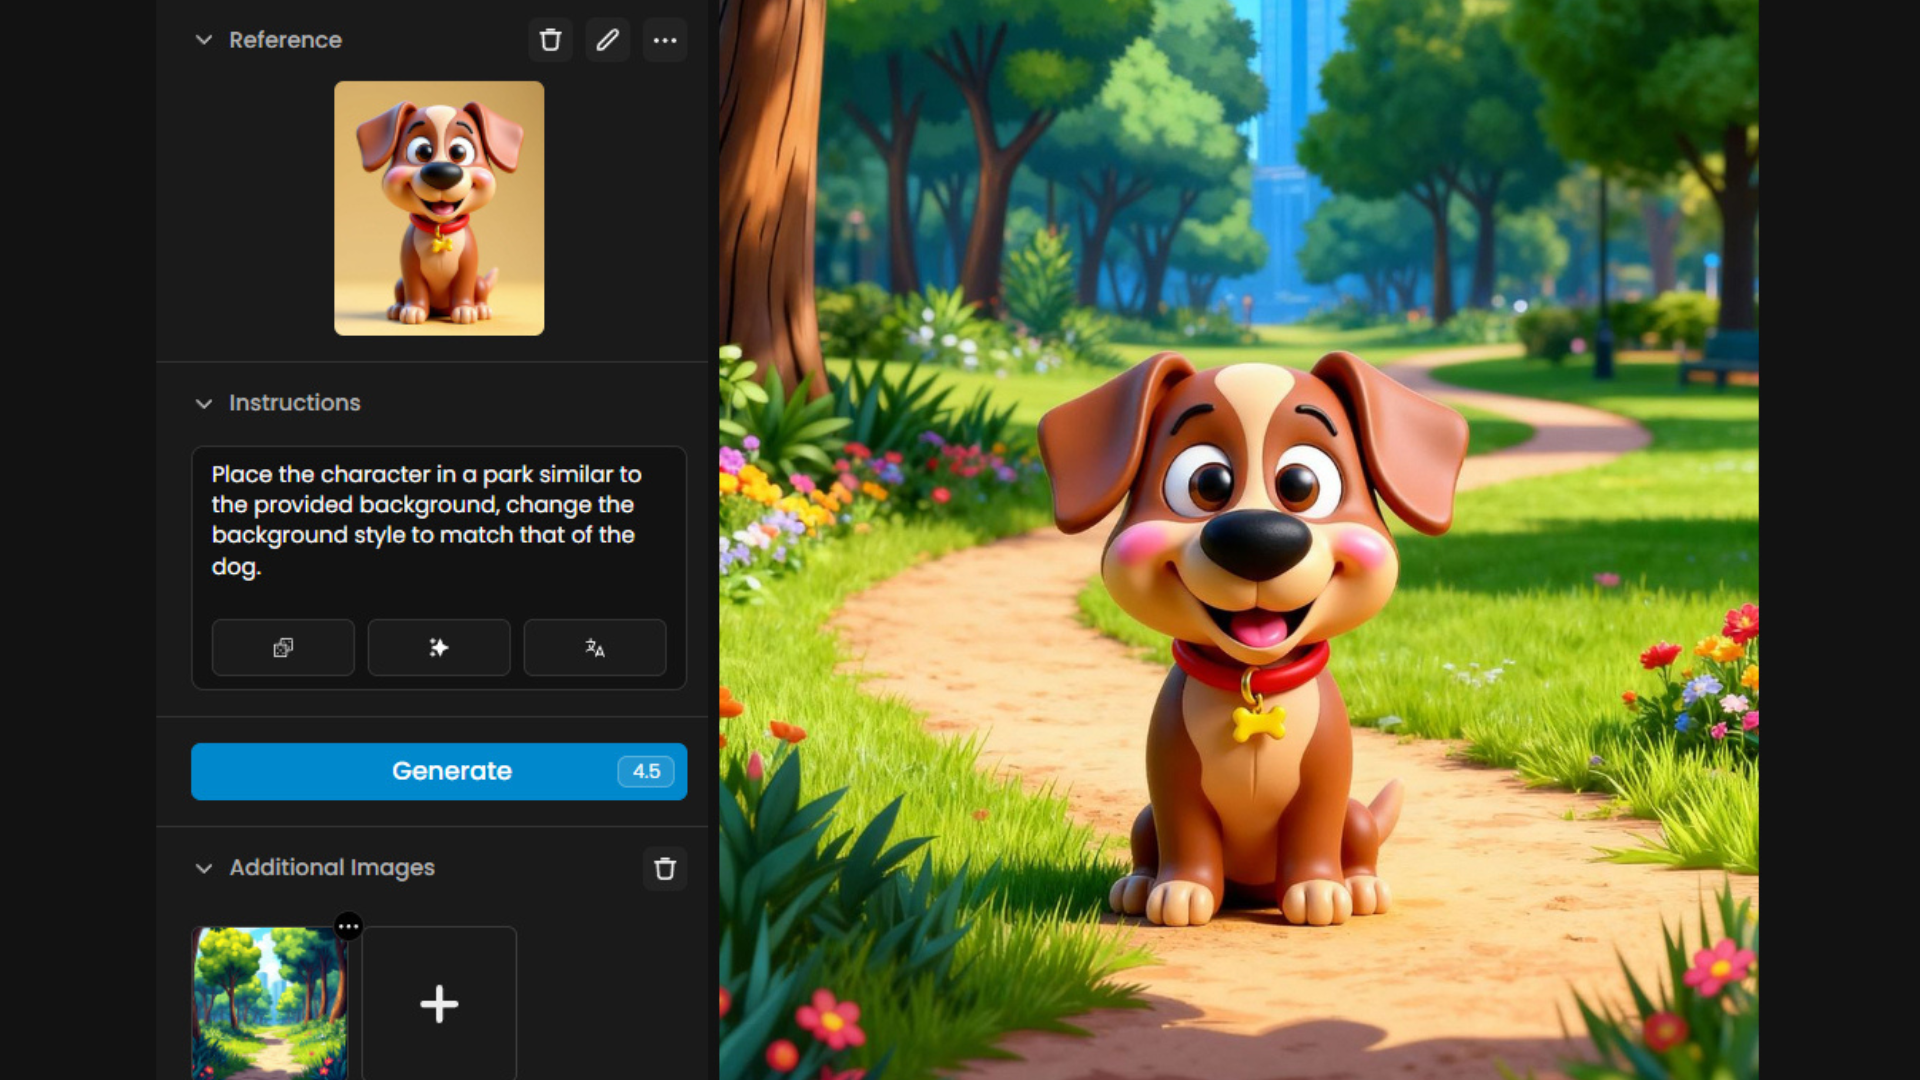
3. Add a background
Instructions: “Place the character in a park similar to the provided background, change the background style to match that of the dog.”
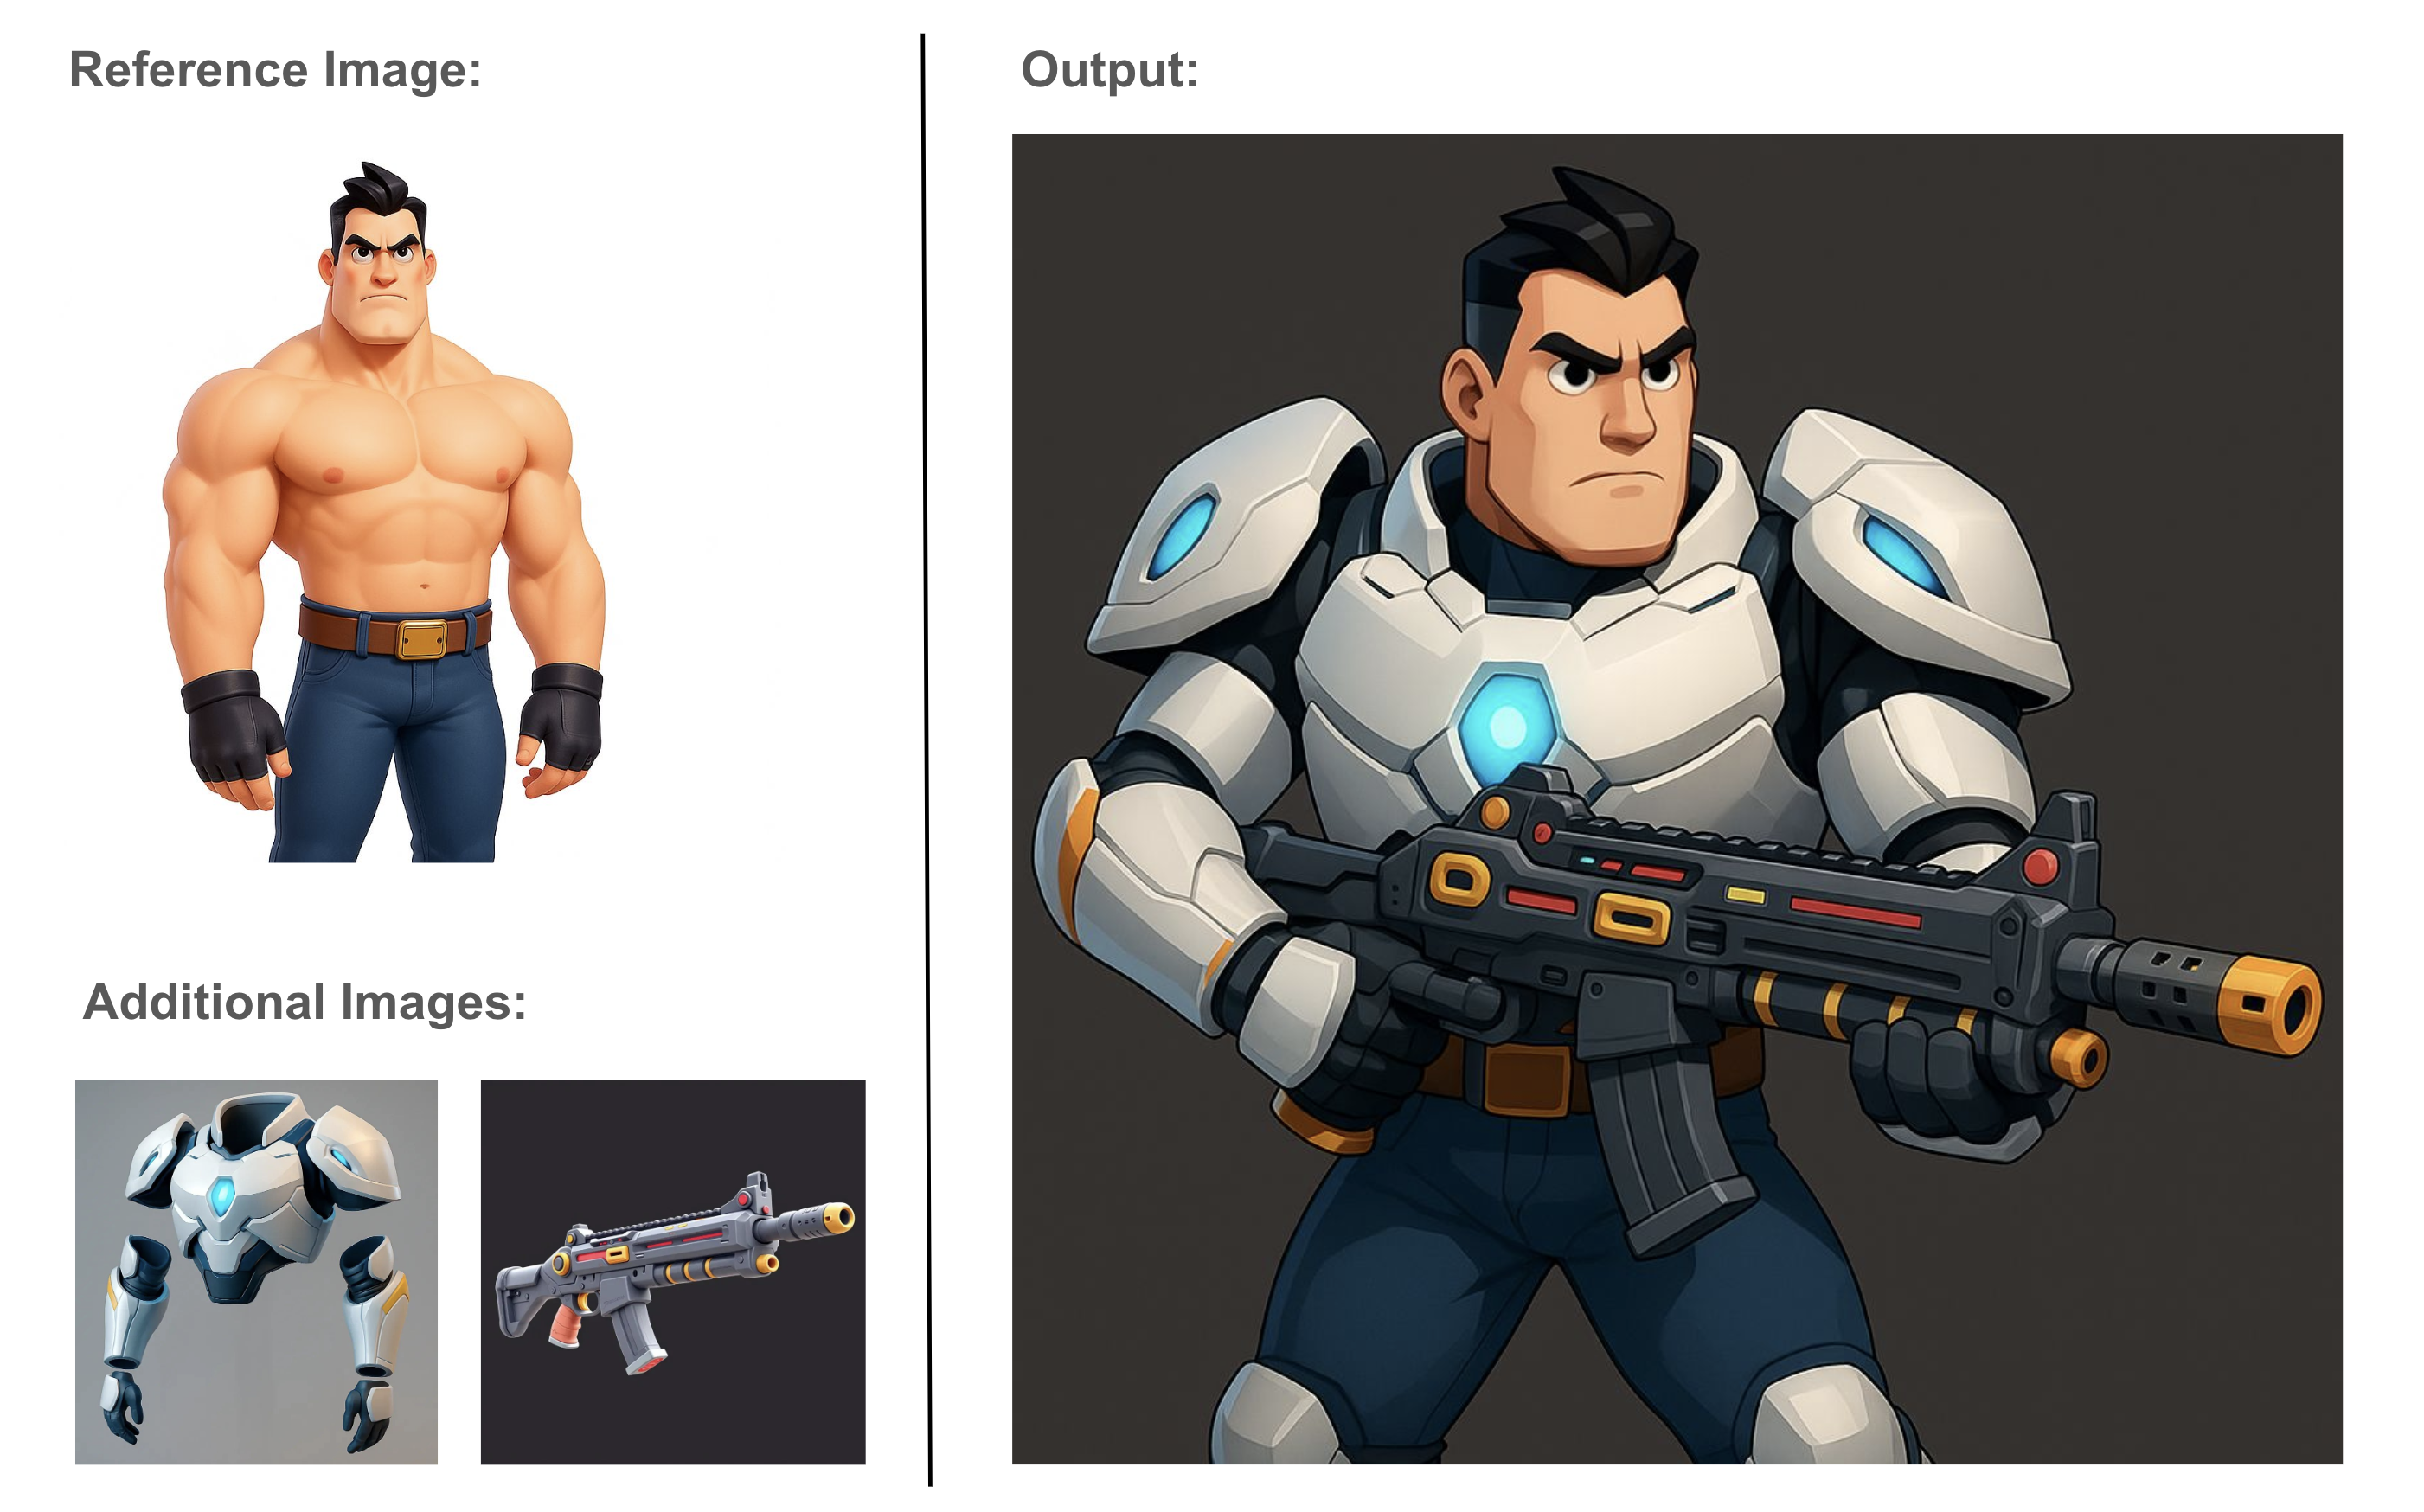
4. Combine Elements
Instructions: “Create an image of this character wearing the exact armor shown and holding the same weapon provided in the reference images”
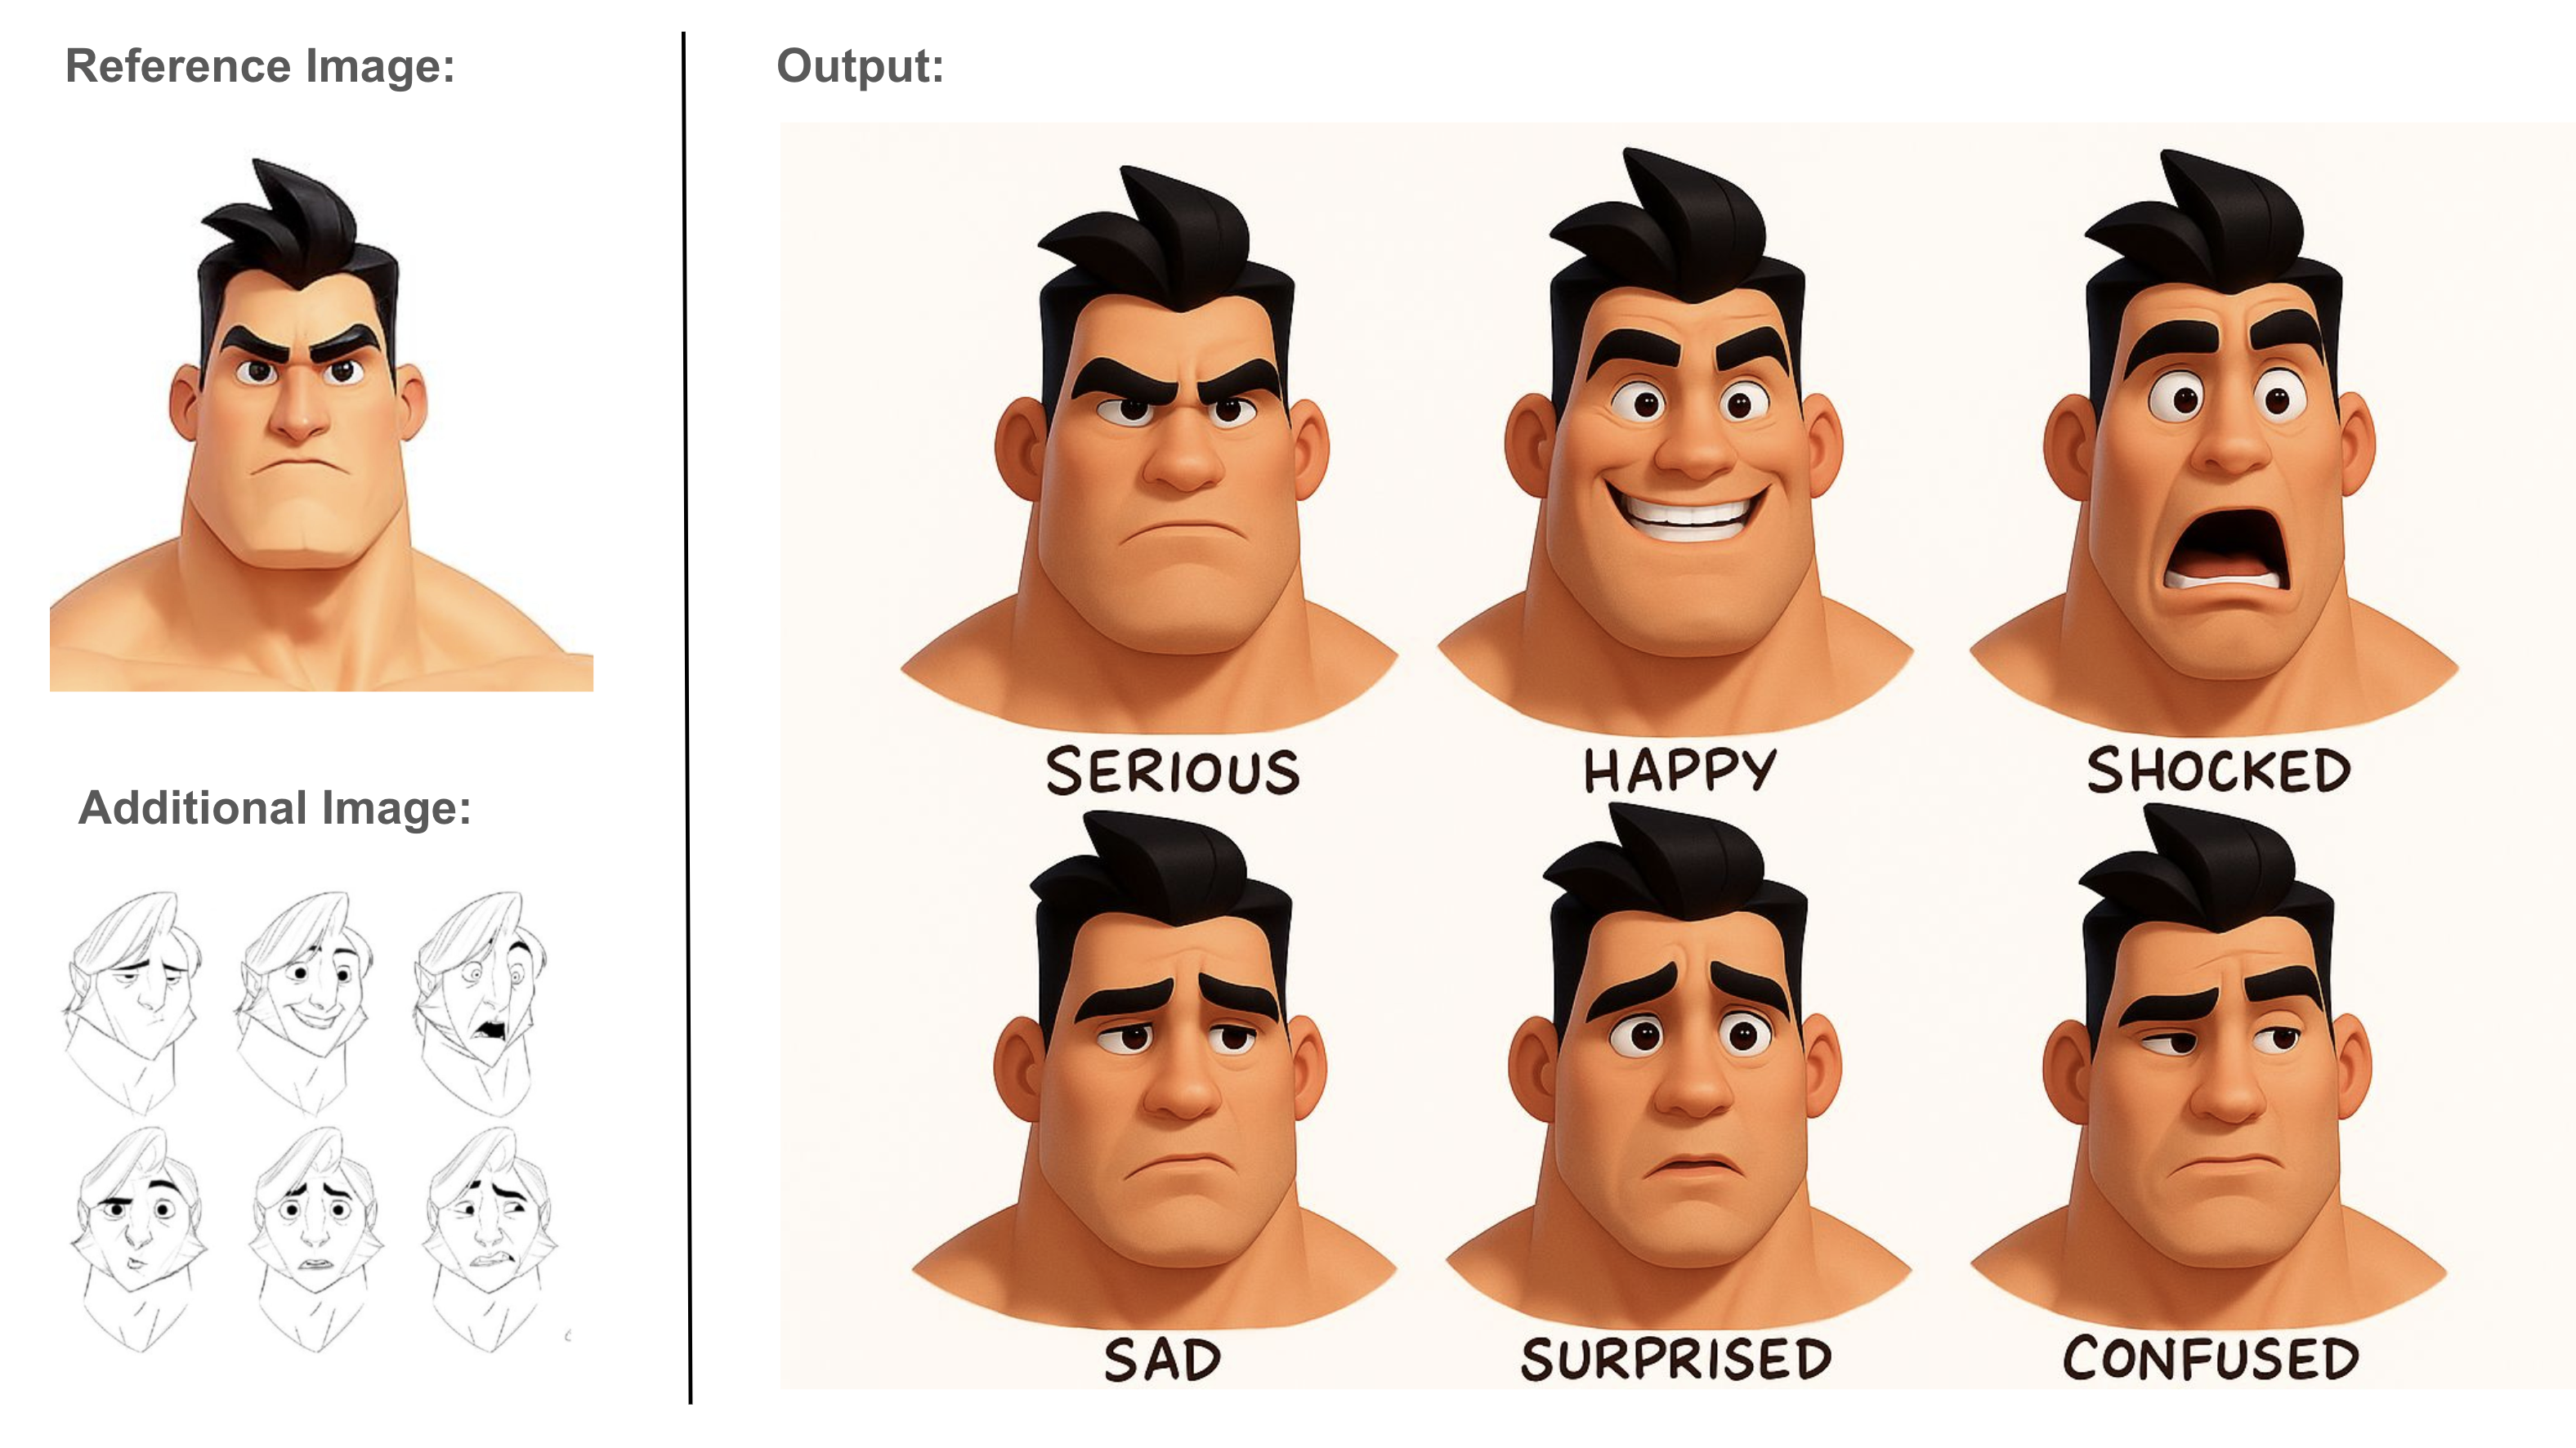
5. Explore Facial expressions
Instructions: “Generate a 6-expression sheet based on the input character headshot and the expression sheet provided (sketches). Maintain character likeness and style. Add one single word under each expression to describe it, using a hand-written style font “
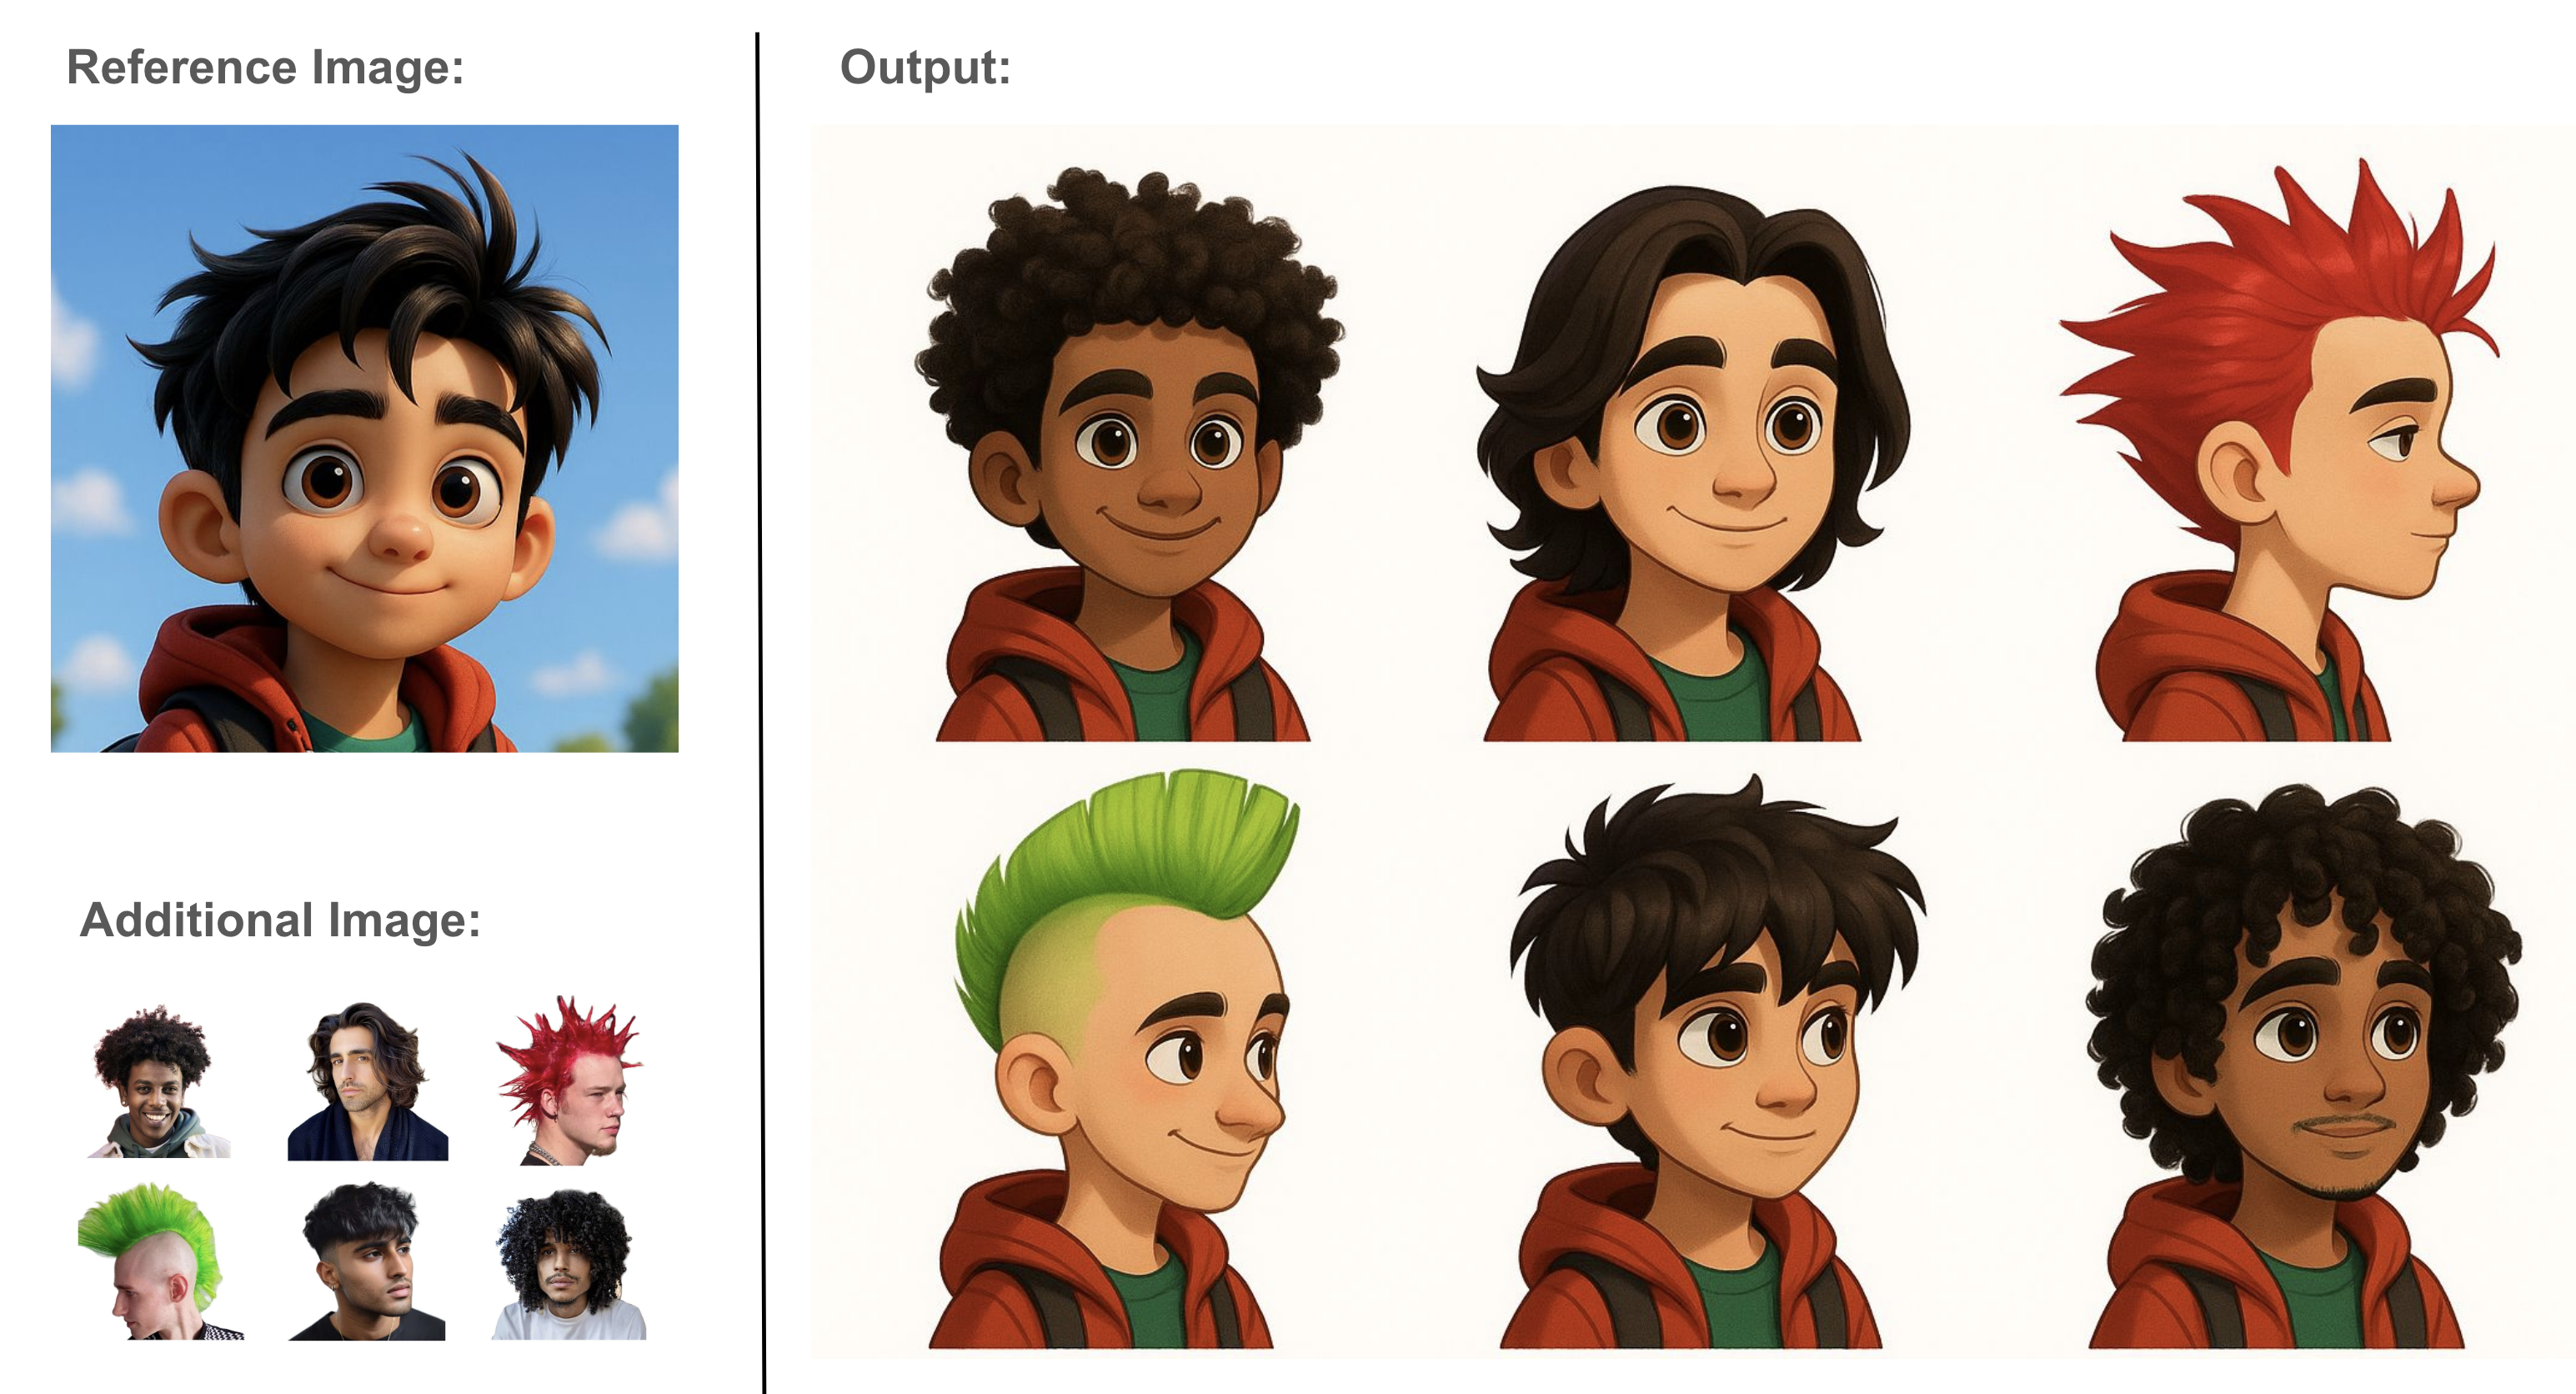
6. Explore hairstyles
Instructions: “Create a single image showcasing six different hairstyle variations for the character, inspired by the provided hairstyle sheet. Keep the character's facial features and style consistent while varying the head poses. Use a white background.”
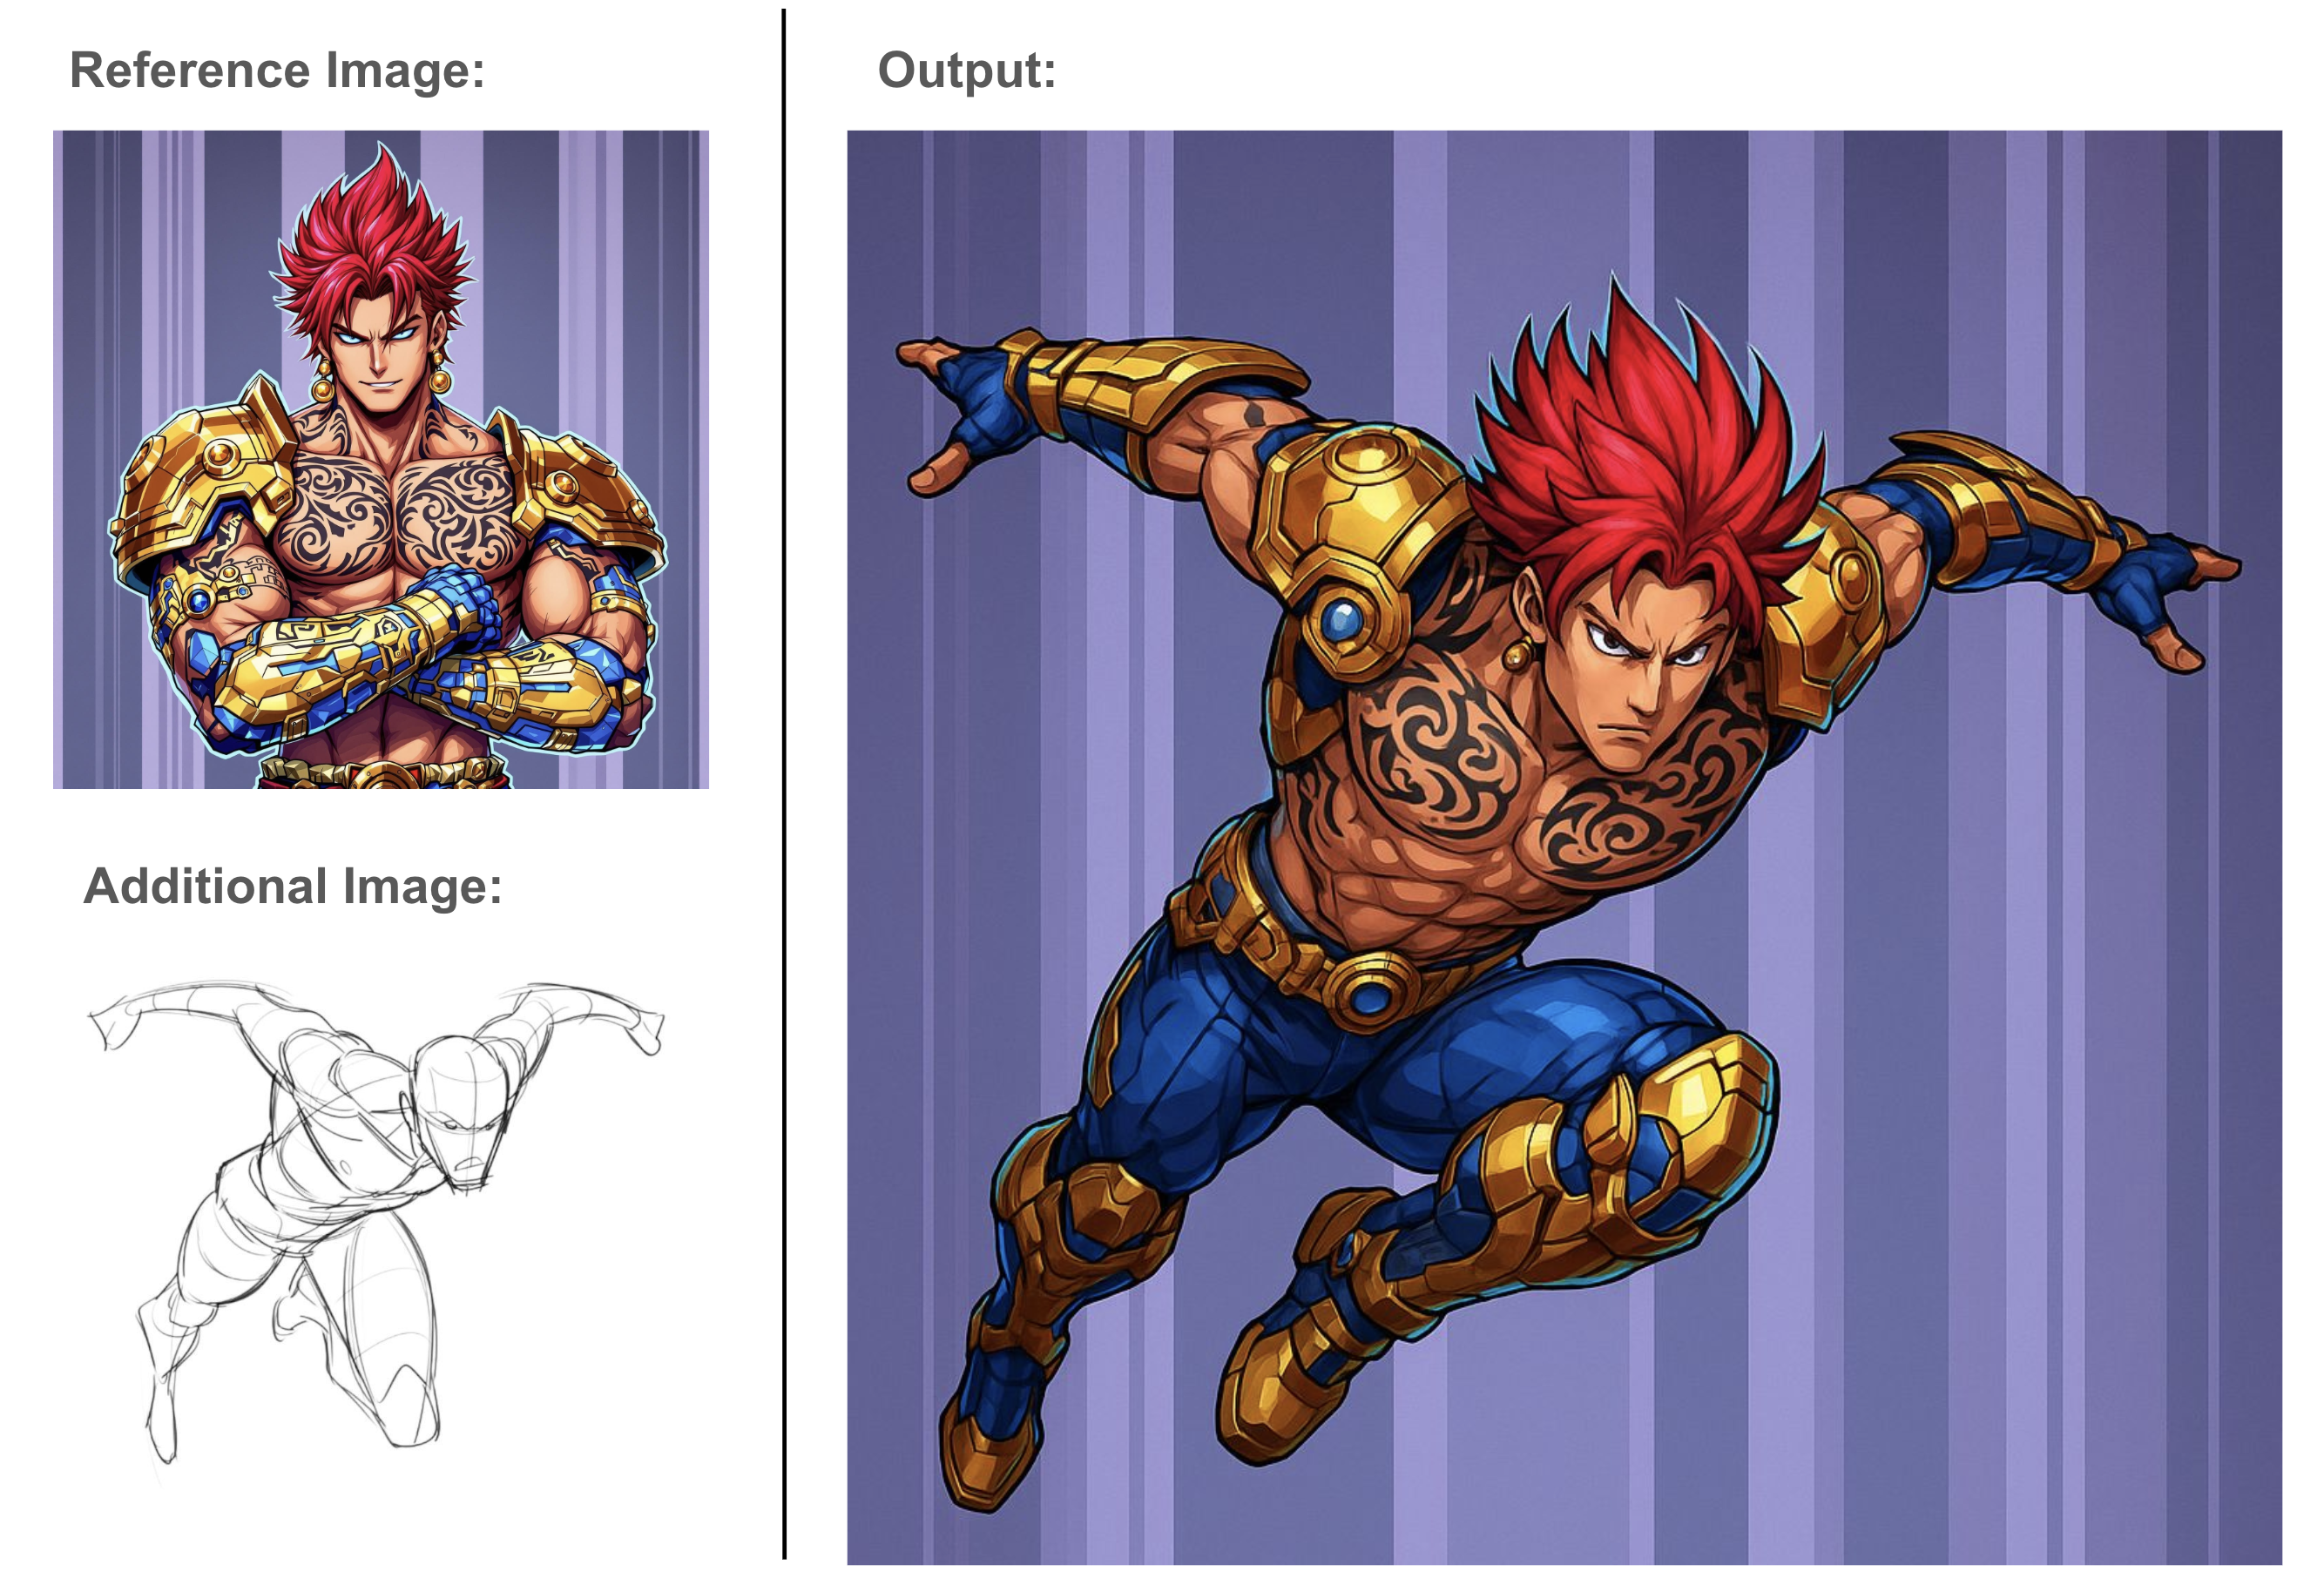
7. Render a sketch
Instructions: “Reposition the armored character (comic style) from the provided image to match the pose shown in the line art sketch exactly (dynamic jumping pose). Ensure the comic style remains consistent. Align all limbs and body positioning with the sketch, including arms extended on each side as if flying, head leaning forward, and one knee bent”
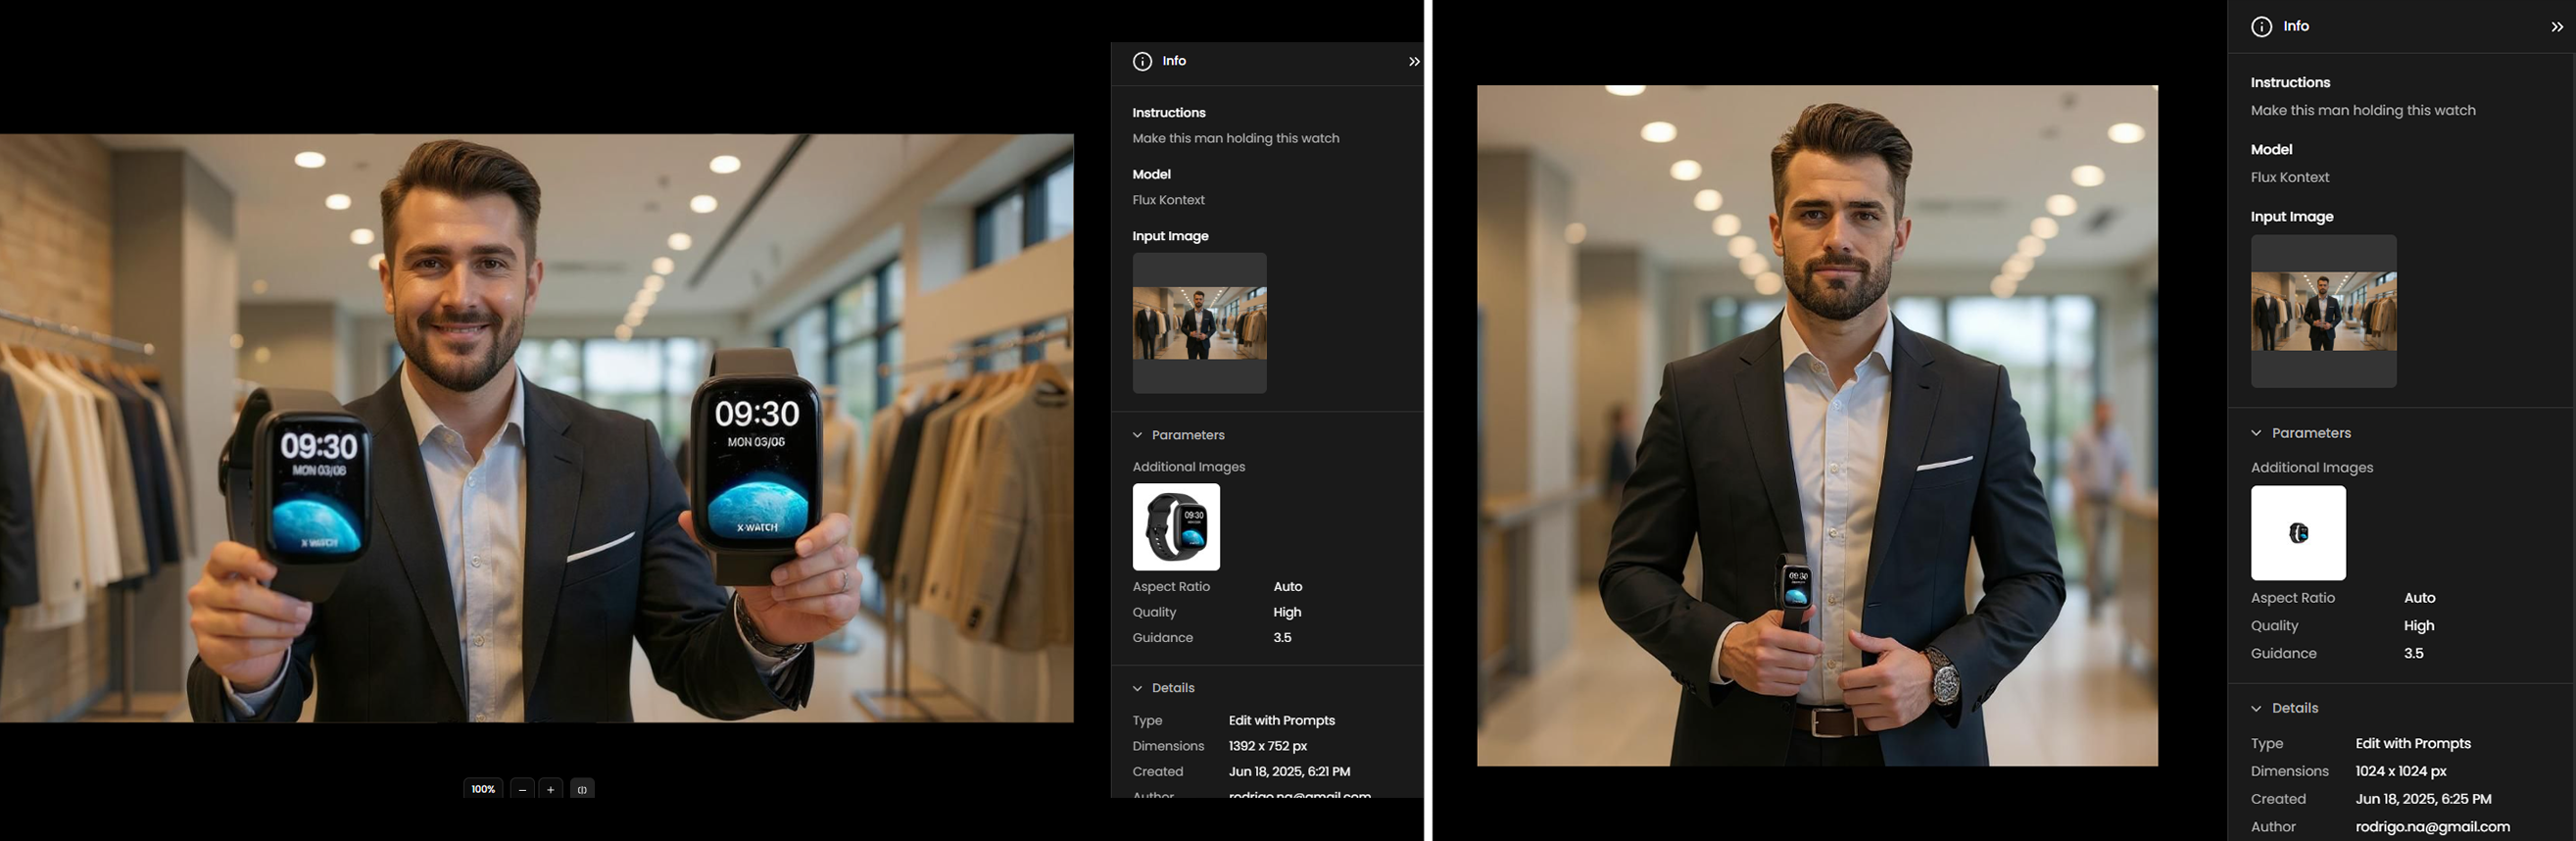
8. Adding Products to Images
When adding products like a smartwatch to an image, use the Edit with Prompts tool and upload a separate reference image of the product. To achieve natural and convincing results, always ensure that the product in the reference image is scaled appropriately to match the person's hand or the intended placement in the main image.
If the product in the reference image is much larger or smaller than it should appear, the AI may generate unrealistic or awkward results. For example, the image on the left shows the product out of proportion—appearing much too large compared to the person. On the right, the product is correctly scaled and looks naturally integrated.
Tip: Before generating, double-check the product’s size in your reference image to avoid distortions or mismatched proportions.
9. Texture Variations with UV Maps

Another powerful use case for Edit with Prompts is working directly with UV texture maps from 3D models. By uploading the albedo or diffuse texture, you can generate multiple material variations while keeping the UV layout intact. This allows you to reapply the new textures seamlessly back onto your 3D model.

Instructions: “Change this UV texture of a futuristic weapon to a shiny gold and silver look with gemstones. Add glowing circuitry lines. Make edges beveled and polished, with some translucent panels glowing blue inside.”
Seedream 4: Upload the model’s UV texture map (albedo/diffuse) as your reference. The model can generate new material variations that align perfectly with the UV layout. The outputs can then be reapplied in 3D software (e.g., Blender, Unreal, Unity), instantly updating the look of your model.
Tip: Use models with clean, non-overlapping UVs for the best results. This ensures details like glow lines or metallic edges match correctly once the texture is wrapped back onto the 3D mesh.
For a deeper dive into how AI can help scale 3D asset libraries through retexturing, take a look at this blog post: Scaling 3D Asset Libraries with AI Retexturing.
Conclusion
Edit with Prompts integrates the capabilities of Scenario's most advanced editing models into a single, intuitive editing experience guided by natural language. Supported models include Gemini 3.1 (Nano Banana 2), Gemini 3.1 Lite (Nano Banana 2 Lite), Gemini 3.0 Pro (Nano Banana Pro), Gemini 2.5 (Nano Banana), GPT Image 2, MAI Image 2.5 Edit by Microsoft, FLUX Kontext, FLUX 2 (Max), Seedream 5.0 Lite, Seedream 4.5, Qwen Edit Plus, Grok Imagine, LongCat Image, Reve Remix, and P-Image Edit.
Fully integrated within Scenario's tool suite, Edit with Prompts provides a flexible and efficient approach to image modification. It supports streamlined creative workflows, multi-model experimentation, and precise control over edits, making it easier to achieve compelling visual results with confidence and consistency.