What is Retouch (Scenario Canvas)
This guide walks you through using Scenario's Retouch tool (also known as Canvas), which lets you modify specific elements within an image while keeping the rest untouched. Retouch gives you the precision and control to refine your AI-generated visuals with surgical accuracy.
When to Use Retouch
Scenario Retouch is a powerful image editing tool that uses AI-powered inpainting technology to make targeted modifications to your visuals. Unlike other inpainting tools, Retouch works with your chosen custom-trained AI models to ensure edits maintain the same style or features as the original generation.
Retouch is for making precise adjustments to your AI-generated images; such as:
Fix common issues like hands, faces, or small details
Add new elements to an existing scene
Remove unwanted objects or background elements.
Generate variations of a specific element (e.g., changing a character's expression or outfit)
Retouch can make “non-destructive edits” using a layer-based system, similar to Photoshop or other design software. The layer-based approach gives you complete control over the editing process, allowing you to track modifications and revert to previous states if needed.
How to Access It
From an existing image: Open any image in your Scenario library. Click the three-dot menu in the top-right corner and select "Retouch". The image will load as a new Canvas project with the original model and prompt already applied
Starting fresh: In the main Scenario interface, open the left sidebar menu. Under the "Canvas" section, click "New". Then, select a model and upload/import an image to begin editing (via the “Import” icon in the vertical toolbar)
Understanding the Canvas Interface

The Canvas interface is organized into four main areas that work together for precise editing control:
A: Inference Panel (Left Side). This is where you set up your generation parameters, just like in the main Scenario interface. Here you can select your AI model, write your prompt, add reference images, and adjust settings like influence and sampling steps.
B: Toolbar (Vertical Bar). This vertical toolbar contains all the essential editing tools including selection for creating masks, sketch and erase tools, import functionality, and undo/redo buttons. Press the "H" key to display keyboard shortcuts for faster editing.
C: Canvas (Center Area). The main workspace where your image and all additional layers are displayed. This is where you view your image, create masks, draw or sketch, and see your edits in real-time.
D: Layer Panel (Right Side). Similar to professional design software, the layer panel lets you manage multiple layers, create new ones, show/hide specific layers, and merge or delete layers as needed.
Additionally, you can export your final image or individual layers using the blue "Export" button in the top-right corner. The Canvas interface also allows you to switch between Retouch mode and Scenario Live using the toggle at the top of the screen (for more on Live, see dedicated article).
Understanding the Basic Principles

Retouch works through four key components that work together to create seamless edits:
A - The Mask – You define which part of the image to modify by selecting or drawing a mask around it. This area becomes your focus for editing.
B - The AI Model – Select from the top-left bar (similar to other Scenario interfaces). The model influences how your edits will look and maintain consistency with the original style.
C - The Prompt – Your text description guides what should be generated in the masked area. The prompt only affects the selected region, not the rest of the image.
D - The Surrounding Context – The areas around your mask influence the final result, helping maintain visual coherence. This is why elements near the mask might influence what appears in the edited area.
Additionally, advanced settings like sampling steps, seed values, and influence sliders give you precise control over your edits.
In the next section, we'll explore how to use Retouch for specific editing tasks and walk through a typical, step-by-step workflow:
Step 1: Identify the area to modify
First, determine which part of your image needs editing. This could be a character's face, a background element, an outfit detail, or any other aspect you want to change. You have two approaches:
You can simply mask the area as-is if you want to regenerate it directly,
Or you can sketch over it to provide more guidance to the AI. Sketching is particularly useful when the AI needs visual hints about what to create. For example, if you want to add "a red bridge over a river" where no bridge currently exists, sketching the rough shape and color of a bridge helps the AI understand your intent.
Best practice: When sketching, always create a new layer first (via the right panel) to keep your edits non-destructive. This preserves your original image and allows you to make adjustments to your sketch without affecting the base image.
Step 2: Mask the area for editing
Create a mask around the area you want to modify, using one of the tools available (brush, lasso, or smart selection). Only this masked region will be edited, while everything else remains untouched. The masked area will appear in the inference panel on the left as your "Reference."
At this stage, check the influence level setting (to the left), which works similarly to image-to-image generation. A higher influence gives more weight to your mask or sketch, while a lower influence allows the AI model and prompt more creative freedom.
Step 3: Select the right AI model
If you're editing an image generated in Scenario, the original model will automatically load: this ensures a better style consistency between your (inpainted) edit and the original image. You can select a different model from the top-left menu if needed. The AI interprets both your prompt and masked area similar to “image-to-image” generations, in the main generation interface.
Using the same model that created the original image typically produces the most consistent results. However, you can use different models in the same Canvas project for more elaborate creative effects, especially for multi-character scenes (see this this workflow tutorial and the associated video below)
Step 4: Craft a prompt
Write a prompt that specifically describes what you want to generate in the masked area. Remember:
Your prompt only applies to the masked region, not the entire image. Focus on describing just the element you're changing rather than the whole scene.
Add style tokens if needed to maintain consistency with the rest of the image.
When using a mask with low influence settings, more detailed prompts help guide the AI more effectively.
Step 5: Generate, review, and iterate
Click the Generate button to create your edit. Review the results, to the left (from 1 to 8 variants). You can select one or multiple results, which will load as separate layers to the right (layer) menu. If it's not exactly what you wanted, adjust your mask, influence, model, or prompt as needed. Scenario's non-destructive canvas workflow makes it easy to try different approaches until you achieve the perfect result.
Now that we covered the basics, let's focus on three distinct techniques that will help you get the most out of Scenario Retouch: how to add an element, remove an element, or generate variants of an element.
Layer Context Menu
When right-clicking on your image in Canvas, you'll access a context menu with various options to manipulate your layer:
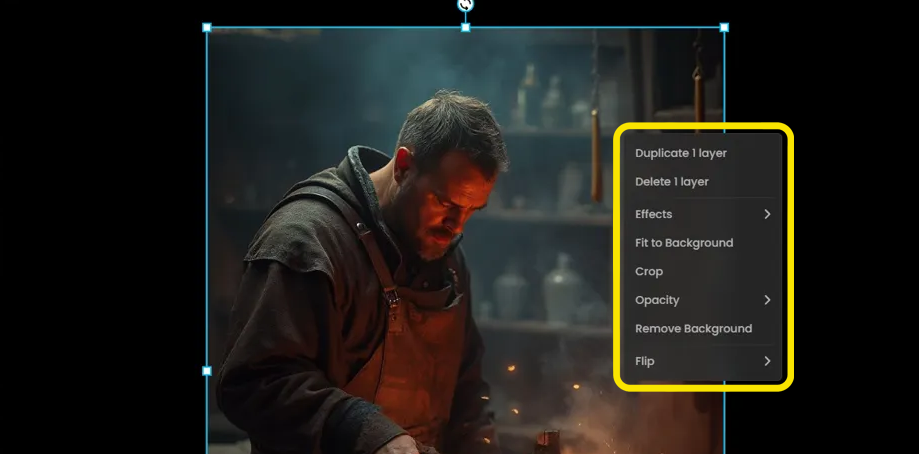
Duplicate 1 layer: Creates an exact copy of the current layer
Delete 1 layer: Removes the current layer from your project
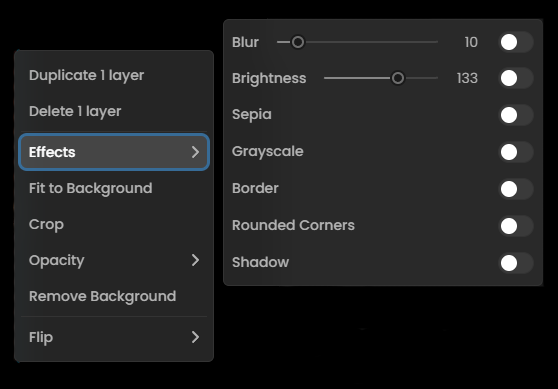
Effects: Opens a submenu with visual effects options:
Blur: Adjusts the softness of the image (slider from 0-10)
Brightness: Controls the image luminosity (slider)
Sepia: Applies a warm, brownish tone to your image
Grayscale: Converts your image to black and white
Border: Adds a frame around your image
Rounded Corners: Softens the corners of your image
Shadow: Adds a drop shadow effect
Opacity: Controls the transparency of your layer with a slider (0-100%)
Flip: Offers mirroring options:
Flip Horizontally: Mirrors the image left to right
Flip Vertically: Mirrors the image top to bottom
Fit to Background: Automatically adjusts the layer to cover the entire background area
Crop: Allows you to trim unwanted areas from the image
Remove Background: Automatically isolates the main subject by removing the background
To Add an Element
Adding new style consistent elements to your image is a powerful capability of Scenario Retouch. Whether you need to insert objects, characters, or details that weren't in the original image, the process is straightforward:
First, create a new layer to work on (click "Add layer" in the right panel, to the top). This keeps your original image intact while you experiment. Next, use the sketch tool to draw a rough outline of what you want to add – this doesn't need to be perfect, just clear enough to guide the AI. For instance, if adding a sword to a character's hand, sketch a basic sword shape in the appropriate position and size.
Once your sketch is complete, use the selection tools to create a mask around it. Make sure your mask covers the entire area where you want the new element to appear, with a small margin around it to help blend with the surrounding image. In the left panel, craft a detailed prompt describing specifically what you want to generate – for example, "a medieval steel sword with an ornate golden hilt and ruby pommel." Set an appropriate influence level (25-50% typically works well for new elements, depending on how precise your sketch is).
Click “Generate“. Review the results and select the best option(s), which will then appear as a new layer. You can further refine this element with additional masking and prompting if needed.
To Remove an Element
When you need to remove unwanted objects or elements from your image, Scenario Retouch offers two effective approaches:
Method 1: Sketch and Inpaint
First, start sketching on the element(s) you want to remove, by picking the same surrounding colors of the background supposed to replace the element. Then, select the area with the lasso. You can either leave the prompt field empty or write a simple prompt describing what should replace the removed element – typically the background or surrounding environment. For example, if removing a character from a forest scene, you might prompt "forest background with underbrush." Generate and select the best result(s) that seamlessly blends with your image.
Method 2: Adaptive Fill
For smaller elements against relatively uniform backgrounds, use the more convenient "Adaptive Fill" feature. Select the element you want to remove using any selection tool (lasso or smart mask), then look for the "Adaptive Fill" option above the layer (shortcut: Shift+E). "Adaptive Fill" is an AI-powered tool that automatically analyzes the surrounding context and fills the mask by matching the background texture/lighting, without requiring a prompt.
To Create Variants of an Element
Retouch can generate variations of existing elements while maintaining overall image and style consistency. This is relevant for exploring different outfit designs, facial expressions, hairstyles, or color schemes, for example:
To create variants, start by selecting the specific element you want to modify – for example, a character's clothing or facial expression. Create a precise mask around just that element using the selection tools. You may not necessarily need to sketch anything for variants, as the original element already provides structural guidance to the AI.
In your prompt, clearly describe the specific variation you want to see. For facial expressions, use descriptive terms like "portrait of a woman with surprised expression, wide eyes, raised eyebrows" (for instance). For clothing variations, a good prompt will describe the desired outfit in detail: "ornate red dress with gold embroidery, flowing fabric". Being precise helps the AI understand exactly what to generate.
Adjust the influence slider based on how much you want to preserve from the original – higher values (30-50%) maintain more structural elements while allowing style changes, while lower values (20-40%) permit more variations.
Generate several options and compare them to find the most relevant variant. You can continue to iterate, combining elements from different generations or fine-tuning specific details until you achieve exactly the look you want. This approach is particularly effective for character design exploration, where you might want to test multiple outfit options or expressions before finalizing (see Facial Expressions video and dedicated tutorial).
Final Tips
Collaborative Editing: Canvas projects are shared across your entire project, enabling team members to collaborate on the same visuals. This streamlines feedback across team projects.
Consistent Multi-Mask Editing: When working with multiple masks on a single canvas, Retouch maintains consistency across all edits, and this is particularly useful for character turnarounds. You can select the same elements across different poses, and your edits will maintain visual coherence throughout all views.
Access This Feature Via API
Image-To-Image Generation: Scenario API Documentation - POST /generate/img2img
Inpainting Generation: Scenario API Documentation - POST /generate/inpaint
Was this helpful?