Use Reference Images for Enhanced Control
Last updated: April 9, 2026
This section walks you through using reference images in Scenario to create consistent visuals and better control your creative workflows. Leveraging reference images helps maintain unified aesthetics or shapes across similar AI-generated outputs.
What Are Reference Images?
Reference images are existing visuals that you can add to an inference to guide the AI in generating outputs that match their visual characteristics.
By providing a visual anchor, reference images reduce the need for elaborate prompts and ensure consistency across multiple generations. They are invaluable for maintaining control over your outputs.
Why Use Reference Images?
Reference images help maintain consistent visual elements such as:
A color scheme
A composition (e.g., depth or structure)
A specific pose (for characters)
A particular style (including colors, brush strokes, outlines, lighting, etc.
Character features
… all without requiring elaborate prompts or risking random AI interpretations. When properly utilized, Reference Images significantly enhance workflow efficiency and productivity by providing clear visual direction rather than relying solely on text prompts, which the AI model might interpret differently than intended.
How to Use Reference Images: Step-by-Step
Step 1 - Locate the “Reference Image” menu in the Generation Interface:
Reference Images can be used for generating images, textures, skyboxes, and more. In this example, we focus on “classic“ 2D images. When accessing the Image Generation interface, you’ll find the “Reference Image” menu under the blue “Generate” button (it may be initially collapsed).

Step 2: Upload one (or two) Reference Images
Reference images can be selected from your Scenario gallery, imported from your computer, pasted from the clipboard, or dragged and dropped from any window or gallery. You can also use the “Use Image” option in the three-dot menu.

You can upload one or two reference images, each with a different mode and influence (“strength”). It’s best to use high-resolution images (typically 1024x1024 or higher). If using dual image control, both images should ideally have the same ratio (same as the generated output too).
Important: You can also quickly draw a rough sketch directly in Scenario, typically for using it with image-to-image at a low influence. Simply choose "sketch" instead of uploading or selecting an existing visual.
Step 3: Choose a Reference Mode
Scenario offers different reference modes depending on what you want to retain from the reference image. Here’s a list of the main modes available:
3-1. Single Image Control
Image-to-Image: Transfers color patterns from your reference image to the output.
ControlNet: Focuses on structural elements like shapes, poses, or layouts. Sub-modes include:
Depth: Preserves spatial arrangement and foreground/background elements.
Structure (Canny): Preserves edges and outlines.
Pose: Preserves a character’s pose.
Style Reference: Extracts and applies a specific artistic style for consistency. Learn more:
Character Reference: Preserves (to some extent) character traits like face, proportions, or clothing. Learn more:
3-2. Dual Image Control
This mode combines two references for more precise control. You can apply the same image twice with different modes or use two different images each with their own mode. Combinations include:
Image-to-Image + ControlNet: Ensures color/pattern consistency while maintaining structural precision.
Image-to-Image + Style: Merges a color scheme with a distinct stylistic overlay.
Image-to-Image + Character: Blends a color composition with character features.
ControlNet + Character: Preserves structural accuracy while locking in character traits.
ControlNet + Style: Combines precise layouts with a stylistic touch.
Fore more information about Dual Image Control, please feel free to check out this short video:
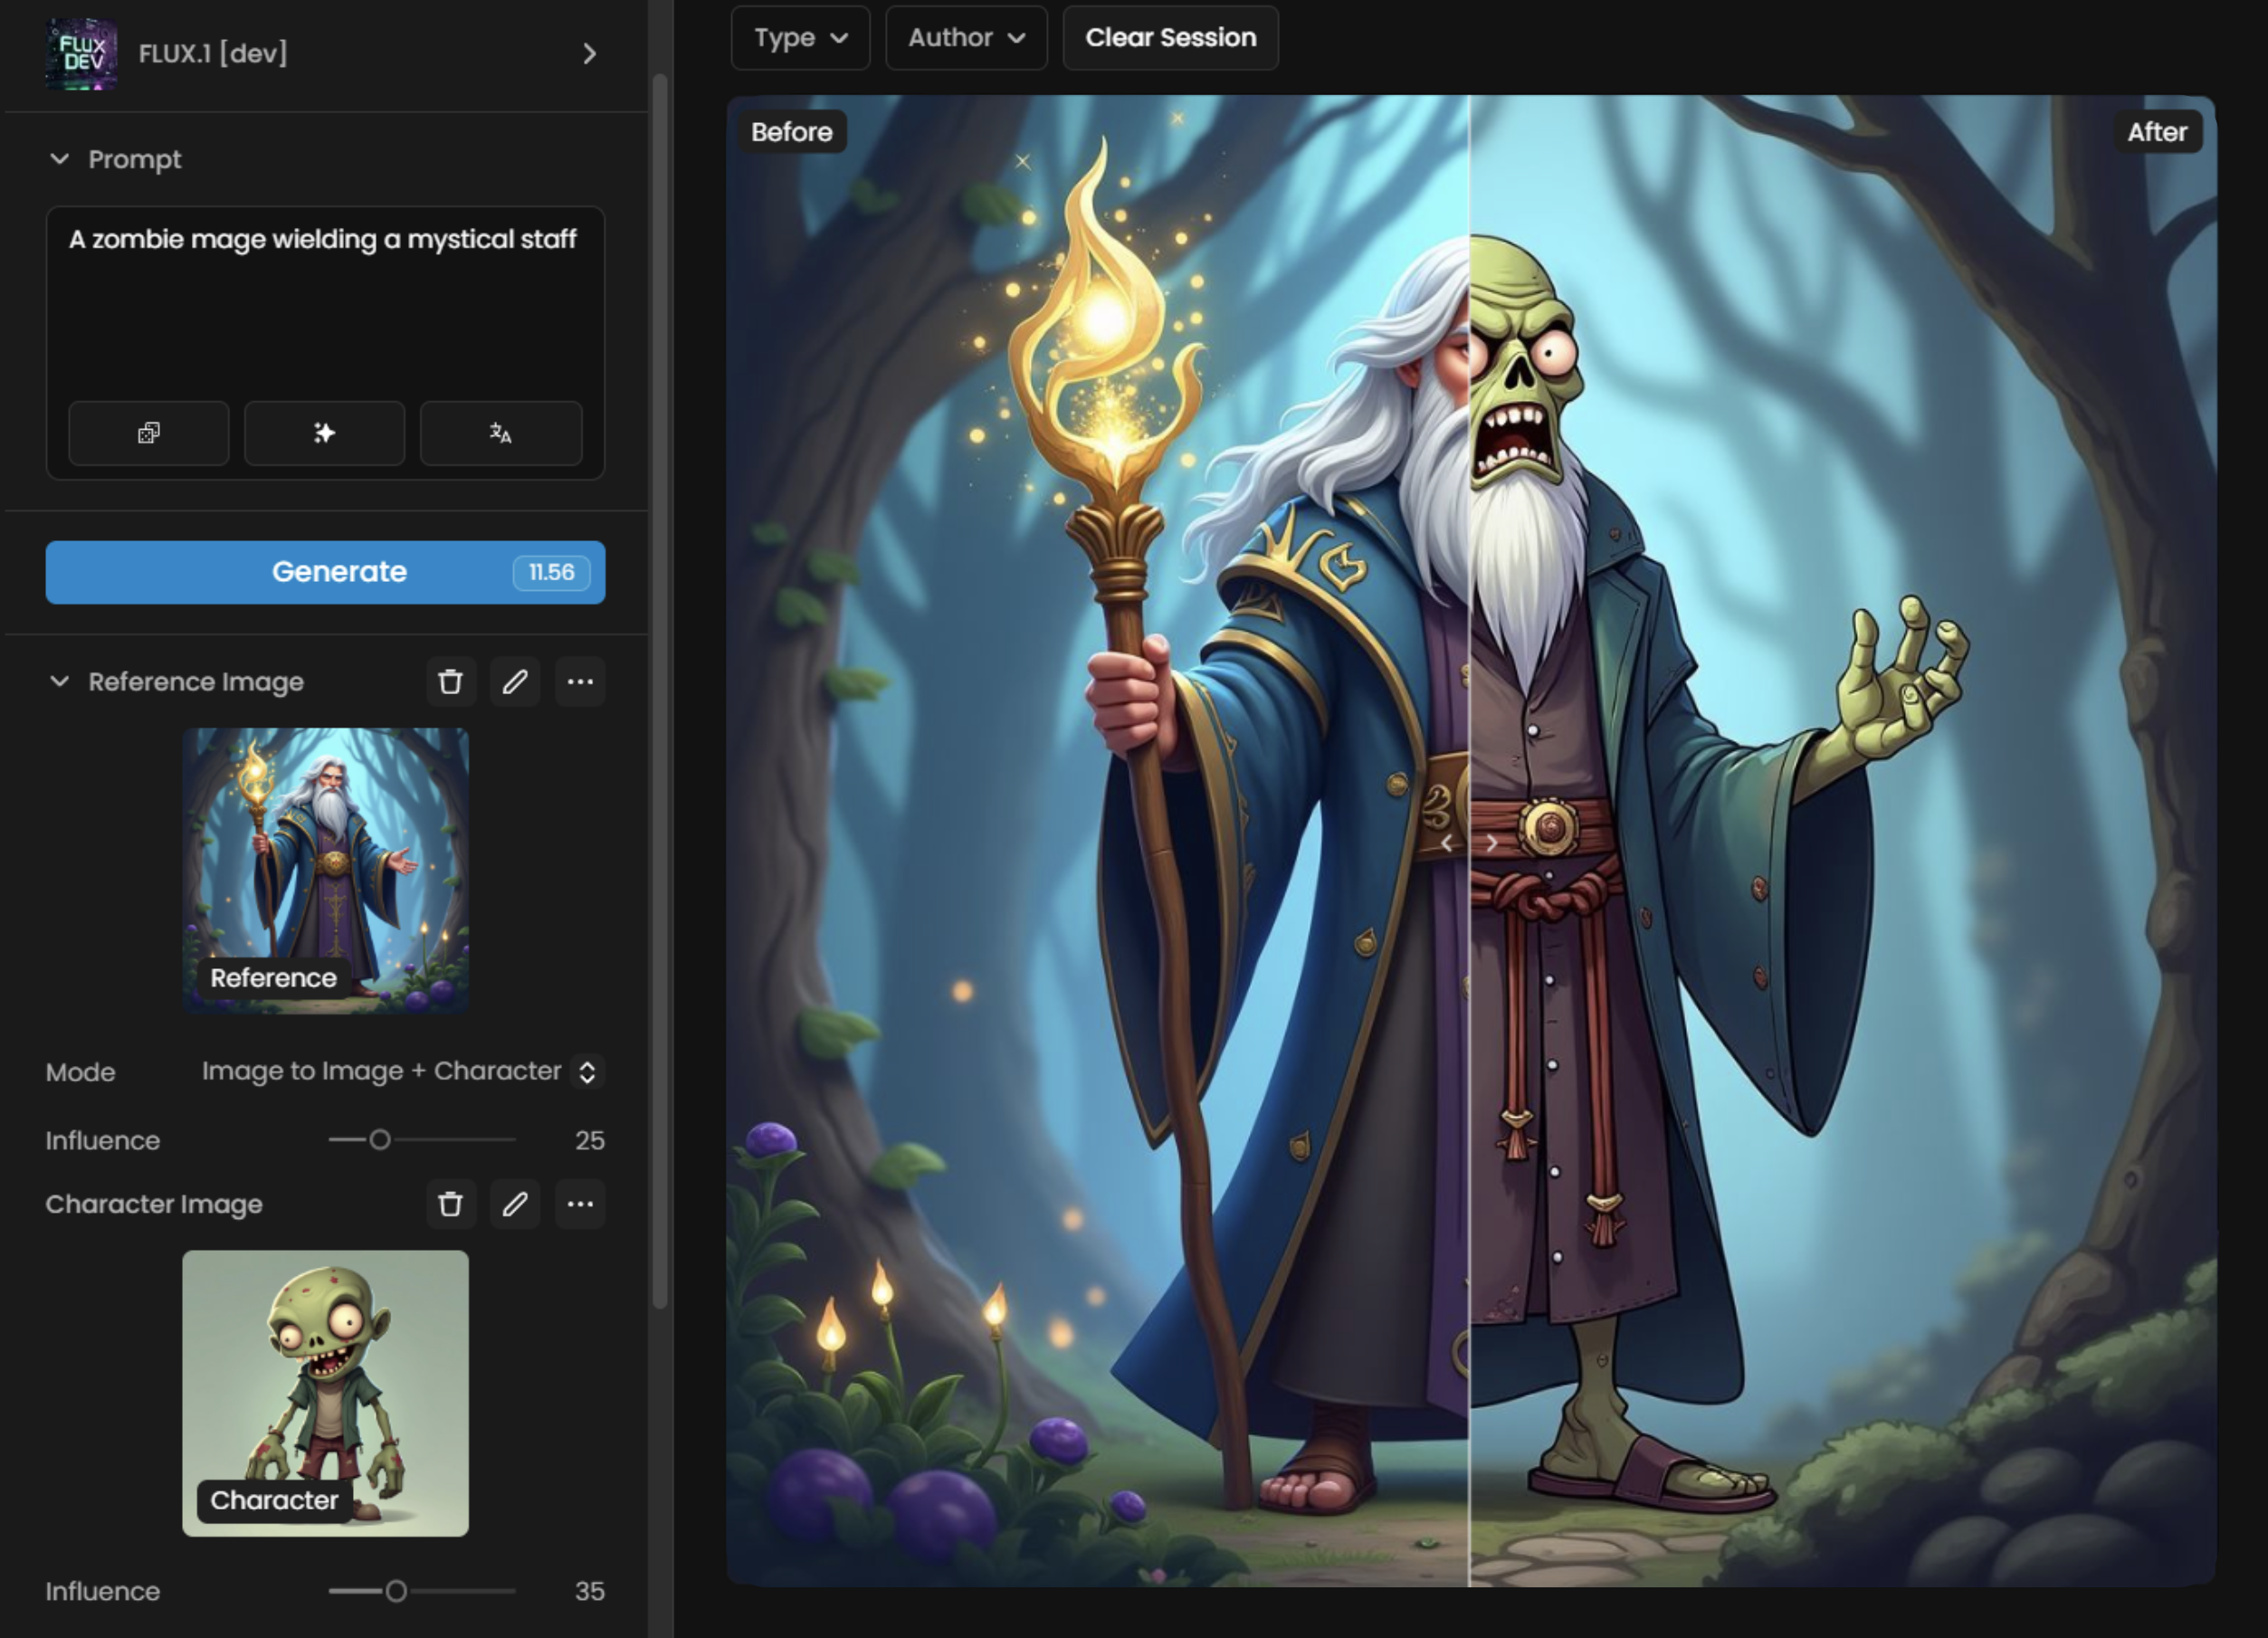
The example below shows Dual Image Control using Image-to-Image + Character Reference: the “Character Image” (a cartoon zombie) is applied to the “Reference Image” (a person holding a staff in a forest), merging color composition and features.
Note that a relevant prompt should preferably also be used alongside reference images to provide additional guidance and further refine the output. Here, it’s “A zombie mage wielding a mystical staff”:
Tip: Start with a single image to test its effect. Experiment with different modes before trying Dual Image Control, for more advanced customization.
Step 4: Adjust the Influence Slider(s)
The influence slider (0-100) controls how strongly the AI adheres to the reference image. Finding the right balance depends on the mode used, your prompt, and the AI model selected. Experimentation is key before scaling up. Some typical values are:
Image-to-Image: Works best in the 5-50 range (5-15 = low influence, 15-25 = medium, 25-50 = high).
ControlNet: Typically effective in the 50-100 range.
Style/Character Reference: usually best in the 10-30 range.
Lower influence values allow the AI model and prompt greater creative flexibility when generating output, while higher values impose more constraints on the final result. For structured experimentation, start with a standard value (e.g., 25 for Image-to-Image) and adjust incrementally based on results.
The sequence below showcases how different influence values affect the output in ControlNet Depth mode. The prompt used was: “An empty ancient frosted coliseum, and vibrant red banners hanging across the stadium.”

You’ll notice that at an influence of 25, the result is quite weak and barely reflects the reference. From 50 onward, it starts aligning more closely with the reference image, and by 75, it even begins replicating finer details.
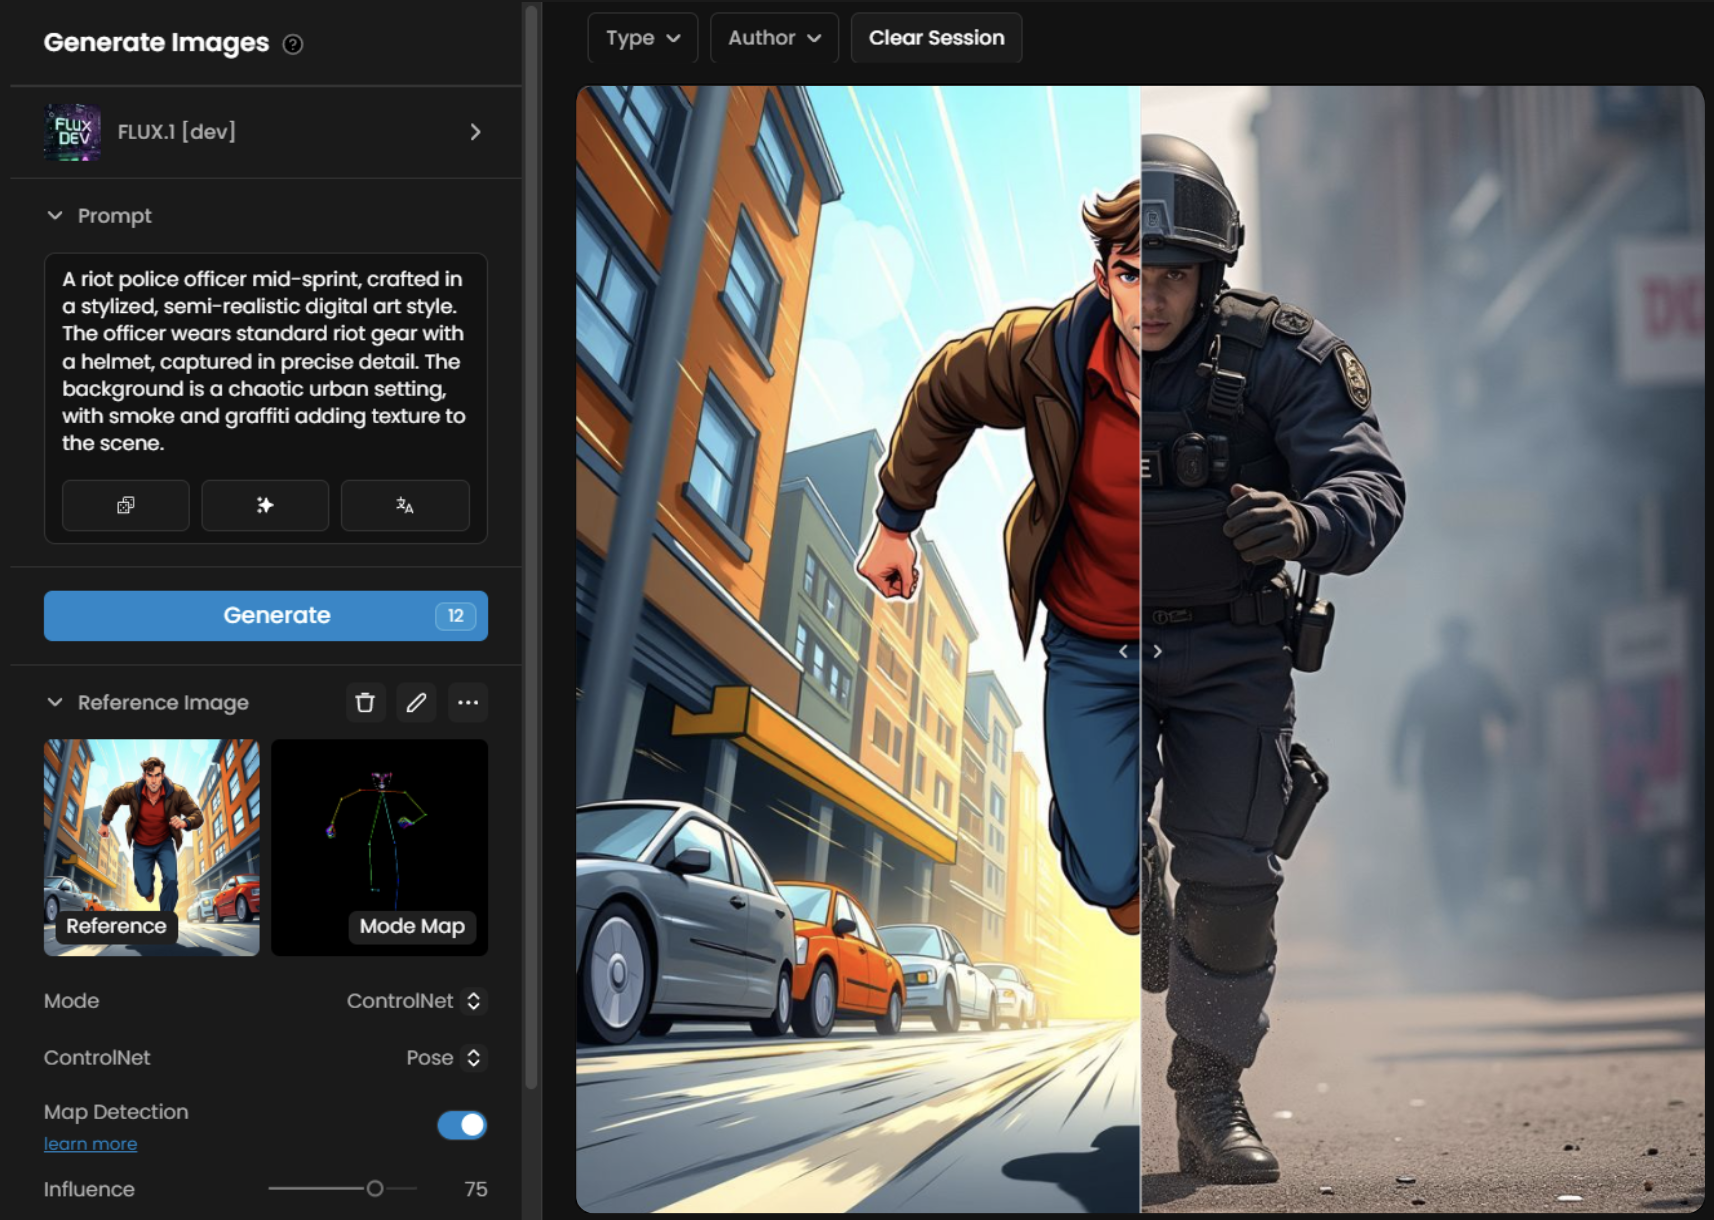
This image shows an example of Single Image Control using ControlNet in Pose mode (Influence 75)
Step 5: Review the Prompt & Model used
As with standard text-to-image generation, your text prompt and chosen model play a key role. Ensure your prompt aligns with your reference to direct the AI correctly. You can experiment with both short and long prompts. Check out Craft Effective Prompts for more tips.
Step 6: Generate and Iterate
Click Generate to create your image, then review the results. If needed:
Adjust the Influence Slider (too high can impact style).
Switch reference modes (e.g., from Structure to Depth).
Modify the prompt or change the model.
Try a different reference or crop an image to focus on specific details.
Experiment with dual mode for advanced refinements.
Remember that you can selectively edit specific portions of the image without modifying the rest by using "Retouch” (Scenario canvas).

This example shows the evolution of the same pixel-art creature, simply generated from a rought sketch (image-to-image) and a custom model trained on pixel art images
Practical Examples
To get used to the few different options on how to use Reference Images, you may try these simple examples below, using Platform Models (available to all Scenario users).
Example 1: Image-to-Image with a Character Model
Process: Choose a trained character model like "Juno" (an anime girl in blue/yellow outfit). In Scenario, make a simple sketch showing three "stick-figures" poses: arms raised, arms down, and hands in pockets. Keep Image-to-Image mode with Influence at 15 (a low value, given the sketch is very basic). Use a prompt like: "A girl with playful and confident expression in three poses: hands raised with open palms, standing with hands in pockets, and one hand on hip with peace sign, white background." Click Generate.
Result: This combination of character model, descriptive prompt, and sketch guidance produces consistent character images that follow both your text description and visual guide (the sketch).

Tip: Scenario Live (also known as live painting) uses Image-to-Image mode to transform your sketches into finished artwork in real time. As you draw on the left side of the interface, the AI model applies your prompt to render your sketch on the right side.
Example 2: ControlNet Pose mode with a Character model
Process: Select the Arcade Hero character model. Upload a reference image showing any character in jumping pose. Switch to ControlNet mode and choose Pose mode with Influence Slider at 70 for strong pose adherence. Start with a simple prompt like "a boy in the middle of jumping," then click the “Rewrite” button below the prompt box to enhance it with character-specific details. When satisfied with the improved prompt, click Generate.
Result: An image of the “Arcade Hero” character accurately matching the jumping pose from your reference image.

Example 3: ControlNet Depth mode + Style Reference
Process: Select the “Imaginative Isometrics” model. Upload an isometric house reference image a a first reference (ControlNet Depth - a grayscale depth map is generated). Then add a “futuristic sci-fi environment” as the second reference image (Style Reference). Adjust the Depth influence to 65 and the Style Reference influence to 40, in order to blend the structural accuracy (depth) with sci-fi aesthetics (style). Use a prompt like: "A futuristic metallic house with a sloping roof, featuring large windows that let in ample natural light." Click Generate.
Result: An elegant isometric futuristic house that maintains the original shape while incorporating the sci-fi styling from your reference image.

Access This Feature Via API
Upload an Image: Scenario API Documentation - POST /assets
Single Reference Image:
Image-To-Image Generation: Scenario API Documentation - POST /generate/img2img
Character or Style Reference: Scenario API Documentation - POST /generate/txt2img-ip-adapter
ControlNet Generation: Scenario API Documentation - POST /generate/controlnet
Dual Reference Image:
Image-to-Image + ControlNet: Scenario API Documentation - POST /generate/controlnet-img2img
Image-to-Image + Character or Style Reference: Scenario API Documentation - POST /generate/img2img-ip-adapter
ControlNet + Character or Style Reference: Scenario API Documentation - POST /generate/controlnet-ip-adapter
Map Detection: Scenario API Documentation - POST /generate/detect