Train a MiniMax H3 Video LoRA
Last updated: November 12, 2026
A MiniMax H3 video LoRA teaches MiniMax H3 your own look and motion: the style of a game or a film, a character, a product, the way a camera moves. You train it in the web app from images, video clips, or both, then generate 24 fps video with audio from it like from any other model.
This article covers the two kinds you can train (the standard LoRA and the Reference LoRA), what footage and images they accept, how captions work, what the test prompts cost, and how to use the trained model. For the concepts every training shares (datasets, epochs, comparing results), see Basics of Model Training. For generating with MiniMax H3 itself, see MiniMax H3: The Essentials.
Before you start: a dataset needs at least 5 assets (or 5 entries for a Reference LoRA). The most you can add depends on your plan and shows in the counter at the bottom of the upload step. Training is subject to the MiniMax H3 license: do not train on real people's faces or likeness without their consent. As the app reminds you before launch, MiniMax H3 outputs may not be used to train other AI models; the license has the exact terms.
Which kind to train
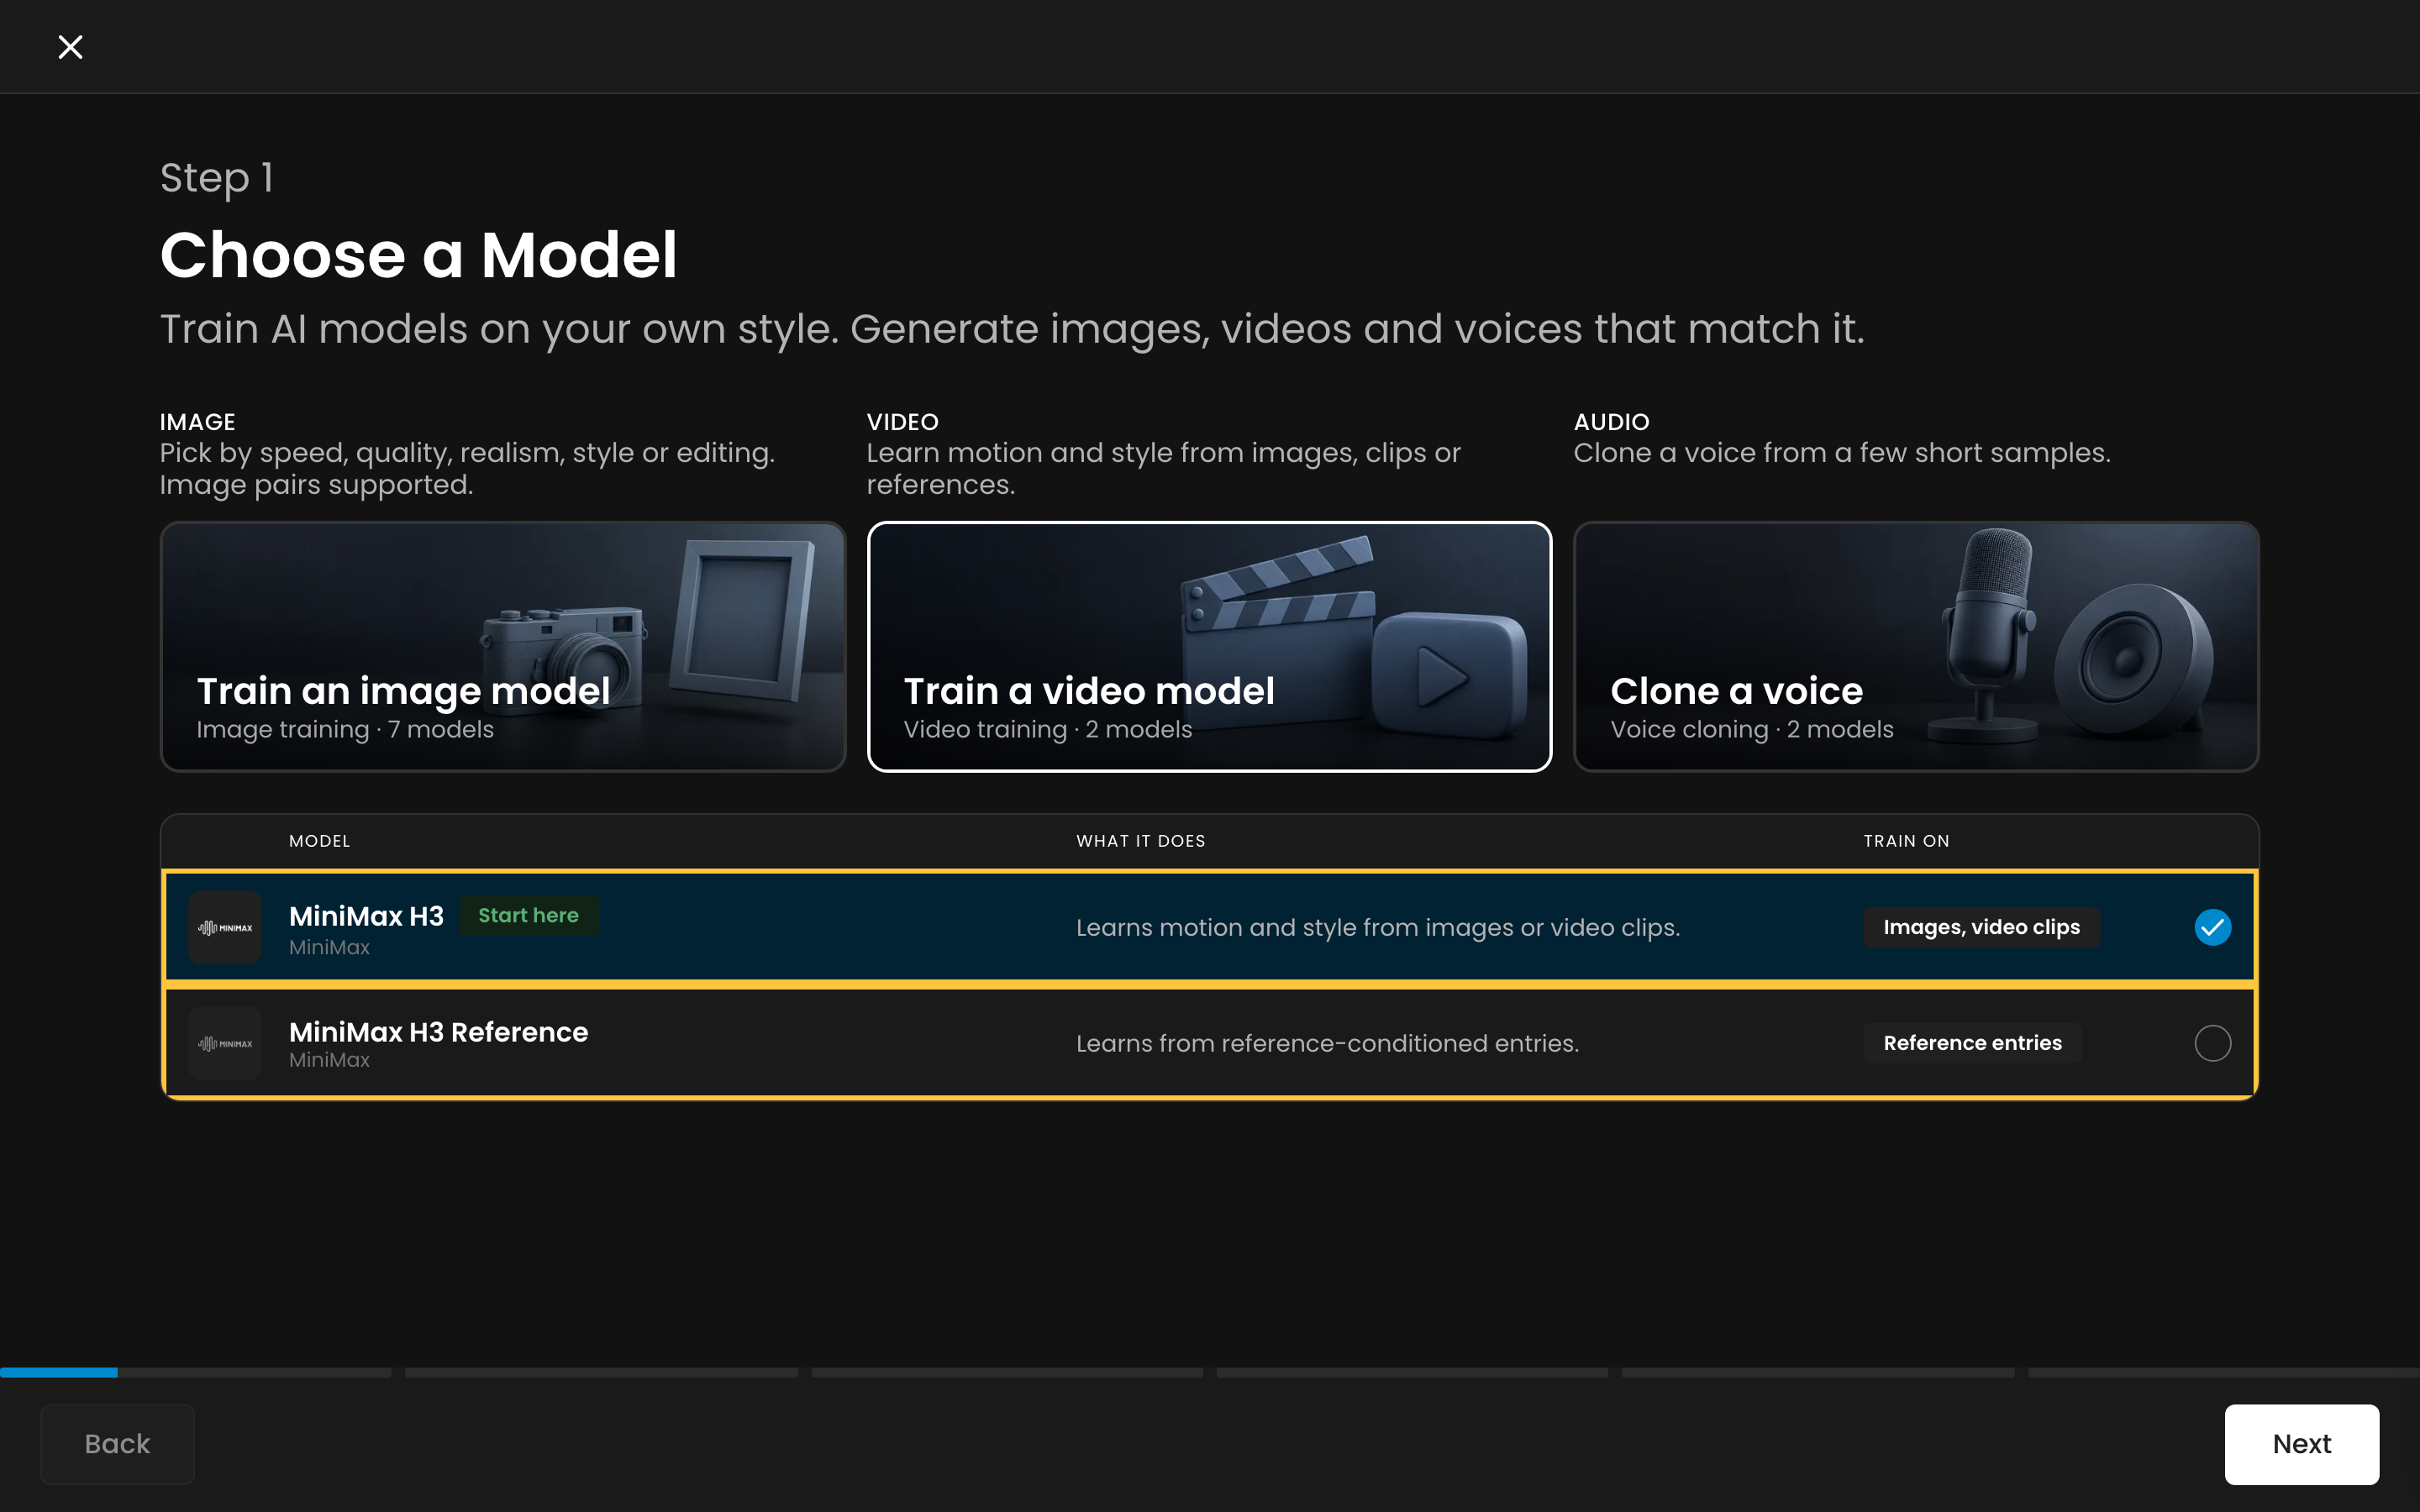
Open Create > Train > Start Training and pick Train a video model. The picker lists two models, and the first one comes in two versions:
Training | Trains on | Pick when | Generates with |
|---|---|---|---|
MiniMax H3 (full precision) | Images, video clips, or a mix of both | You want the model to learn motion from your own footage. It is the only version that does. | MiniMax H3 LoRA |
MiniMax H3 INT8 | Images only | You want a style or a subject and are happy with the base model's motion. It costs roughly two-thirds as much per training step. | MiniMax H3 LoRA |
MiniMax H3 Reference | Entries: one video, its caption, and the reference images, clips or audio it was made from | You want videos that follow the references you give at generation time, such as a character sheet or a screenshot of your game. | MiniMax H3 Ref LoRA |
What you can upload
Accepted | |
|---|---|
Images | Each image counts as a single frame. An image the wizard flags as low resolution has to be upscaled (from its ... menu) or removed before you can continue. |
Video clips | MP4, WebM or MOV, from 5.25 seconds (126 frames at 24 fps) to 30 seconds long. Full-precision MiniMax H3 and MiniMax H3 Reference only. |
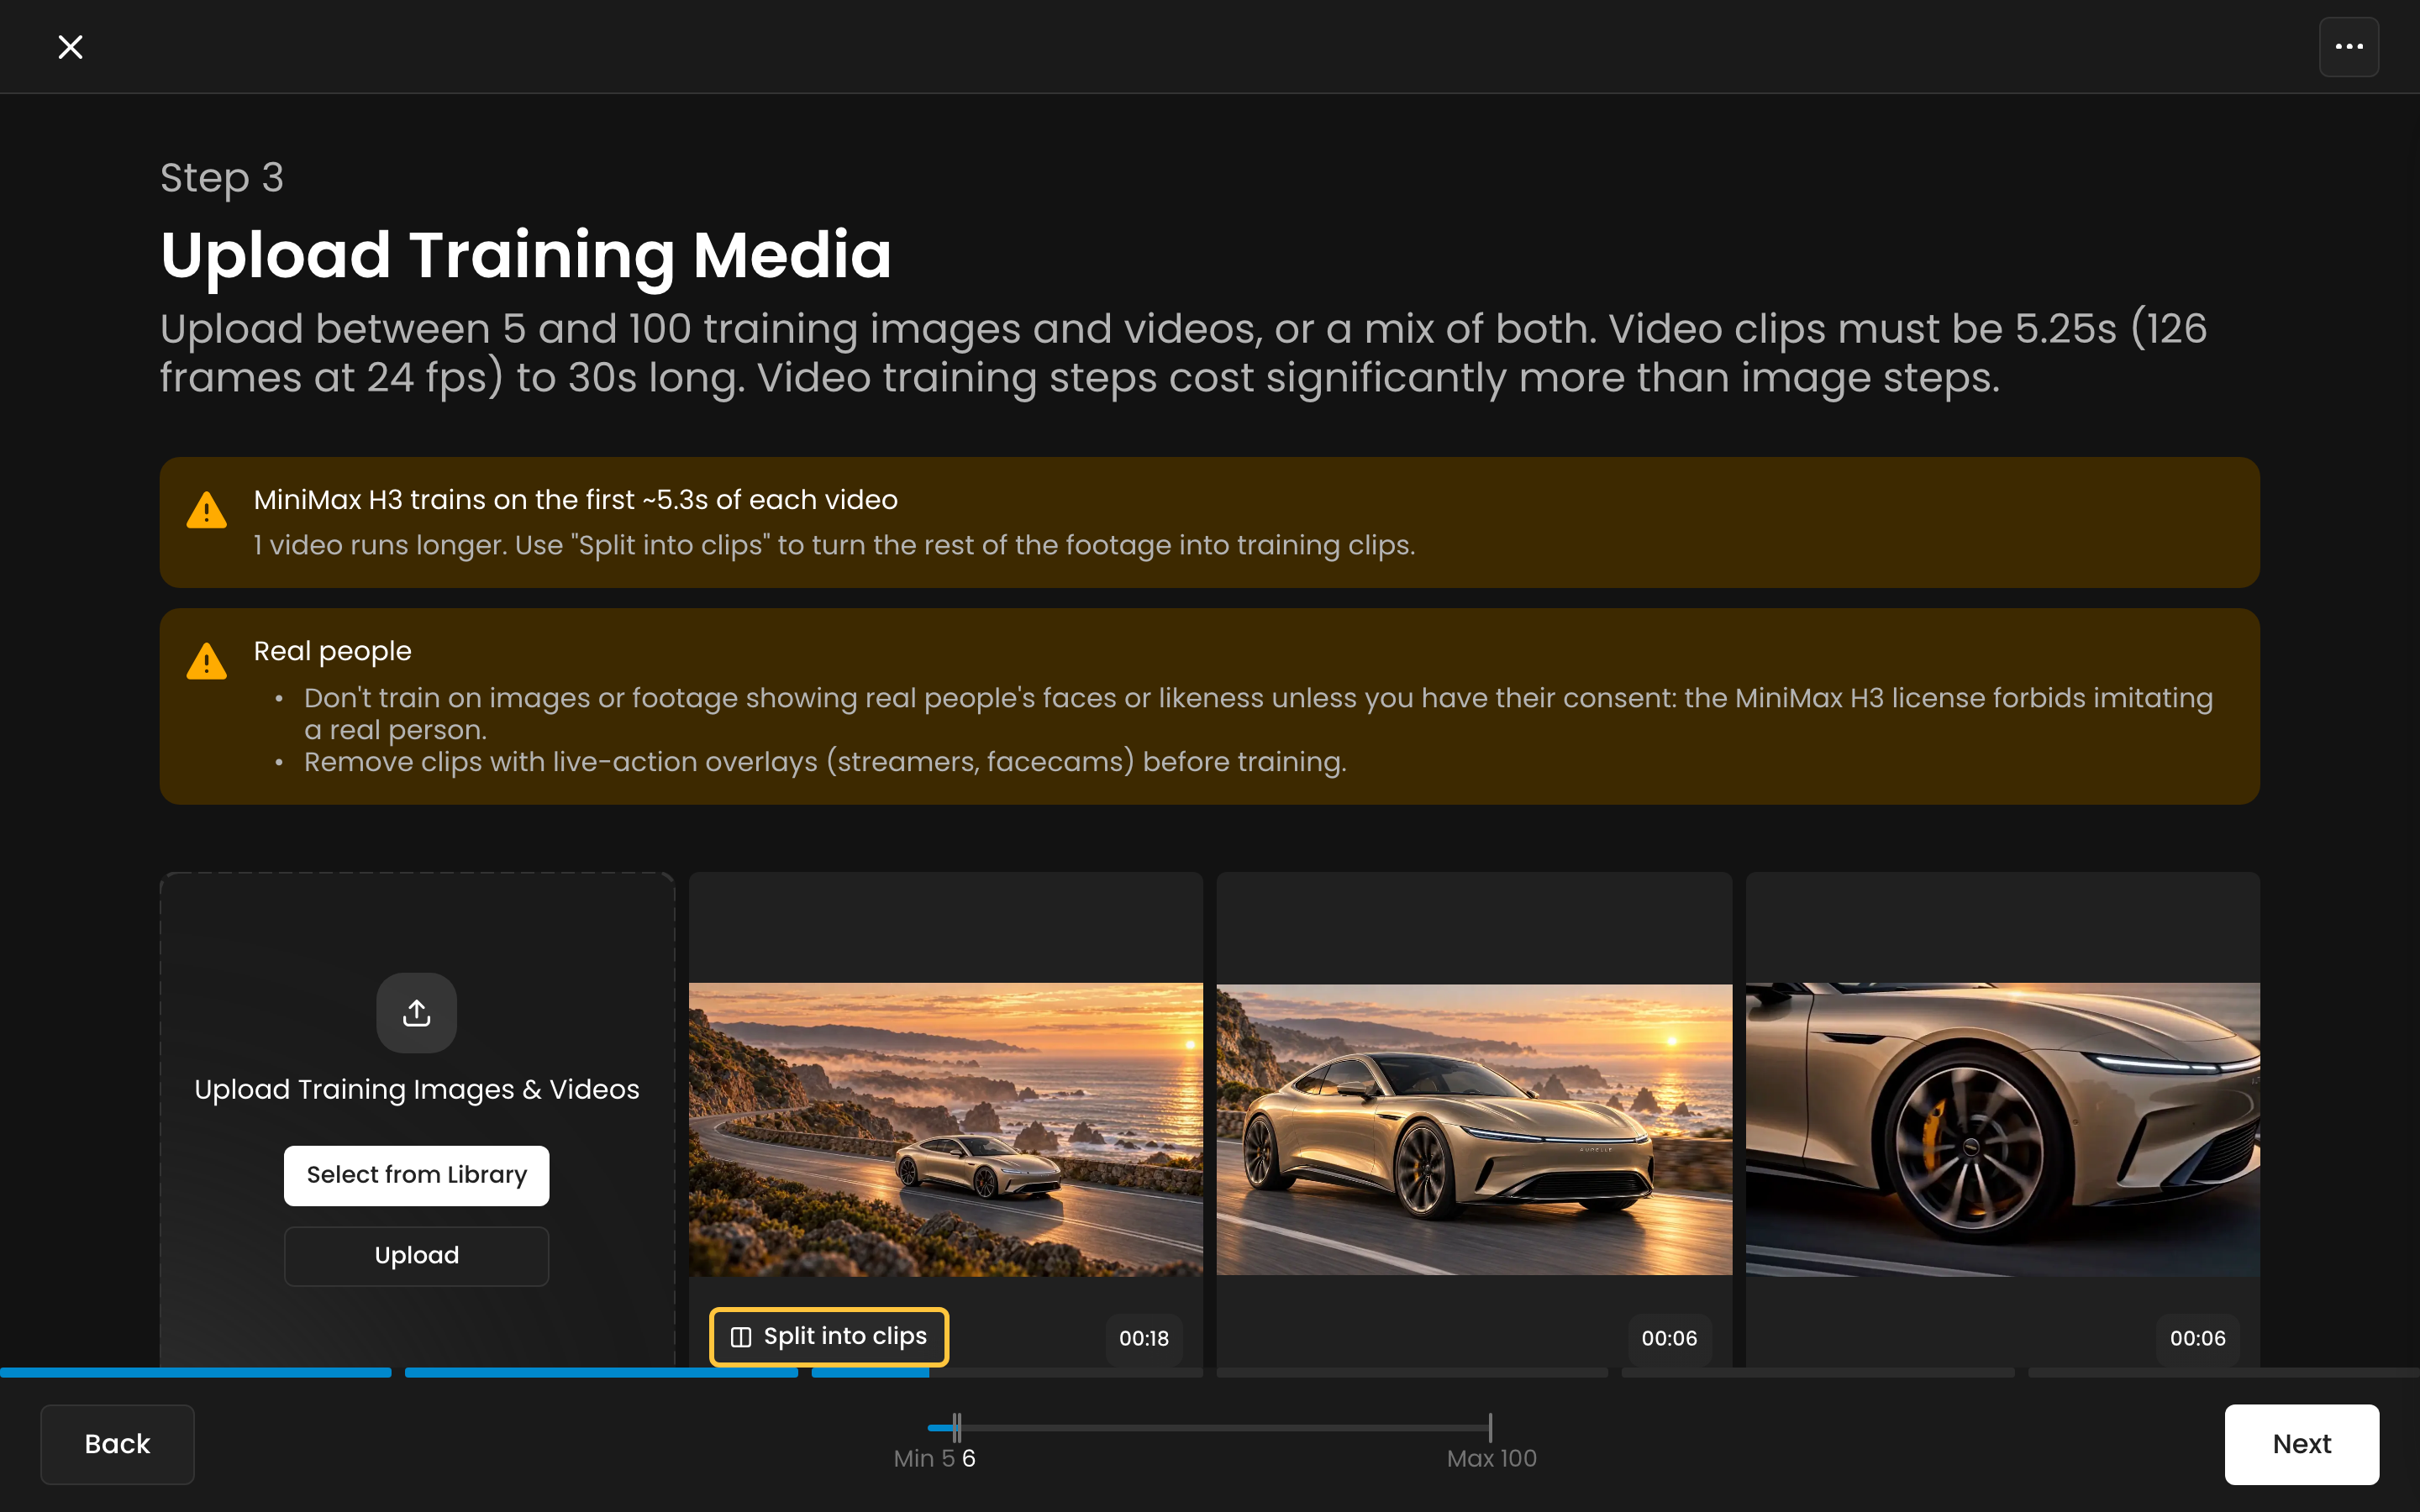
How much of a clip is used | About the first 5.3 seconds. Split a longer video into clips so the rest of its footage trains too. |
Dataset size | At least 5 assets, up to your plan's limit. The videos and audio files of one dataset can total 4 GB. |
Reference entries | At least 5 entries. Each has one video target (5.25 to 30 seconds), a caption, and 1 to 12 references: up to 9 images, 3 videos of 2 to 15 seconds and 3 audio files (MP3, WAV, M4A, OGG or FLAC), with at least one image or video. |
Two rules apply to everything you upload:
Real people: do not train on images or footage showing real people's faces or likeness unless you have their consent. The MiniMax H3 license forbids imitating a real person.
Overlays: remove clips with live-action overlays, such as a streamer's facecam, before training.
Train a standard MiniMax H3 LoRA
The wizard has six steps. It saves the training as a draft as you go, so you can close it and resume from your models.
1. Choose a Model
Select Train a video model, keep MiniMax H3 selected, and click Next.
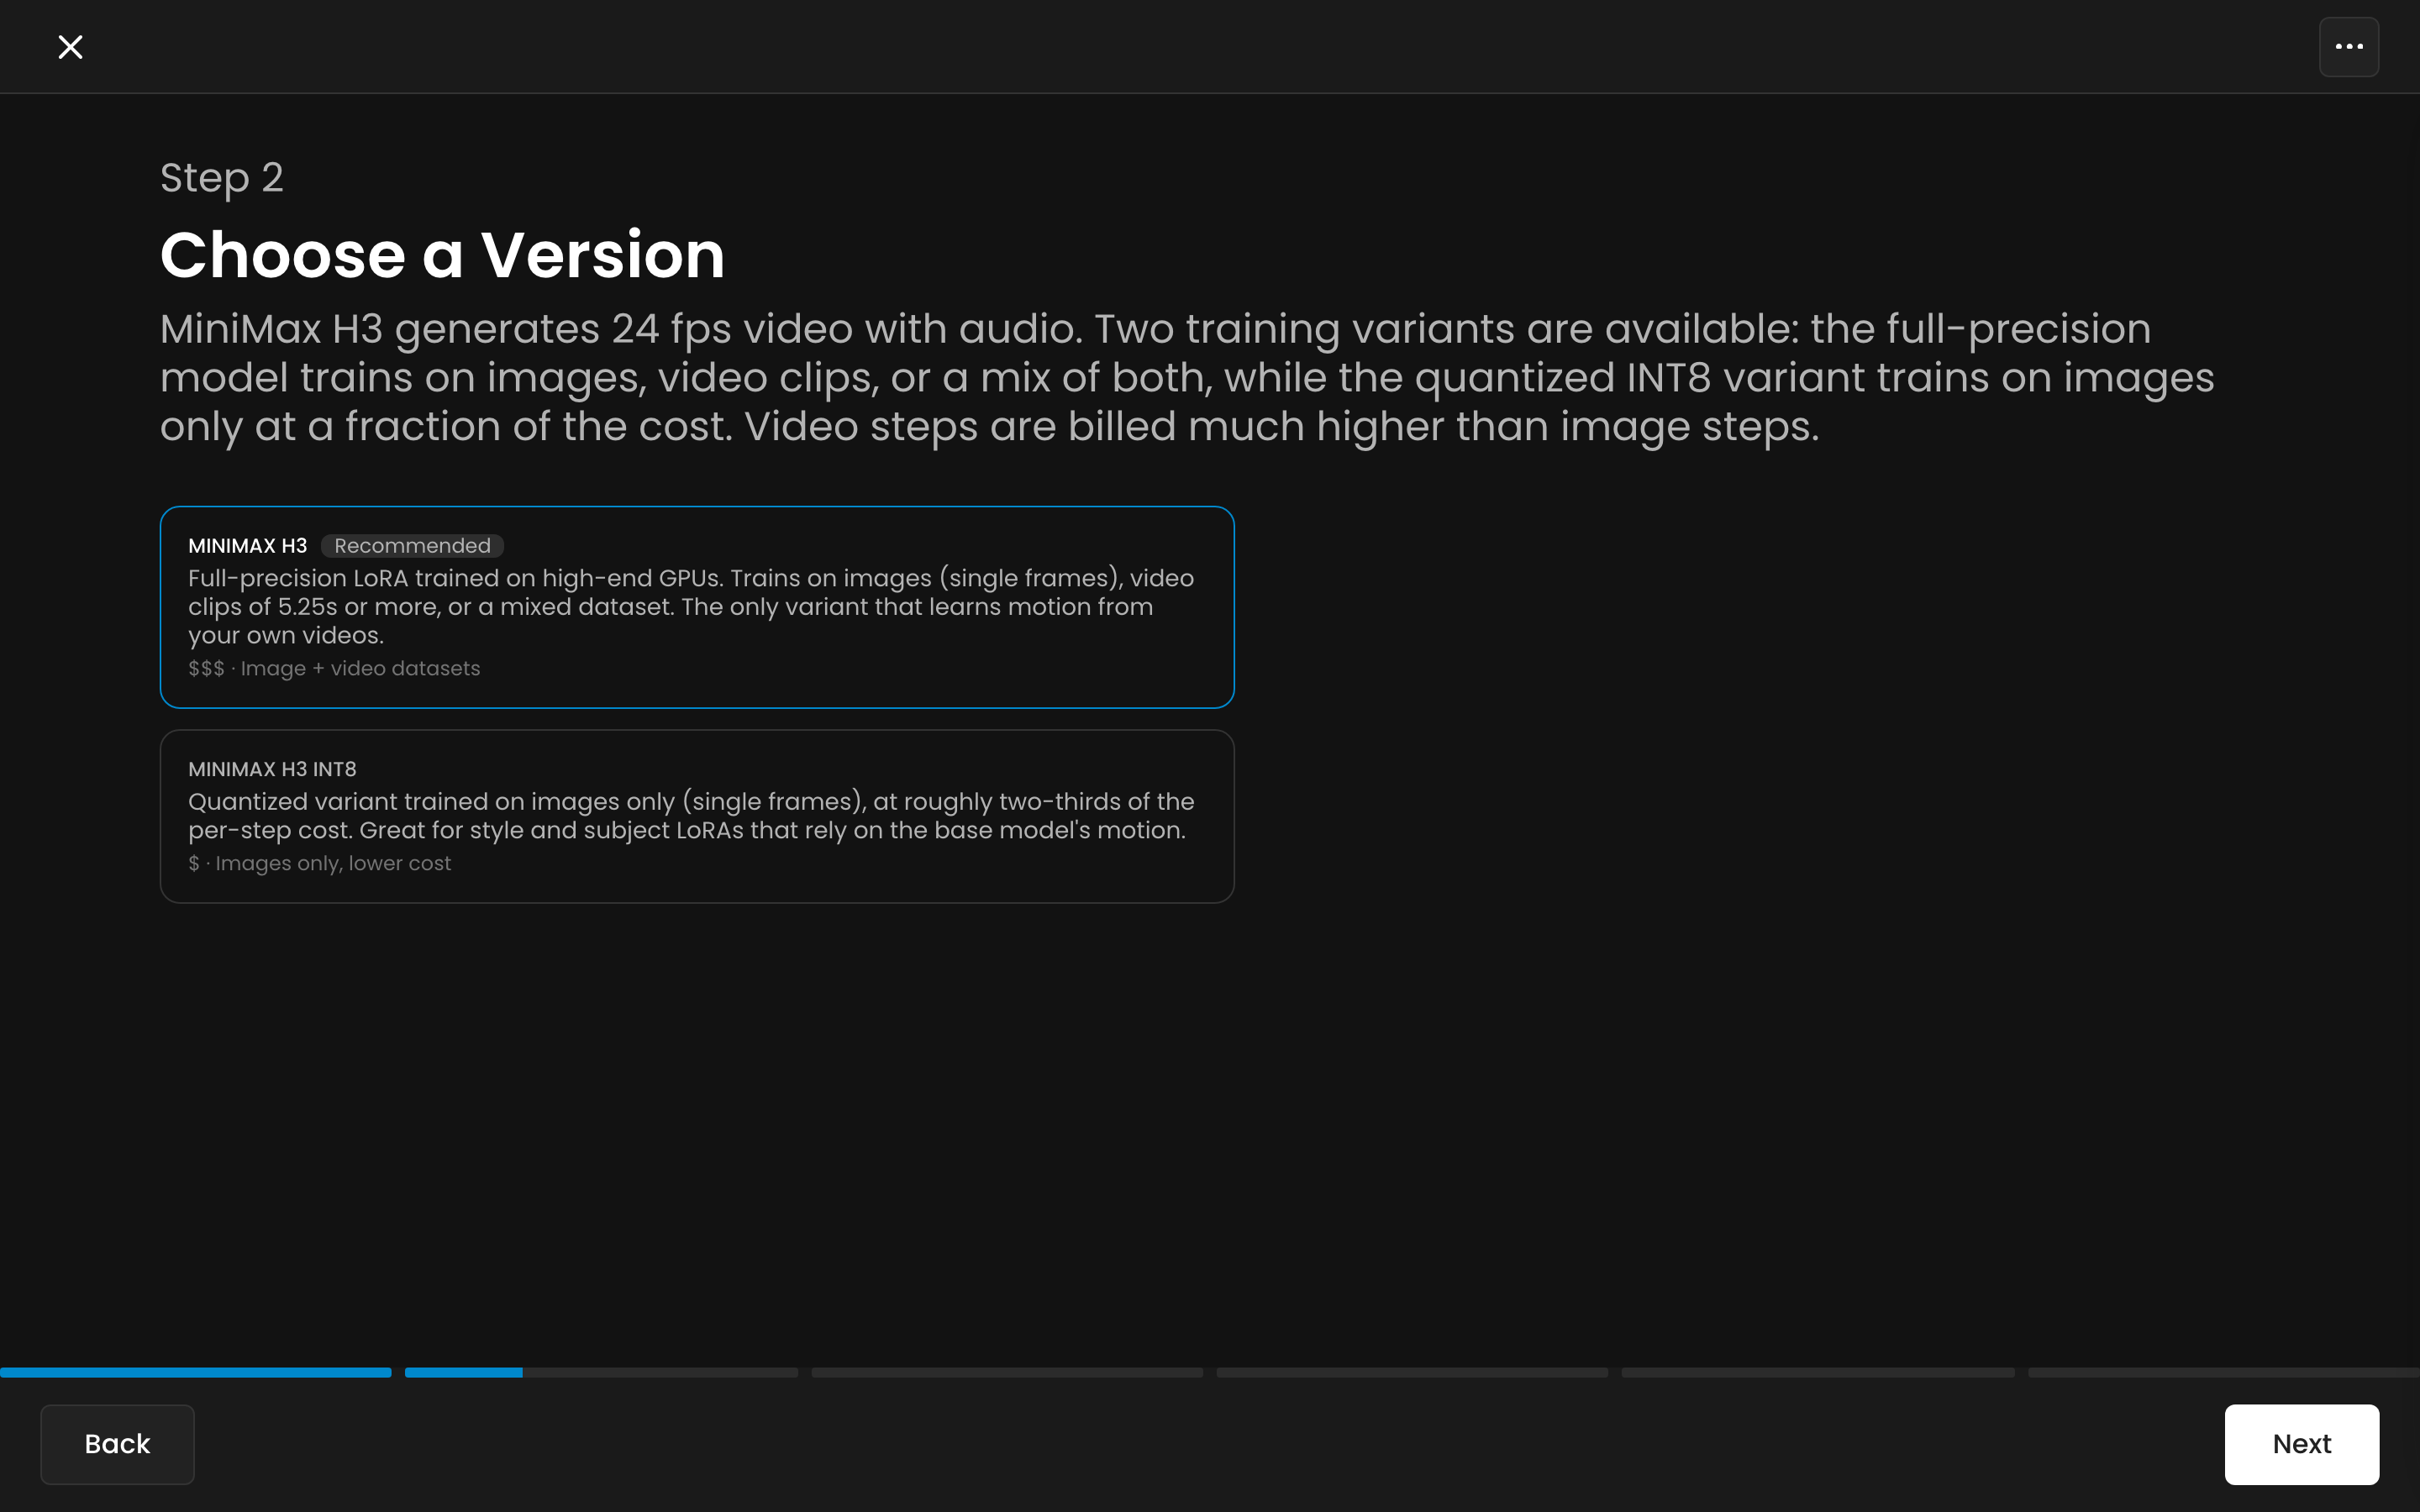
2. Choose a Version
Keep MiniMax H3 (recommended) to train on images, video clips or both, or pick MiniMax H3 INT8 to train on images only at a lower cost. The rest of this section follows the full-precision version; with INT8 the upload step takes images only.
3. Upload Training Media
Click Upload, or Select from Library to reuse assets you already have. Each video shows its duration. A video that runs longer than the trained window gets a Split into clips button, and a notice at the top counts the videos concerned.
Split into clips opens Extract Training Clips, which detects the scenes of the video and cuts it into 5.5 second clips. You choose which clips to keep, and they replace the source video in the dataset. Extraction is billed on the length of the source video, shown on the Extract Clips button, even when no clip passes its quality filters.
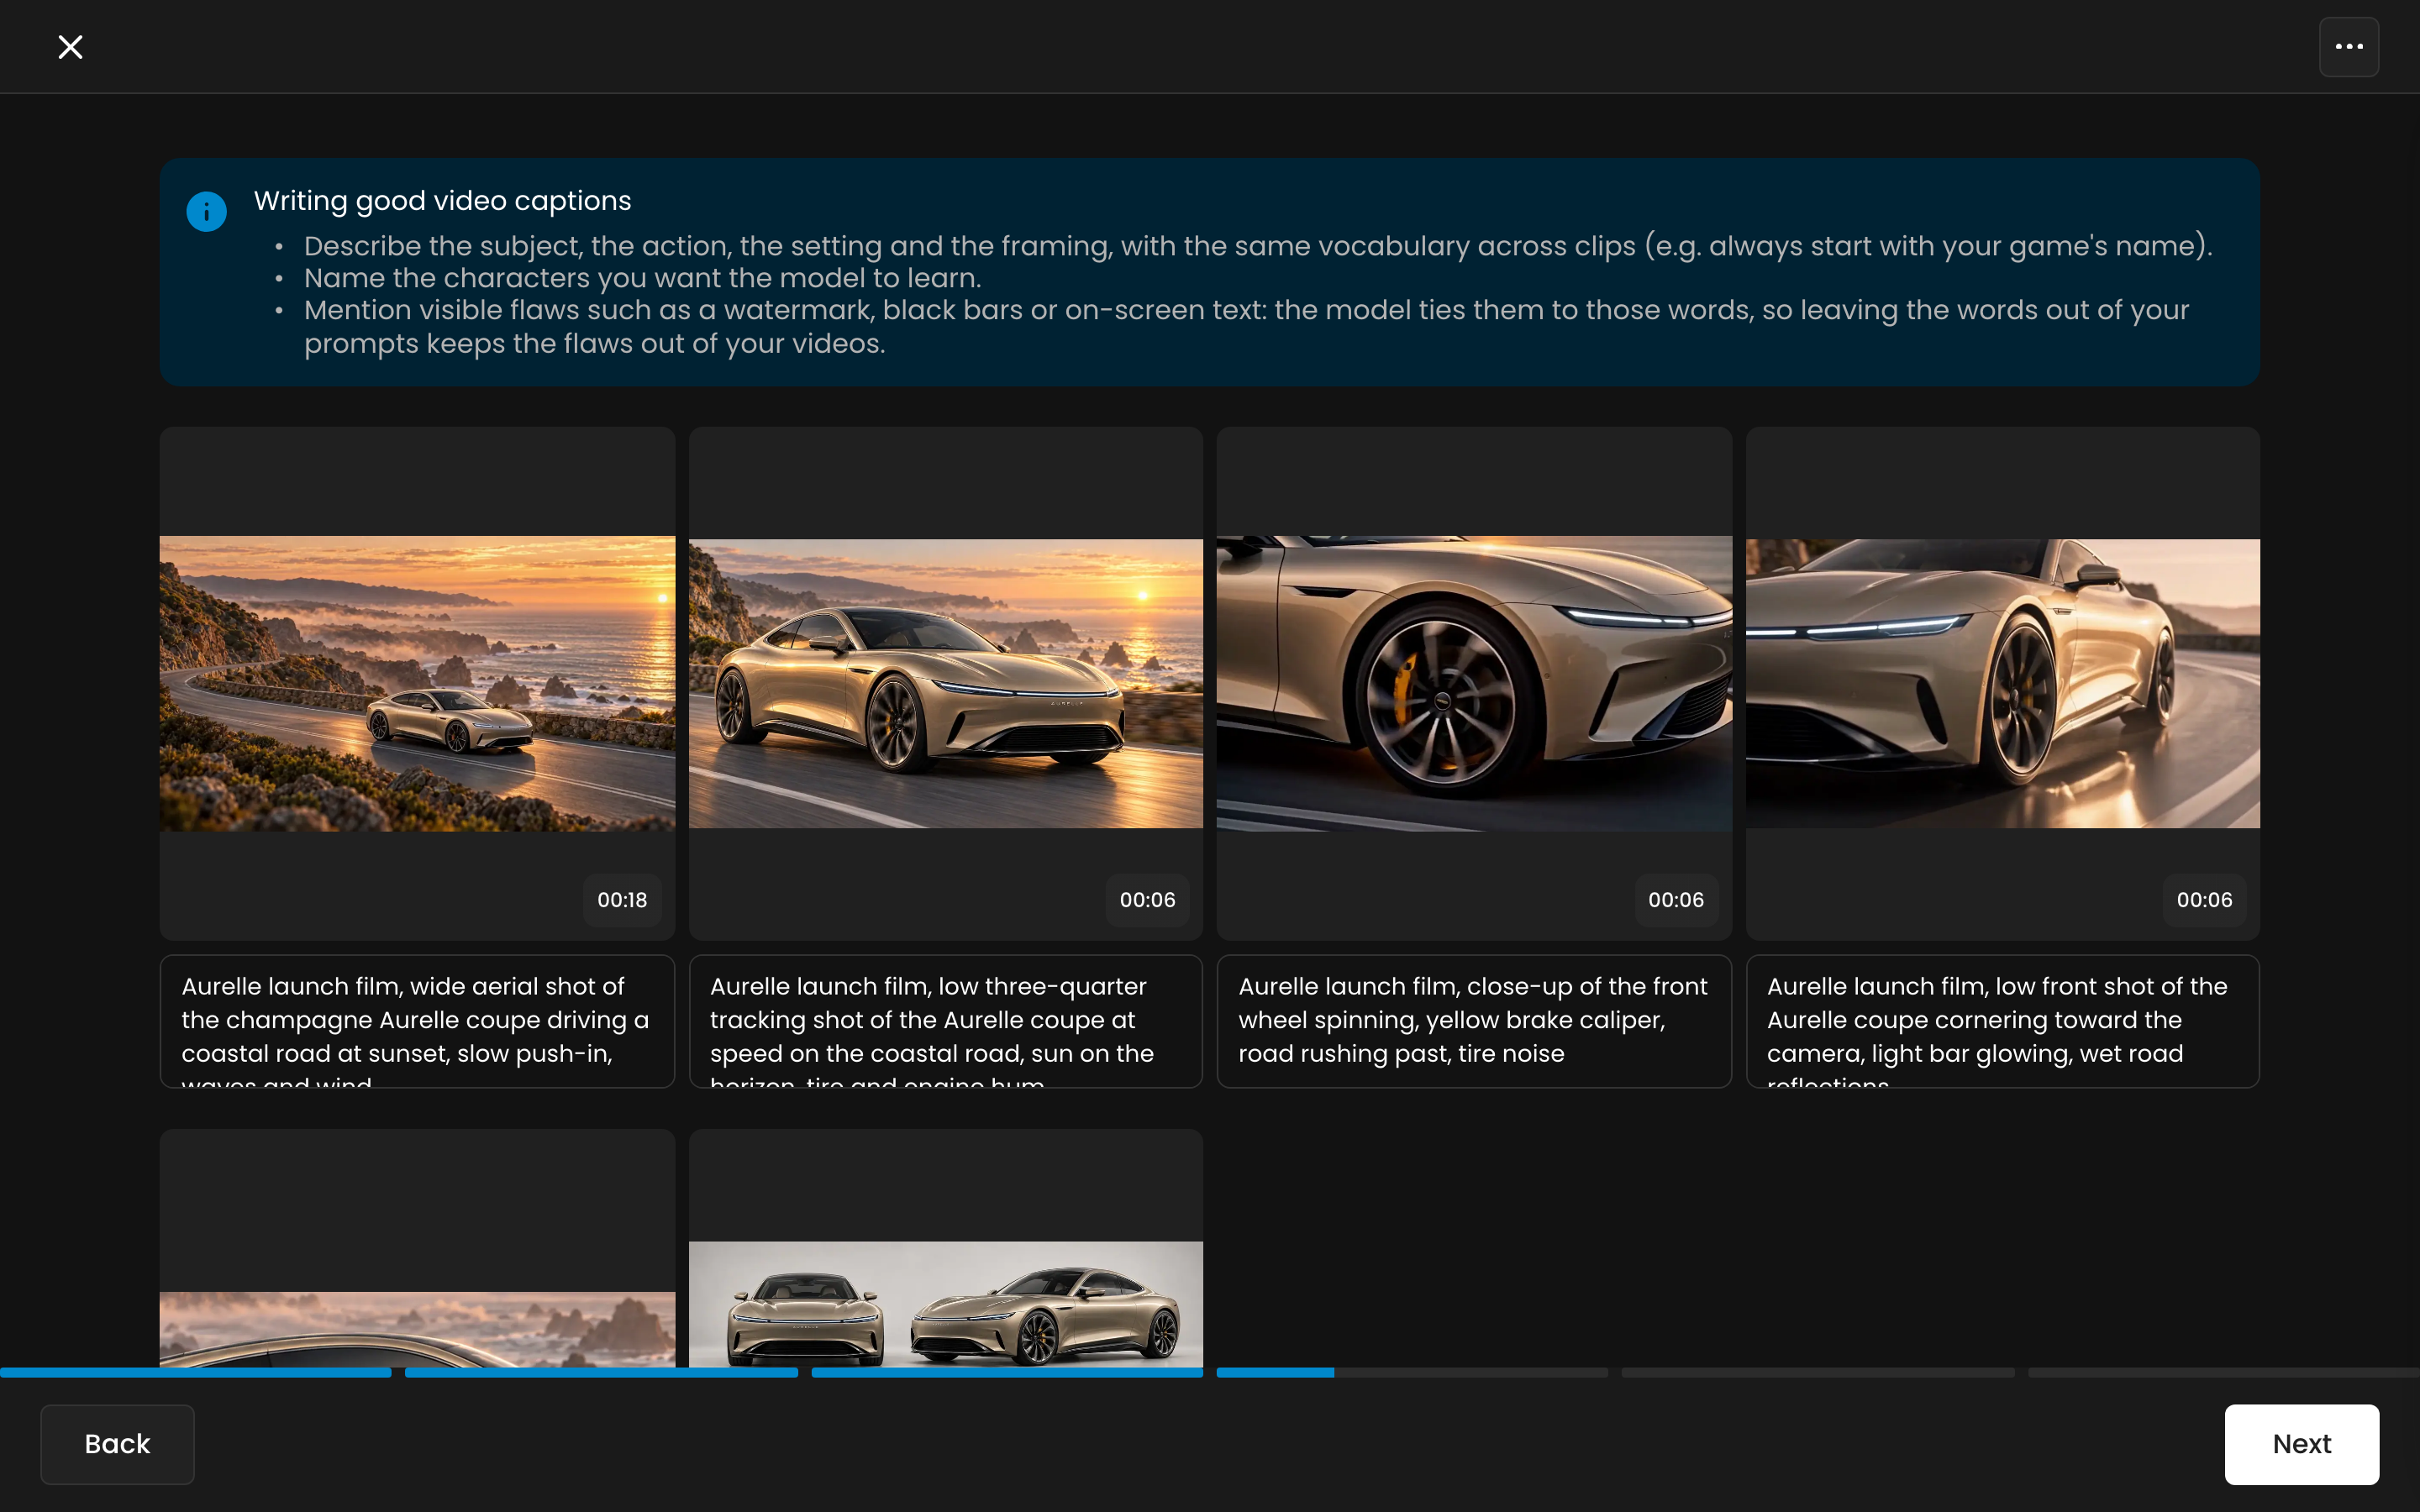
4. Review Captions
Every image and clip gets a caption. See How captions work below, then click Next.
5. Set Test Prompts
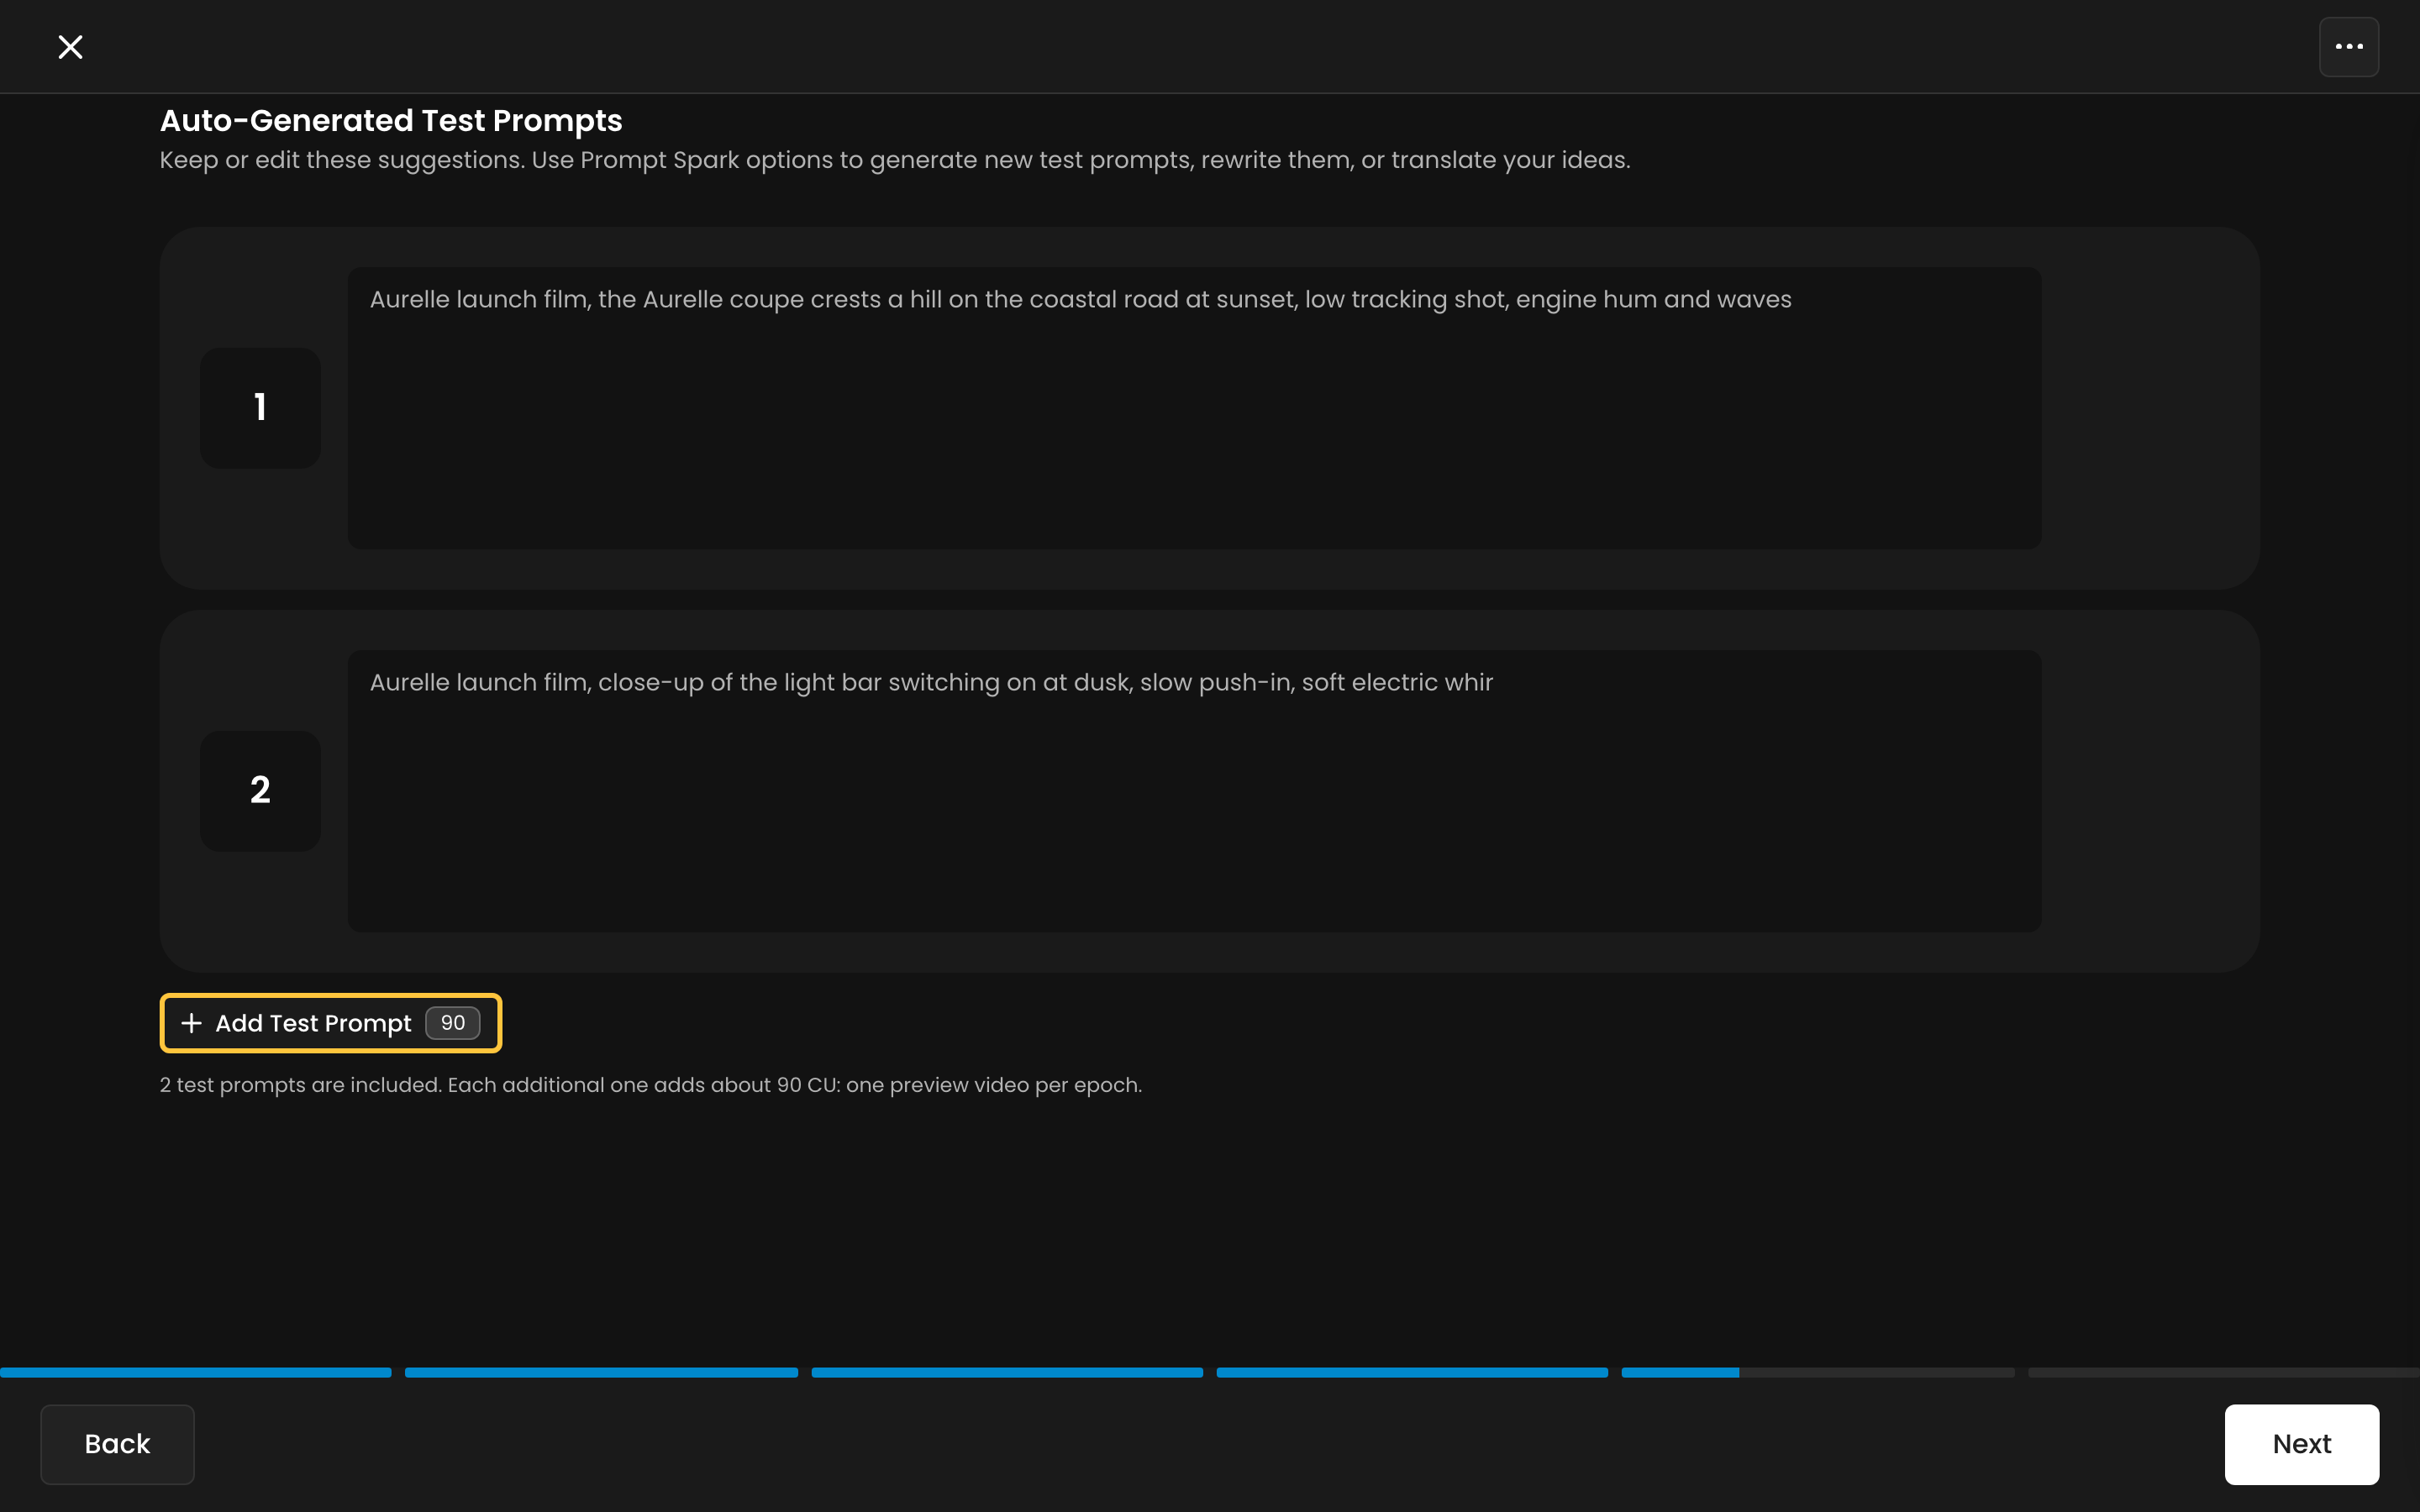
Test prompts generate preview videos at every epoch, so you can compare the versions of your model once training ends. Scenario suggests two, written from your clips: keep them, edit them, or write your own. You need at least one and can have up to four. See What test prompts cost below.
6. Set Parameters and launch
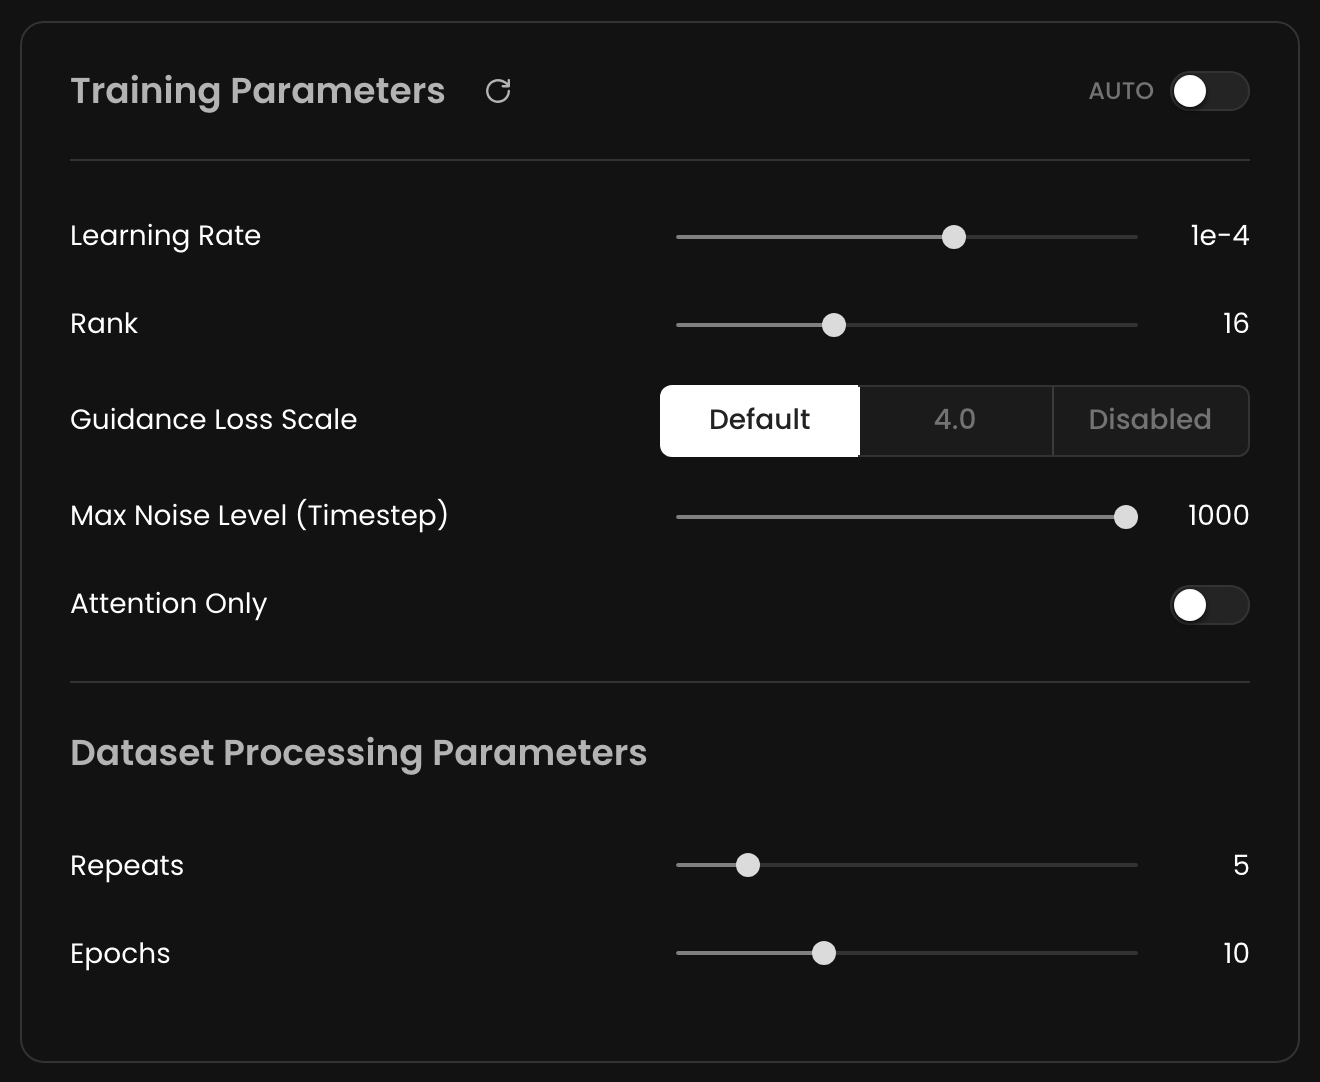
Leave Auto on for a first run. A notice on this step recalls the MiniMax H3 license, and for a video dataset suggests a size: 20 to 50 clips are enough for a first run, when your plan allows that many. Turn Auto off to see or change the values:
Parameter | Default | What it does |
|---|---|---|
Learning Rate | 1e-4 | How quickly the model learns. Lower is safer. |
Rank | 16 | The capacity of the LoRA: 8, 16, 32 or 64. A higher rank learns more and costs more to train. |
Guidance Loss Scale | Default | Default lets the trainer pick the scale. The other choices are 4.0 and Disabled. |
Max Noise Level (Timestep) | 1000 | From 100 to 1000. Values around 850 preserve the base model's motion, which suits a style-only LoRA. |
Attention Only | Off | Trains a smaller adapter, for gentler training. |
Repeats | 5 | How many times each image or video is shown per epoch. |
Epochs | 10 | How many times the model goes through the whole dataset. Each epoch is a version you can compare. |
The Launch button shows what the training costs in Compute Units before you click it. Video clips cost significantly more to train on than images. What happens next (the email when the model is ready, a failed training) is the same as for any model: see Basics of Model Training.
Train a MiniMax H3 Reference LoRA
A Reference LoRA learns from entries. Each entry pairs a video (the target) with the reference images, clips or audio it was made from, so the model learns to generate videos that follow your references. The wizard has four steps.
Choose a Model. Select Train a video model, then MiniMax H3 Reference. It has a single version, so there is no version step.
Set Video Targets & References. Upload your videos and references, or select them from your library. Each video that is ready to train on opens its own entry, captioned with its description when it has one. Everything else lands in the pool on the right: drag an asset from the pool onto an entry to add it as a reference. A reference stays in the pool once used, so one character sheet can serve every entry. The image button on a video target turns one of its frames into an image reference. Longer videos stay in the pool with a Split into clips button.
Set Test Prompts. Each test prompt needs a source image, since the previews are generated from a reference. A prompt without an image, or an image without a prompt, blocks Next.
Set Parameters and launch. The parameters and their defaults are the ones in the table above.
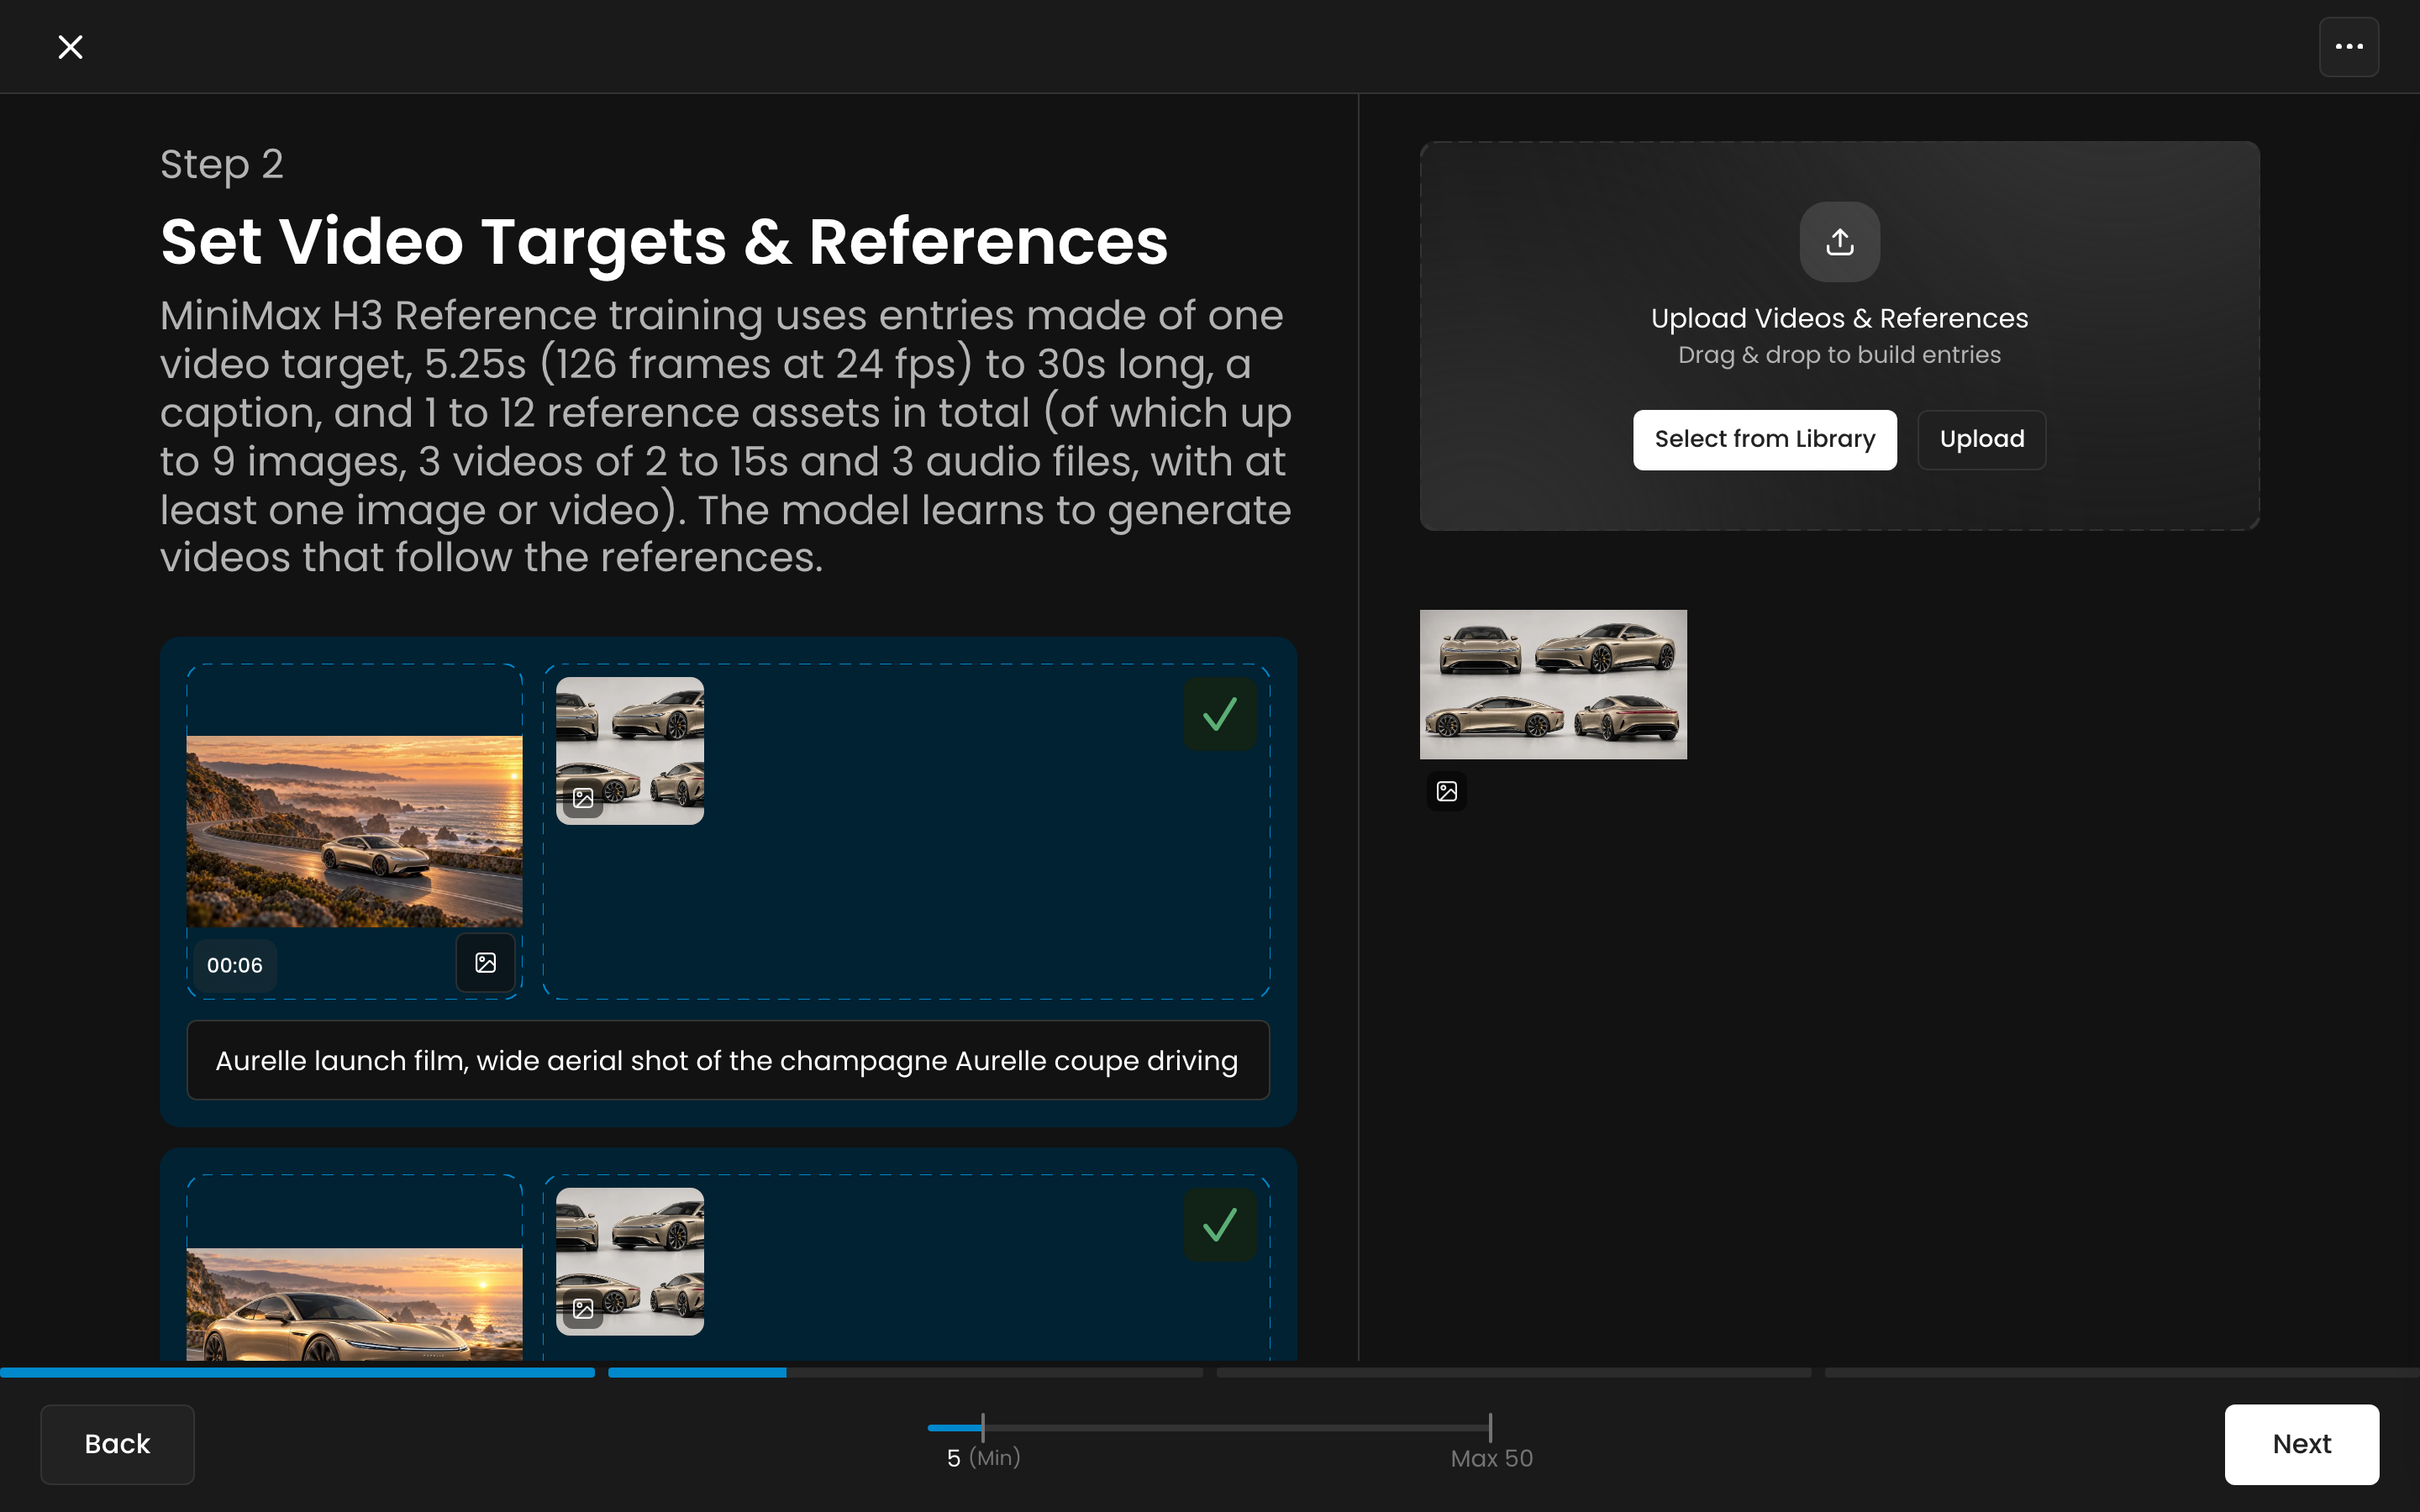
Choose references that look like what you will give the model at generation time: a picture of the character, a screenshot of the game. An entry needs at least one image or video reference. Audio alone is not enough.
How captions work
Scenario captions images and video clips for you. A clip's caption is generated from the clip itself, which takes up to 2 minutes, so captions can still be arriving when you reach Review Captions. You can keep each caption, edit it, or write your own.
A video must have a caption. If one did not get an automatic caption, its field asks you to write one, and Next stays disabled until you do. Describe the scene, the motion and the audio.
For captions that train well:
Describe the subject, the action, the setting and the framing, with the same vocabulary across clips. For example, always start with the name of your game.
Name the characters you want the model to learn.
Mention visible flaws such as a watermark, black bars or on-screen text. The model ties them to those words, so leaving the words out of your prompts keeps the flaws out of your videos.
In a Reference LoRA, the caption belongs to the entry and describes its video target.
What test prompts cost
Two test prompts are included in the price of the training. You can add up to two more with Add Test Prompt, and remove any of them.
Each additional test prompt renders one more preview video per epoch, at 9 Compute Units per preview. With the default 10 epochs, that is about 90 Compute Units per extra prompt, which is the number the Add Test Prompt button shows. Changing Epochs changes it accordingly. The extra previews are billed with the training.
Use your trained model
When the training ends, the model's page lists its epochs with the preview videos of your test prompts. Pick the epoch that looks best and set it as the default, as described in Comparing Epochs with Test Prompts in Basics of Model Training.
Click Use this model on that page to open the generator with your LoRA selected. You can also open the generator yourself and choose your model under LoRA Model:
MiniMax H3 LoRA runs standard and INT8 LoRAs. Write a prompt, optionally add a First Frame and a Last Frame, and set the duration from 5 to 14 seconds.
MiniMax H3 Ref LoRA runs Reference LoRAs. Add the references to follow: up to 9 images, 3 videos and 3 audio files, 12 in total, with at least one image or video.
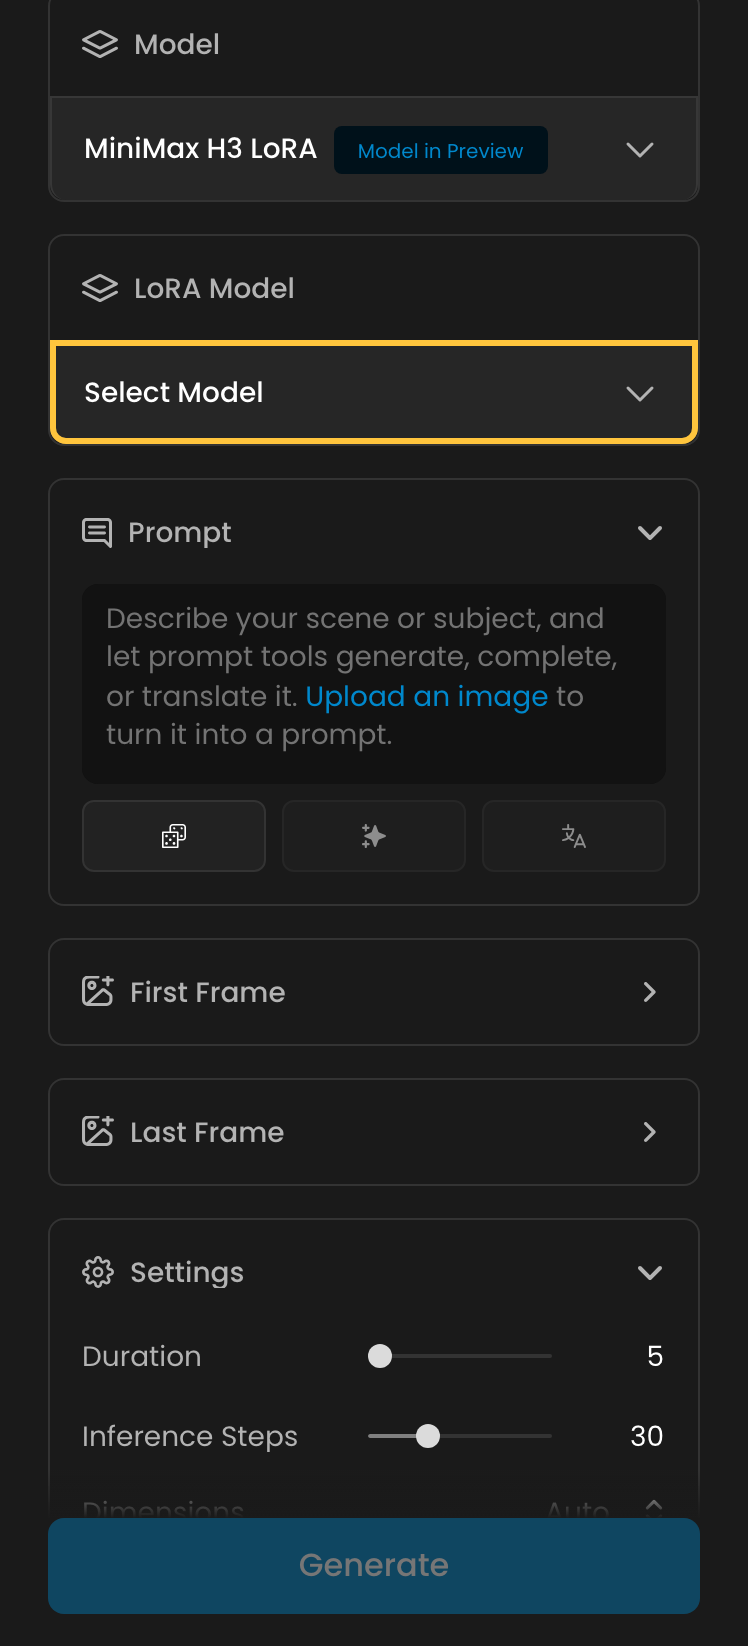
Both generators are in preview. Prompt with the vocabulary of your captions: the words you trained with are the ones that bring your style, characters and motion back. A trained MiniMax H3 LoRA runs on Scenario and cannot be exported.
You can also train and run these models outside the web app, through the Scenario API and the Scenario MCP server.