PATINA Models: The Essentials
Last updated: August 24, 2026


Source photo, followed by its five predicted PBR maps: base color, normal, roughness, metalness, height.
PATINA is a family of three models that all end up in the same place, a clean, seamlessly tiling PBR material, base color, normal, roughness, metalness, and height, but start from three different places: a text prompt, a photo of a real surface, or a texture image you already have. Together they cover generating a material from scratch, lifting one out of a photo, and completing the map set for a texture that only has color information.
How to Use the Models
PATINA Material: Prompt to Texture
PATINA Material takes a text description, weathered copper patina, cracked clay, mossy stone, and generates a tileable base texture plus the full PBR map set. It is the model to reach for when you do not have a reference photo and just need a material that matches a description.

Generated texture, followed by base color, normal, roughness, metalness, and height · prompt: “oxidized bronze statue surface with green-blue verdigris patina, streaked patina running over dark bronze relief” · Open the result on Scenario
An optional reference image adds two more modes. Without a mask, it treats the image as a starting point and generates variations around it. With a mask, it inpaints only the marked region, so you can fix or restyle one part of a texture while the rest stays untouched.

Generated texture, followed by base color, normal, roughness, metalness, and height · prompt: “sun-bleached driftwood plank, silvery grey weathered wood grain with deep cracks and salt residue” · Open the result on Scenario
PATINA Material Extract: Photo to Texture
PATINA Material Extract starts from a real photo instead of a prompt. Point it at a photo that contains the material you want and describe which part of the scene to use, the wooden tabletop, the leather seat, the rusty frame, and it isolates that region, flattens out the perspective and lighting baked into the photo, and turns it into a seamless PBR set.
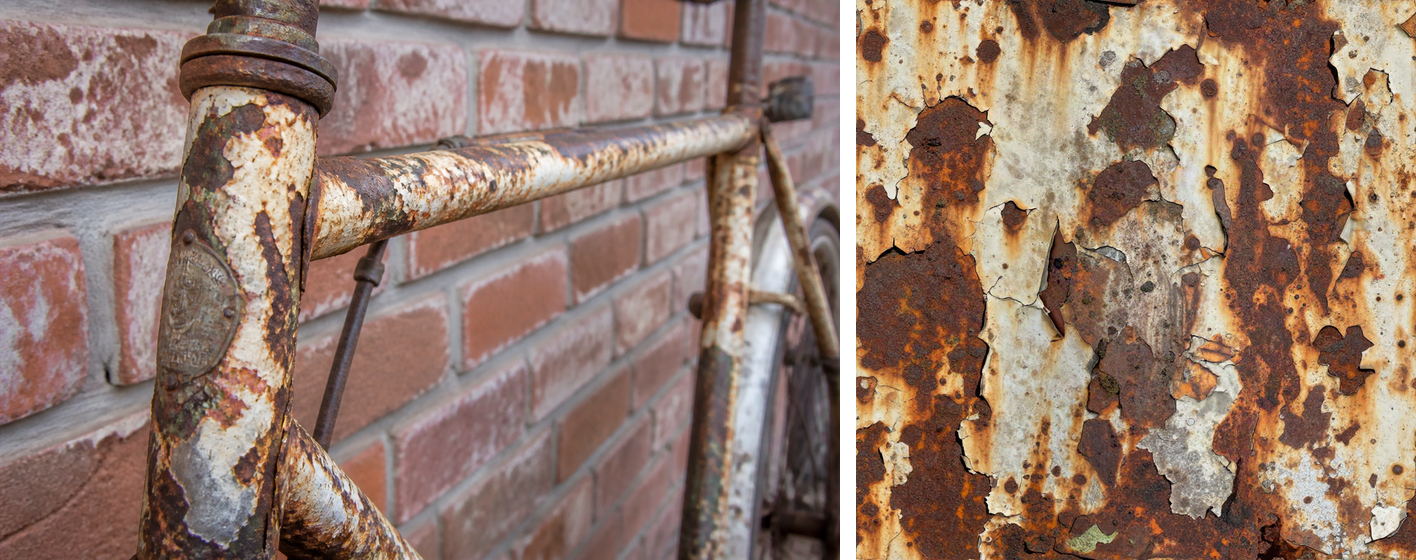
Source photo, followed by the extracted result · prompt: “the rusty metal bicycle frame” · Open the result on Scenario
This works just as well on a clean studio-style shot as it does on a busy scene. The model finds the region your prompt describes and discards everything else.
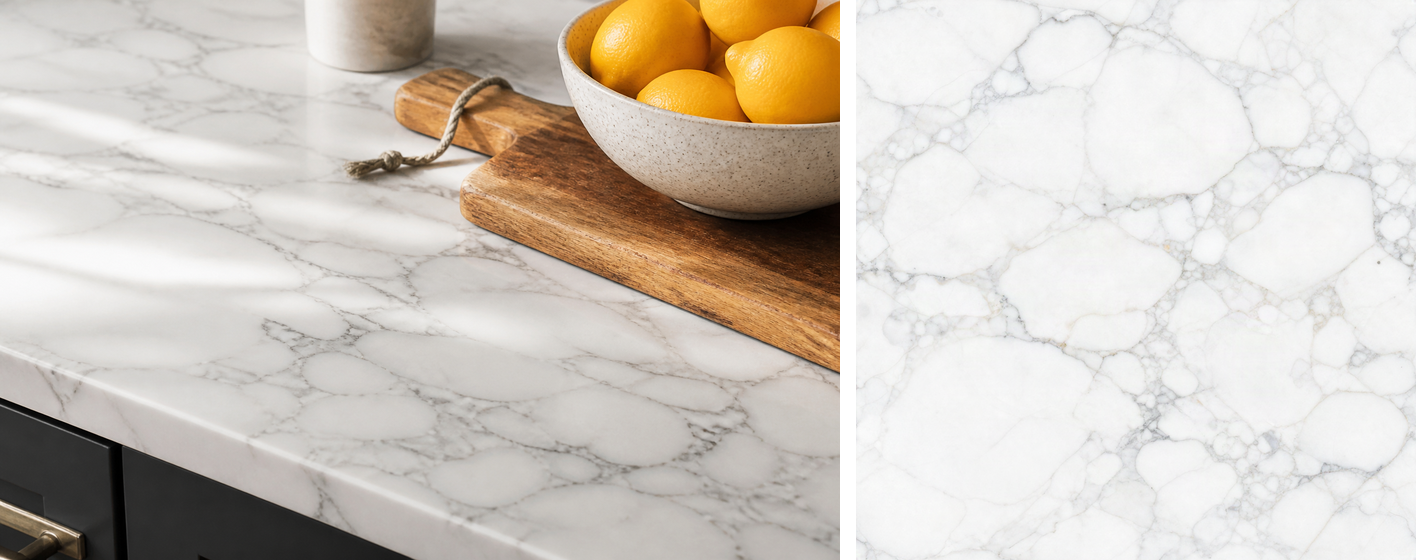
Source photo, followed by the extracted result · prompt: “the white marble countertop surface, not the cutting board or lemons” · Open the result on Scenario
PATINA Image to Maps: Texture to Full Map Set
PATINA Image to Maps is the simplest of the three: feed it a texture or material photo that is already flat and cropped, no prompt, no region to describe, and it predicts the missing PBR channels from the surface detail already in the image. The source image passes through unchanged as the base color; normal, roughness, metalness, and height are inferred from it.
Source photo, followed by base color (unchanged), normal, roughness, metalness, and height · Open the result on Scenario
Use this one when you already have a texture, a scan, a piece of flat art, a photo you already cropped and de-perspectived yourself, and just need the rest of the PBR set filled in.
Choosing the Right Model
All three output the same kind of PBR set. The difference is what you start with.
Model | Input | Best for |
|---|---|---|
PATINA Material | Text prompt (+ optional reference image and mask) | No reference photo on hand, need a material from a description |
PATINA Material Extract | A photo of a scene + a prompt describing which surface to use | Location scouting photos or product shots you want to turn into a material |
PATINA Image to Maps | A texture image that is already flat and cropped, no prompt | Scans, flat art, or textures you already have that are missing PBR maps |
Parameters
Shared across all three, the map set, tiling, and upscale controls work the same way.
maps
Which PBR maps to predict: base color, normal, roughness, metalness, height. Defaults to all five. Deselect all of them on Material or Material Extract to skip PBR estimation and only get the base texture.
tilingMode
Both, Horizontal, or Vertical. Both repeats the material seamlessly in every direction; the other two repeat only along one axis, for materials meant to tile as a strip or a column rather than a full tile.
upscaleFactor
None, 2x, or 4x, applied to the predicted PBR maps only, up to 8K from a 2048px texture. The base texture itself is not upscaled.
imageStrength
On Material and Material Extract, how much the output diverges from the reference image or extracted region. Higher values change the result more.
seed
A number that makes results repeatable. Reuse it with the same settings for the same output; leave it empty for variation.
Use Cases
Game and film material libraries: generate a stocked set of tileable PBR materials from prompts alone, no reference photography needed.
Location scouting to material: turn a photo taken on a scout, or a product shoot, into a ready-to-use material instead of hand-cropping and de-lighting it.
Completing existing textures: take a flat texture, scan, or piece of art that only has color information and fill in the rest of the PBR set.
Environment art and set dressing: match a specific weathering or aging look, rust, moss, mineral deposits, peeling paint, described in plain language.
Tips for Better Results
Be specific about surface detail in prompts, not just the material name. “Cracked clay” is generic; “sun-baked cracked clay with fine hairline fractures and pale dust” gives the model something to work with.
On Material Extract, name the exact region and rule out the rest. “The wooden tabletop, not the linen runner” gets a cleaner isolation than “the table.”
Feed Image to Maps a texture that is already flat. It analyzes the image as-is; a photo with strong perspective or lighting gradients will bake those into every predicted map.
Match tile size and stride to your output resolution when the defaults leave a visible seam or repeat pattern at your target size.
Keep upscale factor in mind for the final asset only. It only affects the predicted maps, so iterate at the base resolution and upscale once you are happy with the result.
Known Limitations
Occasional transient errors shortly after a model launches. A generation can stall or fail under normal parameters; retrying after a short wait resolved every case seen in testing.
Ordinary photos can occasionally trip content moderation. A plain photo of a household object was flagged once in testing with no obvious sensitive content; retrying with a different reference photo worked.
Material Extract needs an unambiguous prompt. A vague description of which surface to isolate can pull in part of the surrounding scene along with the intended material.
Image to Maps only analyzes, it does not correct. Perspective, lighting, or shadows already in the source photo carry through into the predicted maps since the base color passes through unchanged.