Manage Your Custom Models
Last updated: June 19, 2026
As you train custom models in Scenario, effective management becomes essential for maintaining a clean organization, especially as your library grows to dozens or even hundreds of models. Model management involves organizing and documenting your custom models to ensure they remain easily accessible and quickly usable - helping you track versions, share with team members, and quickly find exactly what you need for any project. This section covers the best practices to effectively manage your models on Scenario
Use Clear Names and Descriptions
Name each model with a descriptive, specific title that indicates its purpose, style, or subject. Add the version number if needed. Titles are the first elements you retrieve with a search (Cmd/Ctrl+F)
In addition to the name, add comprehensive descriptions in the “Details“ tab of your model page. You can include important information such as:
The model's purpose or intended use
Effective prompt structures that work well with this model (in addition to the ones in “pinned images)
Any special techniques used during training
Examples of successful outputs or use cases, including links if applicable
Clear descriptions are especially valuable in multi-user environments where others may use your models.

Add Thumbnails and Pinned Images
Having visual references for your models will significantly improve navigation and retrieval of models. Set a representative thumbnail for each model by selecting your best generation that showcases what the model does best (you can also upload any image from your computer).
Add multiple pinned images to highlight different capabilities of your model. To add pinned images, hover over an image you like, and click the “pin“ icon to the top-right. Or you can find the “pin” icon to the top bar on each image page:

Pinned images serve three important purposes:
They create a carousel in the thumbnail view, giving a quick preview of various outputs, for you and others in the organization
They provide reference for what your model can typically produce
They enable and improve the accuracy of the “Prompt Spark” feature, which can suggest new prompts based on pinned images (See dedicated article)
Leverage Tags
Custom tags are efficient tools for filtering and finding models quickly. You can add relevant tags in the “Overview” and “Details“ tabs of the model page. For multi-word tags, use hyphens (e.g., "character-design").
Consider tagging models by:
Style (cartoon, realistic, 3D, pixel art)
Subject (character, landscape, product, UI)
Project name (game_project, marketing_campaign)
Other technical aspects
Save time and tag multiple models at once by selecting them in the model gallery, before applying tags to the whole batch (use the “tag” icon to the bottom-left).
More information about Tags on our dedicated article.
Add Featured (favorite) Models
To favorite specific models and surface them more prominently, add the tag sc:featured in the Tags field when editing a model. Models tagged this way will be visually marked with a "Featured" badge and automatically appear at the top of your model grid in the default gallery view.
To display only the Featured models, simply enter “Featured“ in the search bar. This will surface all models tagged with sc:featured. You can also use any other custom tag (or even different tags for different series) to highlight and quickly access groups of your featured models.
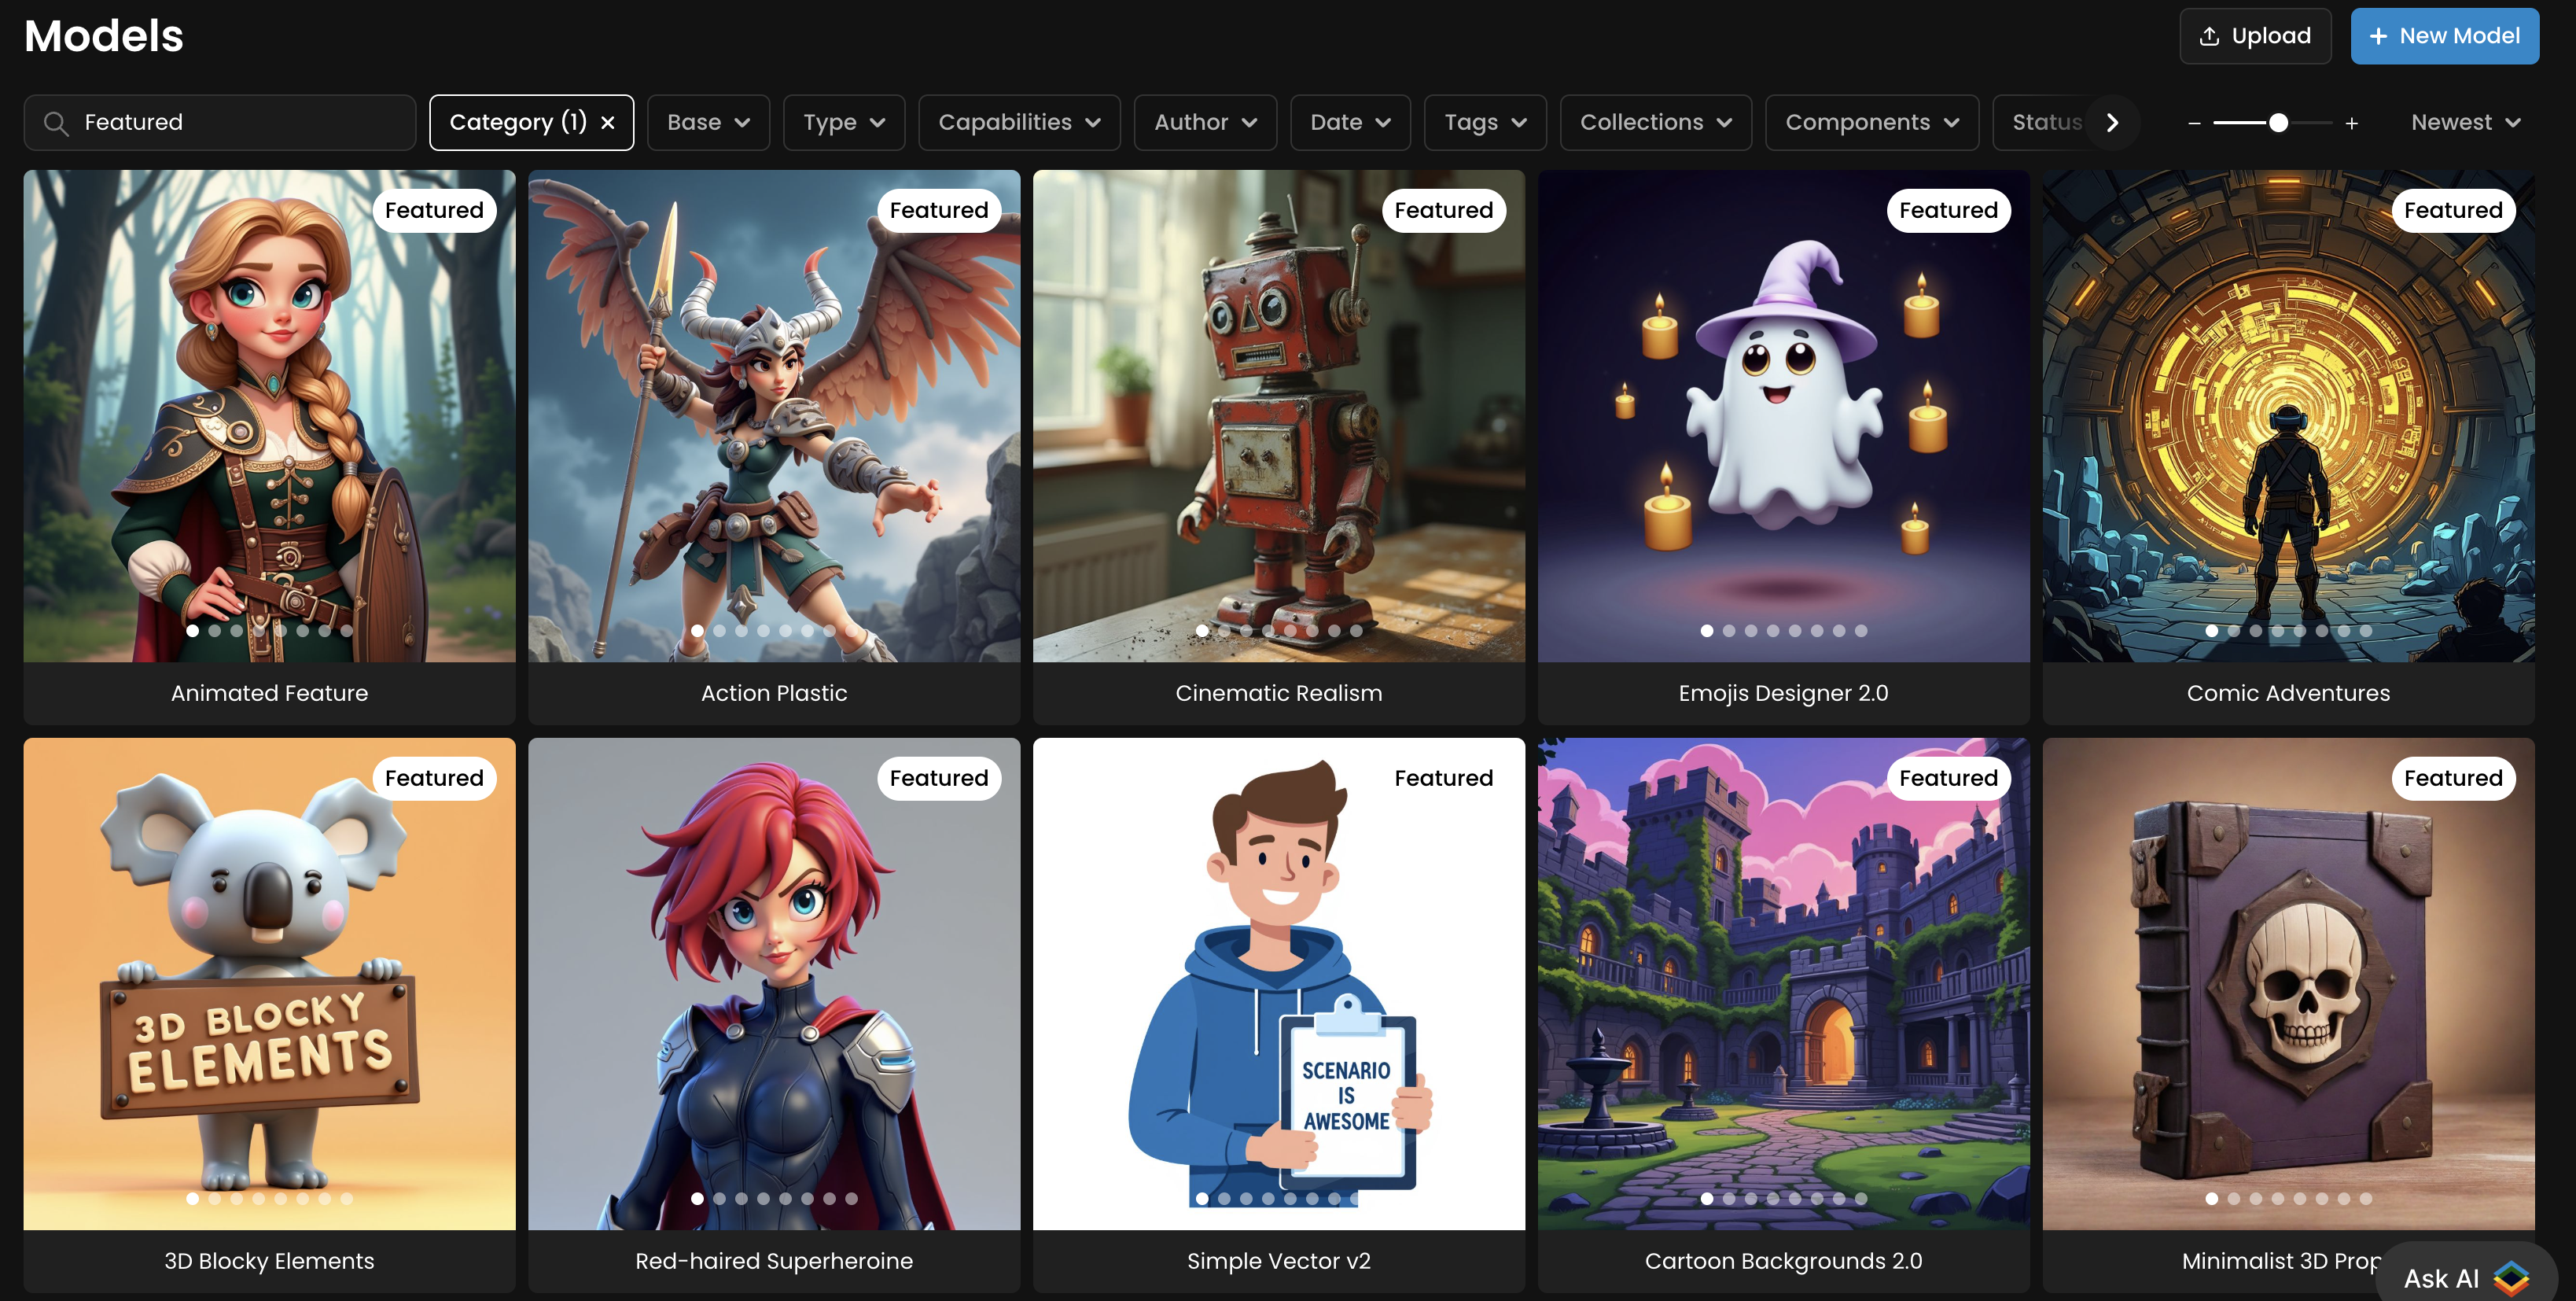
To further declutter the list and view only your own models, use the filter dropdown at the top left of the Models view. Under the "Category" filter, select only “My Models”, and deselect “Platform Models” and “Base Models”. This ensures you're only browsing content on your personal workspace. Combine these filters with other filters available to quickly access your top assets.
Organize with Collections
Collections help group related models together. You can create collections based on projects, styles, or subjects, and add models to them from the model page (via the top bar) or by selecting multiple models in the gallery (via the bottom-right menu).
Important: when a model is added to a collection, all outputs generated with this model will be automatically included in the same collection. This might be convenient to automatically group related outputs into one place, saving time without the need for manual sorting.
More information about Collections on our dedicated article.
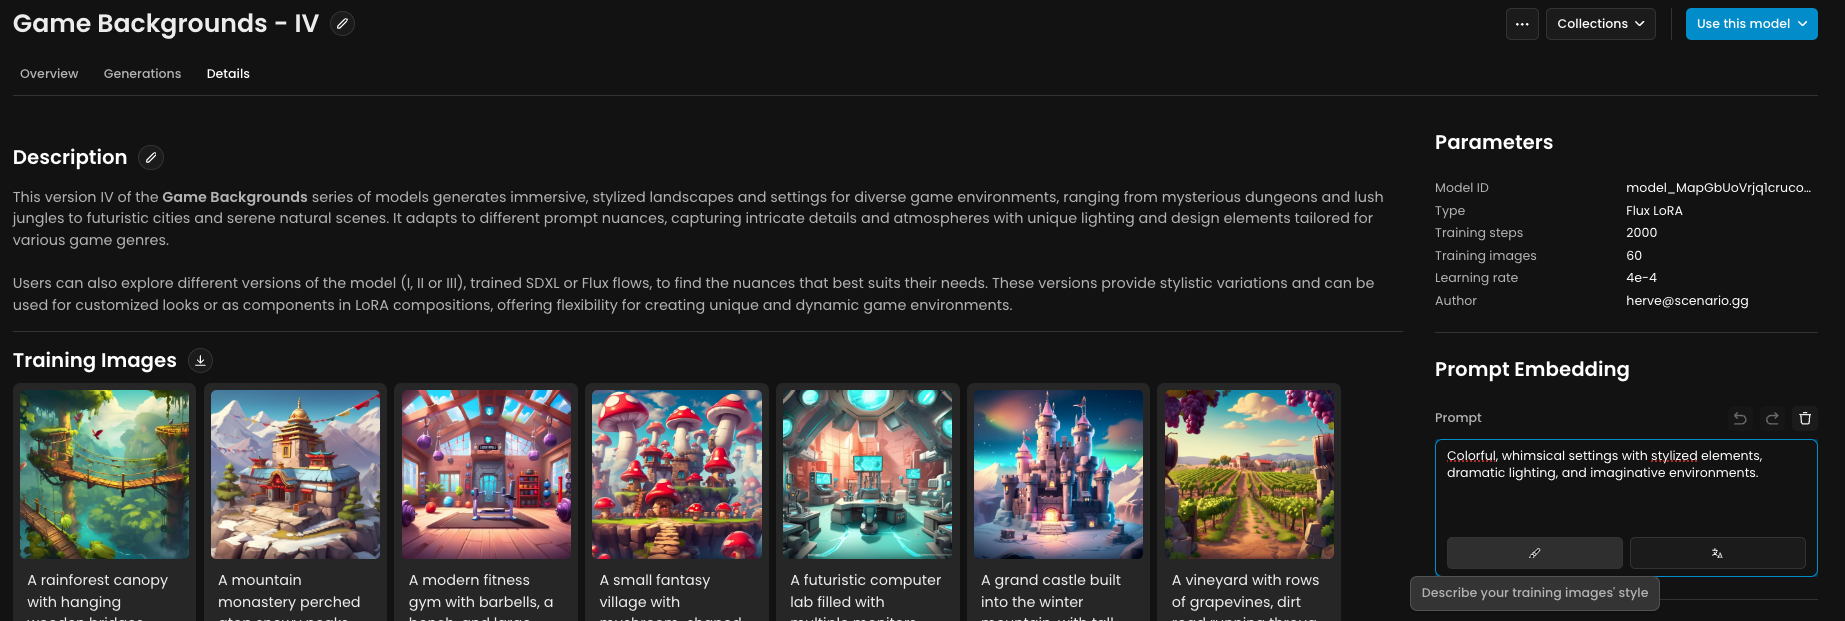
Use Prompt Embeddings
Once you've established effective prompt structures for a model, it’s possible to add frequently used style tokens or descriptors as “prompt embeddings“ in the Details tab. These embeddings will be automatically included in every prompt used with the model.
Prompt embeddings ensure consistency and save time by eliminating the need to repeatedly type the same tokens.
Important: although prompt embeddings can be convenient, they won’t be visible in the image interface. Don’t forget to check them or note them in the model description.
You can also automatically analyzes your training images and creates a style description, in the prompt embedding section. Just click on Describe btton in the prompt embedding box. Especially valuable for difficult-to-train styles or for balancing prompts that might pull toward different aesthetics.
Transfer, Export, and Import Models
You can efficiently share and manage models across projects:
Transfer Models: Move models between projects by navigating to the model page, clicking the three-dot menu, and choosing "Transfer Model." Enter the target project ID, or pick it from the list.
Export Models: To export a model, select "Export" from the model's options three-dot menu. This creates a downloadable file that serves as a backup or can be shared externally. Once initiated, you'll receive a notification via email with a download link. Additionally, a small red dot will appear in the "Recent Tasks" section, located in the top-right corner of the interface. Click the link in the list to download your exported model directly.
Delete Model: To delete a model, you can select it on the models page and click on the Delete button in the bottom bar. On the model page you can click on this three-dot menu and select Delete Model.

Import (Upload) Models: You can easily import custom models directly to Scenario. Access the upload feature through two paths: either via the left-hand menu under Model > Upload (or Model > New > Upload).
You have two primary methods for importing models:
Direct Upload: Upload a .safetensor file directly from your device. Scenario supports various model types, including Flux.1 Dev LoRA, Flux.2 Dev LoRA, Flux.2 Edit LoRA, Flux.2 Kelin 4B and 9B LoRAs, Qwen Image and Qwen Edit LoRAs, Z-Image LoRA.
External Import: Paste a model from Hugging Face by providing the model name (e.g., stabilityai/stable-diffusion-xl-base-1.0) or import from CivitAI by pasting the model URL.

After confirming the import, the uploaded model will be processed in the background. You'll receive email and on-screen notifications once the upload is complete. Uploaded models will be available in your Model Gallery.
Access The Model’s Training Data
Here's how to access the training data (training images) of a Flux LoRA model:
Final Tips for Scaling
As your model library expands to hundreds of custom AI models, streamline your workflows with these best practices:
Use consistent naming conventions across your project, especially in team settings.
Document successful multi-model workflows to simplify replication for yourself and others.
For large teams, designate someone to manage model organization and set standard practices.
Track related models: When retraining, keep both versions briefly to compare outputs, then delete the weaker one after deciding.
For multi-LoRA models, tweak compositions by opening the model page, selecting "Edit" from the three-dot menu, and adjusting weights or swapping components.
By implementing these good practices, you'll create a well-organized, easily navigable model library that enhances productivity and collaboration, even as your collection grows to hundreds or thousands of custom models.
Access This Feature Via API
Update Model Details: Scenario API - Update Model
Upload Model: Scenario API - Upload Model
Manage Model Tags: Scenario API - Manage Tags
Duplicate a Model: Scenario API - Duplicate Model
Transfer Model: Scenario API - Transfer Model
Organize Models into Collections: Scenario API - Collections