Introduction to Workflows
Last updated: April 24, 2026
A new way to create
Creative work today moves fast, but it's often scattered. You generate an image, export it, open another tool, apply effects, export again - and somewhere along the way, the flow breaks. You lose momentum. You lose context.
Scenario Workflows changes that. It's a visual node-based editor that connects every part of your creative process in one place. It is a canvas where ideas don't just get generated: they evolve, connect, and come to life.
Whether you're building a simple image pipeline or a complex multi-model system, Workflows gives you the structure to create with intention and the flexibility to experiment without limits.
What makes Workflows powerful?
Workflows brings together everything Scenario offers, including image generation, video, 3D, audio, editing tools, and your custom trained models, into a single, connected environment.
Each Node represents a step in your creative process: a prompt, a generation, a transformation, or an output. Connect them, run them, and watch your entire pipeline execute on an scalable canvas.
For professionals: It offers precision, reproducibility, and scalability.
For beginners: It makes complex processes simple, turning multi-step tasks into a single click.
In other words, Workflows replaces friction with flow.
The Canvas
The canvas is the workspace where you build workflows. It is a large, zoomable surface.
Navigation:
Scroll to zoom in and out
Click and drag the background to pan (or use Middle Mouse Button + Drag)
Click the title in the title bar to rename your workflow
Adding nodes: Drag nodes from the Nodes Panel on the right side of the screen onto the canvas. The panel is organized into four categories: Input, Generators, Composers, and Utilities. You can also right-click anywhere on the canvas to open the node creation menu directly.
Quick-add from canvas: Drag from any output handle and release on an empty area of the canvas. A dropdown menu appears showing all compatible nodes you can connect to.
Pasting images: You can paste images directly onto the canvas from your clipboard. This creates an Image Input node automatically. An Image Input node can hold one or multiple images.
Nodes auto-save as you build. There is no separate save step.

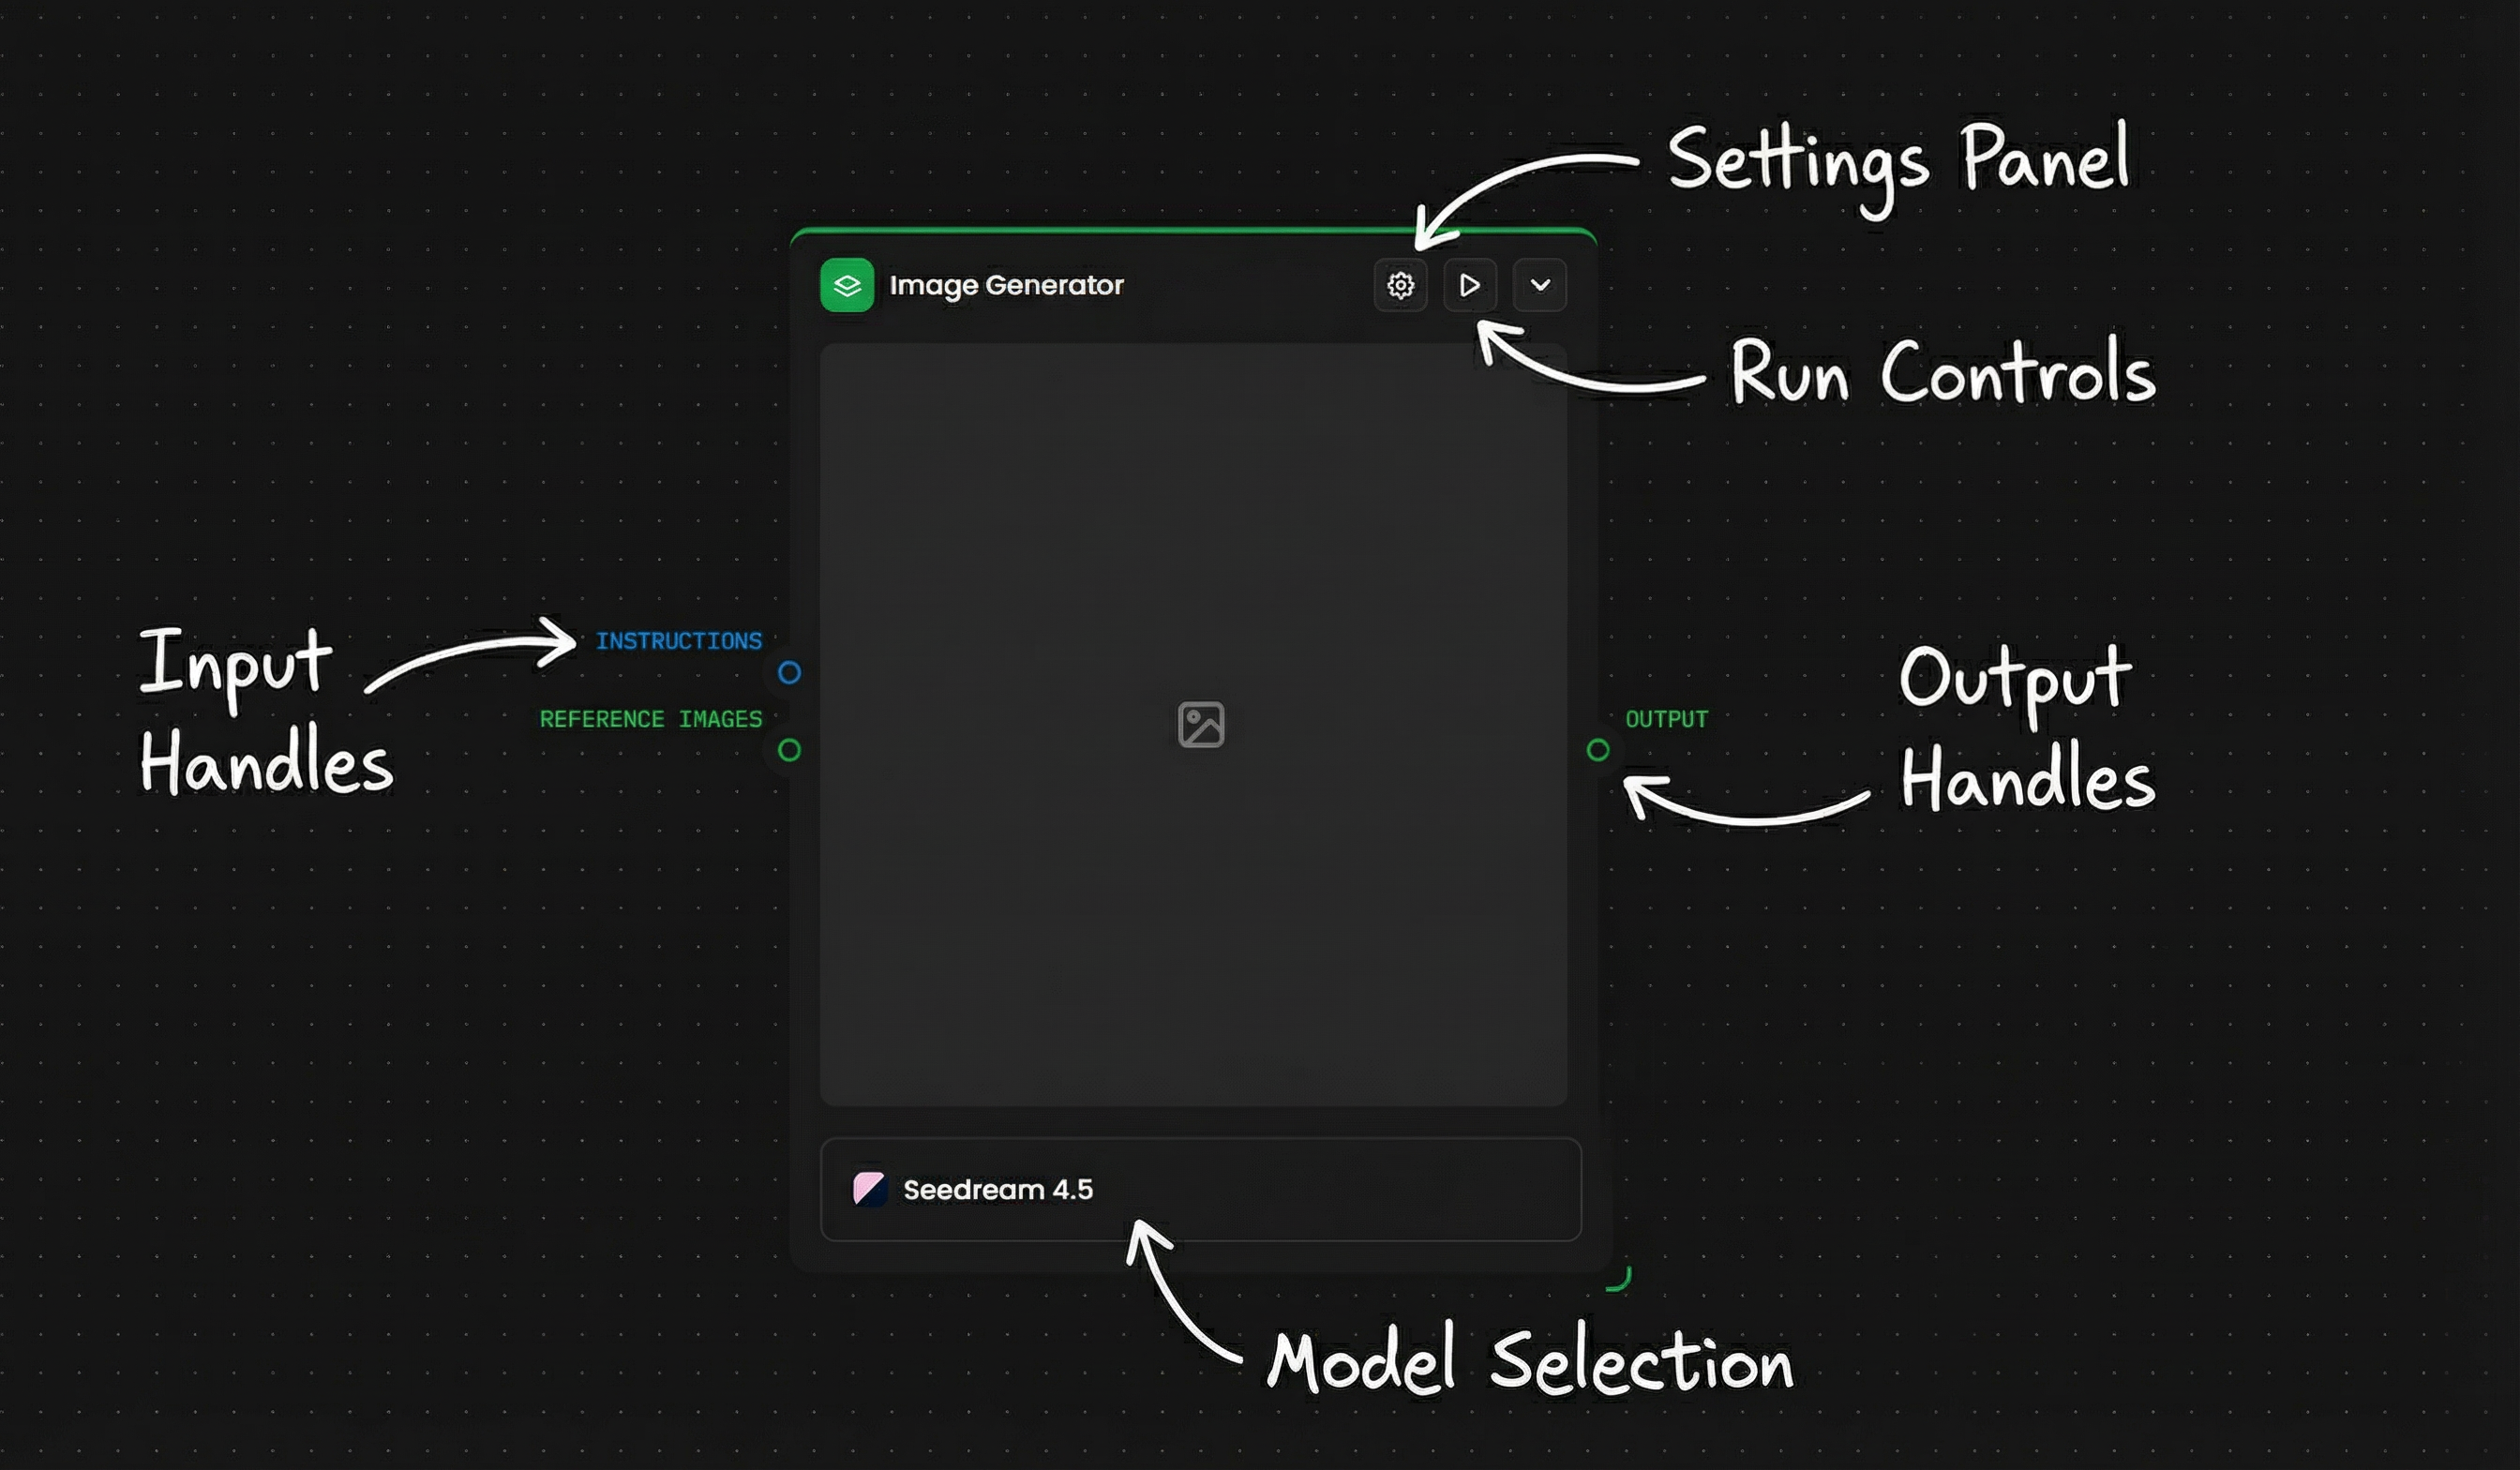
Nodes
Each node is a self-contained operation. All nodes share the same basic structure:
Title bar - Shows the node name and type icon. Contains a settings gear icon, a play button (to run just this node), and a collapse/expand chevron.
Input handles (left side) - Labeled connection points where data flows into the node. Labels vary by node type (e.g. IMAGES, INSTRUCTION, TEXT INPUTS).
Output handles (right side) - Connection points where data flows out of the node. Labels vary (e.g. OUTPUT, FIRST RESULT, ALL RESULTS, FIRST FRAME, LAST FRAME).
Preview area (center) - Shows a live preview of the node's output after execution. Empty before the node has run.
Settings panel - Click a node (or click its gear icon, or double-click it) to open its settings on the left side of the screen. This is where you configure parameters, upload references, select models, and adjust options.
Collapsing nodes - Click the chevron on a node to collapse it, hiding the preview area. This saves canvas space and improves browser performance on large node graphs.
Connections
Connections define how data moves between nodes. You create a connection by dragging from an output handle on one node to an input handle on another.
Making a connection:
Hover over an output handle (right side) until it highlights.
Click and drag toward an input handle (left side) on another node.
Release to create the connection.
A curved dashed line connects the two nodes. You can make multiple connections from a single output or to a single input.
Quick-add from output: Drag from an output handle and release on empty canvas space. A dropdown menu appears showing all compatible nodes. Select one to add it and automatically connect it.
Removing a connection: Hover over the connection line and click on it to delete it.
Color Coding
Connections and handles are color-coded by data type:
Color | Data Type | Examples |
🟢 Green | Images | PNG, JPG, WebP |
🔵 Blue | Text | Prompts, scripts, JSON |
🟡 Yellow | Video | MP4, MOV |
🔴 Red | 3D Models | OBJ, FBX, GLB |
🟣 Purple | Audio | MP3, WAV, AAC |
⚪ White/Gray | Utility nodes | Utility nodes (Tools, Slice Assets, etc.) can process any of the formats listed above |
Groups
You can group nodes together on the canvas to keep related sections organized.
Creating a group: Select multiple nodes (click and drag a selection box, Shift+Drag to multi-select, or Ctrl/Cmd+click individual nodes), then right-click and select "Group."
Locking groups: Lock a group to prevent accidental edits. Locked groups can still be run but cannot be modified. This is useful when sharing workflows with collaborators.
Groups display a label at the top. Click the label to rename it.
Utilities (Logic & Tools)
The refinement and orchestration layer. This is where you transform outputs and control the flow.
Node Type | Key Features |
Tools | AI & Processing: Background Removal, Smart Object Eraser, AI Upscale, Vectorize, and Style Transfer. Post-Processing: Color Grading (LUTs), Film Grain, Bloom, Vignette, and Chromatic Aberration. |
Prompt Builder | Compose prompts from multiple connected text inputs, allowing structured, dynamic prompt construction from reusable parts. |
Group Assets | Collect multiple image inputs into a unified output that can be handled as a single asset in downstream nodes. |
If-Else / Logic | Control flow execution by evaluating conditions and activating different branches based on input state. |
Running Workflows
There are three execution modes:
Run Single Node - Click the play button on a node to execute only that node. Useful for testing individual settings.
Run Node + Next - Runs a node and all nodes downstream from it. Useful for testing a section of your pipeline.
Run Workflow - Click the Run button in the top right to execute the entire workflow. Nodes execute in order based on the connection graph - each node runs only when its inputs are ready.
Viewing Outputs
All outputs from a workflow run are collected in the Outputs panel (top right of the editor). Click "Outputs" to browse and download all generated assets from the current run.
Monitoring Execution
During execution, each node shows a status indicator: pending, running, complete, or errored. Previews update as results come in.
Current Limitations
There is no stop button during execution. To halt a running workflow, delete a connector to break the graph.
"Run selected nodes" sometimes runs all nodes instead of just the selection. This is a known issue.
Save and continue
Your workflow is auto-saved as you build. You can rename it, clone it, or share it with your team. Your creative process is never lost, and your best workflows become reusable assets for the whole studio.
Sticky Notes
Add Sticky Note nodes to your canvas to document workflow sections, explain parameter choices, or guide collaborators. Sticky Notes are non-functional - they do not process data or affect execution. Use them to explain the "why" behind your workflow design, especially when sharing with others.
Export and Import
Workflows are stored as JSON files. You can export and import them to share across teams or projects.
Exporting: Open the workflow menu (···) and select Export. This downloads a .json file containing the full workflow definition - all nodes, connections, and settings.
Importing: Create a new workflow and use Import to load a .json file. The workflow is recreated exactly as exported.
Sharing workflows:
Within a project: All project members can see and edit workflows in that project. To prevent edits, lock the workflow - team members can still run it but cannot modify it.
Across projects or teams: Export the JSON and share the file, or invite collaborators to the project.
As Apps: Convert a workflow into an App (see below) for a simplified interface that anyone can use without seeing the node graph.
Workflow-to-Apps
Once you have built a workflow, you can convert it into an App - a simplified interface where users run the pipeline with just a few inputs, without seeing the underlying node graph.
Creating an App:
Click "Edit an App" in the top right of the workflow editor
Select which input nodes to expose to end users
Define default values, constraints, and descriptions for each exposed input
Publish the App
App URLs vs. Workflow URLs:
Workflows:
app.scenario.com/workflows/[id]- the full node graph editorApps:
scenario.com/apps/[name]- the simplified end-user interface
Apps are useful for distributing workflows to team members, clients, or non-technical users who need to run the pipeline without understanding the node graph.
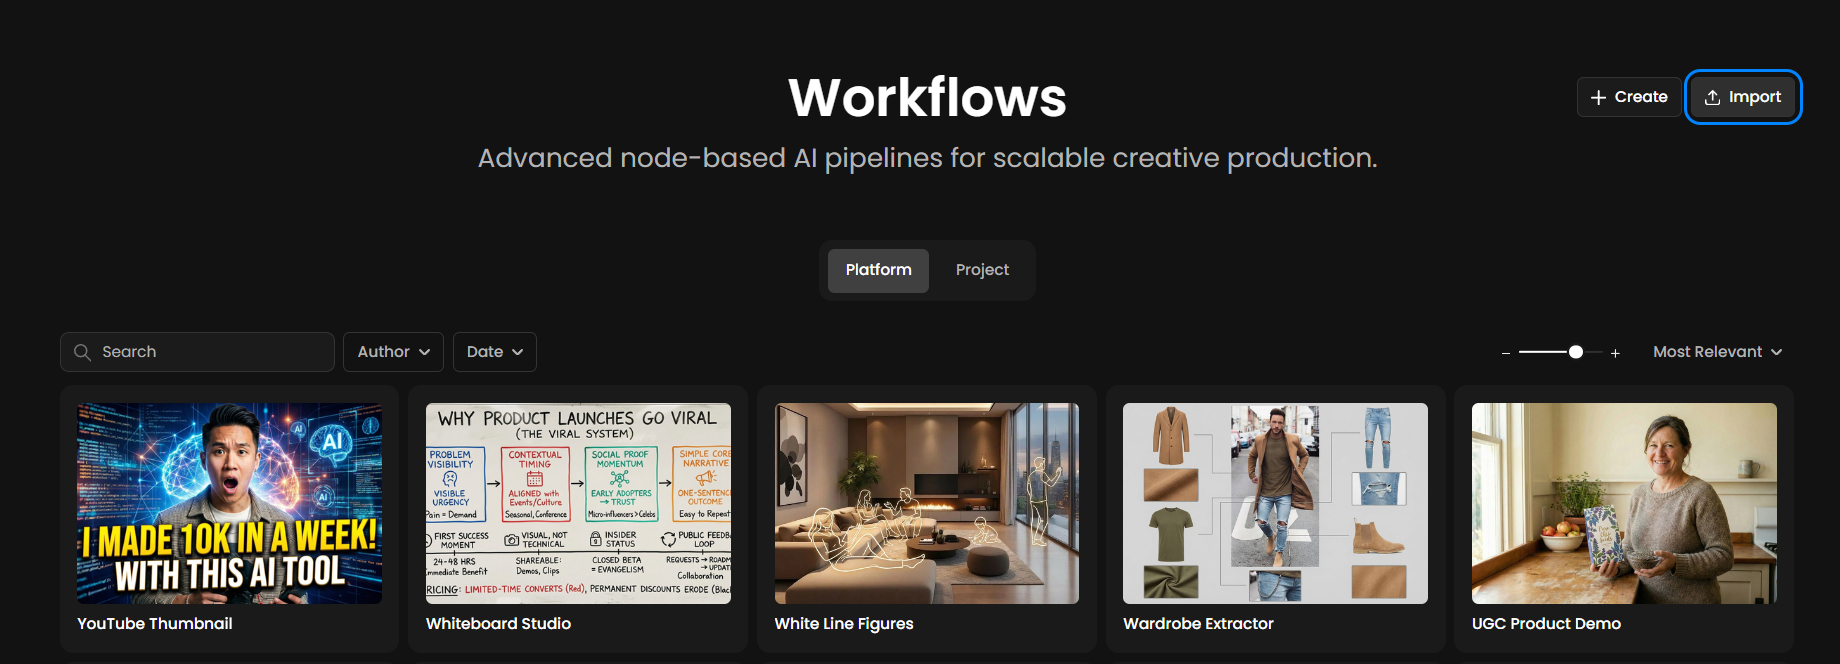
Platform Workflows
Scenario provides dozens of pre-built workflows covering common use cases across multiple industries. These are called Platform Workflows. New ones are added regularly.
Platform Workflows are fully functional starting points. You can:
Run them as-is using the App interface
Duplicate them into your own project to customize
Remix and expand - add nodes, swap models, adjust prompts
Copy and paste nodes from a Platform Workflow into your own workflows
Export as JSON to share, archive, or use for training automation agentsRun your way
Keyboard Shortcuts
Action | Shortcut |
Copy node(s) | Ctrl/Cmd + C |
Paste node(s) | Ctrl/Cmd + V |
Duplicate node(s) | Ctrl/Cmd + D |
Delete node(s) | Delete or Backspace |
Drag node | Click and drag |
Pan canvas | Click and drag background |
Zoom in/out | Scroll up/down |
Select multiple | Click and drag selection box |
Add to selection | Ctrl/Cmd + click |
Troubleshooting
Nodes won't connect - Check that output and input types are compatible (match the color coding). Output handles are on the right; input handles are on the left.
Unexpected results - Use Run Single Node on each step to verify individual outputs. Check node settings for unexpected defaults. Review connection paths.
Slow execution - Identify which nodes are slow using Run Single Node. Use lower-resolution inputs for testing. Collapse nodes and groups to improve browser performance on large graphs.
Need individual frames from a video? Use the Video to Image Sequence tool (available in the Tools node) to extract frames from any video clip. This is useful for feeding extracted frames into downstream image processing or analysis nodes.
Node errors - Hover over the error indicator to see the message. Verify input data format and that all required inputs are connected.
Large graphs feel sluggish - Collapse nodes and groups you're not actively editing. This reduces rendering load in the browser.
Start building
Workflows is more than a feature. It's a new way to think about creative work: visual, connected, and entirely under your control. Whether you're automating repetitive tasks, experimenting with new ideas, or building production pipelines, everything you need is here.
Ready to explore? Open the "Platform Workflows" tab to see pre-built examples, or jump straight into a blank canvas and build something new.