Scenario Live: Generate in Real-Time
Last updated: April 23, 2026
Introduction
Scenario Live is a unique real-time rendering tool that transforms a rough sketch into a rendered version instantly, using a custom AI model and a prompt.
Unlike the standard image generation interface where generations takes longer and you can't adjust the input (reference image) in real time, Live will render your colored sketches in under a second, providing immediate visual feedback.
Live works with any AI model in your Scenario library (whether custom-trained, uploaded, or composed) and parameters give you a lot of flexibility to guide the output via Image-to-Image.
Scenario Live stands out from other live painting tools by offering targeted inpainting capabilities directly within the interface. You can switch effortlessly between Live and Scenario Retouch (Canvas), and integrate smoothly with all of Scenario's generation and editing tools. This creates a comprehensive ecosystem where concepts quickly evolve from rough sketches to finished, production-ready assets.
Here’s a step-by-step guide on how to efficiently use Scenario Live:
Step 1: Access Scenario Live
Choose one of three ways to get started:
From the Main Menu (left panel), under the “Canvas” section, click “Live
From a Model Page: Navigate to your desired model, click "Use this model” (top-right) and select "Live" from the dropdown menu.
Within the Canvas: If you're already working in the Canvas interface (Retouch), simply click "Scenario Live" at the top center of the screen to switch modes.
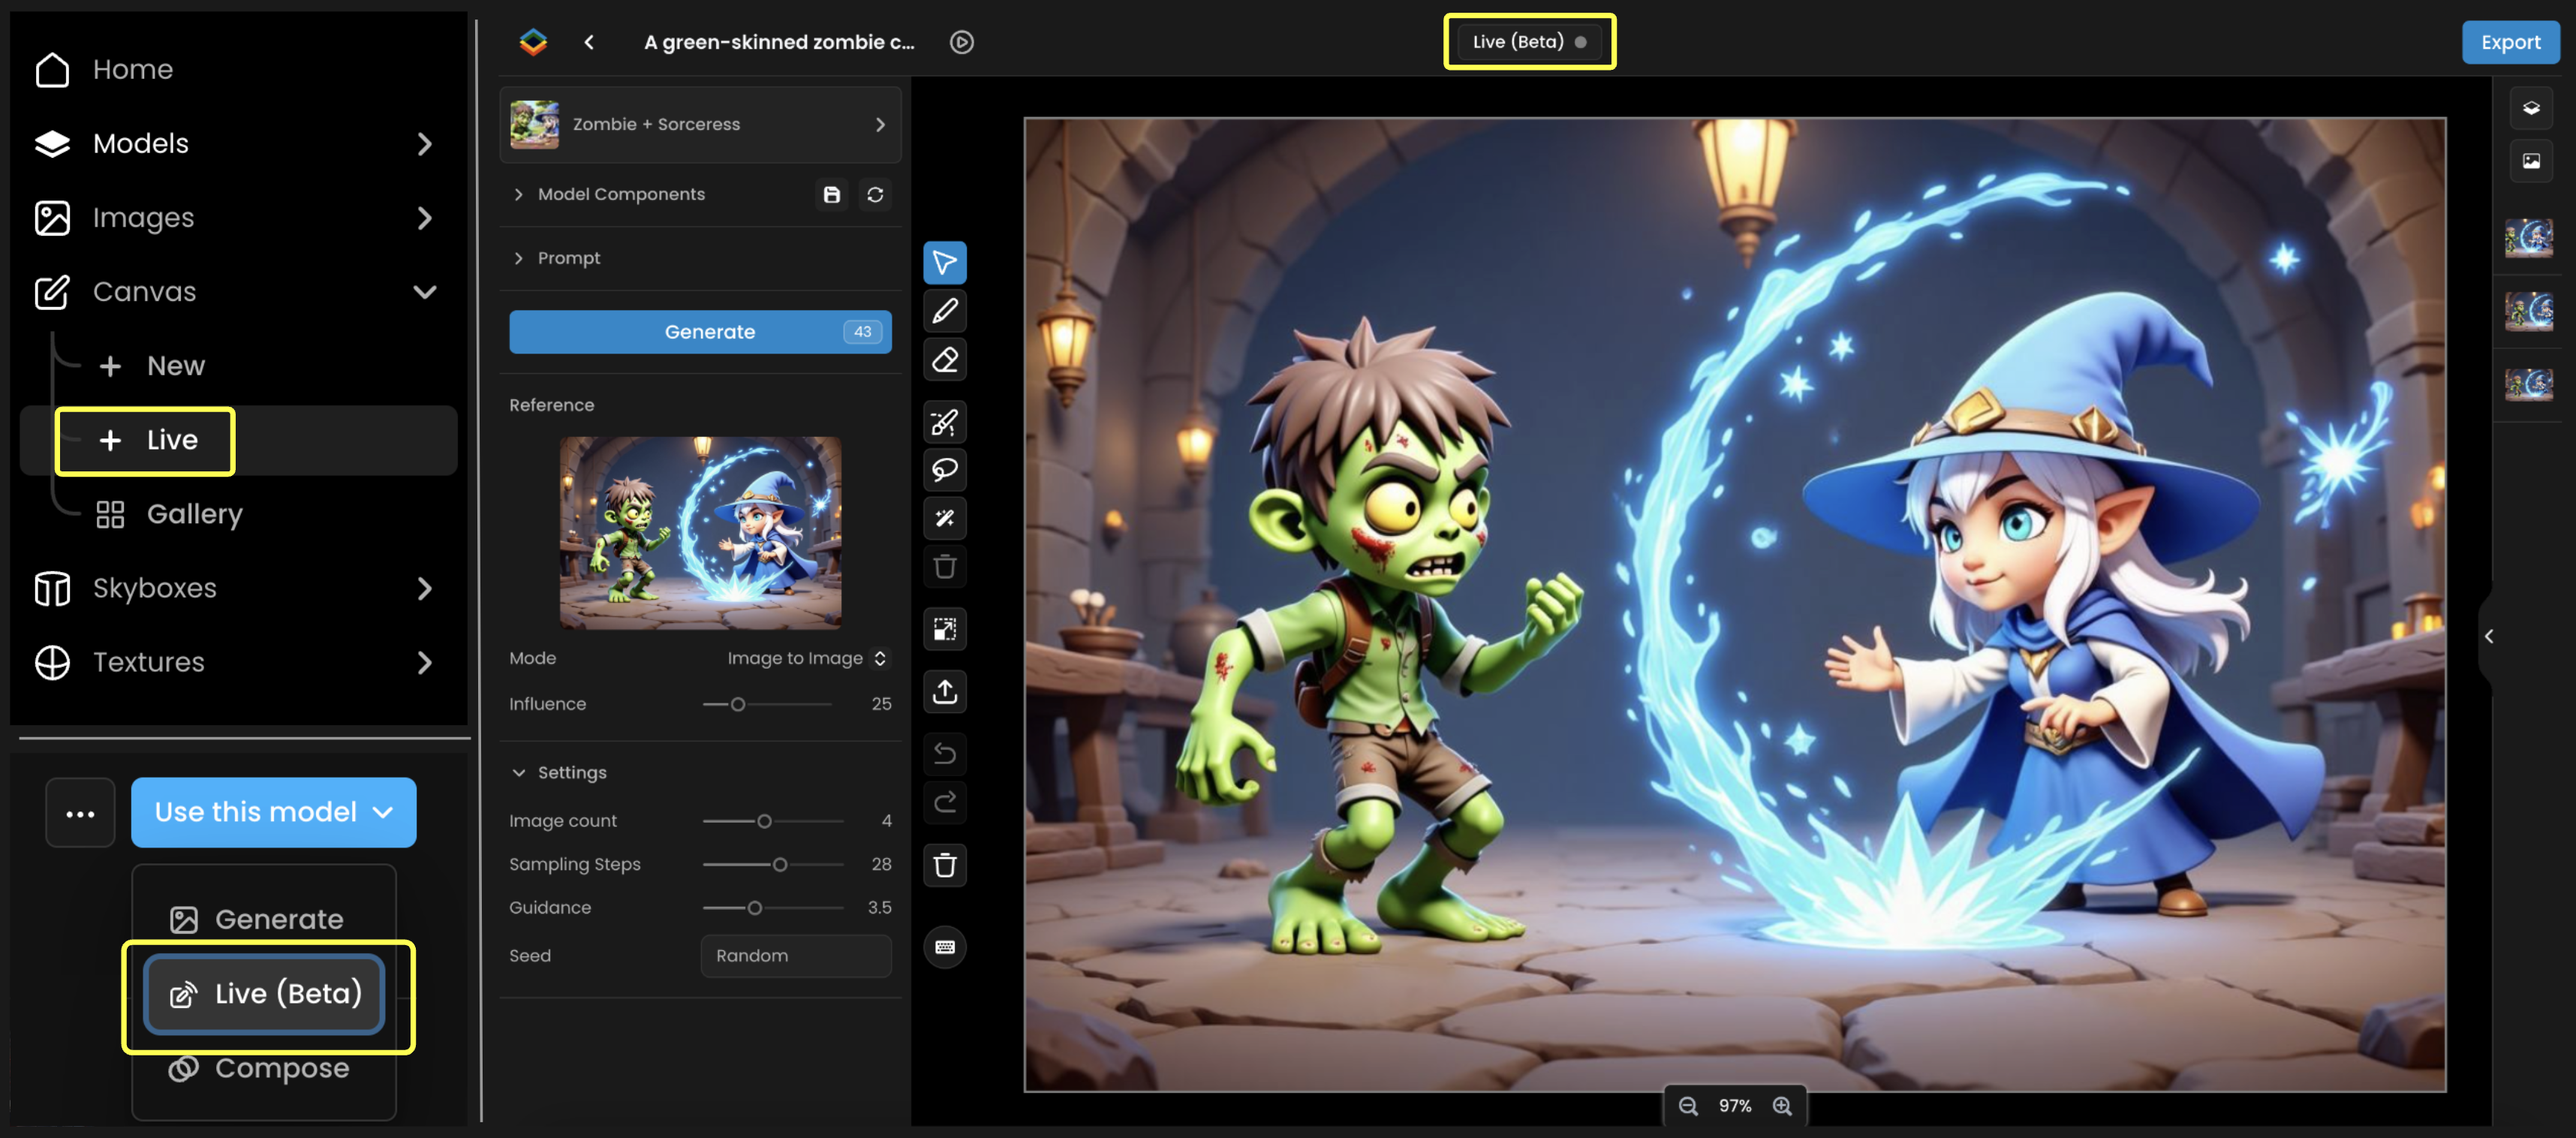
Access Scenario Live through app.scenario.com (i) via the main menu, (ii) directly from any model page, or (iii) while working in Canvas.
Step 2: Interface Overview
A intuitive dual-screen layout makes Scenario Live easy to navigate:
Left Screen (A): Your drawing canvas where you'll sketch your concept
Vertical Sidebar (B): Access essential tools including brush/color picker, eraser, and various options to select (mask), import and undo/redo. More about this toolbar in Canvas Tools (link).
Bottom section (C): Select your custom model, write and adjust the prompt, adjust influence of the input sketch, and other settings.
Right Screen (D): Watch your sketch being rendered in real-time as the AI model interprets your it, based on your prompt.
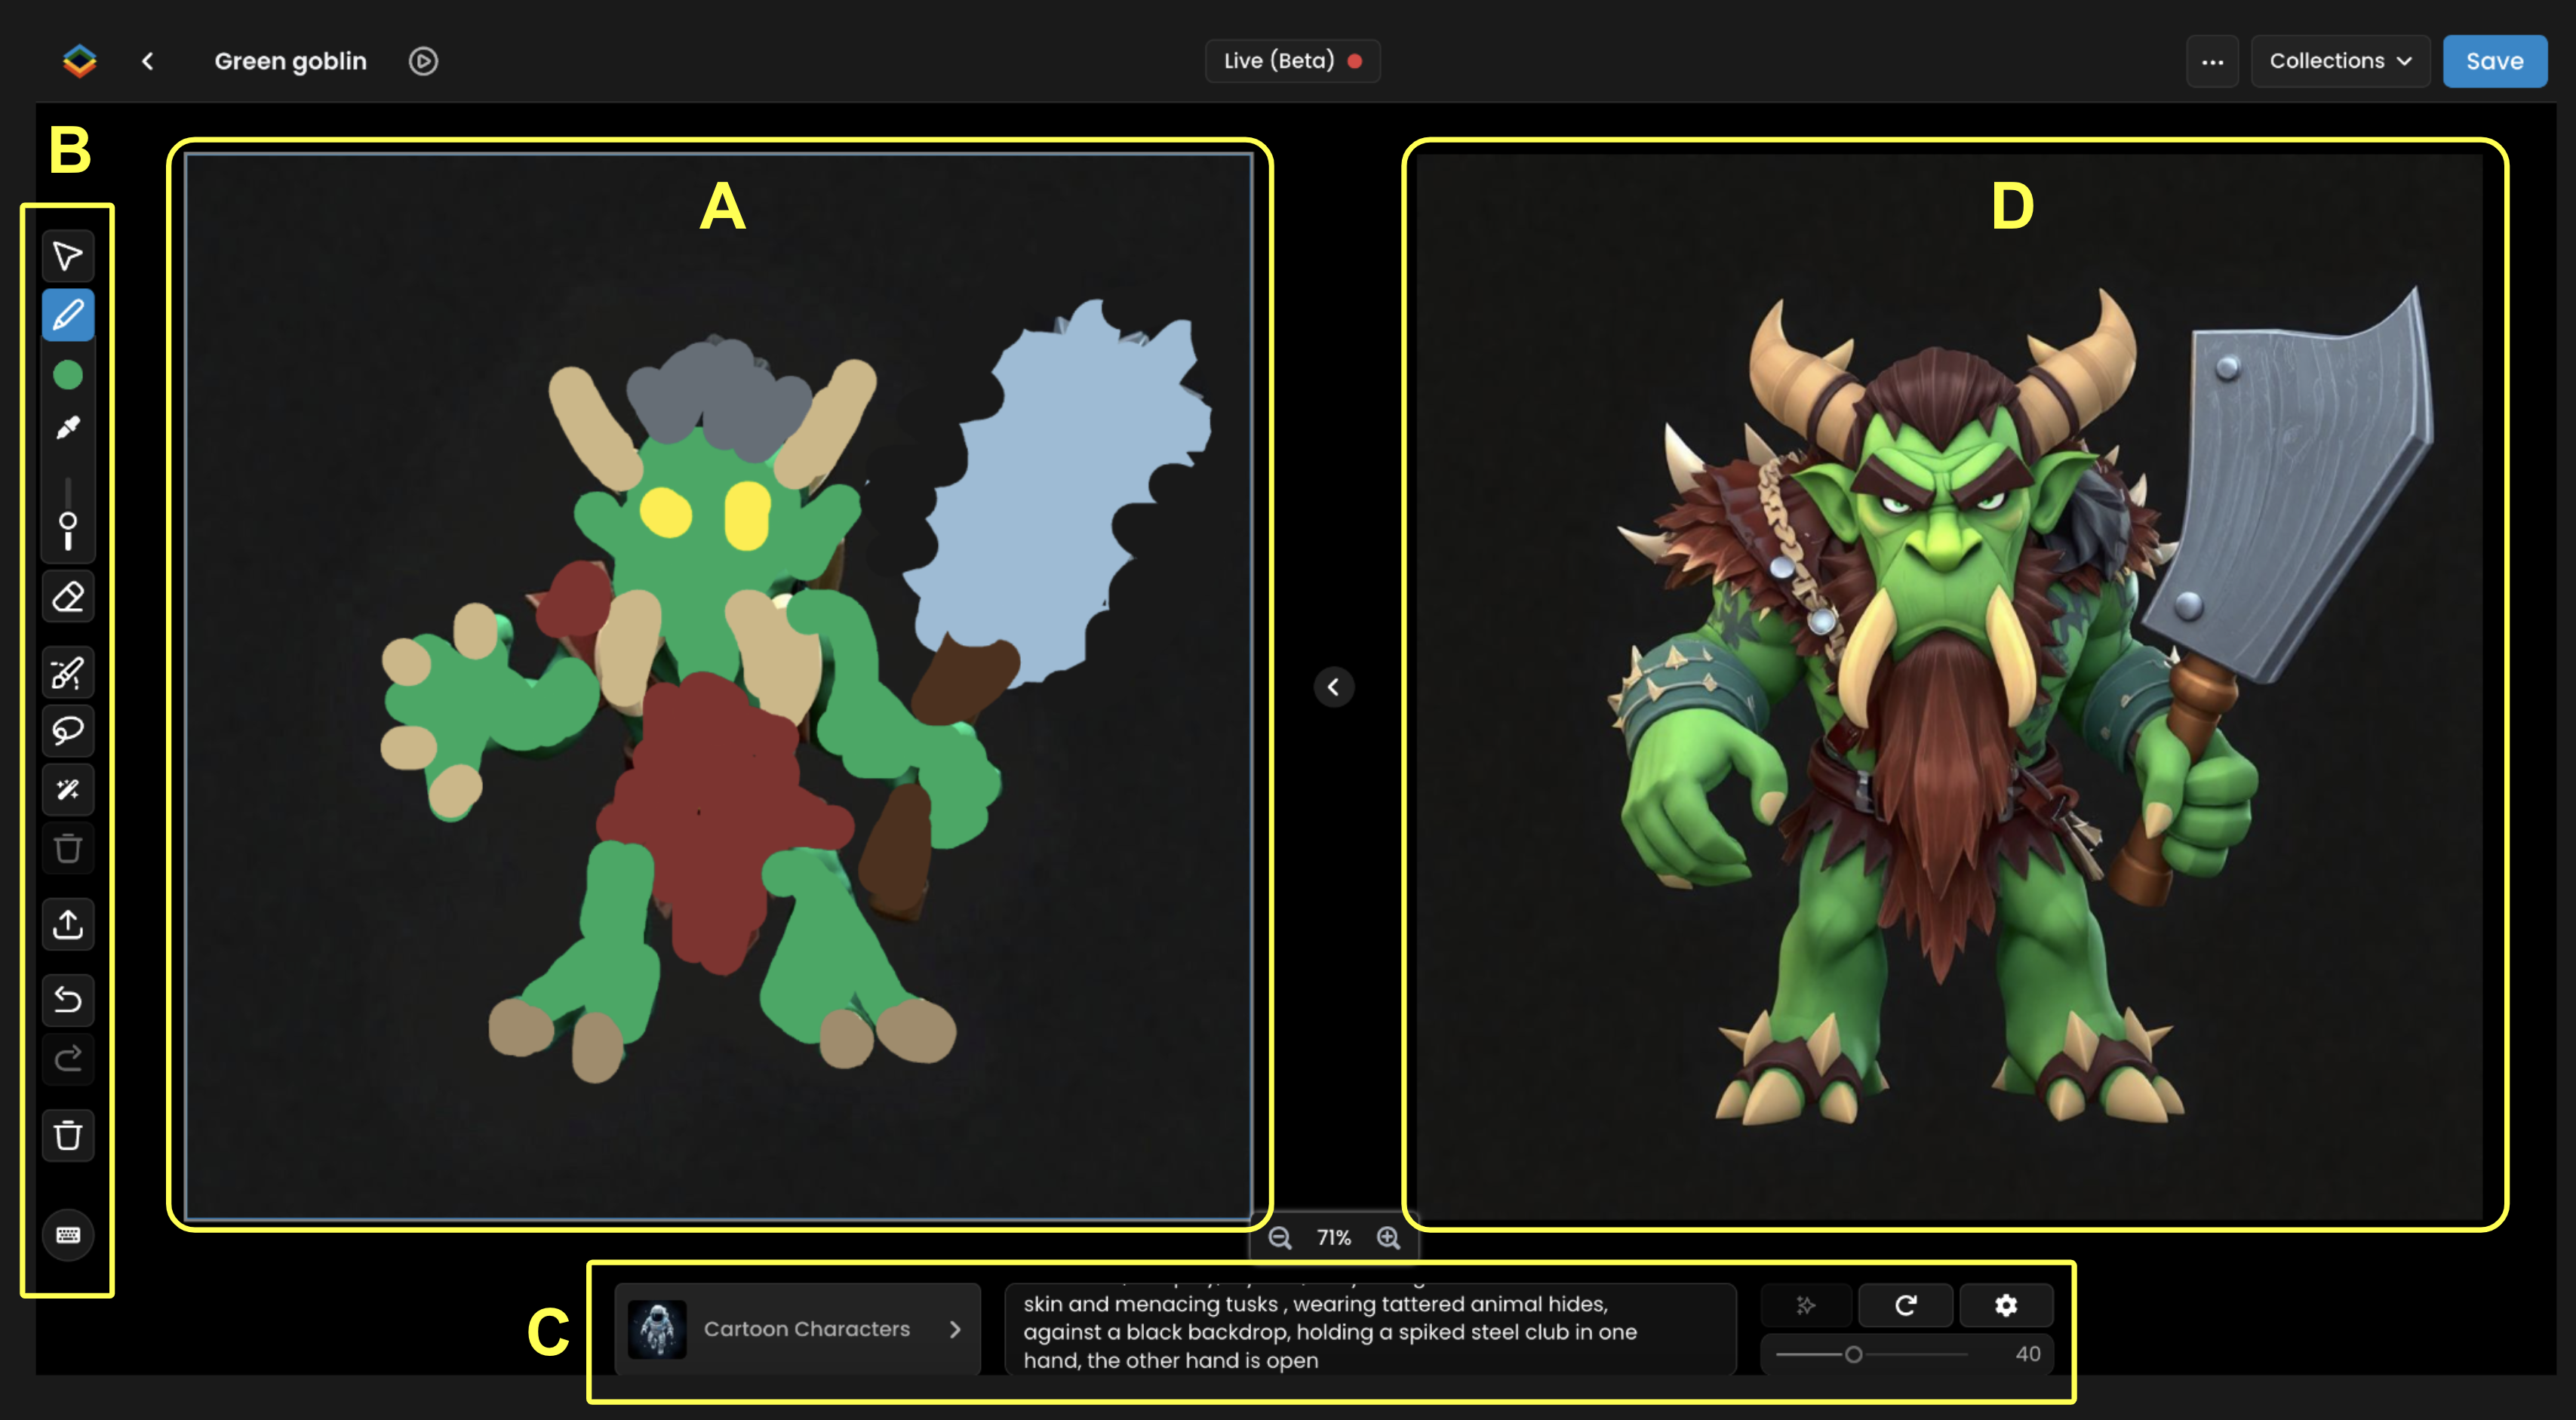
You can also use the top bar to rename the project, switch back to Canvas mode (Retouch) or save the output to collections or Gallery. Just like Canvas, all your projects will be saved in a gallery on https://app.scenario.com/canvas
Note: The middle arrow allows you to transfer your generated image (output) from the right section to the left section, as a new input further editing.
Step 3: Load a model and enter a prompt
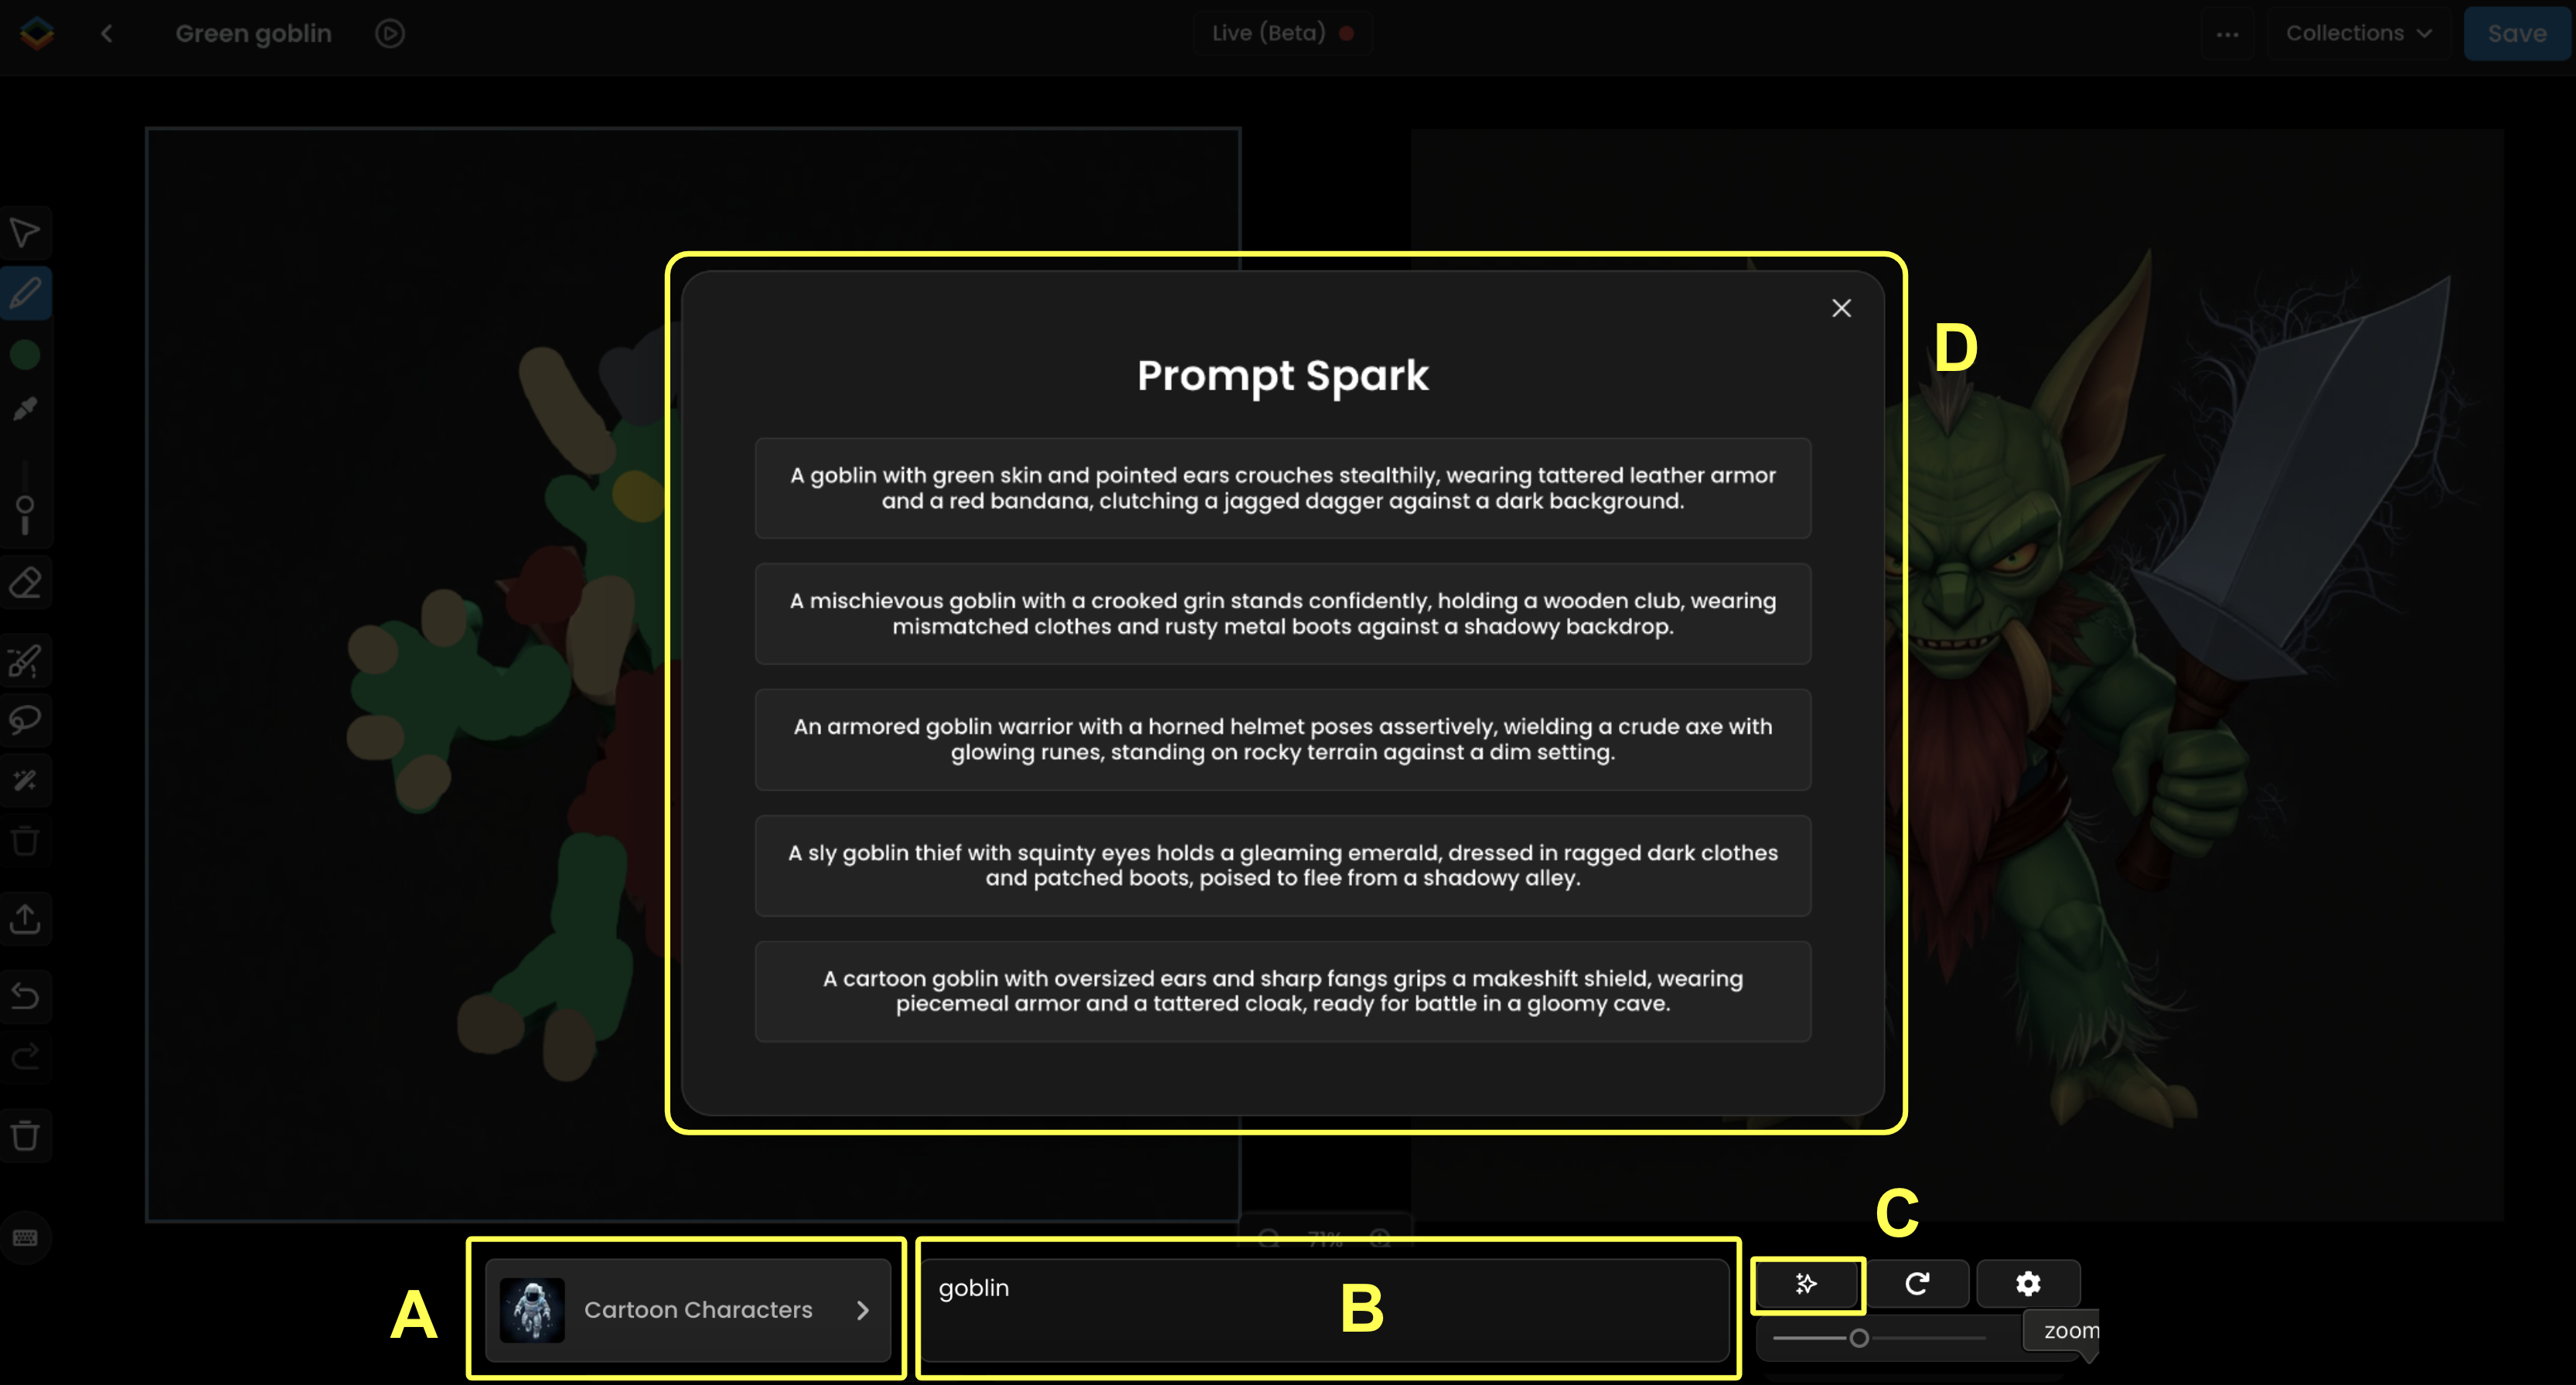
The model and the prompt are two of the three elements in Live (alongside your sketch). Make sure the right model is loaded (A - bottom left) - this could be a style model or character model. If you accessed Live from Canvas, your current model will automatically load in Live.
Enter an initial prompt in the prompt box (B). For quick suggestions, click the "Sparkle" icon (C) next to the prompt box. Prompt Spark offers relevant recommendations based on your model that you can modify (D).
This prompt serves as a starting point that you'll likely refine as you develop your sketch and evaluate the output.
Step 4: Start Sketching
You'll start with a blank canvas (unless you imported an existing image). Select "Sketch" from the vertical toolbar (shortcut: S), pick colors with the color picker, and begin drawing. You can:
Modify brush color and size using the toolbar options or shortcuts
Sample existing colors with the dropper tool (shortcut: C)
Begin with simple shapes and color patches to test how the model responds to your combination of sketch and prompt

Tip: Master the shortcuts! Learning keyboard commands like 'S' for sketch, 'C' for color picker, and 'E' for eraser will speed up your workflow. For a complete list of available shortcuts, press 'H' while in the Live interface.
Step 5: Adjust Influence Value
Adjust how closely the AI follows your visual guidance (sketch). “The Influence” slider controls how strictly the generated image adheres to your sketch
Higher values (40-70%) create results that closely match your drawing's structure and colors
Lower values (10-30%) give the AI model more creative freedom. Your prompt might have more impact overall.

The goal is to find the right balance between sketch precision and AI interpretation, guided by your prompt. While 40 is the default setting, there's no universal "best value" - the optimal setting depends on how your model was trained, the level of detail in your sketch, and the specificity of your prompt.

Step 6: Refine the Prompt
As you continue sketching, consider enhancing your output by refining your prompt:
When adding details to your sketch (accessories, background elements), include these in your prompt to better guide the AI's interpretation
Conversely, remove elements from your prompt when you erase them from your sketch
Remember that prompt and sketch should work in harmony, complementing each other - if your background depicts night, don't prompt for daylight
Begin with shorter prompts and gradually expand with specific details as needed
Step 7: Edit Sections via Inpainting
While Scenario Live typically transforms the entire canvas, you can also refine specific areas using inpainting directly within Live:
Transfer your generated image back to the canvas using the middle arrow
Select a masking tool (draw mask, lasso, or smart mask) to isolate the area you want to edit
Optionally sketch within the masked area to guide the generation
Apply your prompt to update only the selected section
The output will preserve your original image while only modifying the masked region
Note: Inpainting uses an adjusted AI model, so you might notice a brief lag during initial model loading. Once loaded, subsequent inferences will be faster.
Apply the same techniques as before (adjusting influence and tailoring your prompt to the masked area). When your Live edits are complete, consider switching to Scenario Retouch (Canvas) for more precise manual refinements.
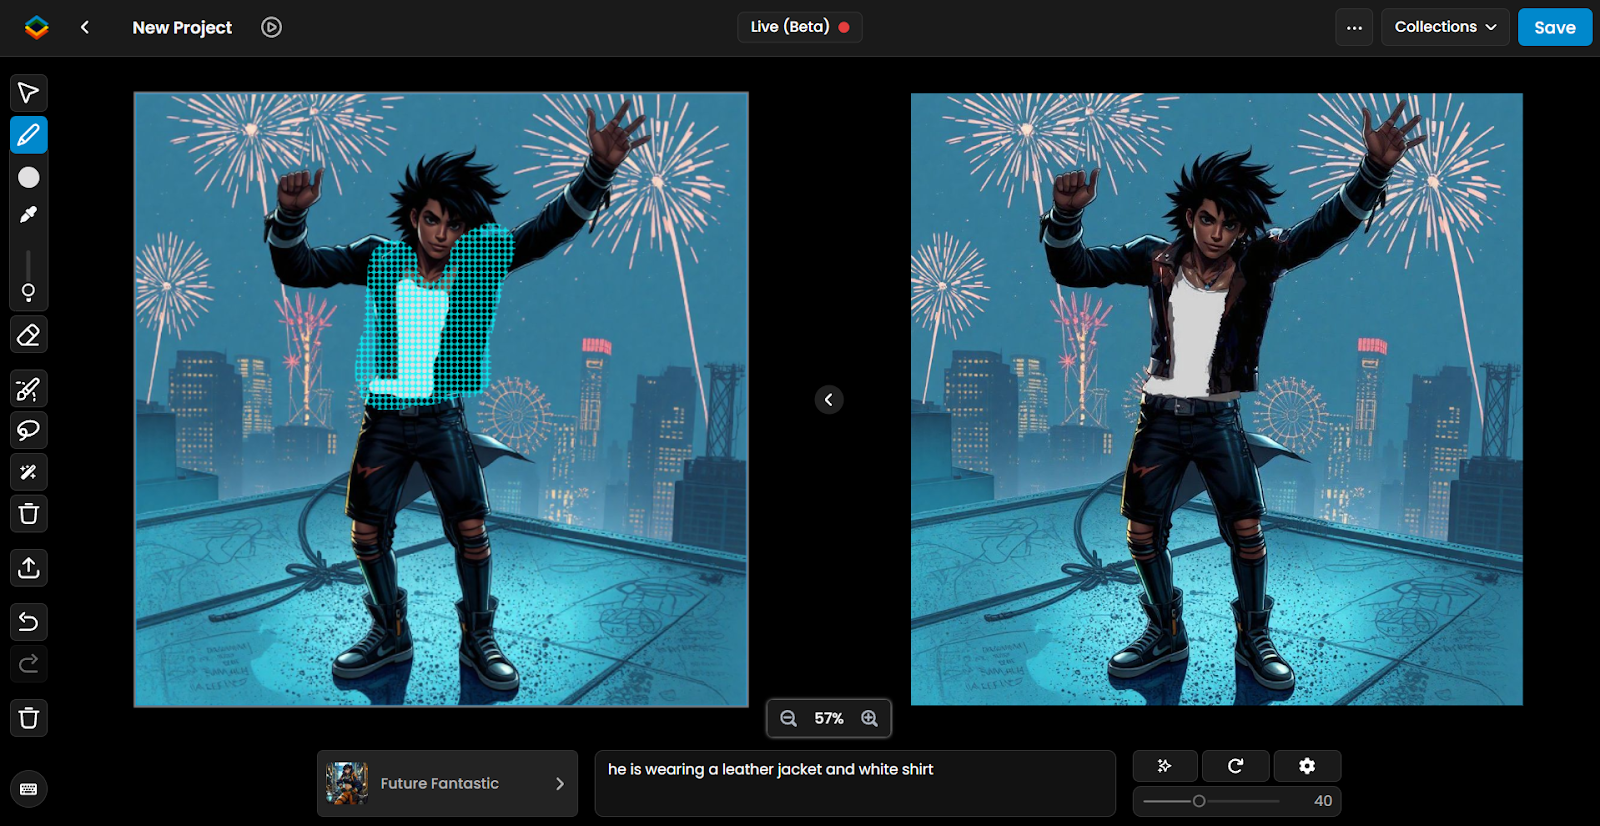
Example: Using inpainting within Scenario Live to edit specific character elements, such as modifying just the outfit while preserving everything else. The AI will only transform areas where you've created your mask (sketched or not) - leaving the rest untouched.
Step 8 - More Customization Options
Adjust your inference with these advanced options:
“Variation” Button (Shuffle icon)
Generate alternative versions of your image by changing the seed value, allowing you to explore different interpretations
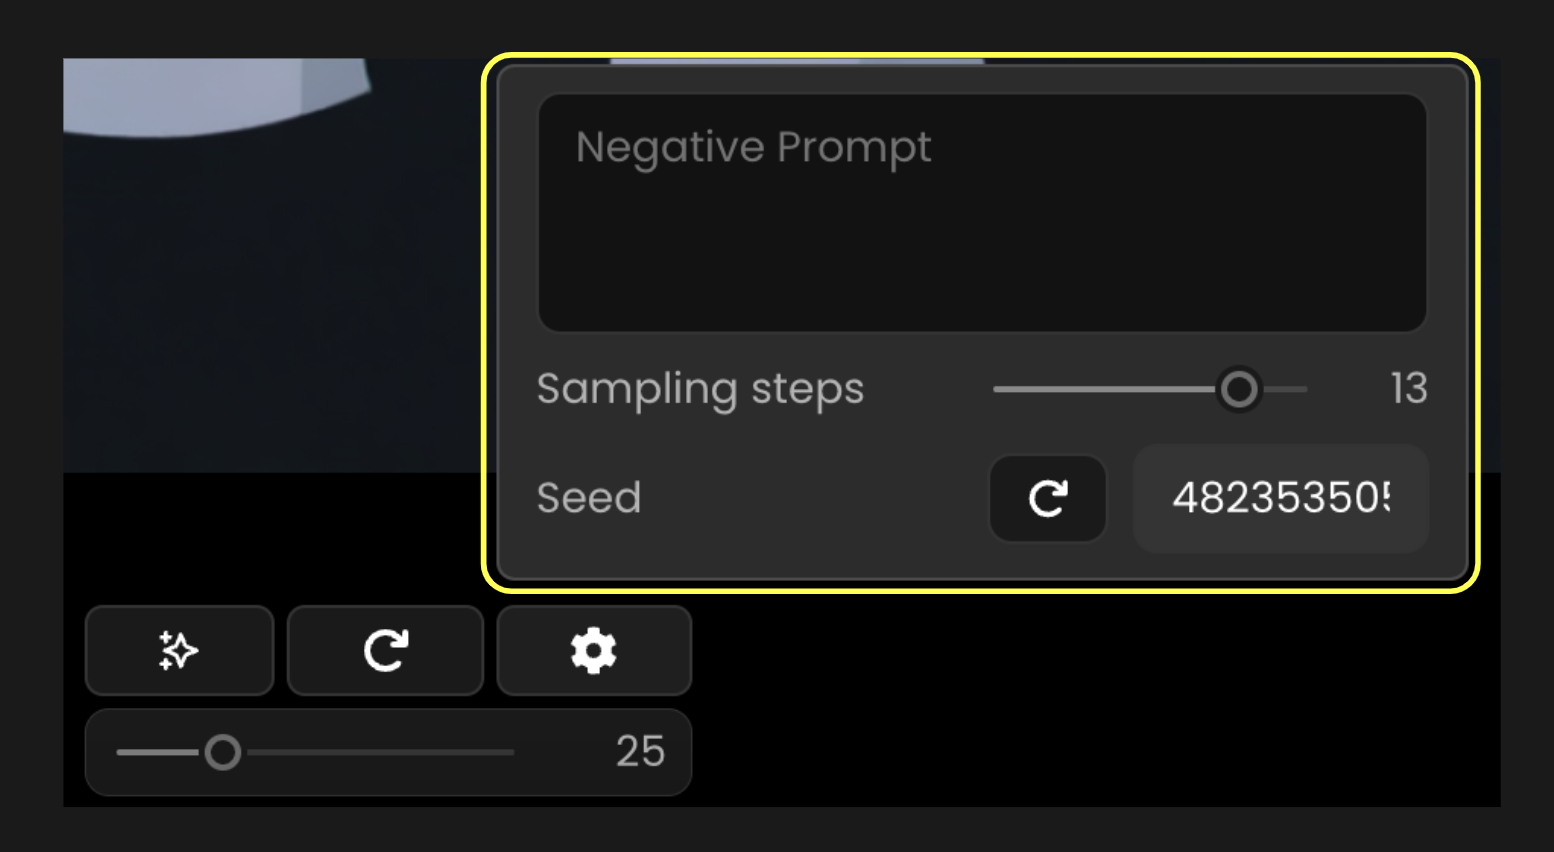
Additional Settings
Depending on your base model, access options like negative prompts to exclude unwanted elements, sampling steps to balance detail and speed, or fixed seeds for consistent results. Sampling Steps control the balance between image detail and processing time - 10 to 15 steps typically provides optimal speed vs. quality performance.
Beyond Scenario Live
It's crucial to understand that while Scenario Live provides quick results, it uses a specialized process (LCM Scheduler) that prioritizes speed over the highest quality of output.
For increasing the quality of outputs, consider these “polishing” workflows, all available within Scenario:
Switch to Canvas (Retouch)
Transfer to Canvas mode to refine your image by selecting specific areas and running additional inferences with the same model—either on large sections or targeted details.
Use Image-to-Image
Import your Live output as a Reference Image in the standard generation interface. Keep the same model and prompt, set a high influence value (25-35), and generate a more refined version.
Apply Scenario Enhance (style consistent upscale)
Process your Live output through Enhance, using 5-10 Style Images from the original model if possible. Compare results from both "Precise" and "Balanced" presets to find the optimal settings.
Remember that Live is one tool in a complete creative ecosystem. It helps you rapidly visualize concepts and bypass endless prompting, letting you focus on creativity rather than mundane tasks. The most effective workflows integrate Live with other Scenario tools to achieve both speed and quality.
Practical Examples
Example 1: Create a Cartoon Background
Process: In Scenario Live, start by selecting the Cartoon Backgrounds 2.0 model. Use the sketch tool to draw a rough outline of an ancient temple structure, adding basic shapes for trees, vines, and rocks. Adjust the brush color and size to define the sketch, then set the Influence Value to 50 to ensure the output closely follows the sketch. Add a prompt such as "A hidden jungle temple overgrown with tangled vines, its ancient stone entrance partly collapsed. Tropical birds flit among the trees, adding bursts of color to the lush surroundings under the dappled sunlight." to guide the real-time generation.
Result: The final image depicts a vibrant cartoon-style jungle temple, with detailed stone architecture overgrown with lush vines and tropical foliage. Tropical birds are visible in the sky, and the scene is enriched with a colorful, immersive background, reflecting the sketch and prompt accurately.

Example 2: Sketch a Consistent Character
Scenario Live is particularly powerful for quickly sketching consistent characters using trained custom character models. By drawing basic outlines, you can rapidly create iterations of your character while maintaining their defining features.
Process: Select a custom character model (e.g., "Red-Haired Superheroine") to ensure character consistency. Use the sketch tool to draw a basic outline of a female character, focusing on her pose, red hair, and tactical suit. Adjust the brush color to sketch her vibrant red hair and navy blue suit. Set the Influence Value to 50% to align the output with the sketch. Apply the prompt: "A female character with vibrant messy short bob red hair and bright blue eyes, wearing a dark navy blue tactical suit with silver accents on the shoulders with a dark crimson cape, silver forearm protection, big smile" to guide the AI in generating the character.
Result: The final image depicts a consistent superheroine with vibrant, messy short bob red hair and bright blue eyes. She is dressed in a dark navy blue tactical suit with silver shoulder accents, a dark crimson cape, and silver forearm protection, striking a confident pose with a big smile, all rendered in a cohesive cartoon style.
