Train a Consistent Character Model
Last updated: May 18, 2026

What is a Character Model?
A Character Model is a custom-trained AI model designed to generate a specific character with consistent traits across different poses, expressions, and scenes. Unlike standard prompting, which often struggles to keep a character on-model from one image to the next, a well-trained Character Model preserves the features, proportions, clothing, and signature details that make your character recognizable.
Character Models are especially useful for game development, concept art, animation, and storytelling in general (comics, webtoons, books, marketing campaigns, and more). They let you recreate the same character seamlessly in different environments and contexts, removing the need for constant manual adjustment or in-painting.

Some examples of Character Models available on Scenario
The big advantage is control. Instead of tweaking prompts endlessly to keep your character on-model, you can focus on the scene or composition, knowing your AI-generated character will retain their defining attributes every time.
Just like Style Models, Character Models reward careful dataset curation and a few tuned training settings. This guide walks you through every step.
For the broader workflow, see Basics of Model Training.
Step 1: Pick a base model
From the main menu, navigate to Train > New Model to open the training interface. The first decision is which base model family you train on top of. Each family has its own strengths.
Family | Pick when |
|---|---|
Flux 2 (Dev / Klein 9B / Klein 4B) ⭐ | Default for new character models. Pick the variant by quality versus cost: Dev for hero work, Klein 9B for production, Klein 4B for fast iteration. |
Z-Image (Z-Image / Z-Image Turbo) | When you want fast inference at low cost (especially with the Turbo variant) and bilingual English/Chinese text rendering. Also strong for photoreal characters. |
Qwen Image 2512 | Cost-sensitive workflows, high-volume character work, or strong prompt adherence for complex scene descriptions. |
All three families handle both stylized and photorealistic characters: illustrated heroes, anime, cartoon mascots, hyperreal portraits, photo-based likenesses.
Step 2: Curate and upload your training set
A well-prepared dataset is the foundation of a successful Character Model. Three rules cover most of it:
Image quality. Use high-resolution images (1024 x 1024 pixels or higher) to capture fine details like facial structure, hair texture, and clothing. If your images are too small, use the Enhance 2x tool to upscale them in one click.
Consistency in features. Every image must depict the same character with the same defining traits: facial features, hair, body proportions, signature clothing, recurring props or accessories (if they are part of the identity).
Variety in poses and expressions. Within that consistency, vary angles (front, profile, three-quarter, back when possible), expressions (neutral, smiling, surprised, serious), zoom levels (close-up portraits, half-body, full-body shots), and backgrounds. This prevents the model from baking the pose or environment into the character's identity.
Avoid excessive repetition of the same pose or angle. It limits the model's ability to generate dynamic and flexible results, and pushes it toward overfitting.

Step 3: Size your training set
Character Models typically need fewer images than style models. A small, well-curated dataset of 5 to 15 images is often more effective than a larger one (20+) where images become redundant. Too many similar images push the model toward overfitting, and the character ends up "stuck" in the poses and environments it was trained on.
If you have only 5 to 8 images to work with, make sure they cover at least 3 distinct poses or angles. Repetitive framing is the most common cause of weak character recall.
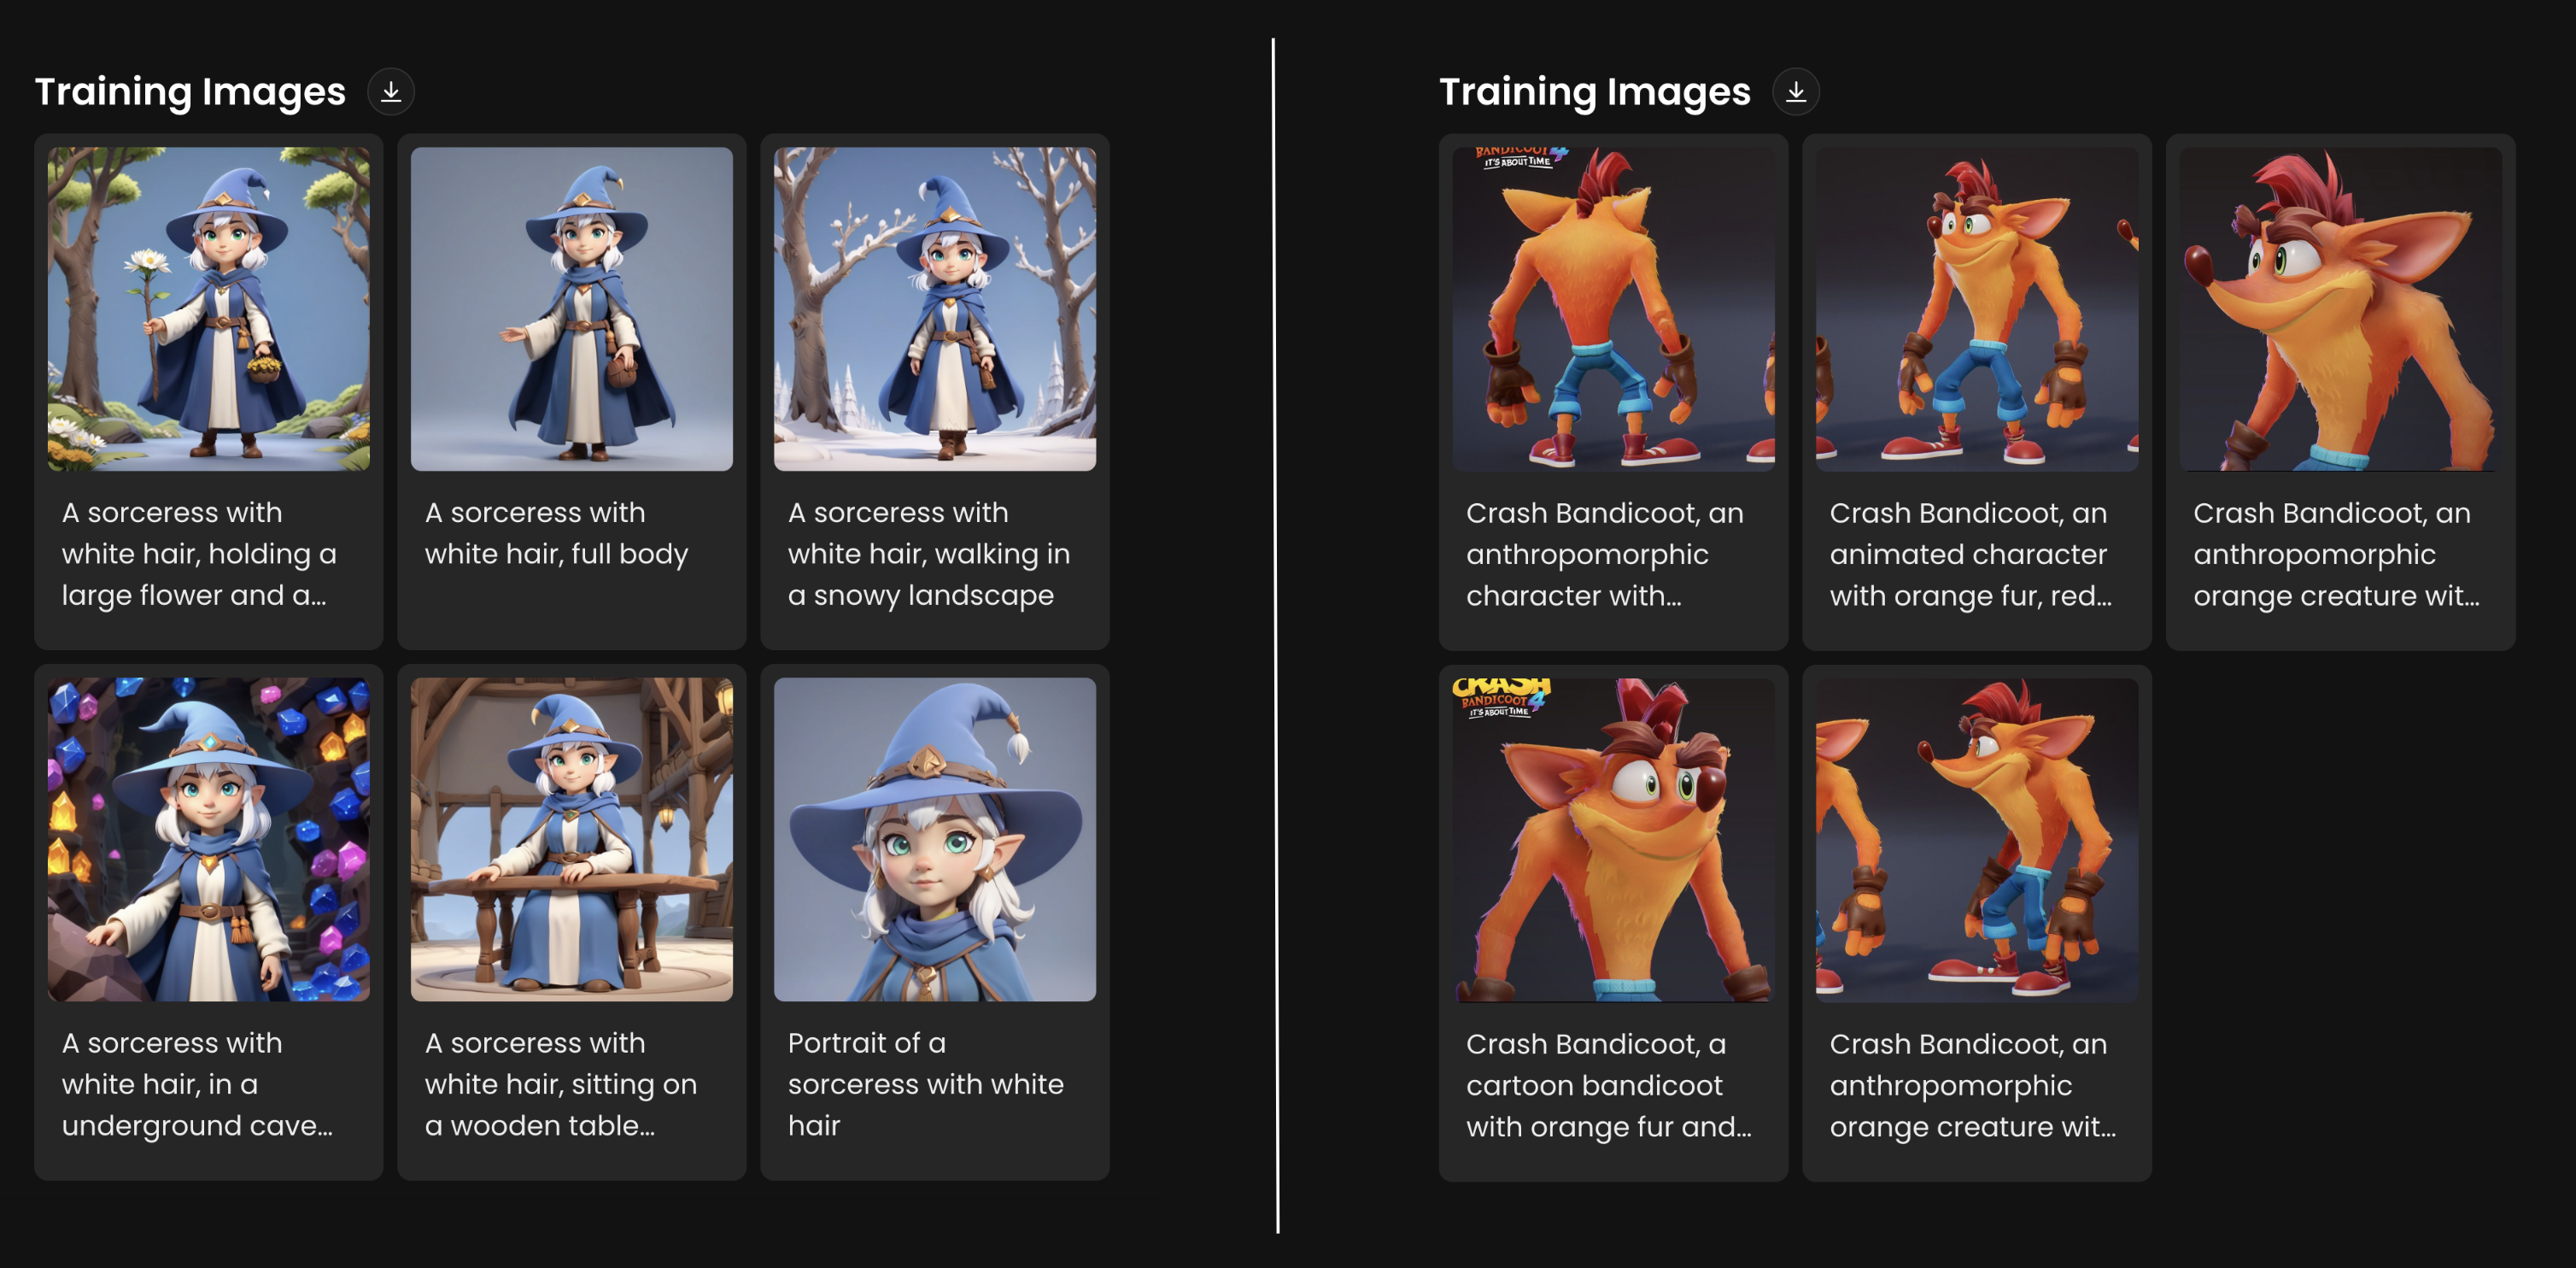
Here are some examples of character models training sets using only 5-6 images.
Step 4: Crop training images (optional)
Training images can be uploaded in any format. Square crops are optimal, but non-square images are accepted too. You have two options:
Crop your images to a square format before uploading.
Upload images in any format and adjust cropping directly in Scenario's interface during upload.
For flexibility, you can mix square and landscape crops to better capture different poses. This works particularly well when your dataset combines close-up portraits, half-body shots, and full-body views, since each framing benefits from a different aspect ratio.
Low-resolution images are automatically detected. You can upscale them 2x in one click before training: open the three-dot menu on any image and select Enhance 2x.

Step 5: Caption your images
Once your dataset is uploaded, every image gets an auto-generated caption. Captions help the AI understand your character's unique attributes. Scenario's automated captioning works well in the vast majority of cases, but reviewing and refining captions is always recommended. You can edit each one by clicking on the image individually.
Unlike style captions (which omit the style), character captions are descriptive and trigger-anchored. A good character caption identifies:
Trigger word or character name: a unique token (such as
Vendalixia,KAEL_07, orMYHERO) used in every caption.Defining physical traits: features that stay constant across generations (
silver hair,red scarf,cybernetic left arm).What varies in this image: pose, expression, framing, environment, lighting. These tell the model "this is variable, not part of identity."
Optional art-style notes: include only if you want the character locked to a specific style. Otherwise leave them out so the model stays flexible.
Example caption:
Vendalixia, a young woman with silver hair and a red scarf, three-quarter view, smiling, standing in a forest at dusk, soft warm lightThe trigger word and identity traits should appear in every caption. The pose, environment, and lighting change per image. In short: caption the elements that are meant to vary in the generated outputs.
For more on captioning best practices, see Advanced Captioning.

Step 6: Set test prompts
Before starting training, add up to four test prompts to monitor your model's progress and evaluate the quality of each epoch.
During training, the model generates one image per test prompt for every epoch. For example, with 4 test prompts and 10 epochs, you will receive 40 test images (4 per epoch). This gives you a built-in apples-to-apples grid to compare across epochs.
For character models, use all four test slots to exercise different aspects of identity:
A baseline pose:
Vendalixia, standing, neutral expressionA pose not in your dataset:
Vendalixia runningA new environment:
Vendalixia on a beach at sunsetA different framing or art direction if relevant:
close-up portrait of Vendalixia, anime style
This is the fastest way to spot overfitting (the model cannot break out of training compositions) versus underfitting (the model loses the character's identity in new contexts).
You can quickly create test prompts using Prompt Spark, Scenario's built-in prompting assistant (via the buttons to the right of each prompt field). For best results, keep test prompt structure similar to your training captions: same trigger word, same approach.

Step 7: Configure training parameters
The defaults work for most character runs, so you can usually skip this step:
Learning Rate:
1e-4Text Encoder Learning Rate:
1e-5Batch Size:
1Repeats:
20Epochs:
10
For very small datasets (5 to 8 images), give the model more cycles to learn the character: increase epochs to 15 to 20, raise repeats to 25 to 30, and lower the Learning Rate to 5e-5 so it does not memorize too aggressively.
For deeper parameter tuning, see Advanced Training Parameters.

Step 8: Start training and monitor progress
Once everything is set, click Start Training and wait for the process to complete. Training time depends on your dataset size, the base model variant, and your training settings, and typically ranges from 30 minutes to 2 hours.
You will be notified when training finishes by email and through the Recent Tasks icon in the top menu (a red dot appears as soon as the job is complete).
During training, each epoch generates results using your test prompts, so you can watch how identity develops over time.
Step 9: Compare epochs and pick the best one
Once training is complete, compare two epochs side by side to determine which performs best. The last epoch is set as the default, but earlier epochs often produce more flexible characters.
To compare, simply select two epochs, click Compare, and follow the on-screen options. Look for these signs:
Underfit signs: identity drifts; face, hair, or signature traits look generic or inconsistent.
Sweet spot: the character is clearly recognizable across prompts that are not in the training set.
Overfit signs: outputs reproduce specific training poses or backgrounds; the character appears stuck in scenarios you trained on.
For characters meant to be merged with style LoRAs (see Merge Custom-Trained Models), prefer slightly earlier epochs. They keep more flexibility for the style on top.
Step 10: Finalize your model
Don't forget to finalize the process. Test your model with a few real prompts (try a short description and a detailed one to find the prompt style that works best), then add a clear description that outlines the character's key features, set a representative thumbnail, pin a few example images, and tag the model so teammates can discover and reuse it. See Improve and Refine Your Models for the full process, including retraining strategies if identity drifts.
Common pitfalls
Same pose in every image. The model bakes the pose into the identity. Vary aggressively.
Background bleed. When all images are shot in the same room, the character "wants" to be in that room. Mix backgrounds.
Trigger word missing from one or two captions. Inconsistent triggering means inconsistent recall. Audit before training.
Multiple characters in training images. Crop to your target character or remove the image entirely.
Outfit variety when you wanted a signature outfit. Decide upfront: is the outfit part of the identity, or variable? Caption accordingly across the whole set.