Sketch-to-Render
Last updated: April 9, 2026
Note: Newer Workflows Available
The Sketch-to-Render workflow described in this article remains fully functional. However, for improved efficiency and consistency, we now recommend using newer models and dedicated tools that simplify the process.
Models like Nano Banana Pro and Seedream 4.5, as well as Flux Kontext LoRAs, often achieve similar or better results with fewer steps. Additionally, the dedicated Sketch Colorizer workflow streamlines the process.
Recommended Guides:
- Gemini 3.0 Pro Image: The Essentials
- Seedream 4: The Essentials
- Train a Flux Kontext LoRA
👉 Access the Sketch Colorizer workflow here
Transforming Line Art into Rendered Images
In this workflow, we’ll show how to turn simple sketches into polished, high-quality images using Edit with Prompts, ControlNet Sketch, Image to Image, and Enhance. There are two main approaches:
Edit with Prompts – Works with Nano Banana, Flux or GPT models.
LoRA + ControlNet (Sketch Mode) – Works only with Flux models, ideal for character creation, stylized environments, and artwork refinement. Sketch ControlNet is not supported on non-Flux models.
We’ll walk through practical examples below.
Method 1 – Edit with Prompts (Flux or GPT-Image)
Step 1 - Open your sketch in Scenario.
Go to your image in the gallery, click the three dots (⋯) on the thumbnail, and choose Edit with Prompts. This loads the image into the Edit with Prompts interface.
Step 2 - Choose your model.
When you open your sketch in Edit with Prompts, the first step is to choose the model that will process it. Nano Banana is designed for fast, high-fidelity results. While Flux Kontext can also produce good edits, Nano Banana consistently delivers cleaner, more detailed outcomes. It respects the structure and composition of your sketch while enhancing it with additional detail, lighting, and texture.
The two models approach a sketch differently, so it can be useful to run your prompt through both and compare the results. This gives you options to choose from — or even combine — when finalizing your render.
Step 3 - Write a detailed prompt.
Describe the exact look you want — colors, materials, lighting, mood, and any background elements. For example:
Make this drawing in a realistic style on a full moon night.
Step 4 - Generate and review.
Click Generate to produce the first result. Inspect how well it respects the sketch’s structure and the details from your prompt.
Step 5 - Refine if needed.
Edit your instructions to clarify missing details or adjust the style. Try the other models like Flux Kontext or GPT if you want a different artistic approach. Repeat generation until the result matches your goal.
This method is a faster, more cost-efficient way to turn a sketch into a finished render. It’s ideal when you don’t need ControlNet’s precise structure matching or a style/character LoRA, and you’re happy to let the AI work more freely. For more tips, see the full Edit with Prompts guide.
Method 2 - LoRA + ControlNet (Flux only)
This method gives you maximum control over both structure and style. By pairing a Flux-based model with a style LoRA (for an overall artistic look) or a character LoRA (to maintain a specific character’s appearance), you can lock in exactly how your render will look while ControlNet (Sketch Mode) ensures the pose, proportions, and composition match your sketch perfectly.
If you’re working on a series—like multiple poses of the same character, or a set of scenes in the same art style—this approach ensures consistency from image to image. Since Sketch ControlNet works only on Flux models, always start with clean line art (no filled black areas). Once the base image is generated, you may refine with Image to Image for small adjustments and use Enhance to create a polished, high-resolution final render.
Example 1: Simple Character Transformation
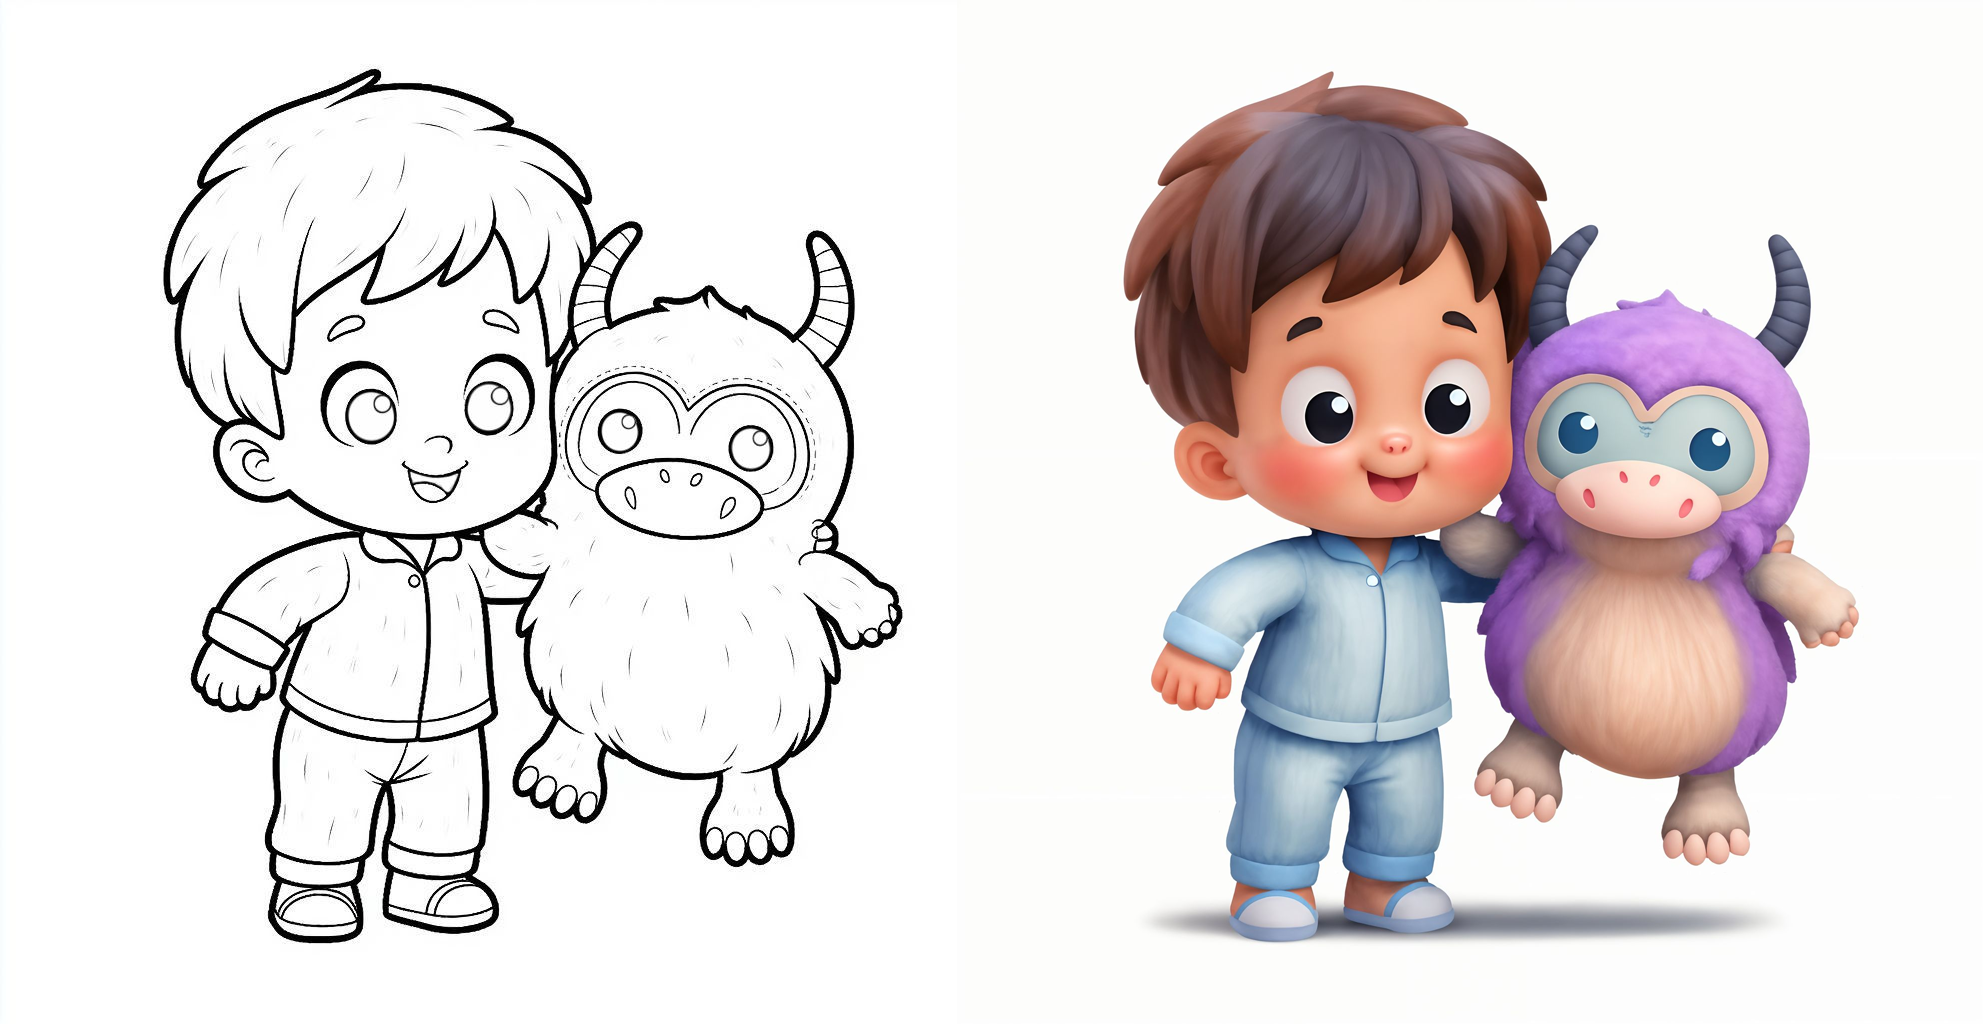
In this first example, we use a reference sketch of a young boy and his plush monster toy to create a colorful, playful final image. The goal here is to generate a vibrant 3D-style character while maintaining the original pose and structure.
For this, a detailed prompt describing the colors and textures of each element will be needed. The model used was Cutesy 3D, ideal for producing a soft, cartoony 3D look, perfect for children's characters.
Important: Before using the sketch with ControlNet, you should remove any filled black areas from the line art. Filled areas can cause distortions when using the Sketch mode. Always ensure your reference is clean, with only outlines.
Prompt:
A cheerful young boy with light brown skin, big brown eyes, and short dark brown hair, wearing light blue pajamas with a white collar and matching cuffs. His shoes are soft blue slippers with white soles. He has his arm affectionately around a cute, fluffy monster plush toy. The plush has soft purple fur, a lighter lavender belly, and round pink cheeks. Its face is beige with large light blue eyes and a round pig-like snout in pale pink. The monster has small dark gray horns with white tips and tiny claws on its hands and feet. The background is white, letting the bright, playful colors of the characters stand out.
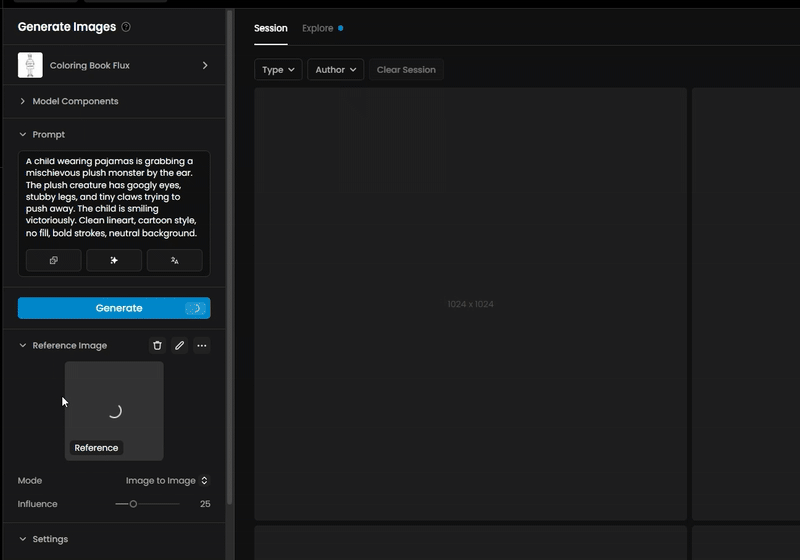
Steps to generate the colored image:
Select the model Cutesy 3D and click on Use this model > Generate.
Start adding a reference image with a clean line art sketch without any black filled areas.
Use ControlNet (Sketch Mode) with Influence 75 and Duration 60 (for example)
Increase the Sampling Steps (for ex to 35) to add more detail to the result.
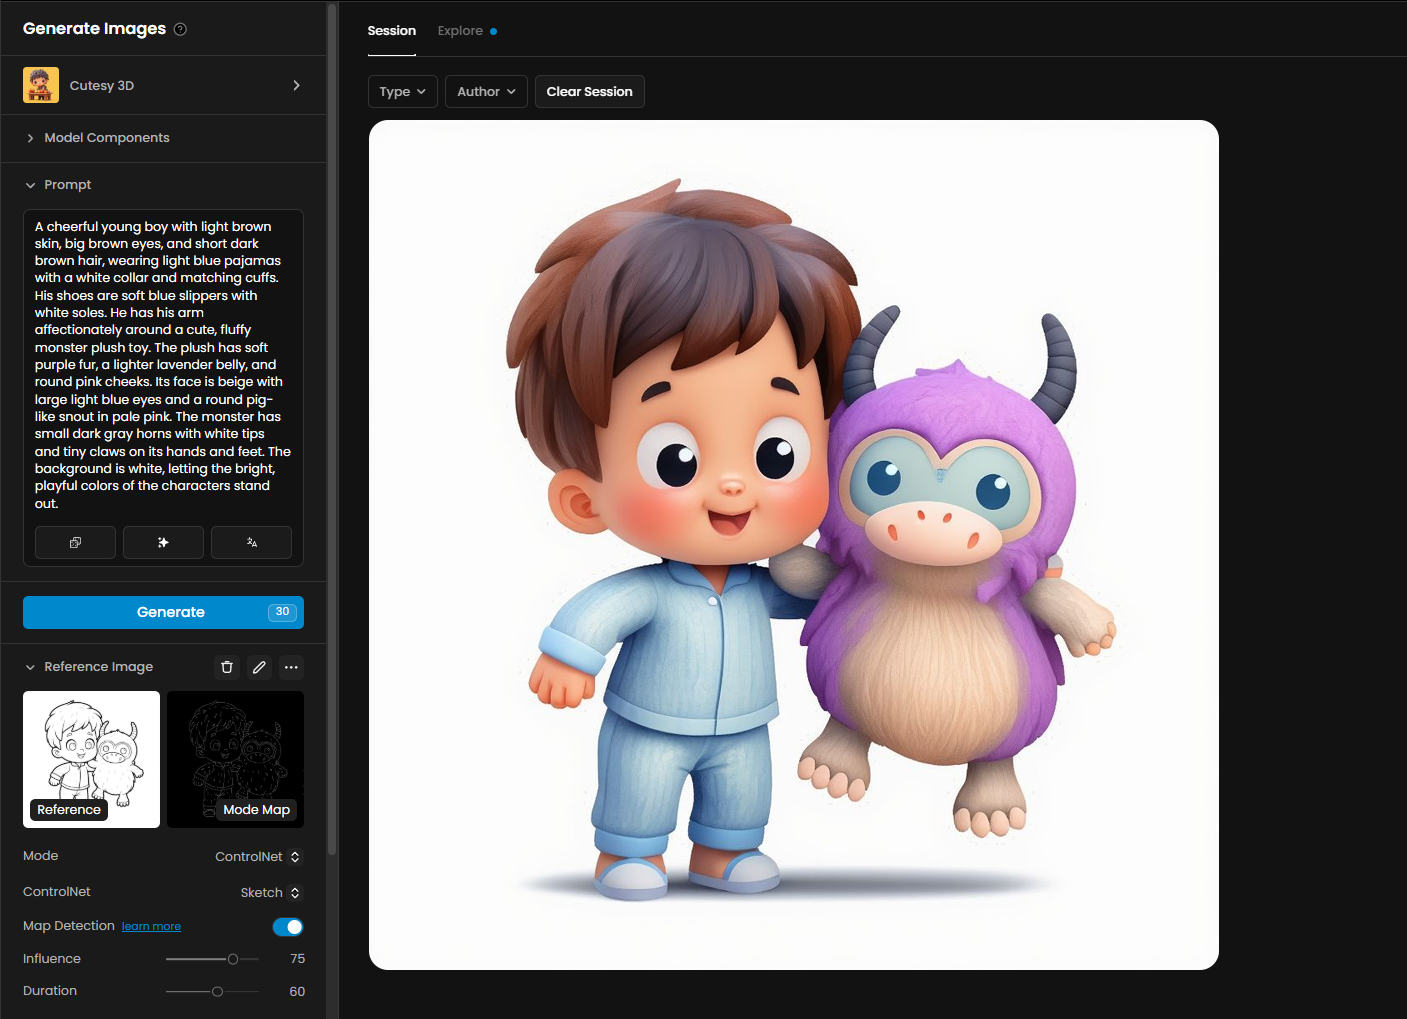
Adjust the Influence value as needed to balance the fidelity to the reference with some creative freedom during generation. A lower influence add more creativity to your result.
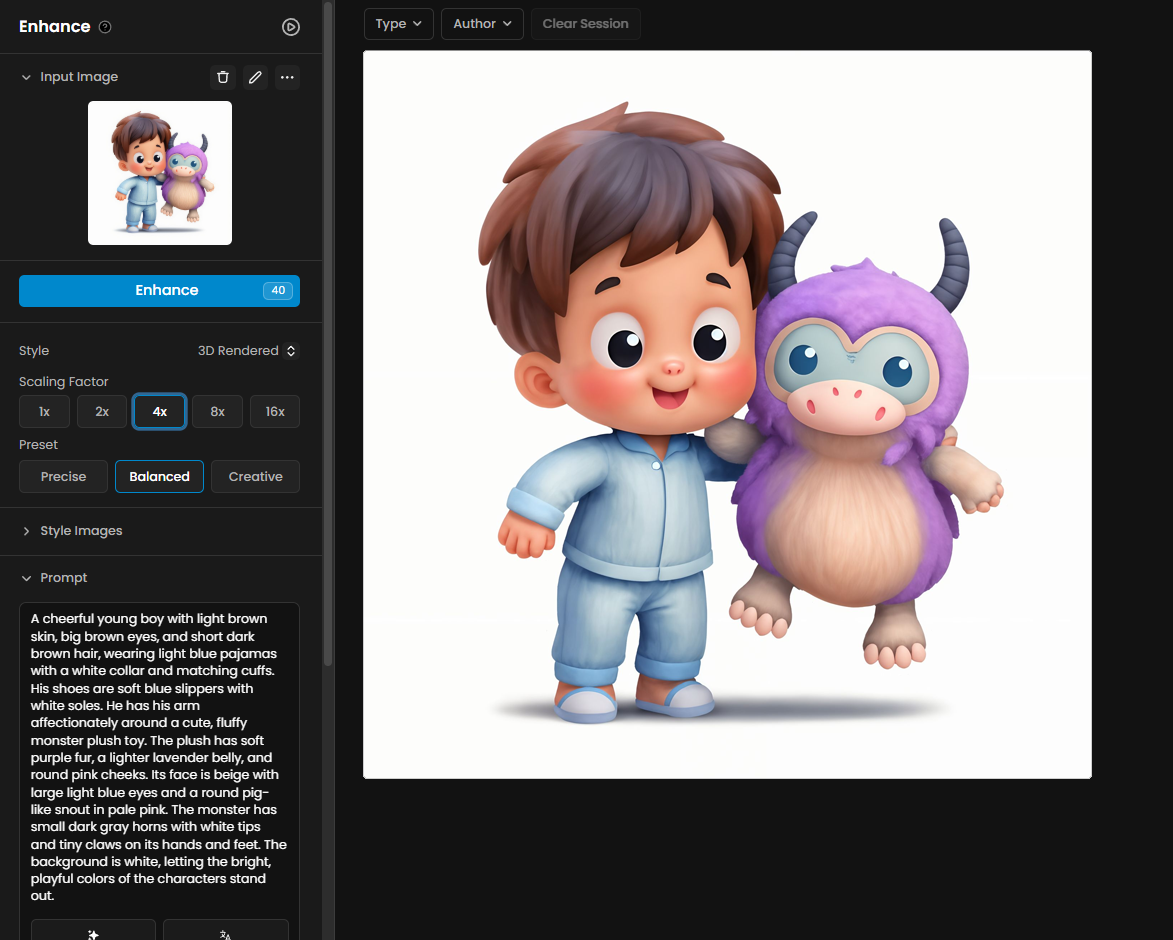
Once your image is generated, run it through Enhance to increase resolution and sharpen details. In this example, we used a 4× scale, 3D Rendered style, and the Balanced preset:
Example 2: Character Refinement and Quality Improvement
In this example, we'll work with a more detailed subject: a futuristic soldier holding a weapon. The goal here is not only to colorize the sketch but also to improve the quality of the final render using Image to Image generation. This method helps fix minor deformations, enhance textures, and deliver a sharper, cleaner result.
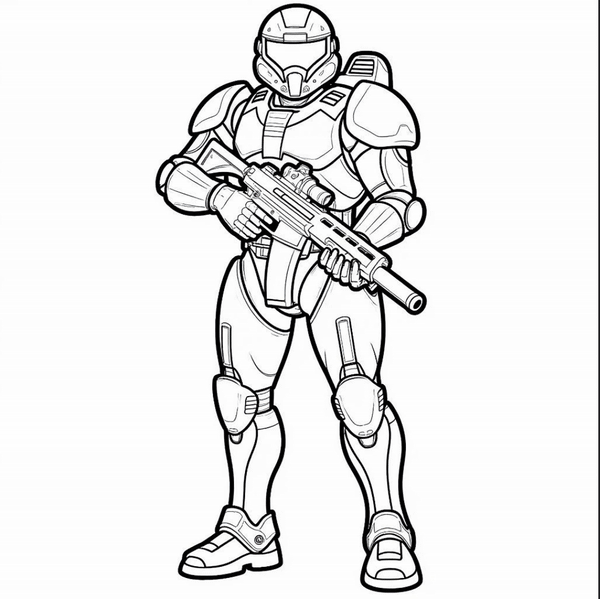
The model used was Action Plastic, ideal for creating toy-like, detailed 3D stylized characters.
Prompt: “A futuristic soldier in a yellow and grey suit of armor holds a large gun, standing confidently against a solid blue background."
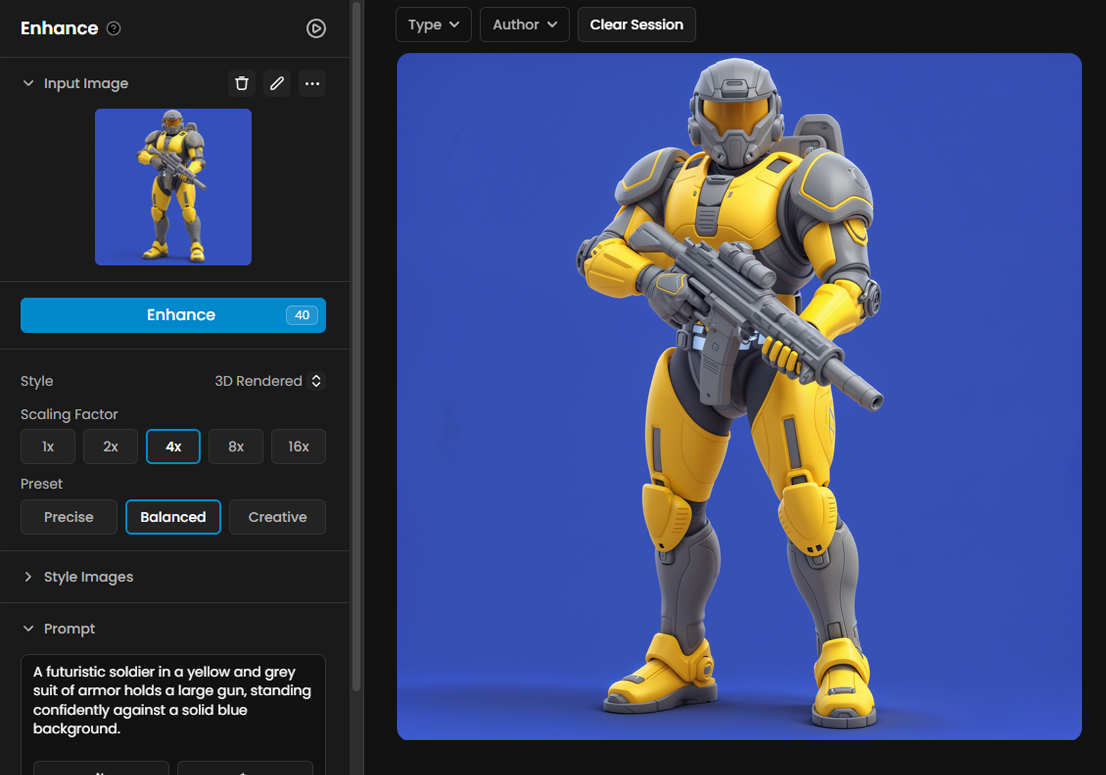
Steps to generate the rendered sketch:
Select the model “Action Plastic“ and click on Use this model > Generate.
Start by adding a clean line art sketch as the reference image.
Use ControlNet (Sketch Mode) with Influence 75 and Duration 60.
Increase Sampling Steps to 35 to improve the level of detail.

After the first generation, to further refine the result:
Use Image to Image with the first colored version as reference.
Set Influence to 70 to correct minor imperfections while preserving the original structure.

Finally, apply Enhance to boost resolution and give the image a polished finish. For this example, we used 4× scale, 3D Rendered style, and the Balanced preset. This approach helps maintain high fidelity to the original sketch while ensuring the final image is polished and ready for use.
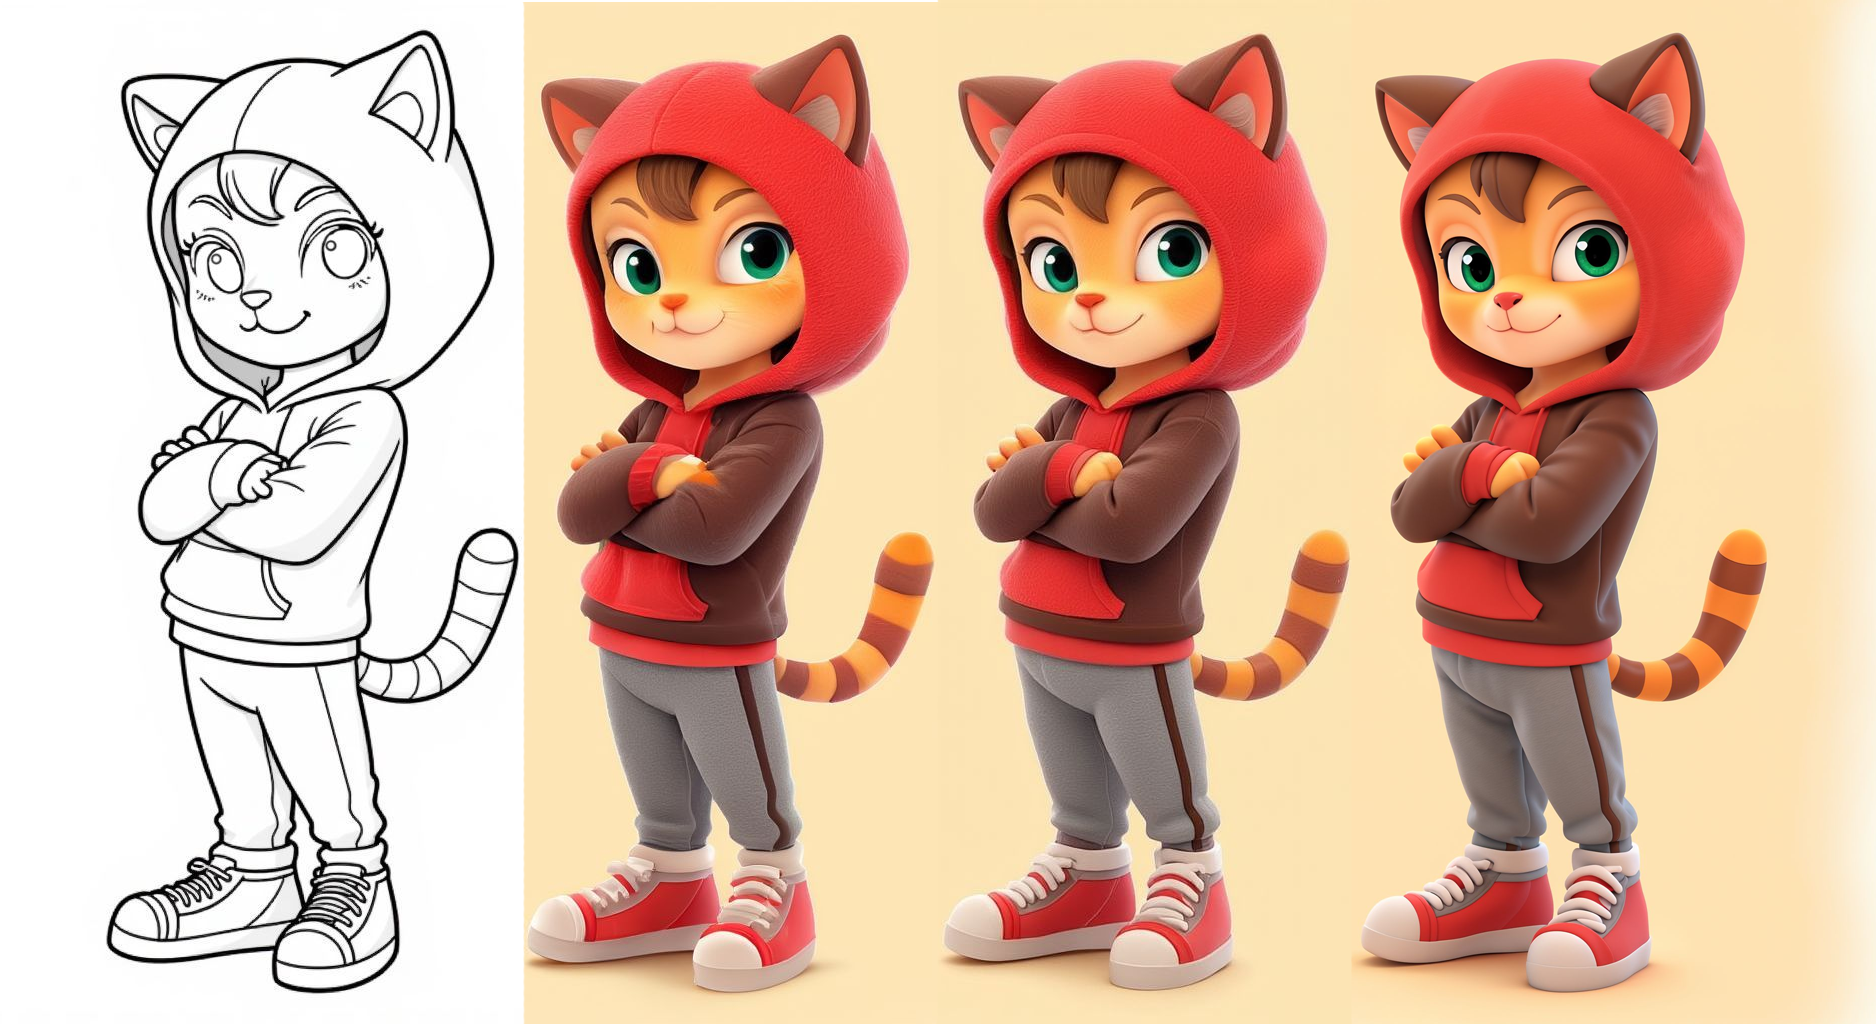
As an additional example, the same workflow was applied to a "Cat Boy" character:
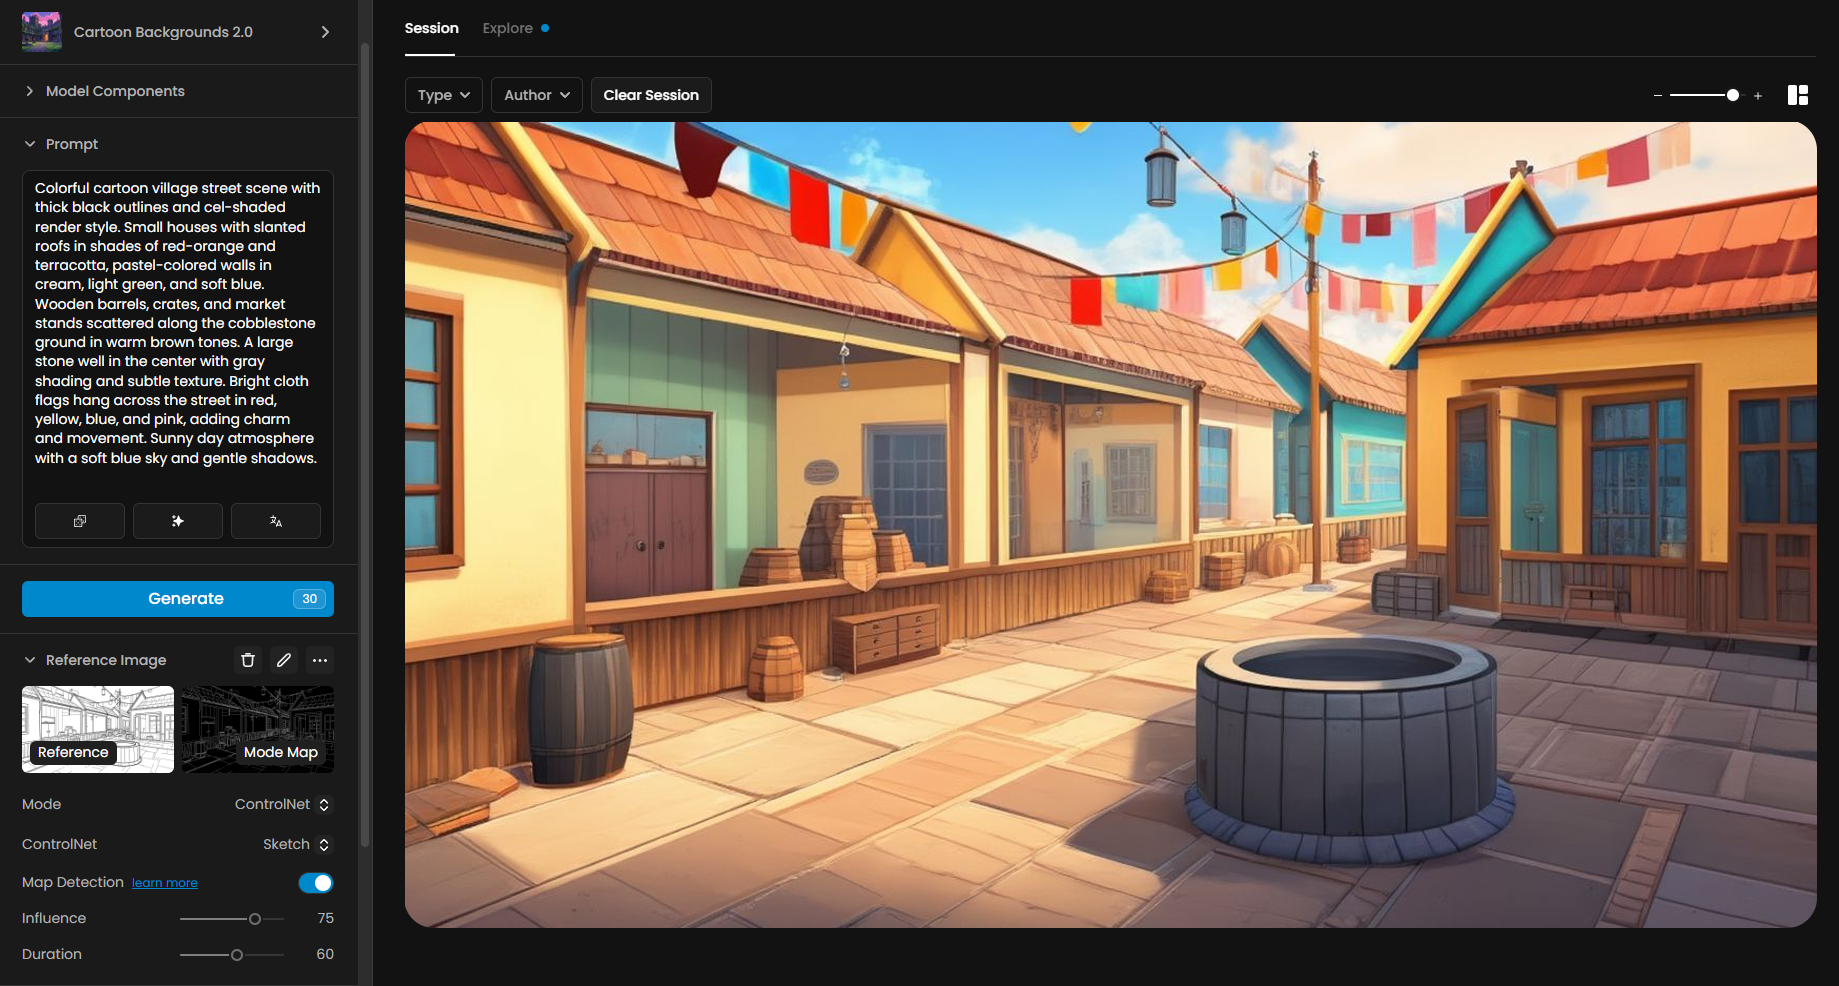
Example 3: Applying the Workflow to Environments
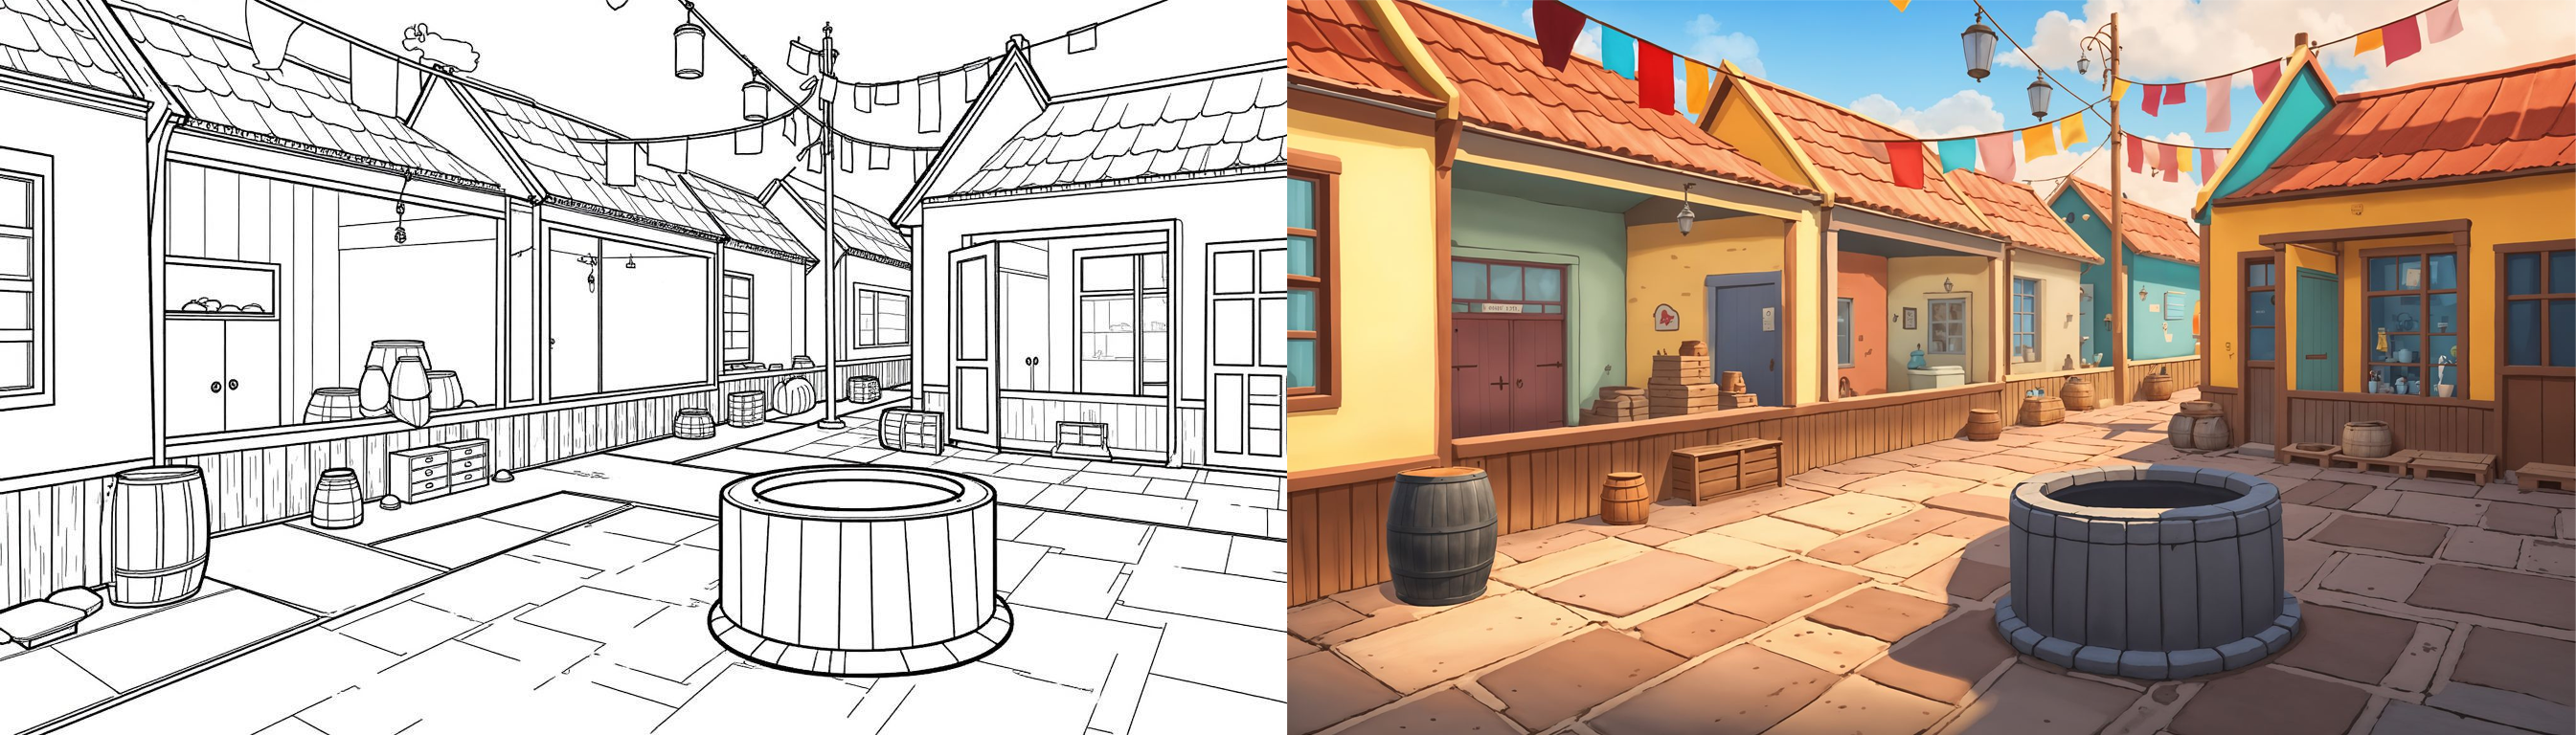
In this third example, we show how the Sketch to Render workflow can be applied to background and environment creation. We'll work through a colorful cartoon village scene as the main focus. The method remains the same as before, but applied to broader compositions and environmental details.
The model used was Cartoon Backgrounds 2.0, ideal for creating vibrant, stylized 2D environments.
Prompt:
"Colorful cartoon village street scene with thick black outlines and cel-shaded render style. Small houses with slanted roofs in shades of red-orange and terracotta, pastel-colored walls in cream, light green, and soft blue. Wooden barrels, crates, and market stands scattered along the cobblestone ground in warm brown tones. A large stone well in the center with gray shading and subtle texture. Bright cloth flags hang across the street in red, yellow, blue, and pink, adding charm and movement. Sunny day atmosphere with a soft blue sky and gentle shadows."
Steps to generate the colored image:
Select the model Cartoon Backgrounds 2.0 and click on Use this model > Generate.
Start by adding a clean line art sketch as the reference image.
Use ControlNet (Sketch Mode) with Influence 75 and Duration 60.
Set Sampling Steps to 35 to improve the line and texture clarity.
After generation, use Image to Image with the first colored version as reference:
Refine the scene using Image to Image with Influence 65.
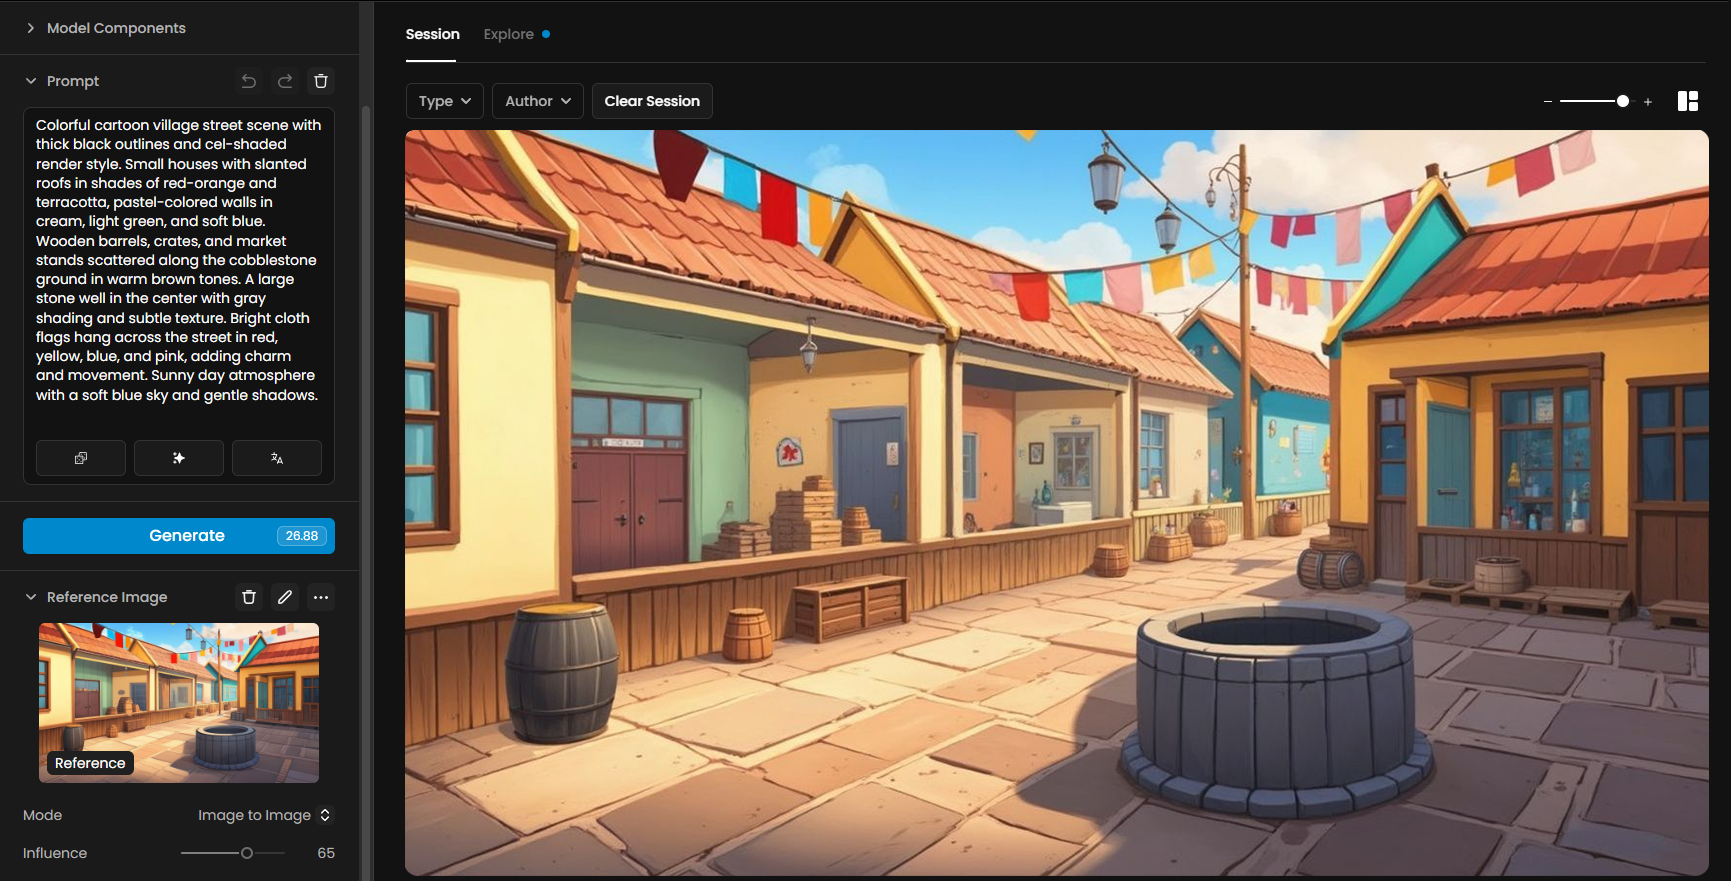
Finalize the image with Enhance for higher resolution and a clean finish. In this case, we used 4× scale, Standard style, and the Balanced preset.

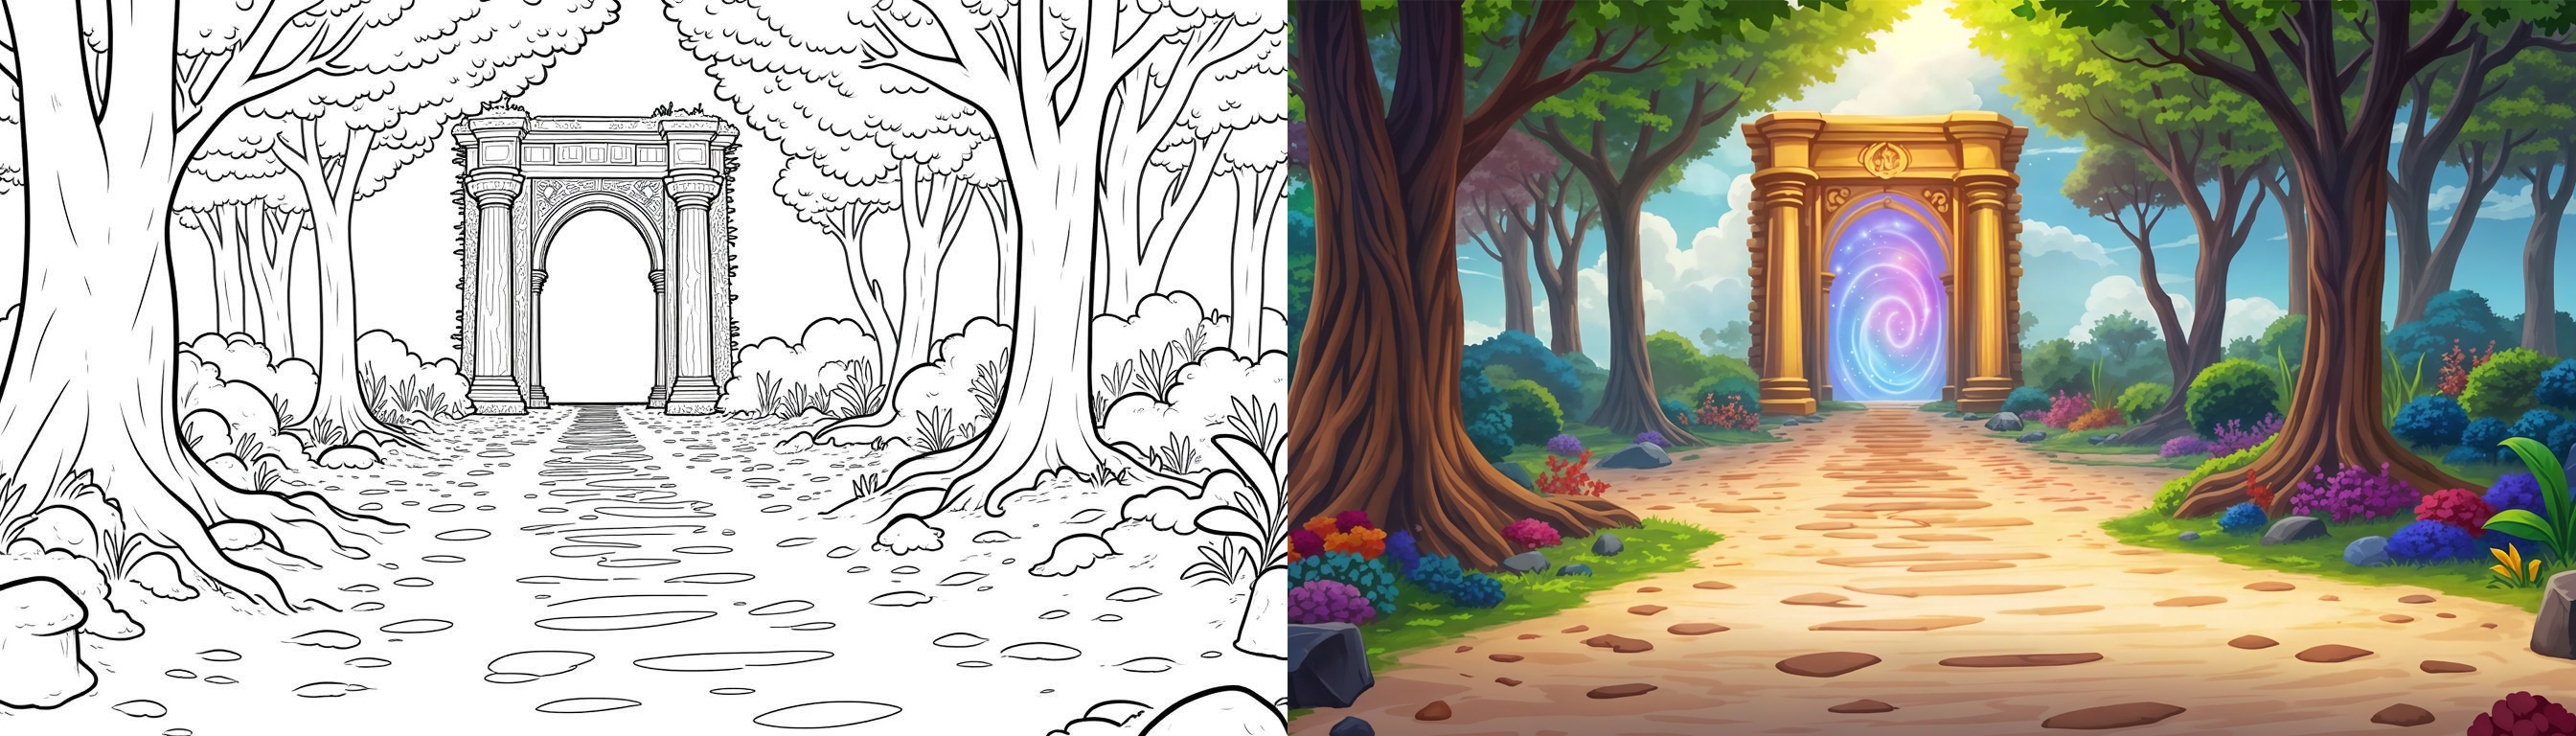
We also applied the same workflow to a "Fantasy Forest" scene following the same process:
Key Points to Remember
ControlNet Sketch Mode requires clean line art: avoid filled black areas.
Influence Settings: Higher values stick closer to the sketch, while lower values allow more artistic freedom.
Consistency: Describe all key elements and colors clearly in the prompt.
Troubleshooting
If your image appears blurry after applying Sketch ControlNet, consider enhancing the reference image to improve overall quality or reduce the Influence of ControlNet (slider). This will lead to better results in Sketch Map Detection
Conclusion
The Sketch to Final Render workflow is a simple but powerful method to bring your ideas to life, whether you're creating charming characters, futuristic soldiers, or immersive environments.
With careful prompt writing, clean sketches, and strategic use of ControlNet and Image to Image, you can achieve professional results while maintaining creative flexibility.